


For years, I’ve been keeping little digital sticky notes on my computer desktop. If something pops into my mind that I need to do later, tomorrow or next month, I’ll type it into my sticky. I keep track of ideas for posts, upcoming projects and appointment reminders. It’s become so habitual, and I’ve become so used to my brain on these notes, that for me, this works! (My second brain belongs in a notebook that’s always by my side, but I don’t want you to start getting the idea that I’m that antiquated. Even if I am.) I’m telling you this, because one of my many color coordinated stickies is a running tally of our most frequent reader email questions. These questions read a little like this: Are you still loving your decision to use this-or-that for that project? Or, how is the so-and-so holding up?
Well, today is the day that I’m crossing off that sticky list and putting it right here into a blog post! Scott and I have talked about compiling this list for months (years?), but I suppose the upside to our slowness is that a lot of these projects have been put through the ringer for that much longer! So, let’s reminisce on old projects and ask ourselves the question, would we do it again?
Entryway
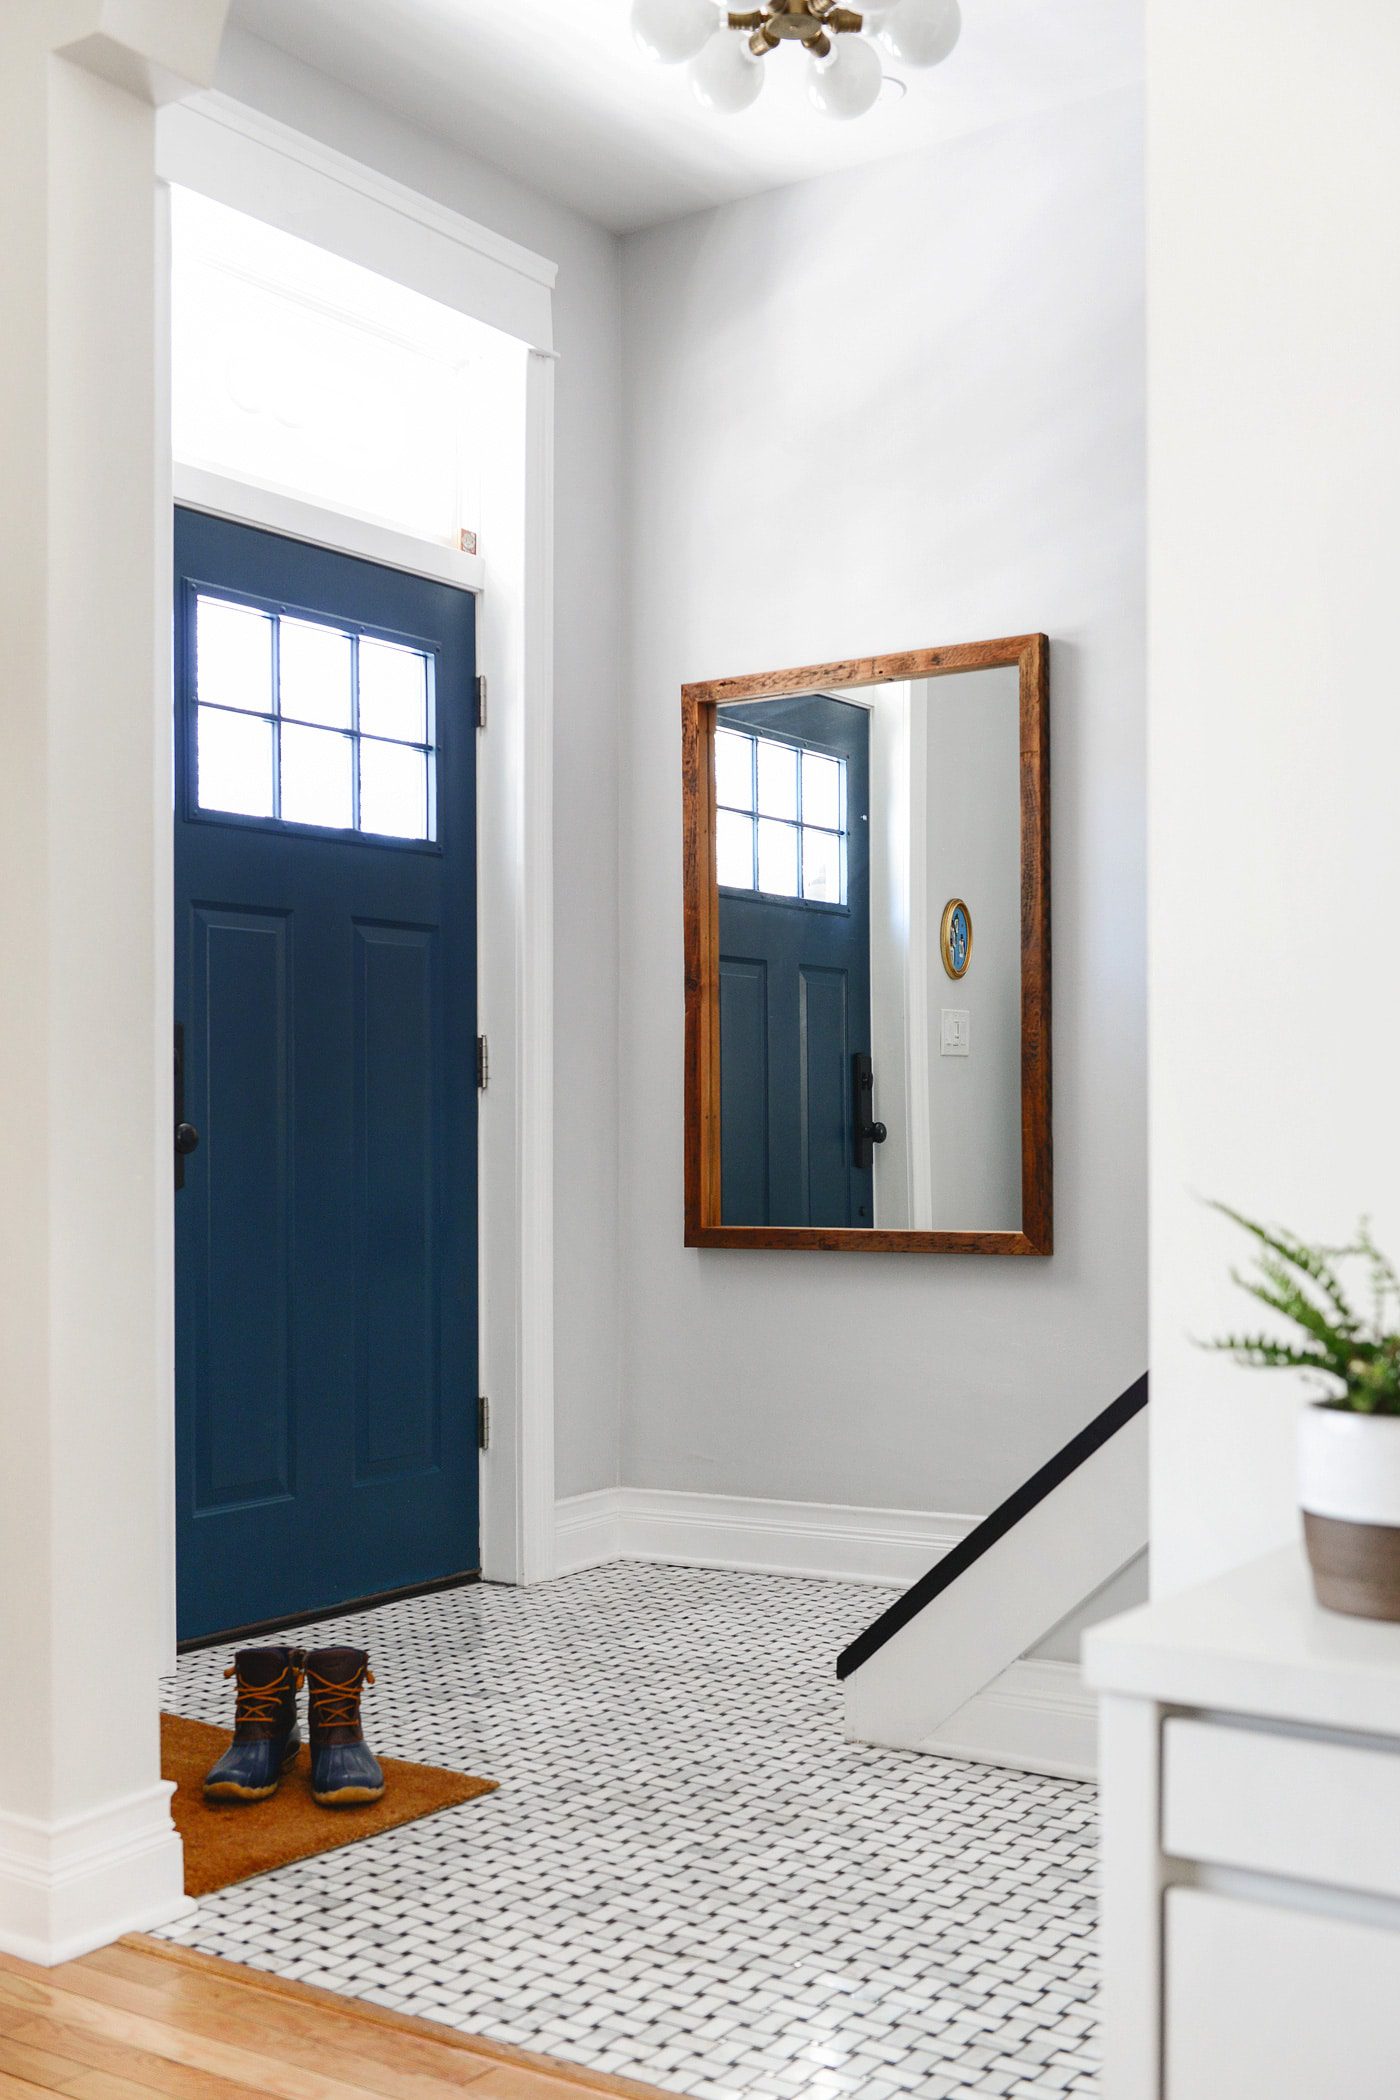
Marble tile floors: When we first installed the marble floors in our foyer, we were met with both praise and horror – praise, because marble(!), and horror, because marble. In an entryway! We use our front door pretty frequently, so these floors have seen a fair amount of abuse from rain, snow and muddy doggie paws, and we certainly don’t treat these floors with kid gloves. There are areas where the marble isn’t as shiny as it once was, and there’s a near invisible crack in one tile (that looks like veining, to be honest).
Would we do it again? Without hesitation, a million percent yes! The wear pattern in the marble is consistent, and it’s a stone that only gets better with age, we think. The more wear and tear, the better. Rather than looking dingy over the years, it only looks more lived in.
See how we laid our marble tile here and here.
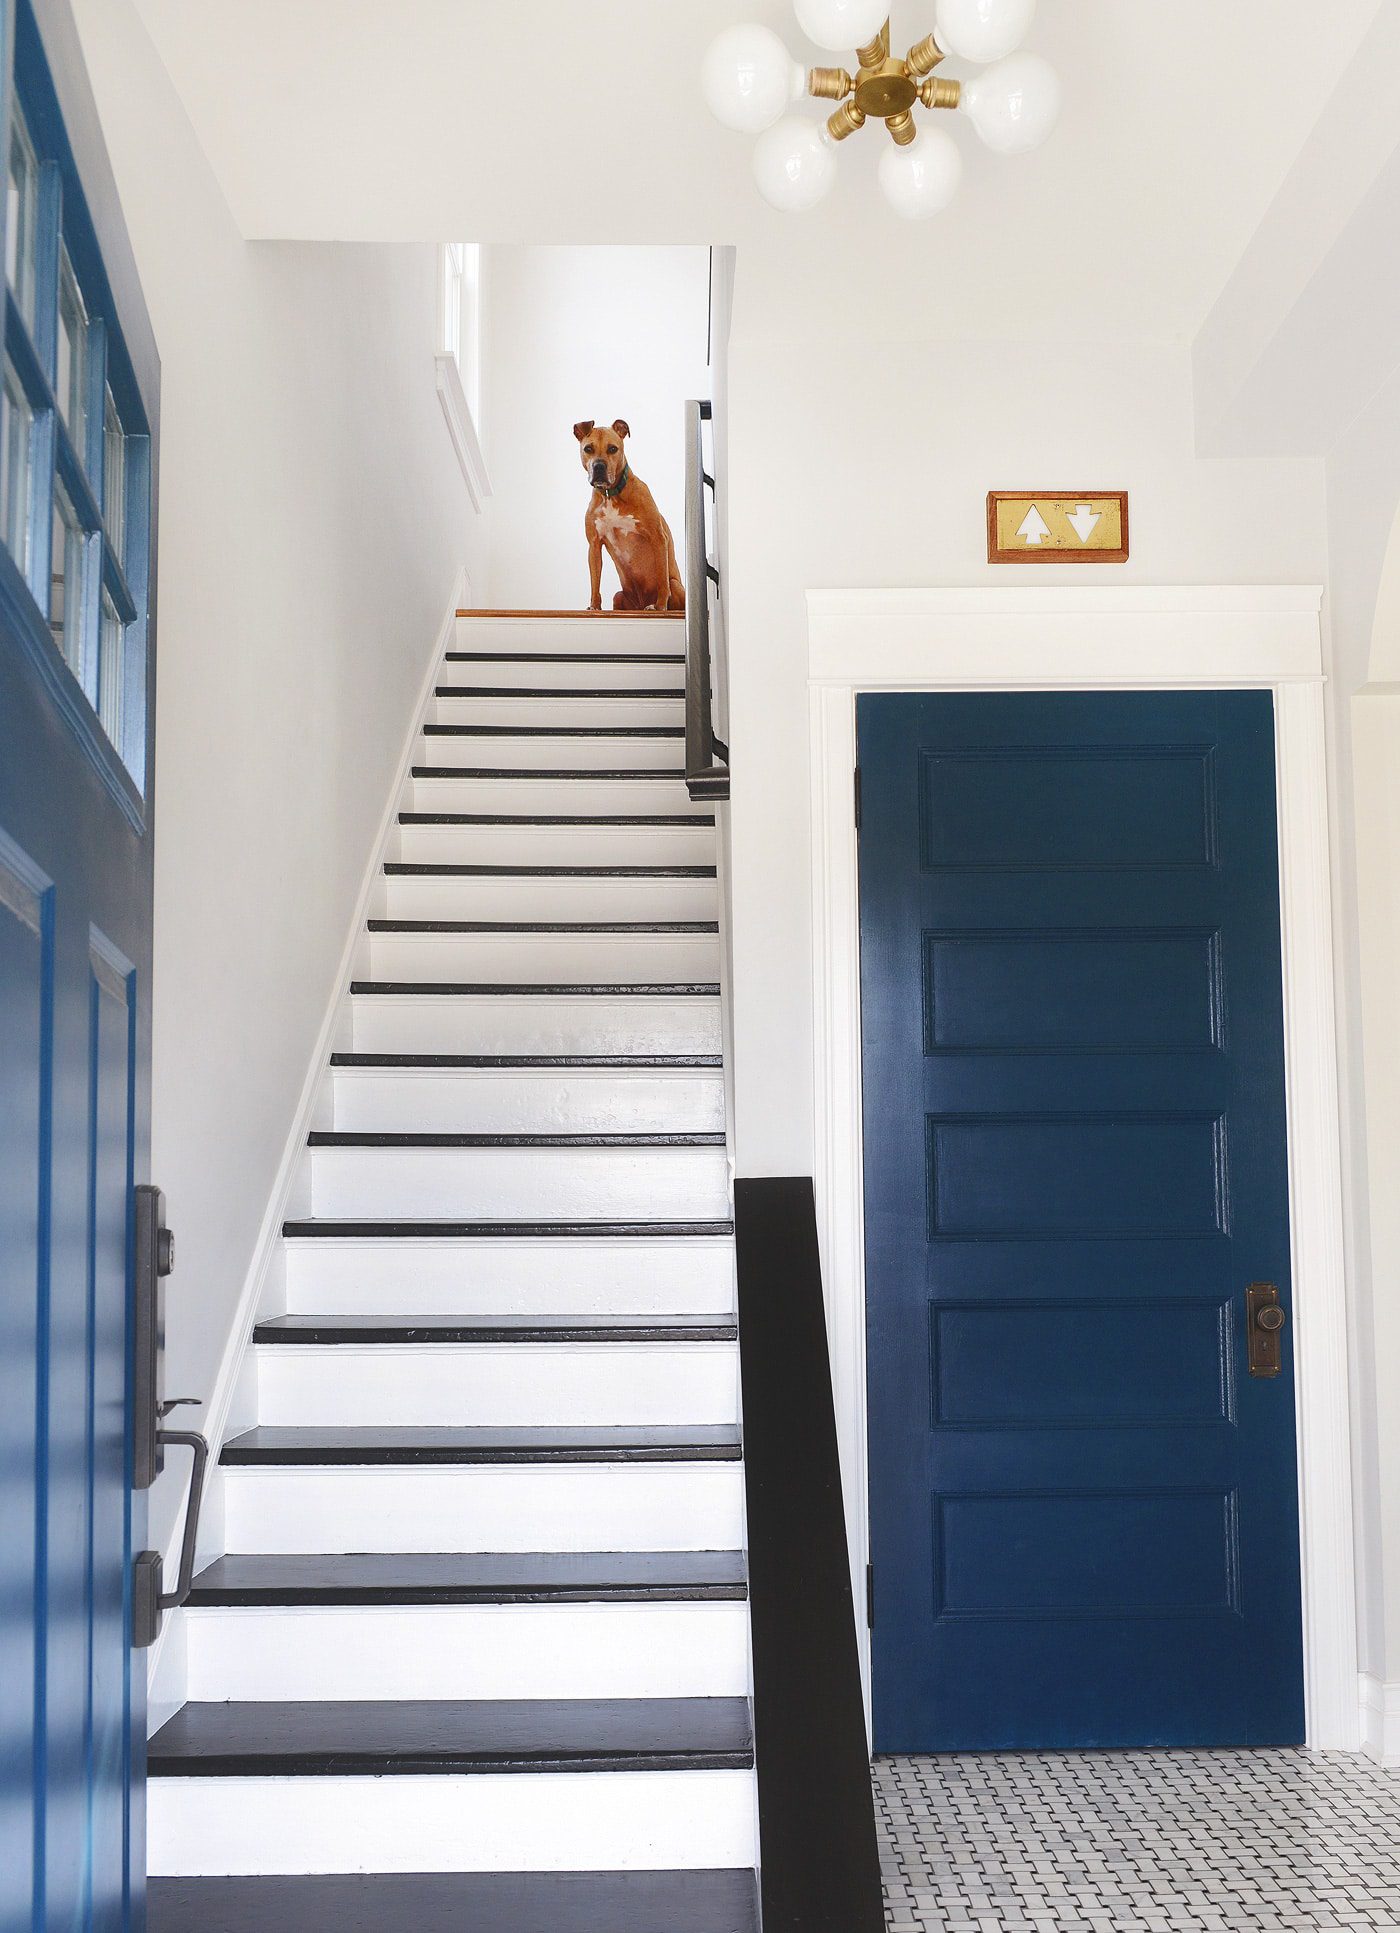
Painted stairs + poly: If you’ve been reading this blog for a long time, you know that we poured our hearts and souls into these stairs! I always say that the entryway is one of my favorite ‘rooms’ in the house, and that’s partially due to the amount of time it took to get from A to B. (Remember this?) It took us a handful of years to get them to this point, as they were far (very far!) from perfect. Last year, I became frustrated that I was touching up the paint every 4-6 months, and so I broke down and finally applied four coats of floor-grade polyurethane. As the months passed by, we were blown away by how well the poly eliminated the need for touch-up. Hooray!
Would we do it again? I’ll answer this with a cautious yes. We couldn’t love the look of a black and white staircase more, however, the polyurethane makes the stairs a little slick. Since applying that protective layer, I have had to touch up two of the treads only because our dogs use the third and fourth stairs as a launch pad. Aside from that, the poly changed everything in terms of maintenance and looks. Do we wish they were less slippery? Yes. Are we on the hunt for a runner? Always.
See how we prepped, primed, painted and added polyurethane to our stairs.
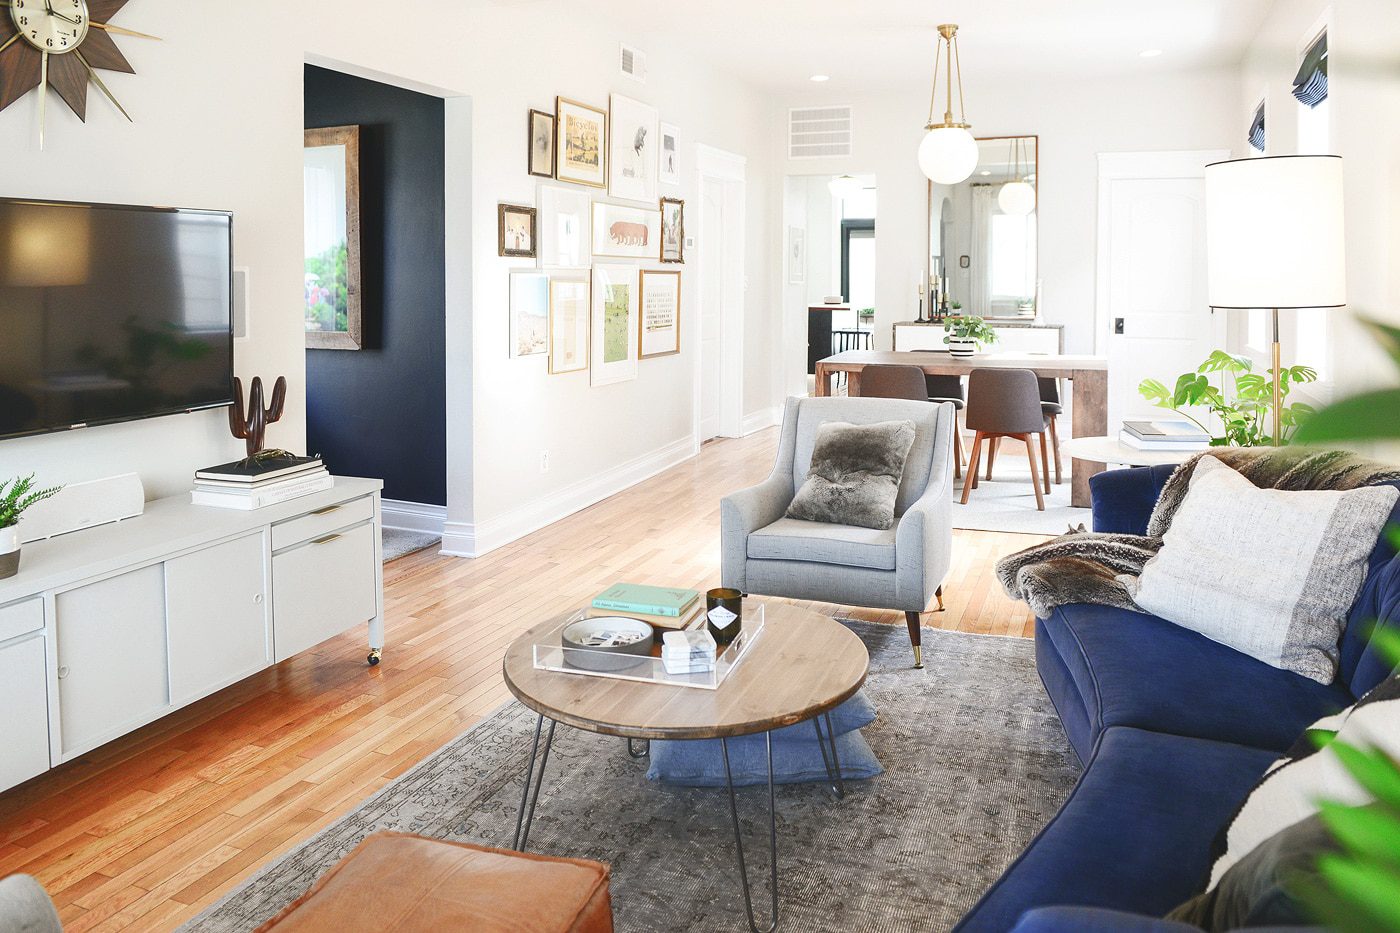
Living Room
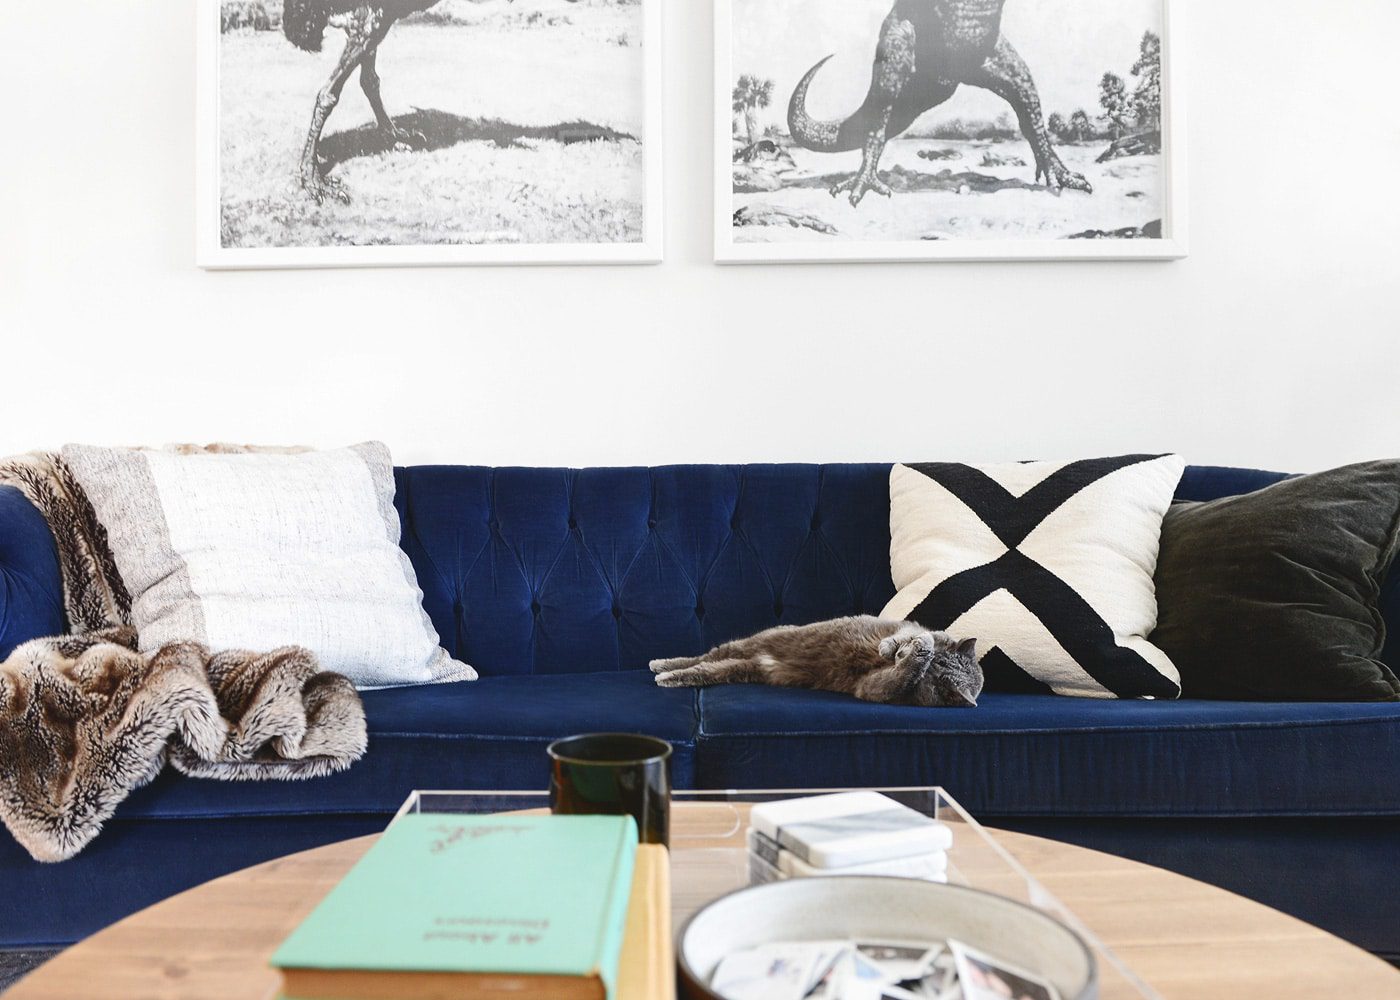
Velvet furniture: I’ve read a lot of articles that talk about the high maintenance surrounding velvet furniture, and I’ll share these new nuggets of information with Scott. This results in conversation where we agree that we find this a little odd, because a high performance velvet wears really well – at least, it has in our case. I should add that we’re a no-dogs-on-the-furniture household (this privilege has always been reserved for the kitties), and I’m sure that helps quite a bit. We currently have a couch and three chairs upholstered in velvet, and if they get stained or gunked up with anything, we’ve found that a solution of soapy dish water and a microfiber cloth (we use these for everything!) will wipe things right up. (We keep a permanent spray bottle with water and 2 drops of dish soap!) Some of the edges are a little worn on our couch, but just like marble, doesn’t velvet look more cozy when it shows off a happy life?
Would we do it again? Yup, although I’m not positive that I’d recommend velvet for a household with lots of multiple couch loving pets. We vacuum the furniture once a week to rid everything of Libby hair, because velvet will attract pet hair. If that sounds like your idea of a terrible time, skip it. Aside from that, we find it to be quite durable!
See more about our velvet couch, Milo, my grandma’s chair and this thrifted find.
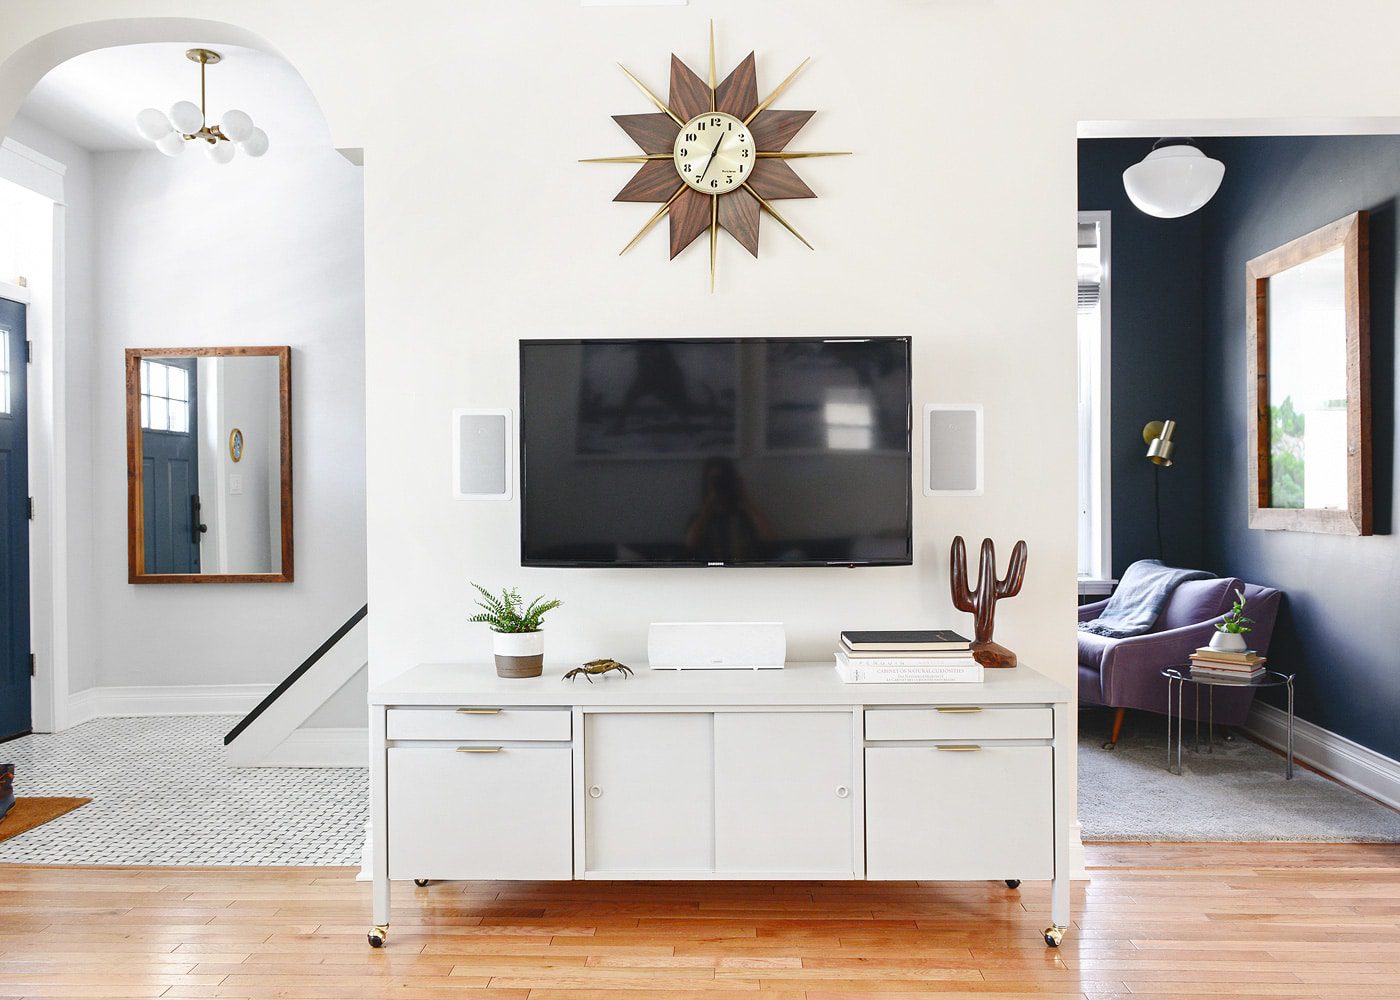
One step paint console: We refreshed our tired wood laminate console with a coat of Amy Howard One Step paint a year and a half ago. It was finished off with a wax coat, and since then? We haven’t touched it. The finish is beautifully matte, and we haven’t had a need to touch up any chipped or dinged corners – because there aren’t any! It’s likely overdue for a maintenance wax, so this is my own little reminder to do so. (On the other hand, I’ve been itching for a different console altogether, but I can’t put my finger on exactly what I’d like. Until then, this stays!)
Would we do it again? On the right piece of furniture, sure! The process was super easy, and it covered the original dark finish beautifully. But DIY-er beware – the matte finish does make it easier for light scuffs to appear and harder to eliminate them. We have a couple of really light barely noticeable scratches across the top, and they don’t exactly wipe right up due to the finish. I doubt this would be an issue with a darker paint color, since the scuffs are only on the surface and would essentially disappear. This paint sticks (really, really well!), but the matte finish does require a little more care (unless you’re going for shabby chic, in which case, go for it!).
See how we refinished this console right here.
Kitchen
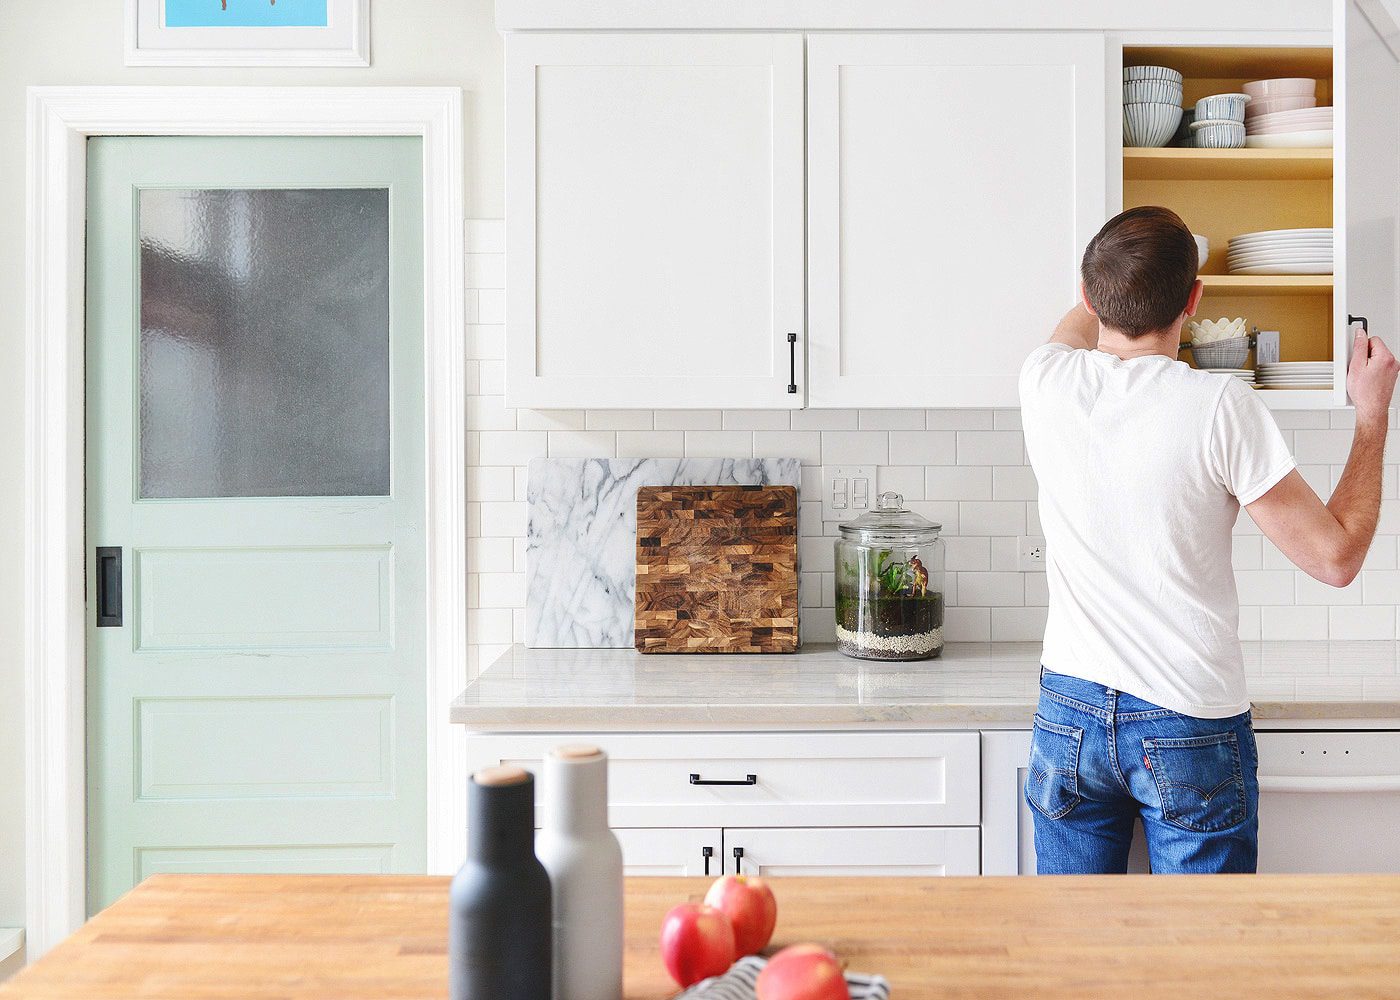
White kitchen cabinets: Before we began our kitchen renovation, we knew we wanted white cabinets. Having always had cherry or dark stained cabinets, it was a matter of personal preference. White feels classic and clean, and an all-white kitchen should stand the test of time.
Would we do it again? We love the look, so yes, in a heartbeat. That said, it’s so important to have a quality finish coat applied. Our sink cabinet started chipping/cracking about one year in, which I’m sure was due to the amount of water that got dribbled on it. We dropped off all the doors to our friends at MegMade, and they applied a crystal clear, crazy strong coat of poly after refinishing them for us. (The rest of the kitchen is a-okay.) White cabinets do require more frequent wipe downs, but the only downside to that is my regret for not having wiped down wood tone cabinets in the past – yuck.
See our kitchen renovation right here!
Workshop
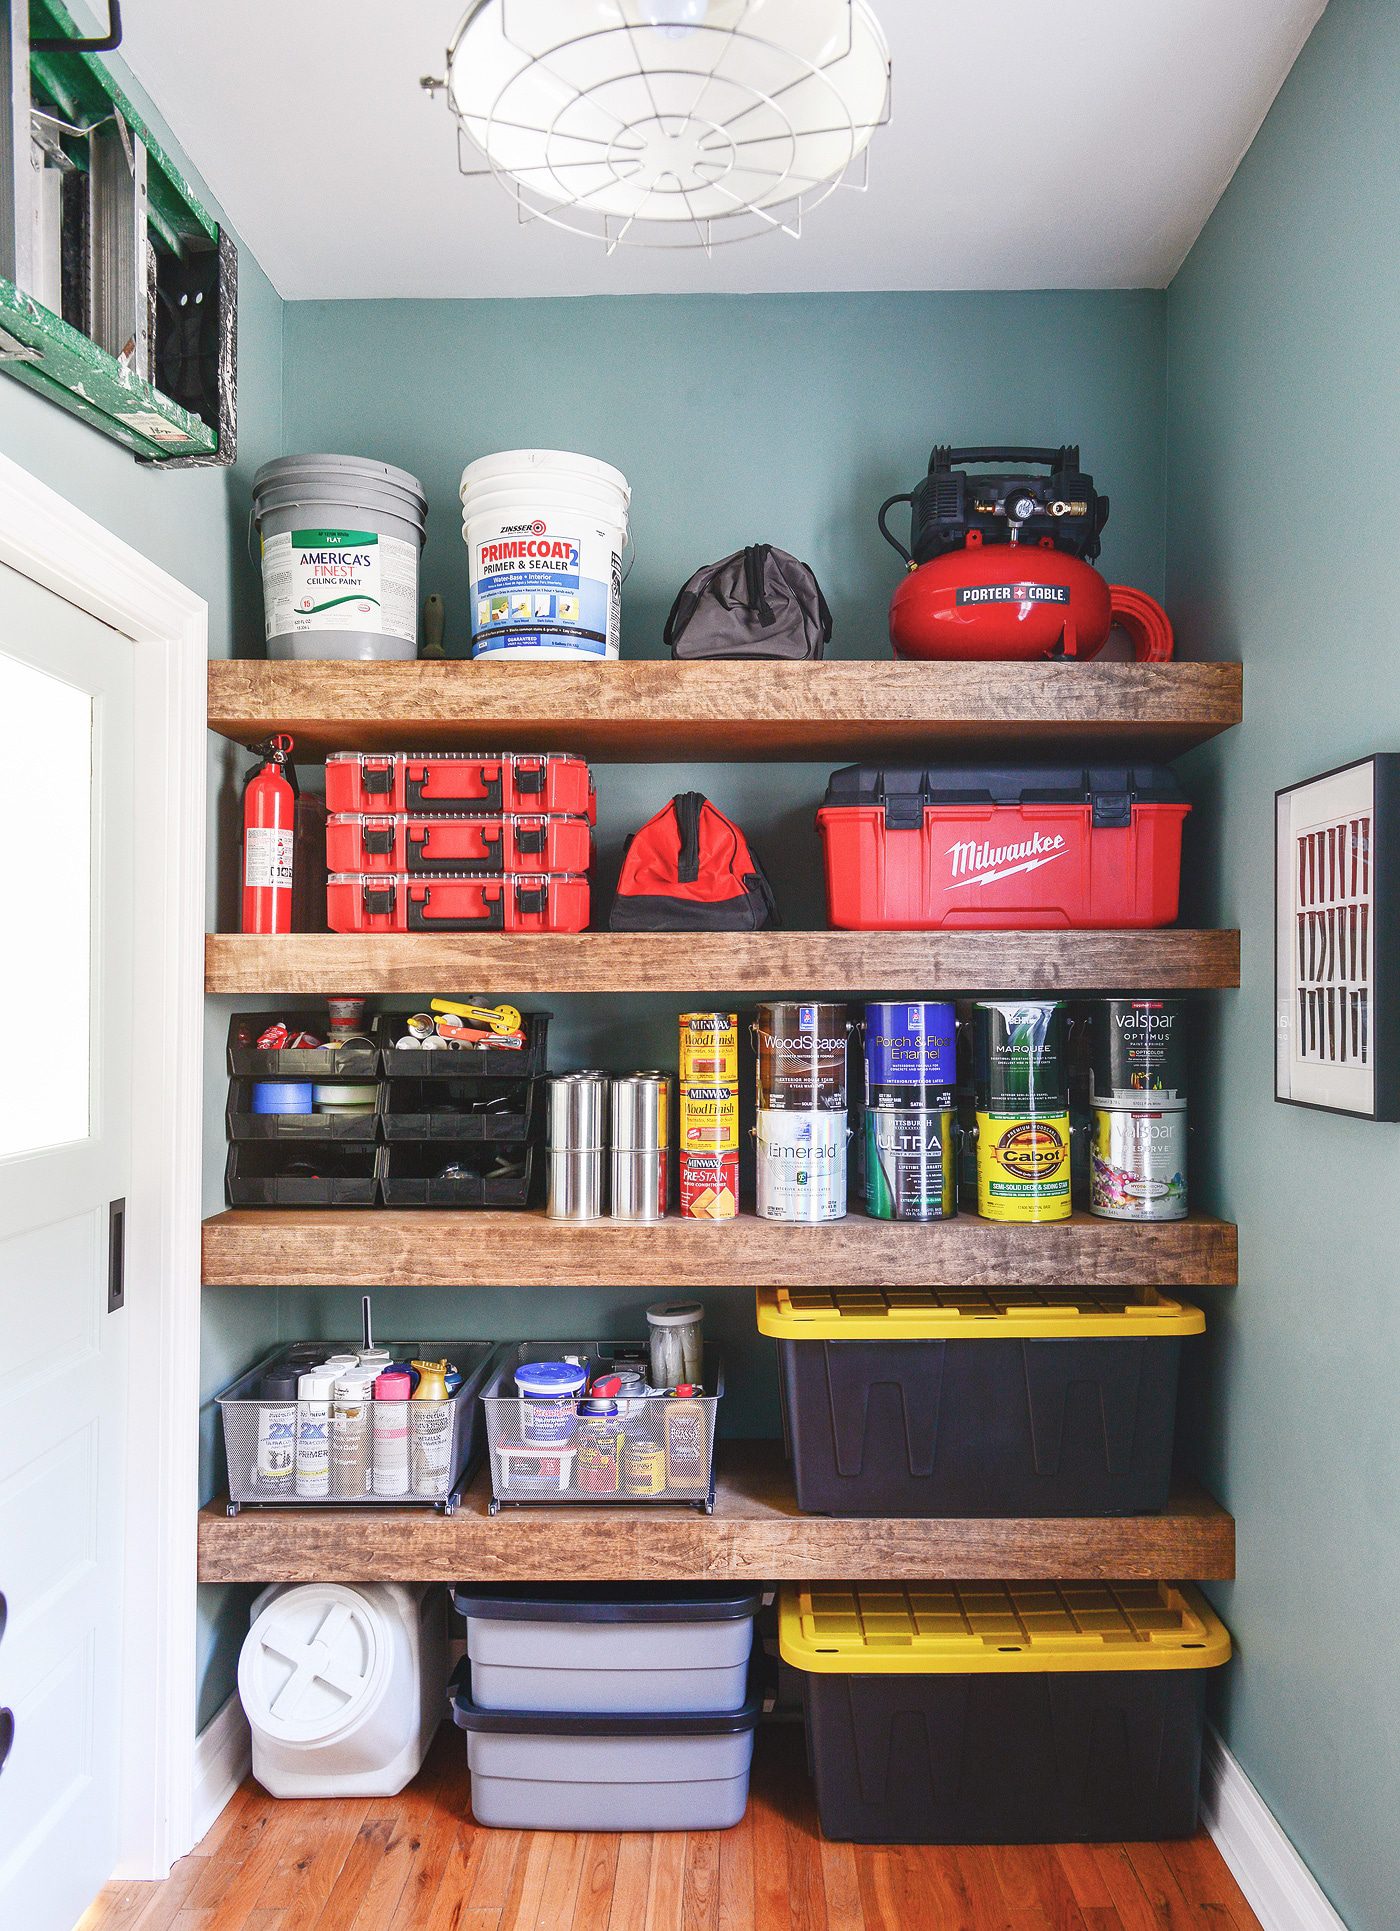
Wall to wall floating shelving: This project was a game-changer for us! Although the goal was to create as much storage as possible for our DIY tools and supplies, we wanted it to look good, too. The most common question we get is from someone wanting to use this same method on a longer length of wall. Of course, this is totally dependent on how wide and if you’d be able to secure them on three sides. Our advice? If you can’t secure them on three sides, opt for a more shallow shelf, and always (always, always!) secure them into every single stud.
Would we do it again? They’re holding up beautifully, they stash all of our stuff, and we think they’re pretty handsome. Absolutely!
See how we made these shelves here and how we organize the rest of our workshop here.
Bedroom + Laundry
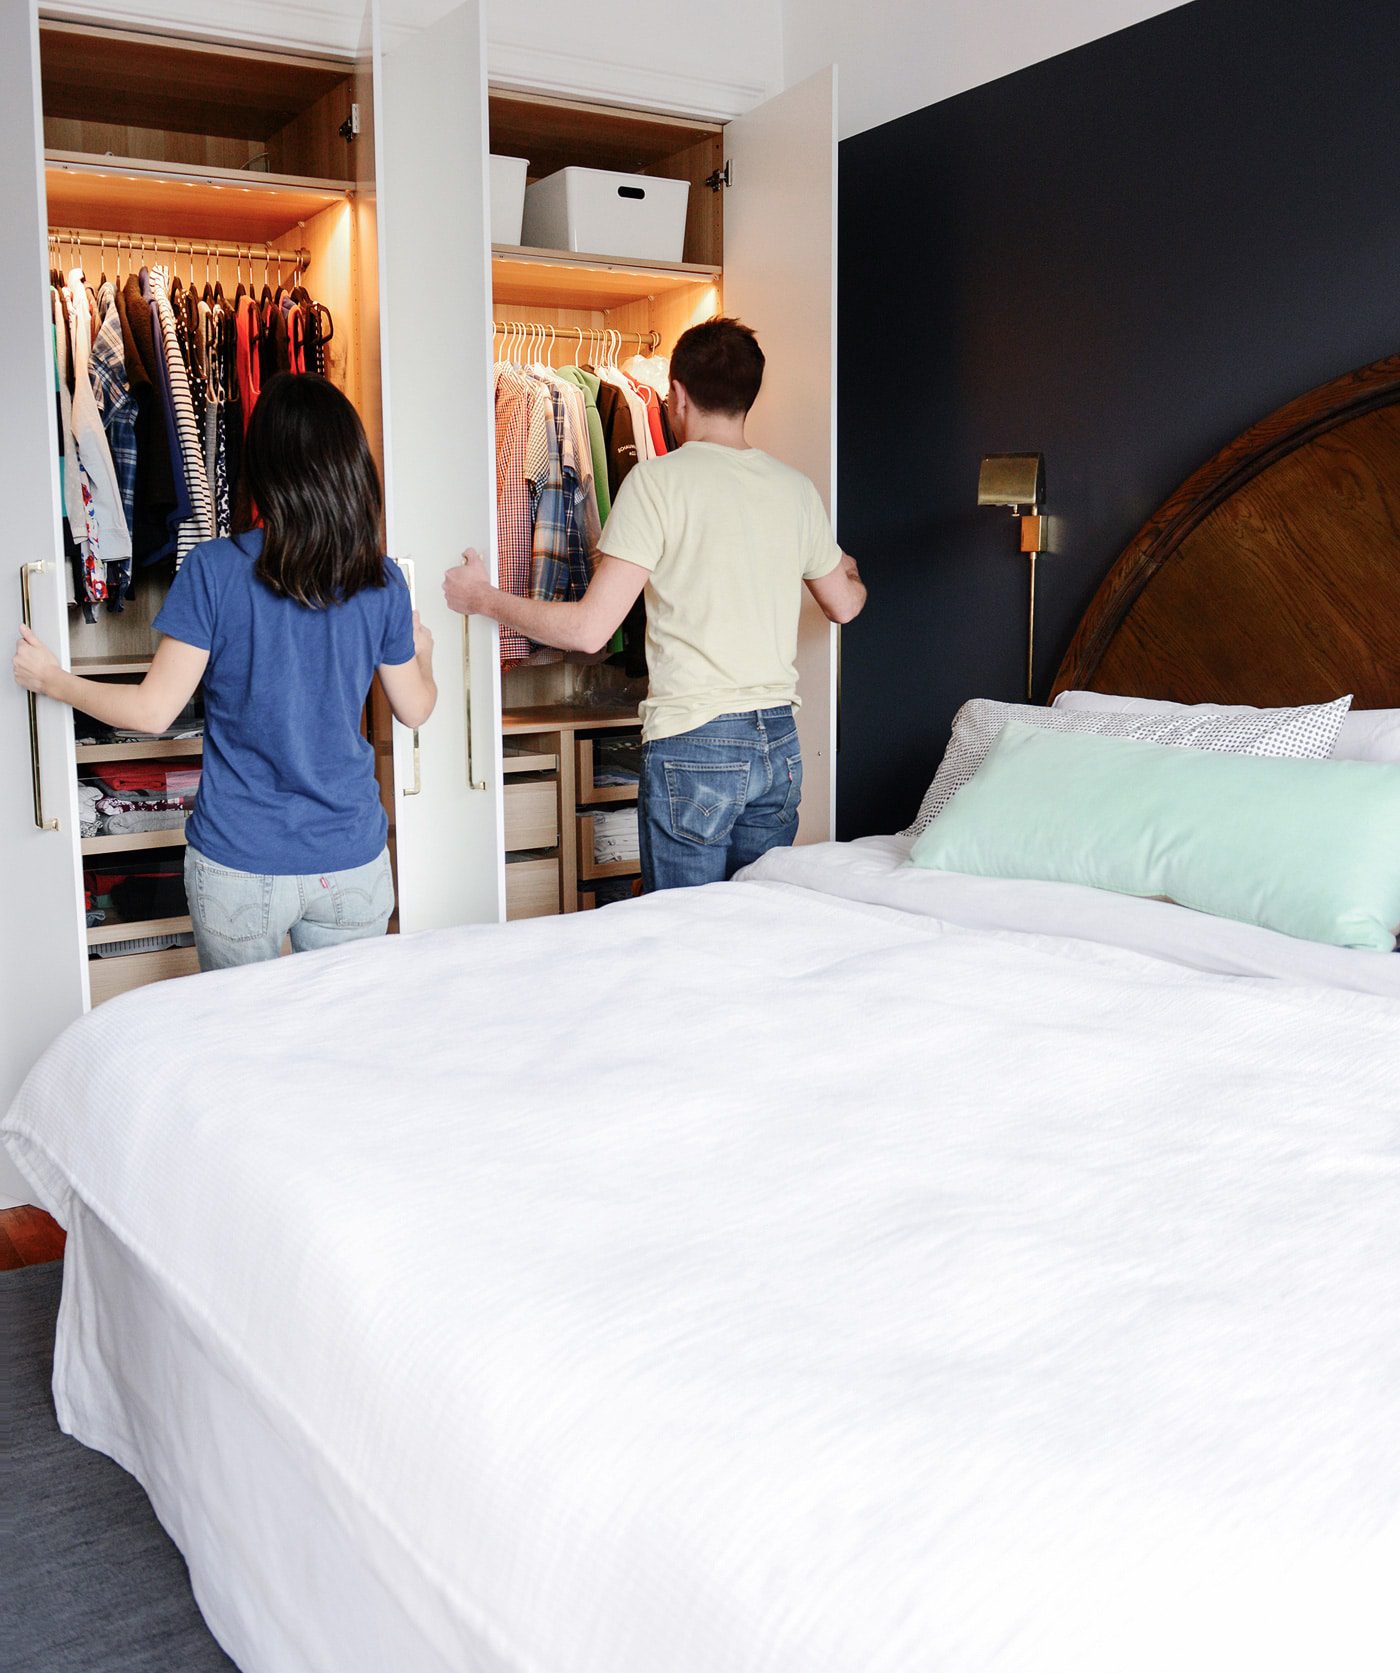
IKEA PAX closet system: We landed on the IKEA PAX closet system during our bedroom renovation as a solution to keep all of our clothing behind doors. Our bedroom is a good size, but it’s not large enough to have a closet and a dresser (or two). The PAX solved all of those problems, as we were able to incorporate hanging rods, overhead storage, drawers and gliders for our shoes and accessories.
Would we do it again? Our PAX closets look so neat and tidy in the room, and aesthetically, we couldn’t be happier. Functionally, the soft close hinges, LED lighting and amount of storage is a dream! The only time we run into an issue is if we’re both trying to get into our closets at the same time. Because I opted for full width drawers, I need to have both of my doors open to pull them out, and if Scott is in his closet at the same time, we’ll have a log jam of too many doors and brass handles! Keep this in mind if you’re designing your own.
See how we planned, built, organized and executed our IKEA PAX plans.
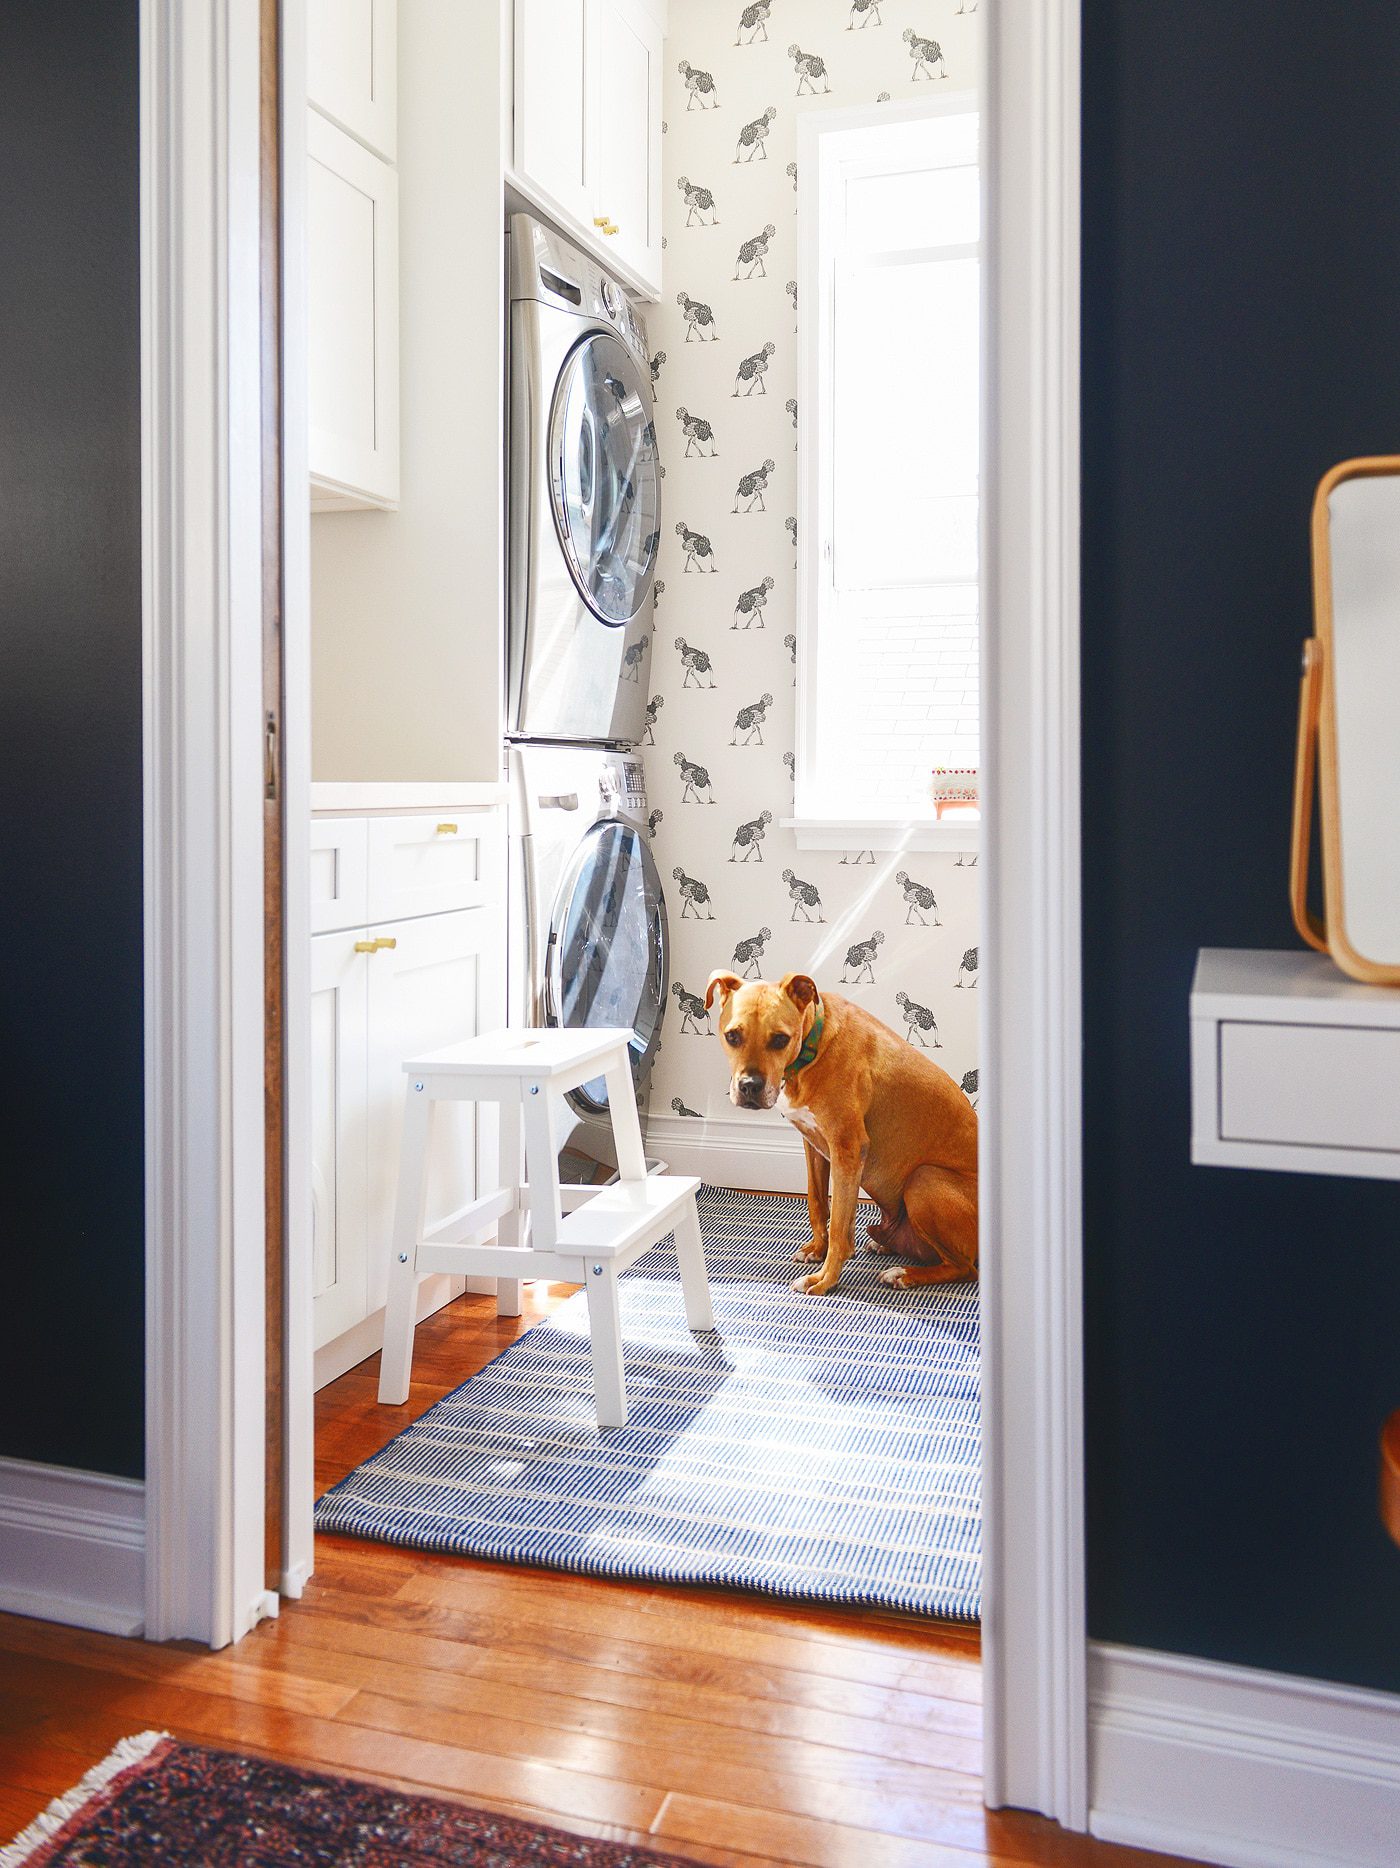
Laundry room in the bedroom: Instead of turning this space into a master bathroom, I pushed hard for a laundry room. Scott wasn’t on board at first, but thank goodness he eventually saw all the pros to making this happen! When clean clothes are fresh from the dryer, we can grab an armload, drop everything right onto the bed and fold it all away into our closets.
Would we do it again? Enthusiastically, yes! It makes laundry less of a chore when you barely have to leave the room to get the job done. (And the master bathroom is still only steps away! We have survived this decision, and we’re so, so happy.)
See the finished laundry room right here.
Outside
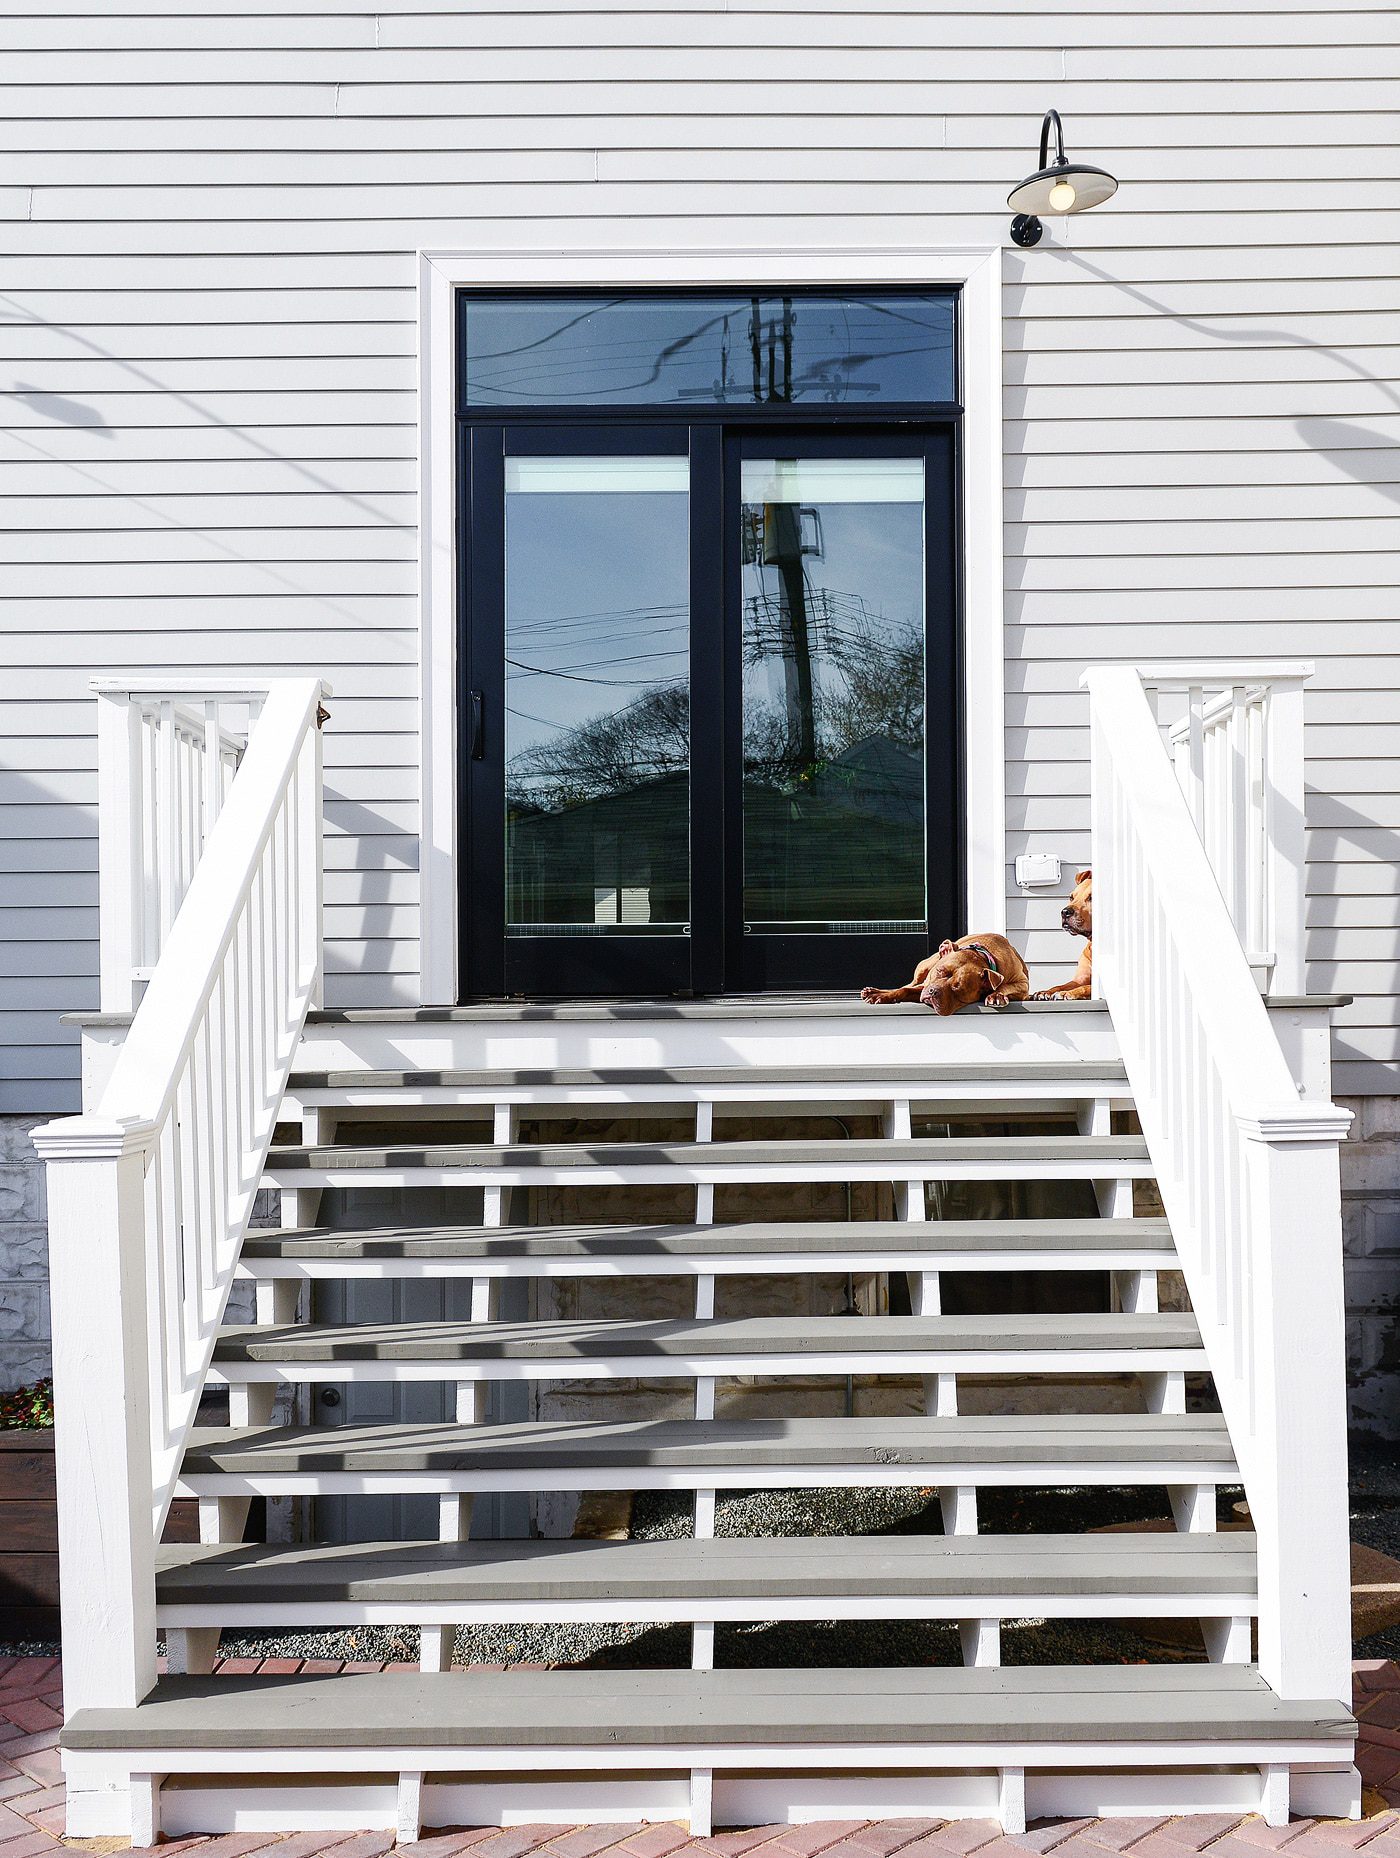
Stained deck and porch: Have you ever read paint/stain reviews? They’re downright terrifying. According to every review ever, your paint (or stain) will peel, it will chip, and it will leave you questioning why you ever thought you needed to paint or stain a single thing in your life. We fell quickly down the rabbit hole when researching the best stain to use on our outdoor pressure treated wood deck, and the only thing we could surmise is that most people don’t take the time to prepare their painted/stained surfaces properly. We were careful to pressure wash our deck, remove splinters and use the recommended supplies by the manufacturer to get the job done. We stained our front porch years ago, and we’ve been so impressed with how well it has held up, that we used the same product on our back patio. The product changed in name in that amount of time, but you guys, Sherwin Williams WoodScapes has been a champion.
Would we do it again? Our front porch is due for a light refresh this summer, but we’re using it as an opportunity to apply the same color we chose for our back patio staircase. We would use WoodScapes over and over again, with the caveat that preparation is everything. If you want your paint/stain to work for you, you have to provide it with a clean and ready surface first.
See how we stained our front porch and our back deck (and see more of our backyard makeover right here!).

Front porch swing: Arguably, the best seat in the house is outside. We live on this swing in the summer. We thought for sure that we’d store it in the garage over the winters, but almost three years later, it hasn’t budged from it’s front row spot, and it’s still looking brand new!
Would we do it again? This might be the easiest one. Yes! We have plans to spruce up the front porch a bit this spring, but that will come in the form of accessories and smaller decor. We’re often asked if it’s holding up (i.e., is the wood warping?), and we’re thrilled to report that she’s hanging (ha) in there beautifully!
See how we made and painted our porch swing right here.
Friends, are you still with me? I’m sure that this list can grow from here, so if there’s anything else you’ve wondered about – or maybe you’re left with more follow up questions? – let’s get the conversation going! I’ve got my sticky note up and at the ready.
PS: If you’re wondering where we got a specific item in our home, you can always shop our house right here.


This was such a fun post to read! My husband and I are renovating a 1930 bungalow that was previously abandoned for 20 years, and sadly if I was to make a similar list, I would have far more “no” than “yes.”
This list is not to say we haven’t had to redo several paint colors or swap furniture pieces from room to room over the years. That’s all part of finding out what works best for you!
I’m going to follow your lead and start using stickies on my Mac more – I’m the worst at having an idea come into my head and then it leaving just as quickly! Still so jealous of your laundry in the bedroom situation, would make life so much easier.
Ugh, I’m so addicted to my stickies. My whole brain is on them! I’ll even email myself a reminder to ADD something to a sticky if I’m not near my computer. It’s so backwards and antiquated, but it works.
Awesome! I love these kind of re-caps, especially when they include posts I haven’t read yet (I think I found your blog a year ago). Thanks so much for sharing!
I love this follow up post, very informative! I’ve always wanted a laundry room in my bedroom, it makes complete sense to me! Imagine every large walk in closet with a stack washer and dryer! Design genius. And your Pax is pretty cool option for not having much of a closet.
Oh yeah, a walk in closet with stacked units would also be dreamy!
fyi for anyone thinking about the poly’d stairs. There is a water-based Bona Traffic Anti-Slip product that has a much better coefficient of friction which is specifically suited for this purpose. I’ve used it in two homes now. Worth every penny.
You two are really amazing. The attention to detail of every project is inspiring. Can’t wait to see the new room you are working on completed!
This is so kind, thank you!
Loved this post. Perfect for taking me down the rabbit hole on a gray cold Saturday to enjoy your wonderful wonderful style. Love everything you do — what vision and talent you have, accompanied with hard work to accomplish it! Wow!
Almost 4 years later, and it’s finally looking like the home we imagined! Thank you, Kim. :)
I love this. Thank you so much for following up for those of use who let this kind of apprehension keep us from doing projects. It’s reassuring that things have held up and that you still like the way they turned out.
Thanks for sharing, it is always nice to hear how products honestly wear and tear. I am in love with that porch swing. I feel as though they add so much to your patios home decor and they are comfortable, so who could complain?
For the stairs, did you consider putting an wall texture additive (sand) in the poly or paint to cut down on the slickness?
We did for a second… and then for some reason didn’t pursue it much further. We’d be curious in anyone’s first hand experience doing so!
late post! Went to Sherwin Williams today to look into the stair paint! :) Did you choose Woodscapes over SuperDeck for a reason? The guy said Woodscapes is for vertical surfaces like siding and trim and SuperDeck is for flat horizontal–maybe it was thicker?? I want to stick with what you recommended but just curious.
And regarding sand to a previous comment–dont do it–it makes surfaces impossible to clean! Our porch was painted by someone else with gloss oil paint with sand added. The stains you recommend are better IMO because they are kind of matte and not slick. (the stain permeates as opposed to sitting on top of the surface etc)
Hi, Sooze! For our exterior stairs, Woodscapes was recommended the first time around, and it has held up so well (with minimal scuffs on the stair treads), that we were happy to use it again on our back porch stairs. I can’t remember why SuperDeck was out of the question – maybe it was only oil based? Or perhaps there wasn’t an option for an opaque stain? We wanted water based stain for easy clean up, and we prefer the look of opaque stain, so I think those factors swayed our decision.
And great tip about the exterior stains! They DO dry matte, and they aren’t slick at all. The opaque stain looks like paint, but instead of sitting on the surface, it actually permeates into the wood.
Love the floating shelves! So often shelving is just made basic and boring but yours adds some style. Great way to make a storage area pop.
https://society6.com/skylinesquirrel/collection