

This post is sponsored by Lowe’s. We’re sharing the exterior reveal of our Two Flat renovation, taking a look back and breaking down what you can expect when you’re ready to paint your home.
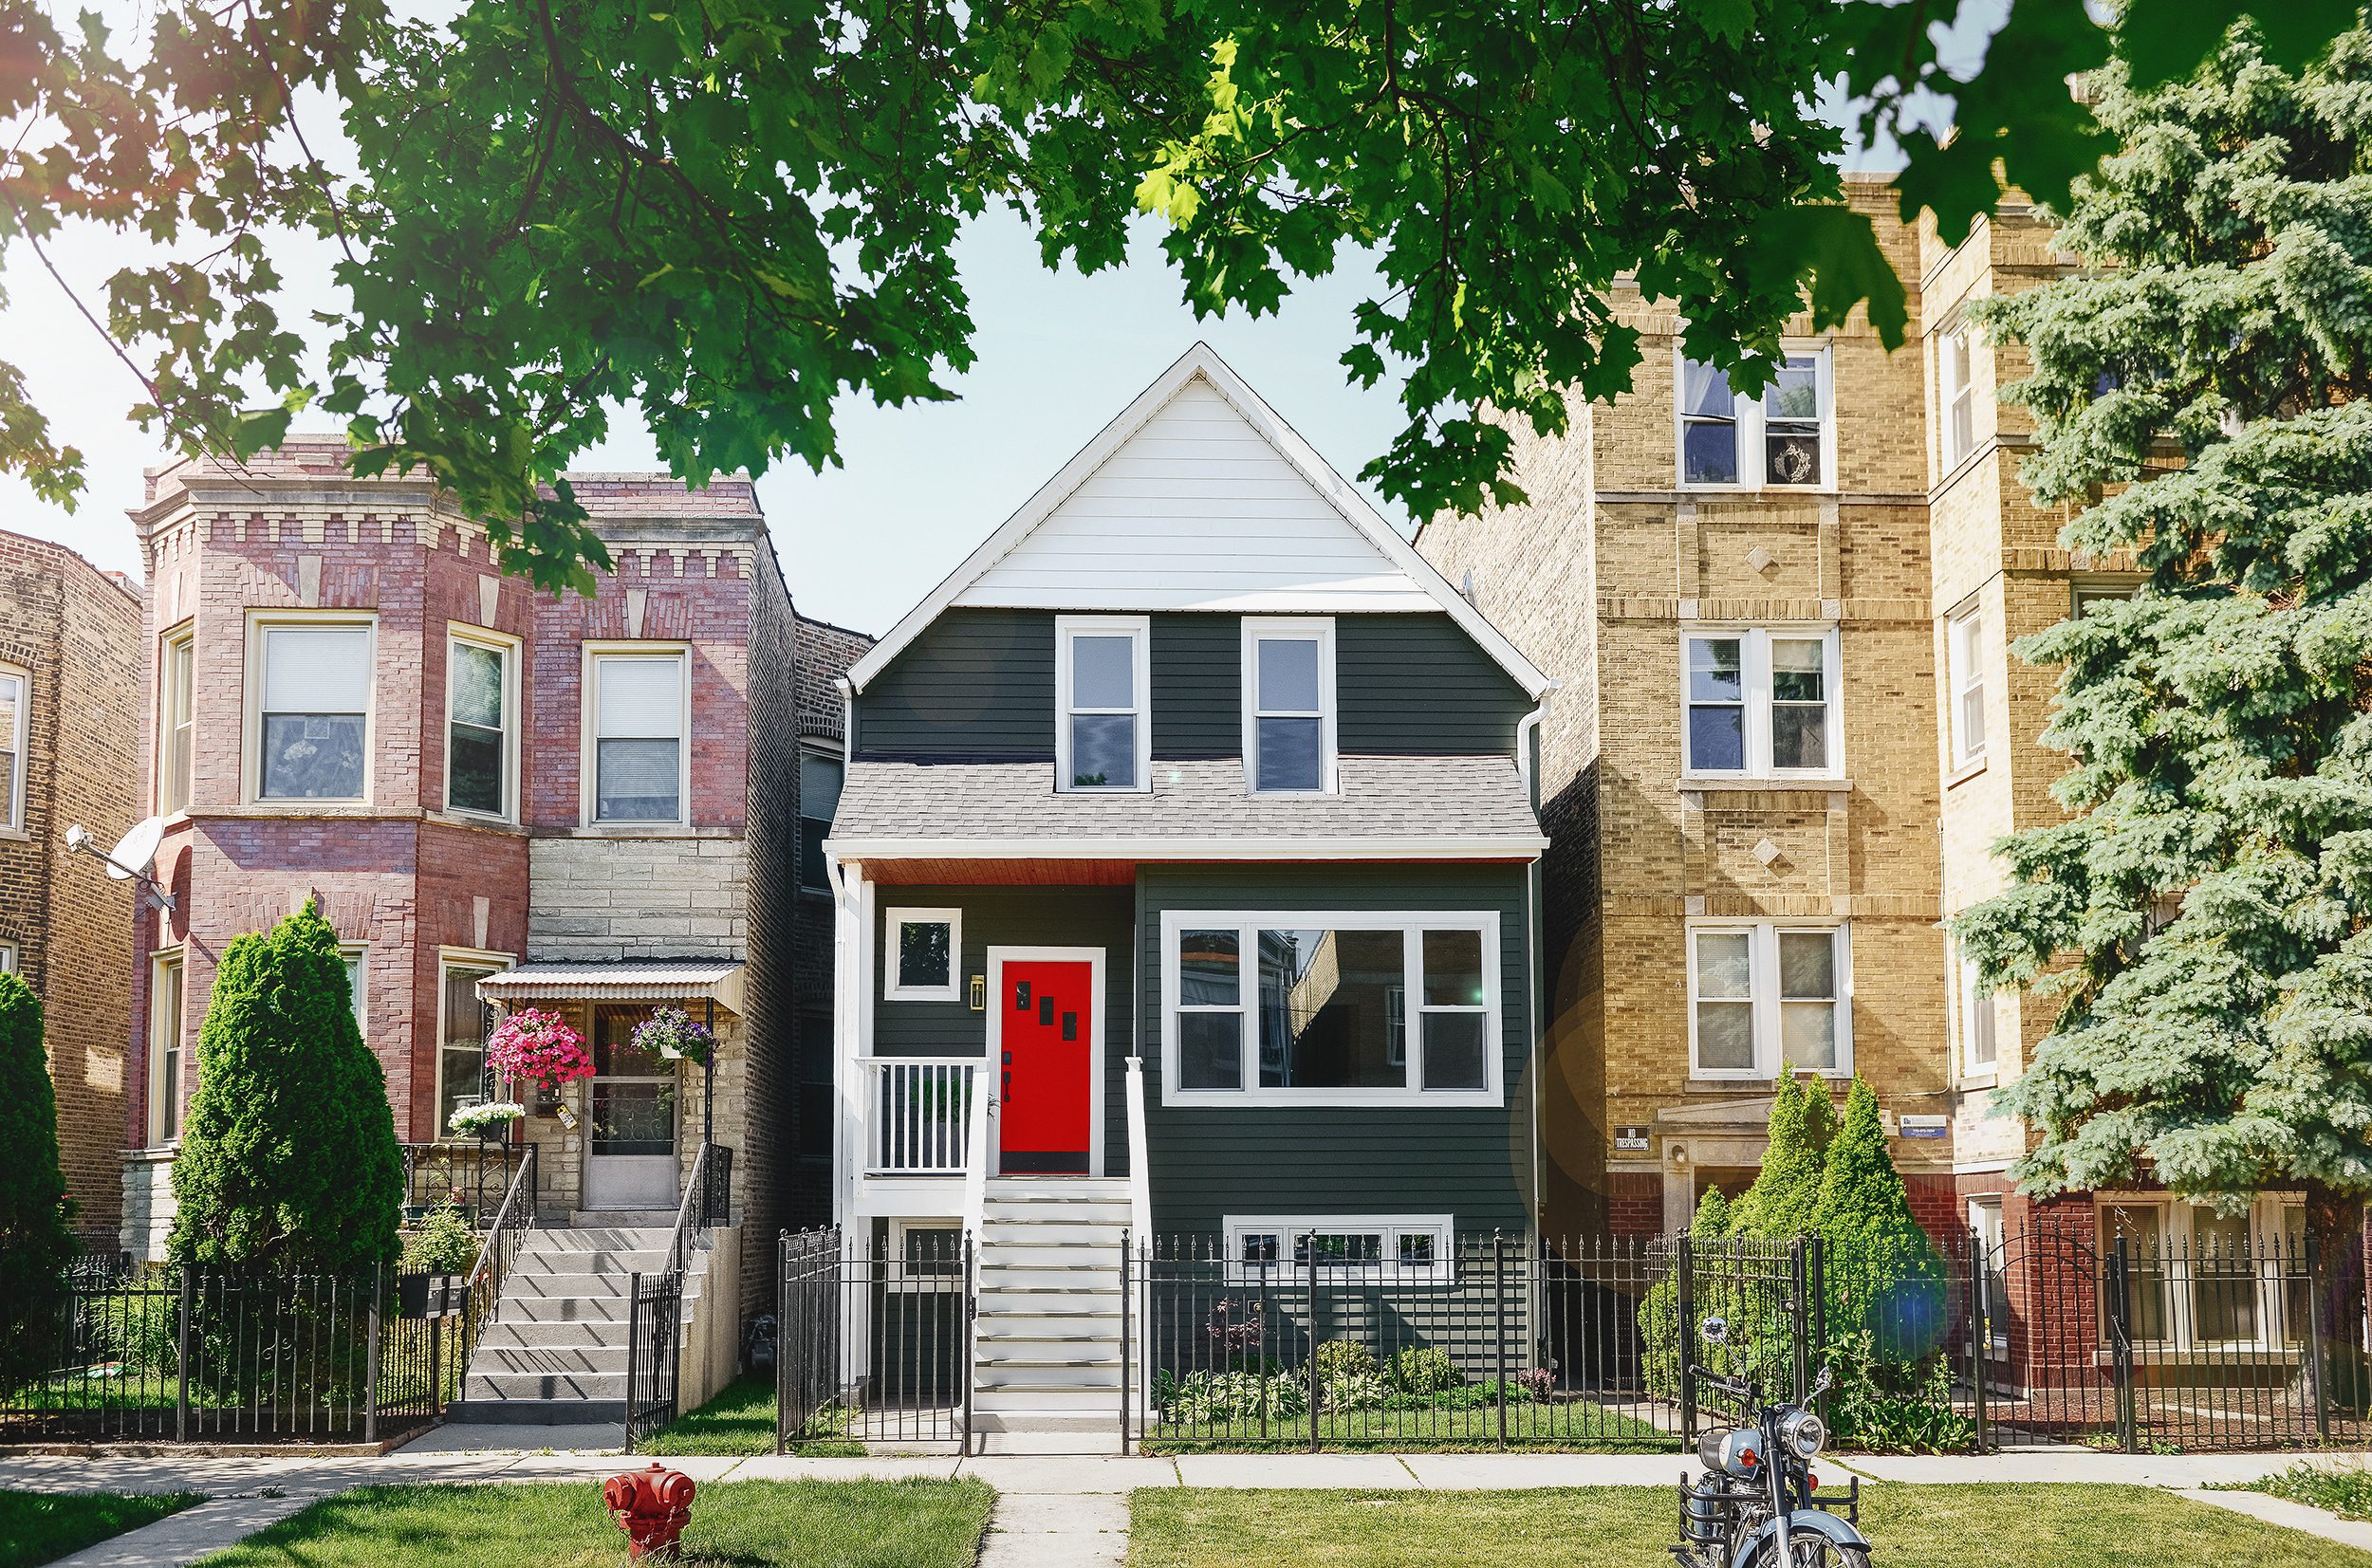
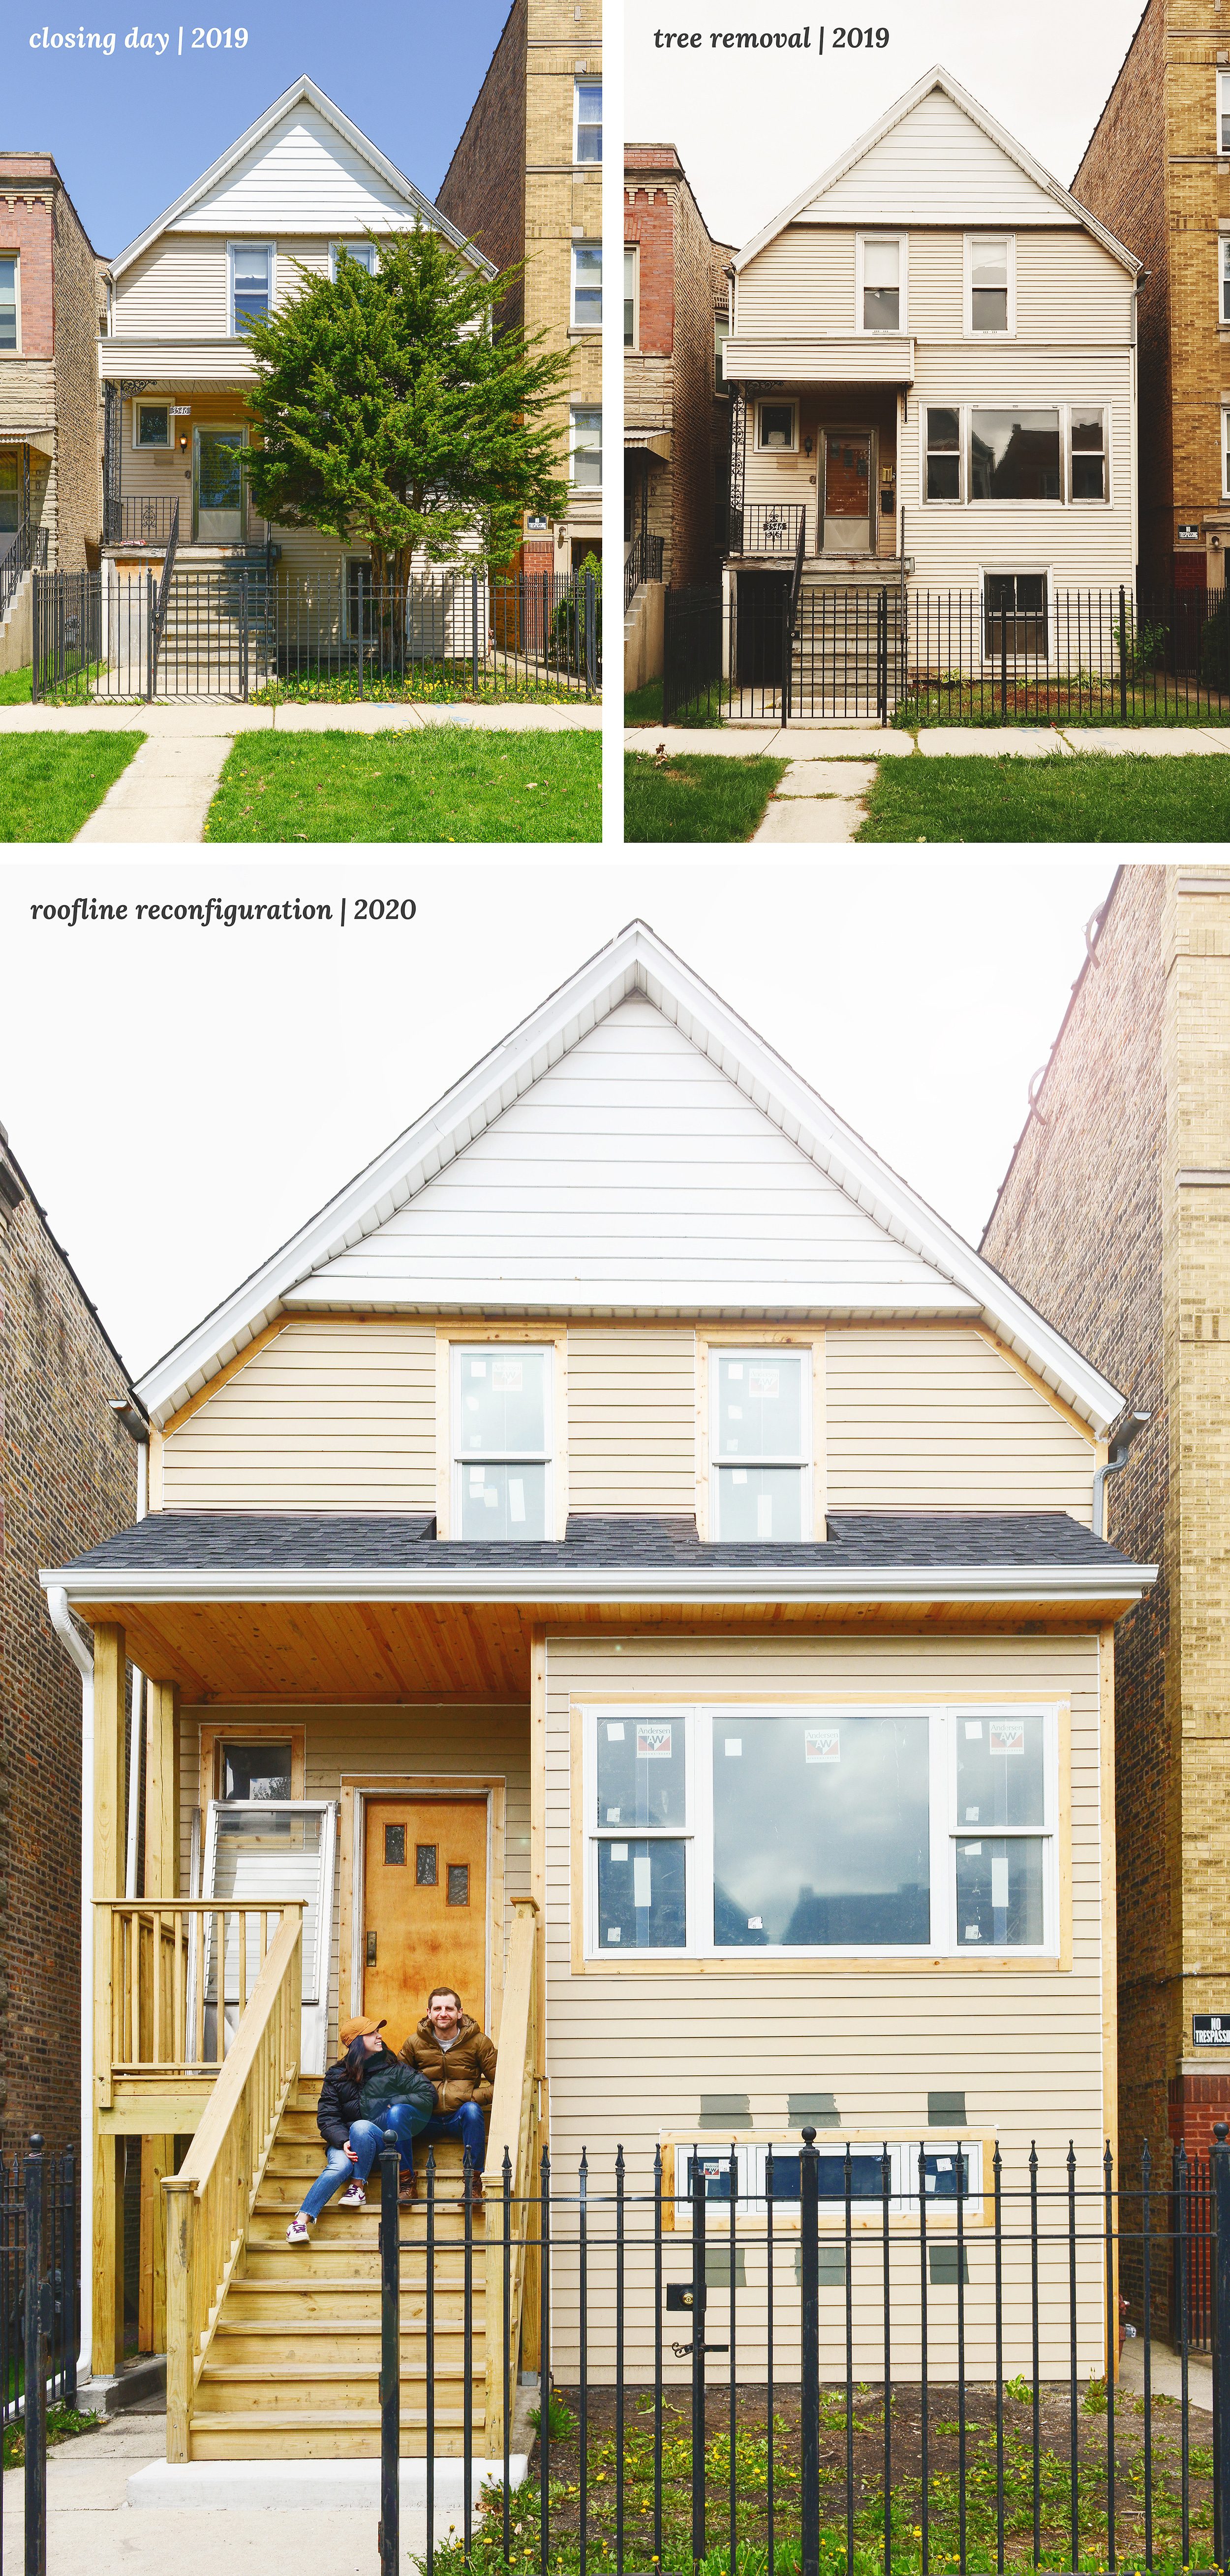
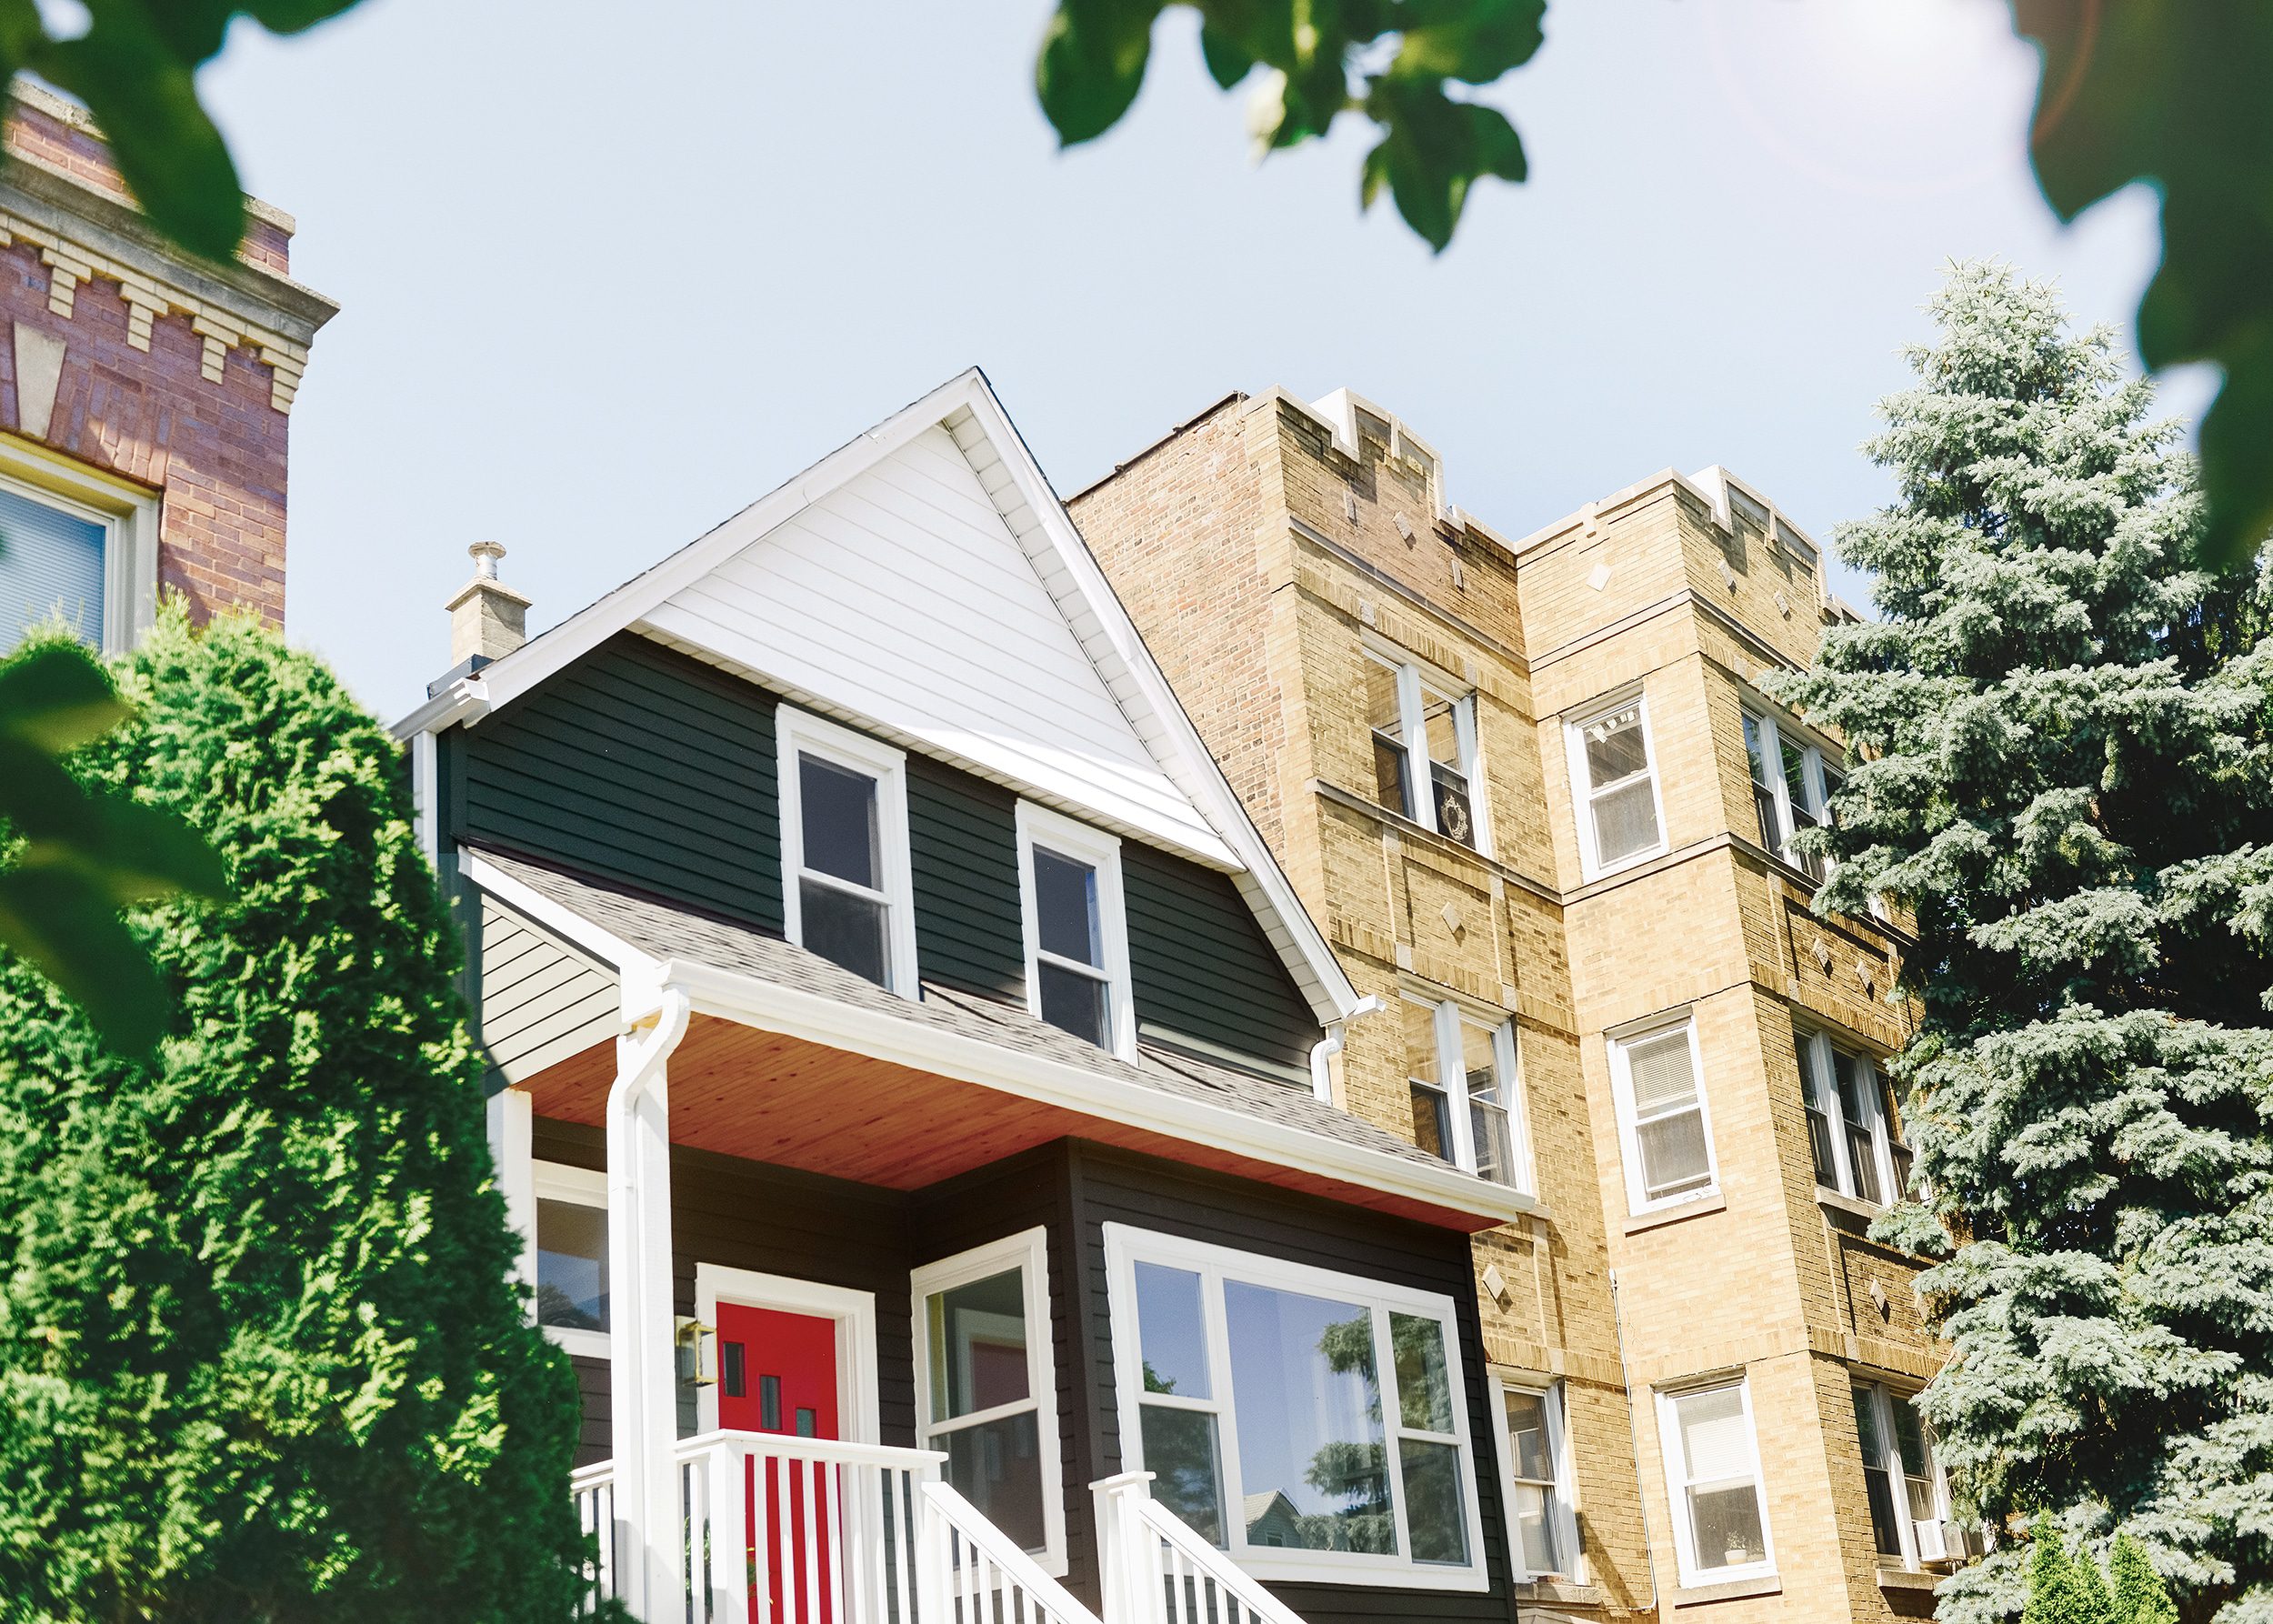
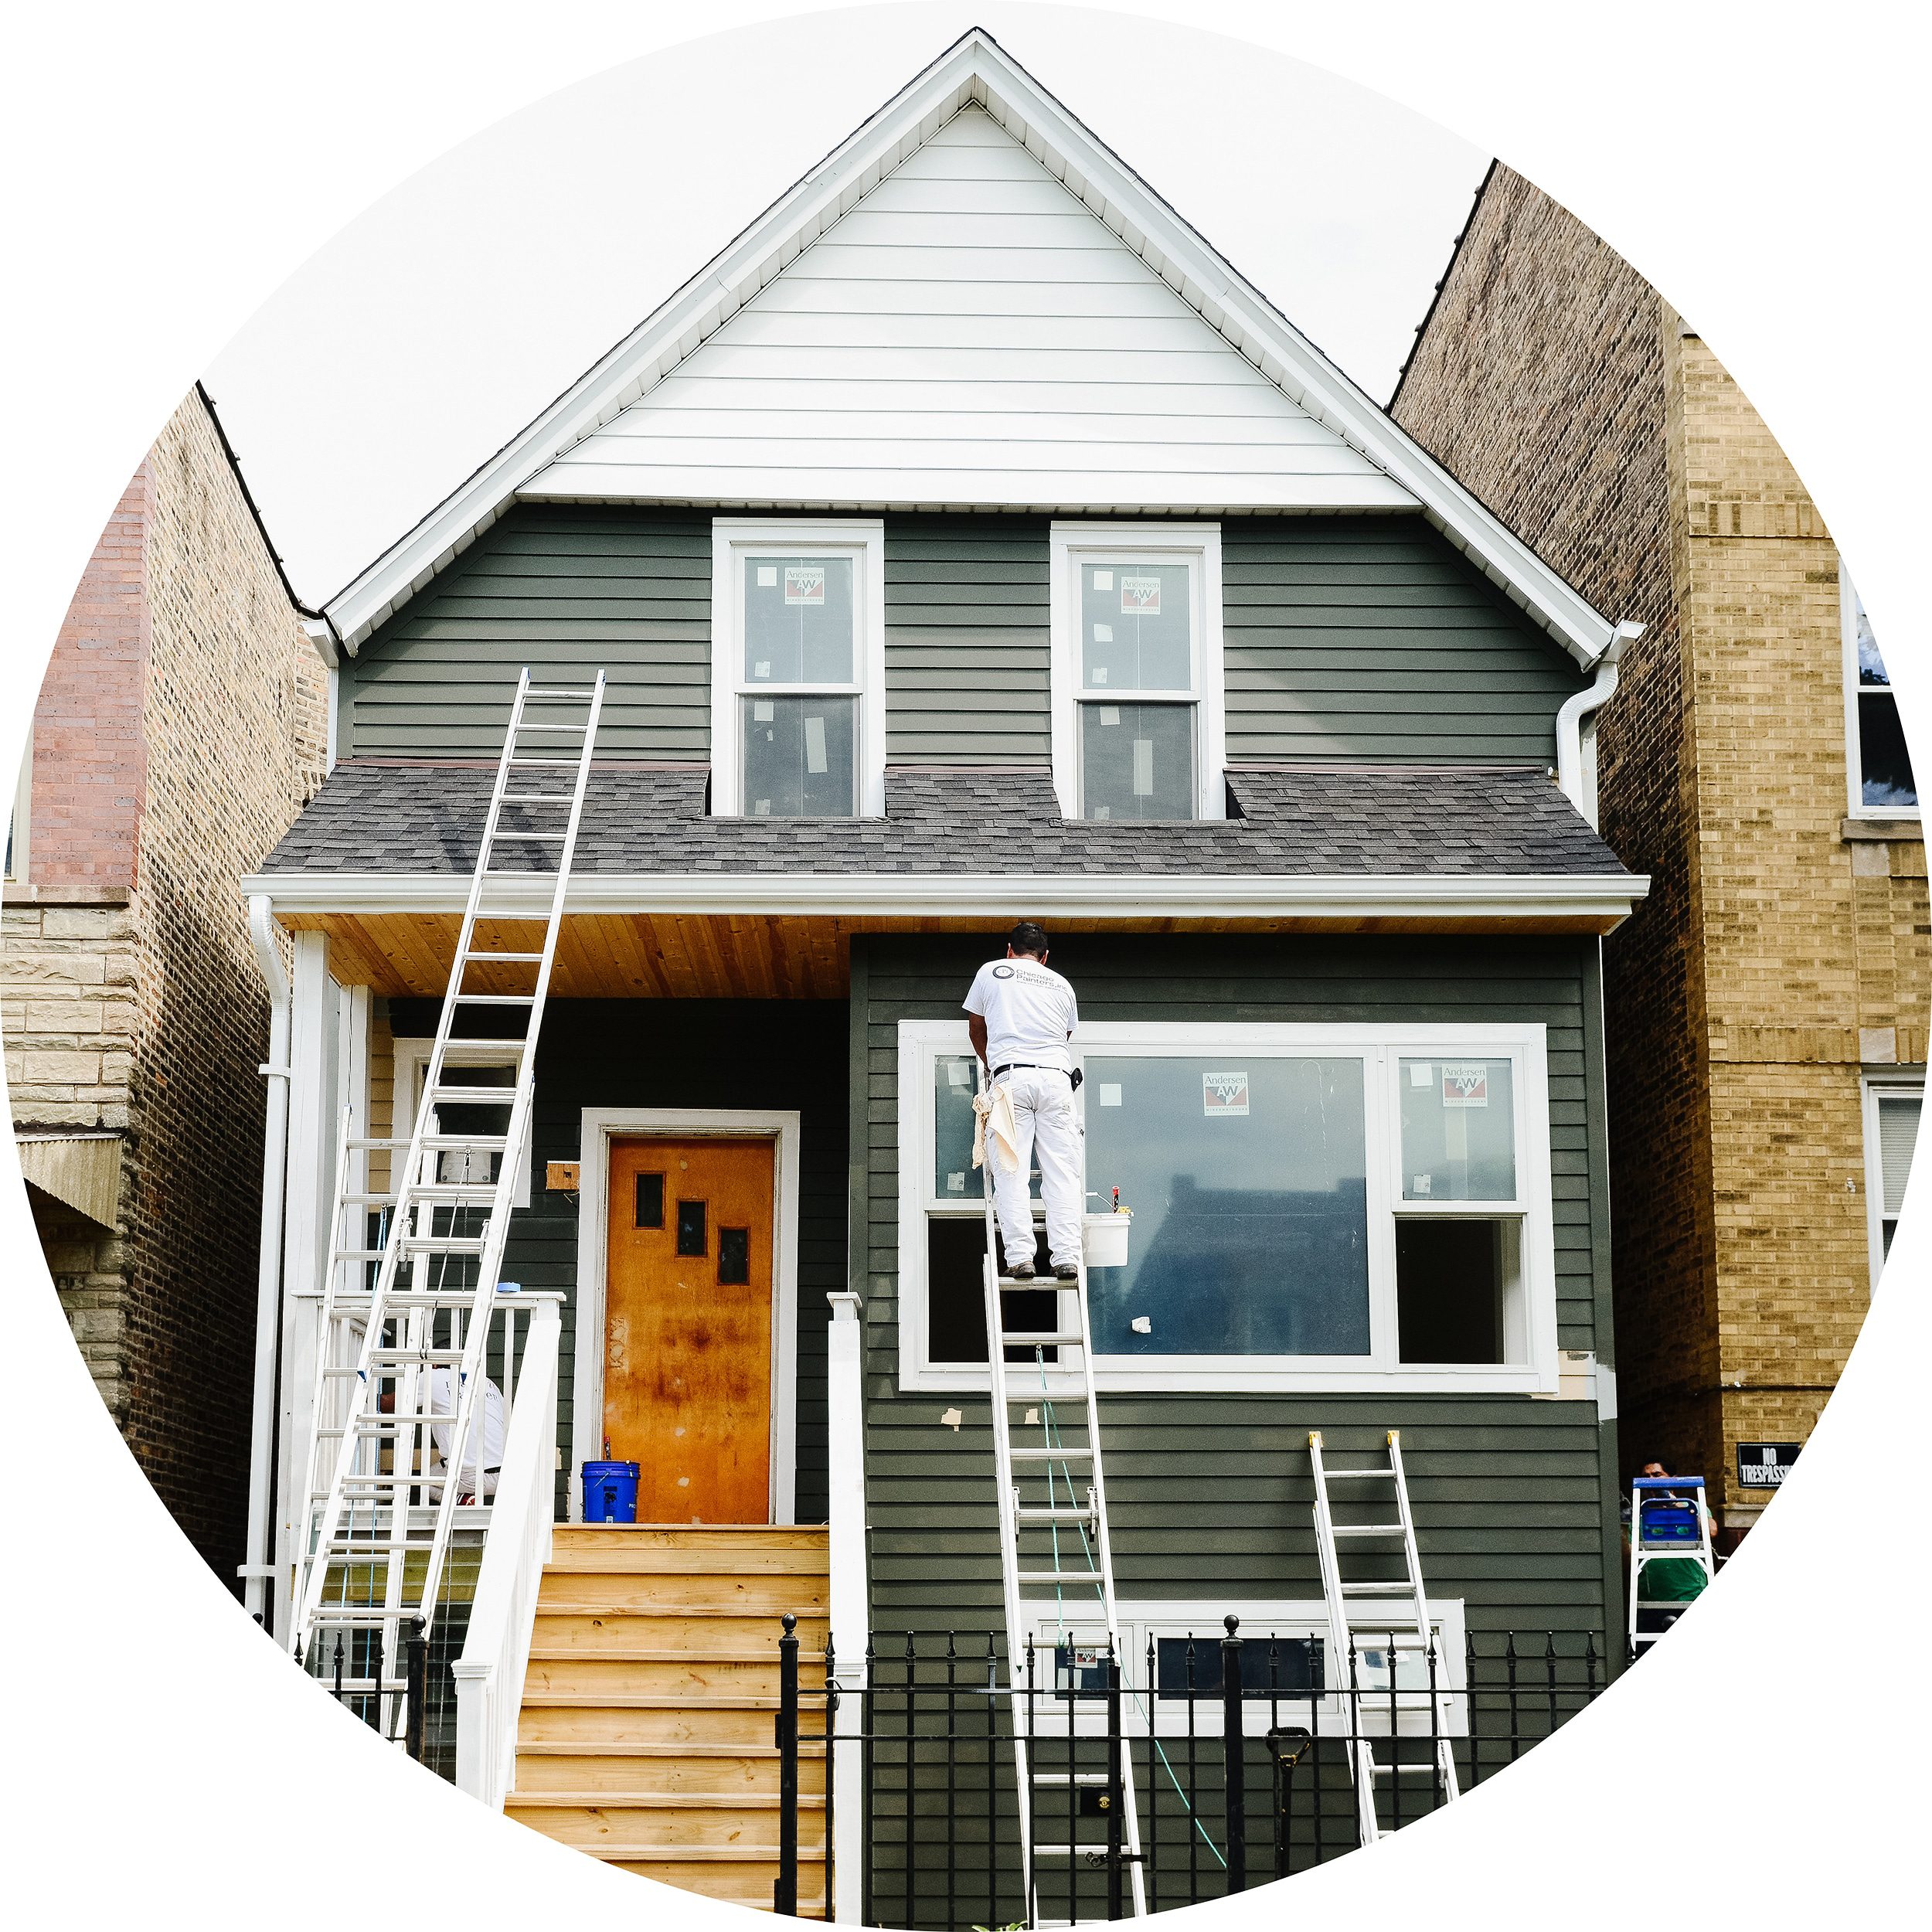
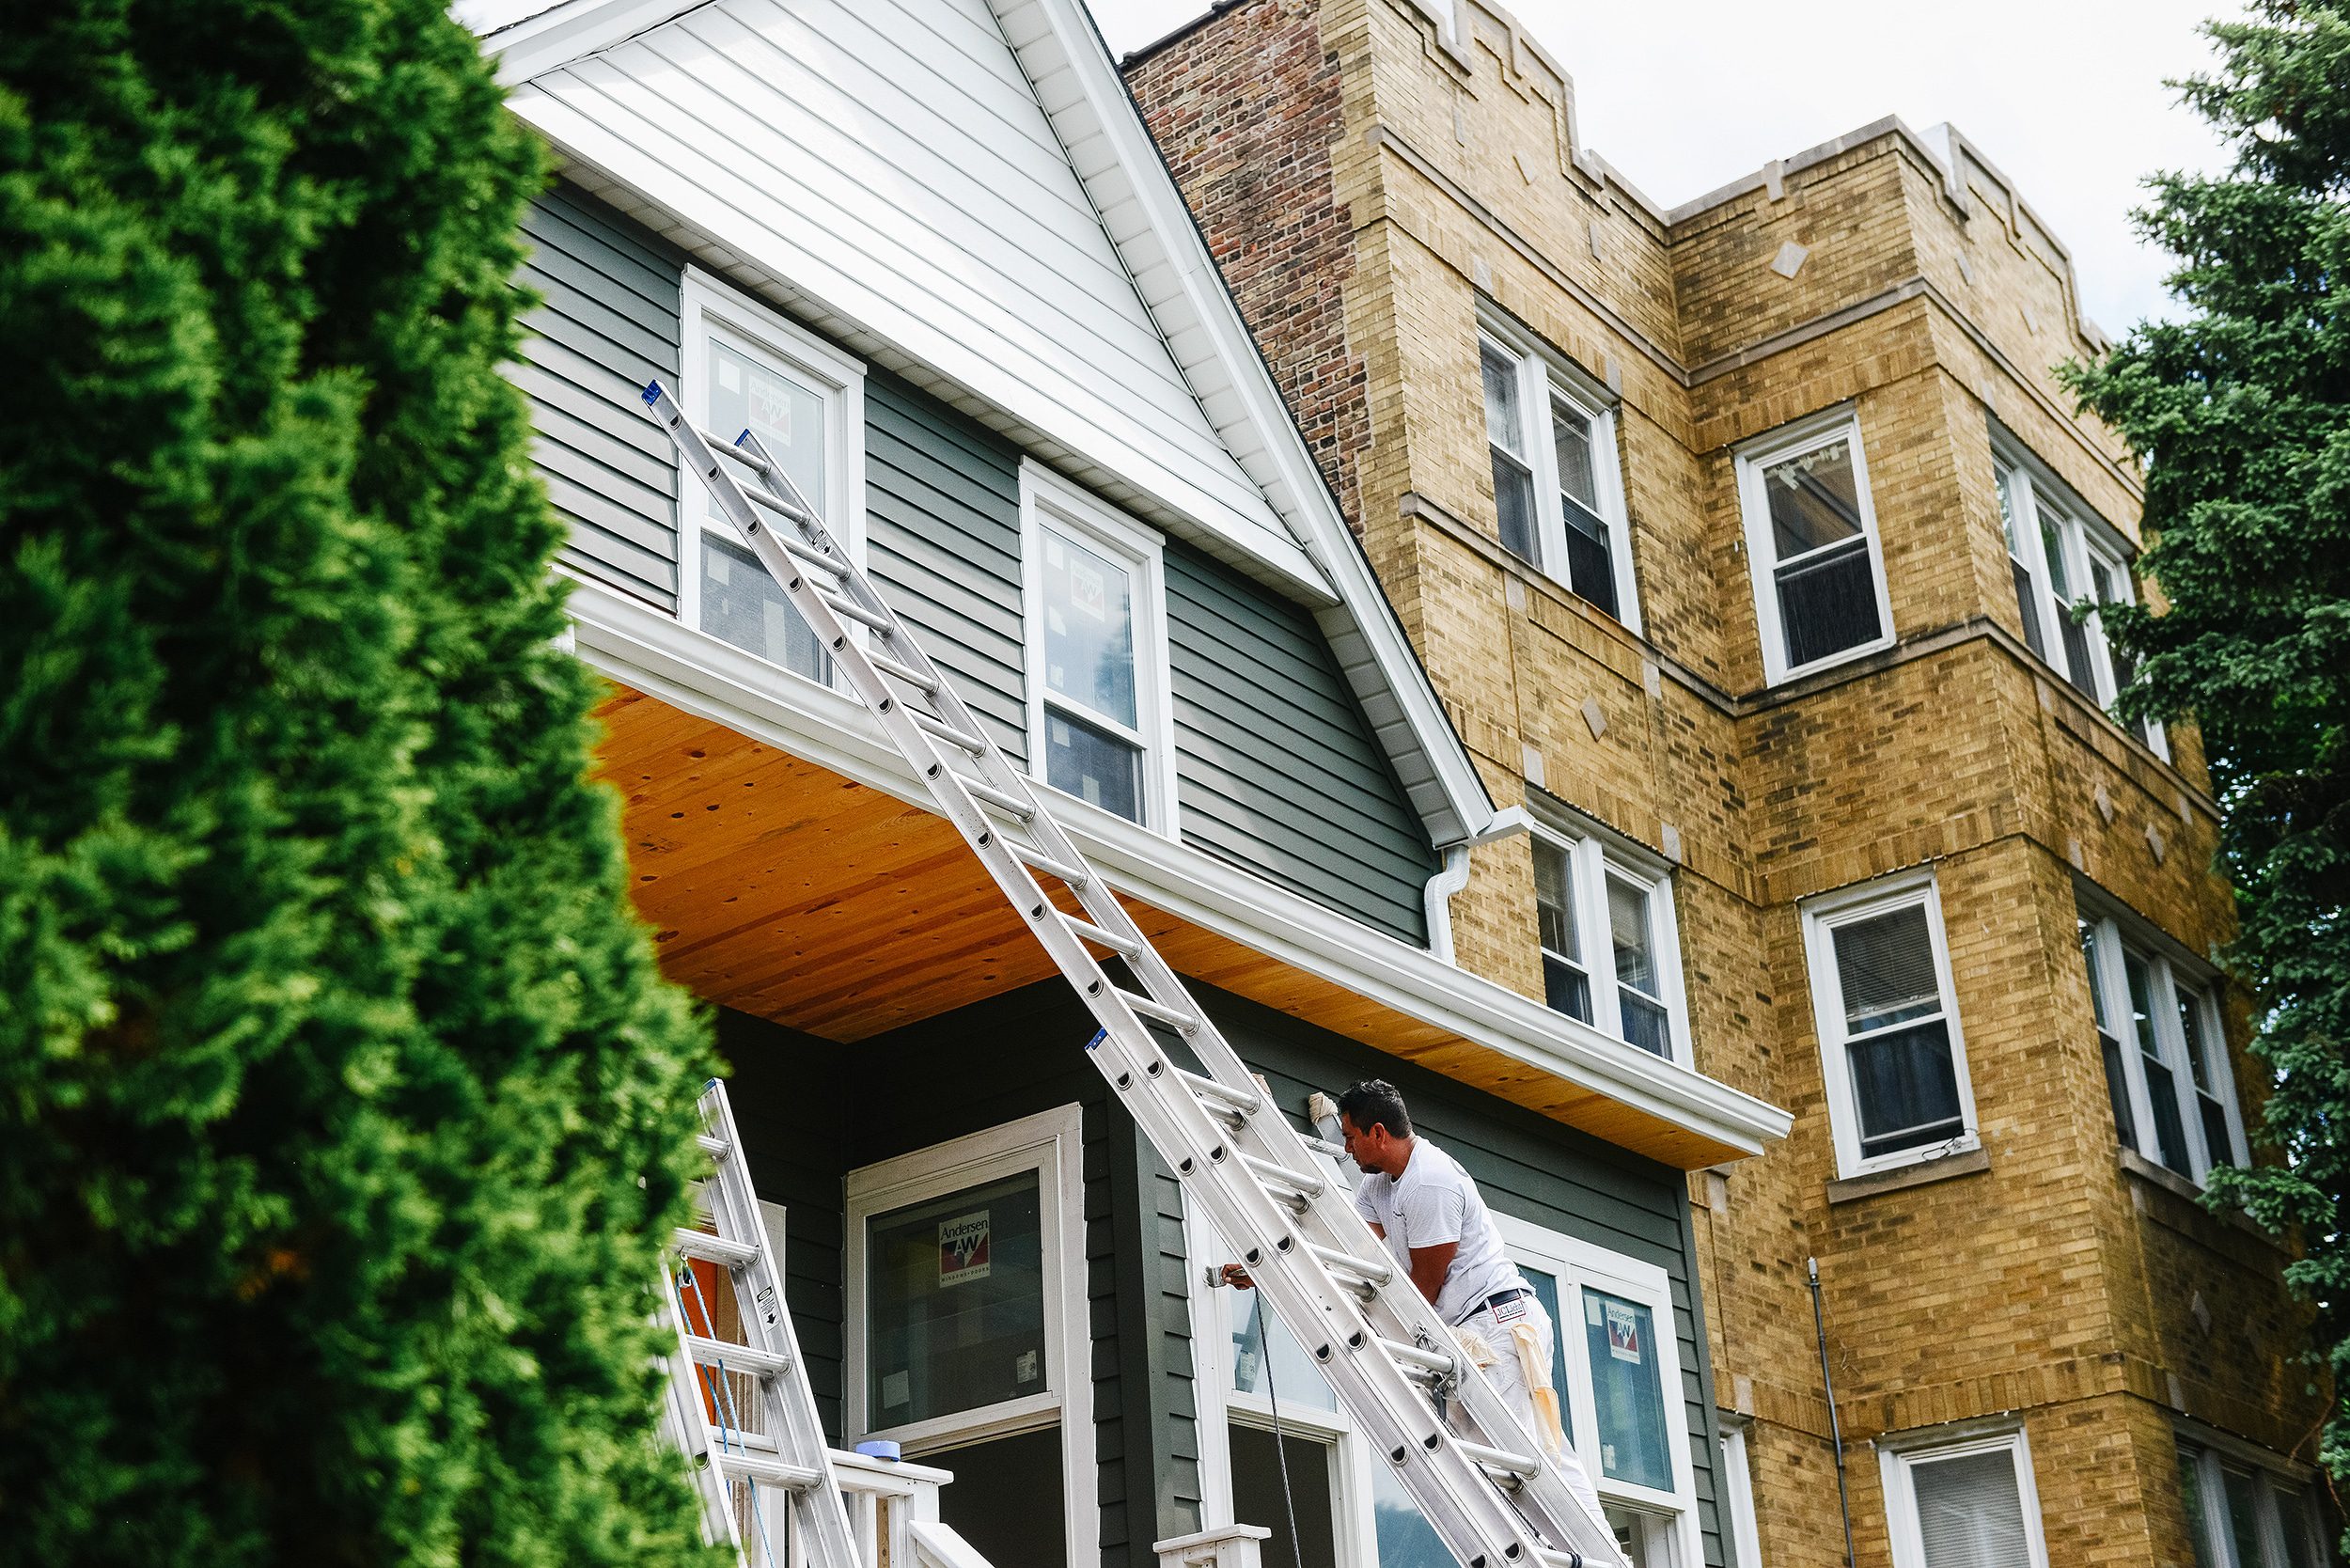
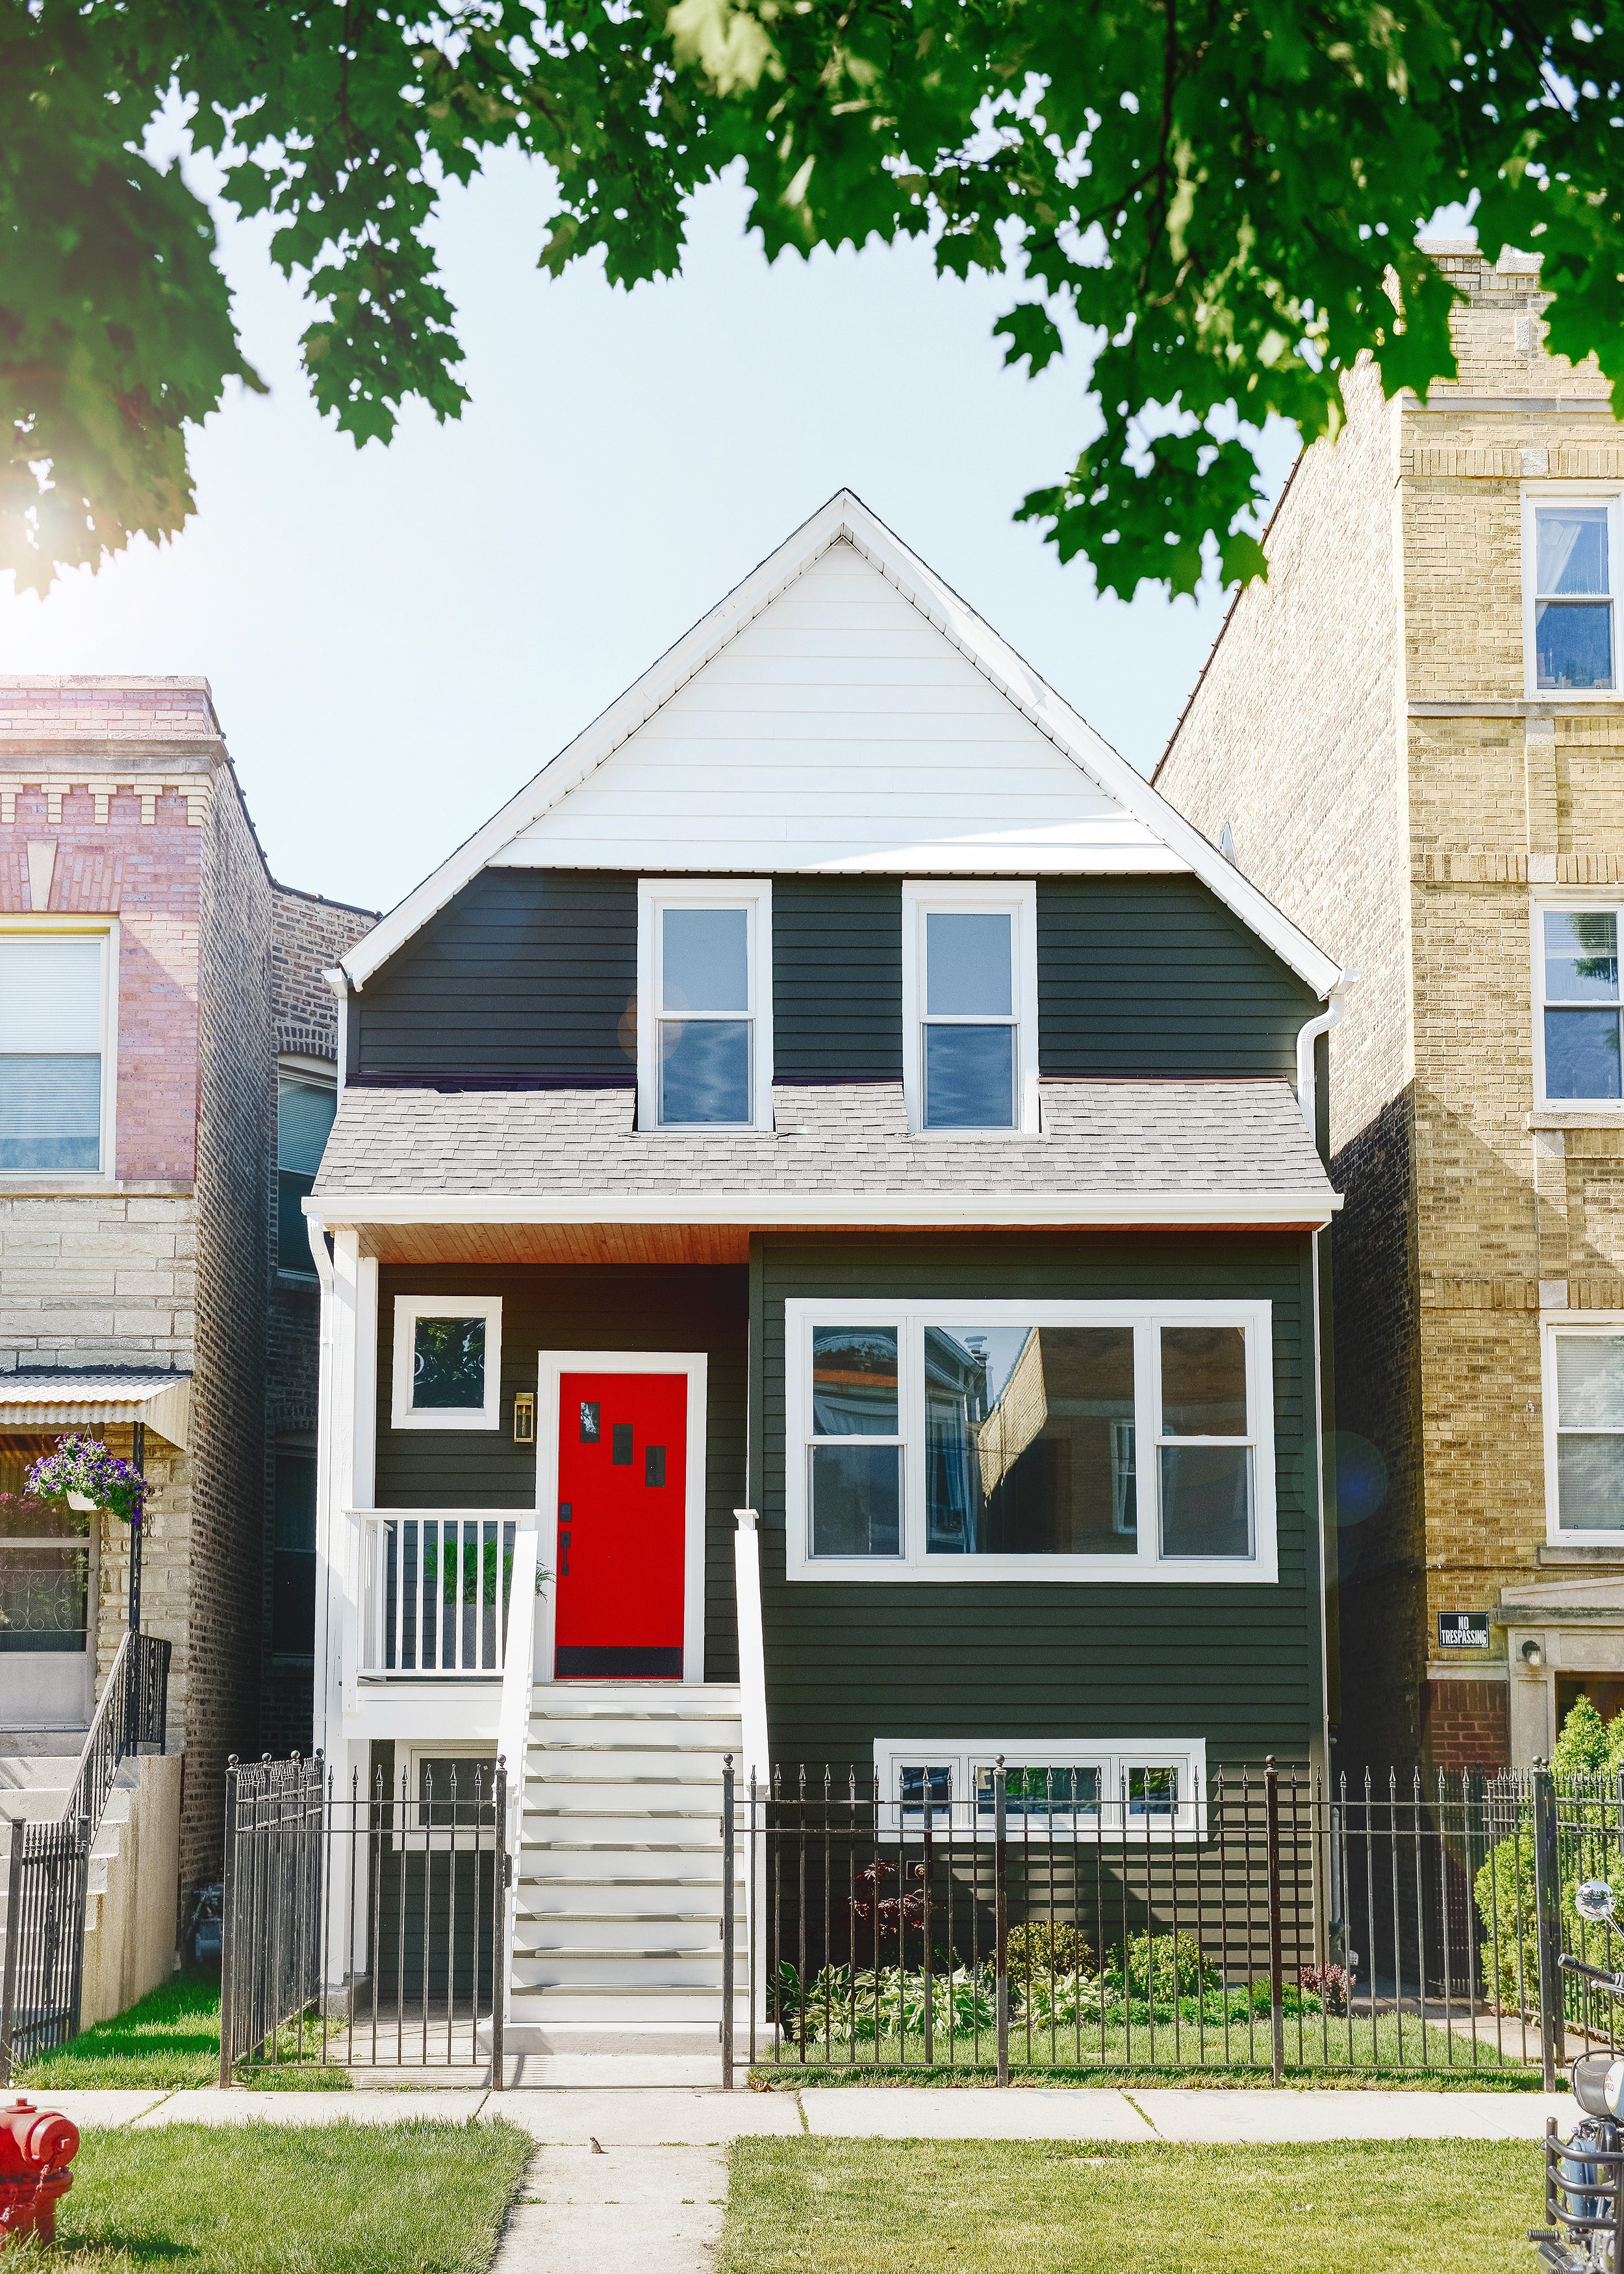
The Two Flat’s exterior is painted! Our little gem has come so far; she’s hardly recognizable from where we started in April of 2019. We removed an overgrown tree-slash-bush in the front yard and reconfigured the roofline, which led to residing the front of the home and deciding on shingle colors, porch railings and paint colors! Let’s dive right in, because there’s a lot to get to.
In This Post
A Look Back
The Two Flat Today!
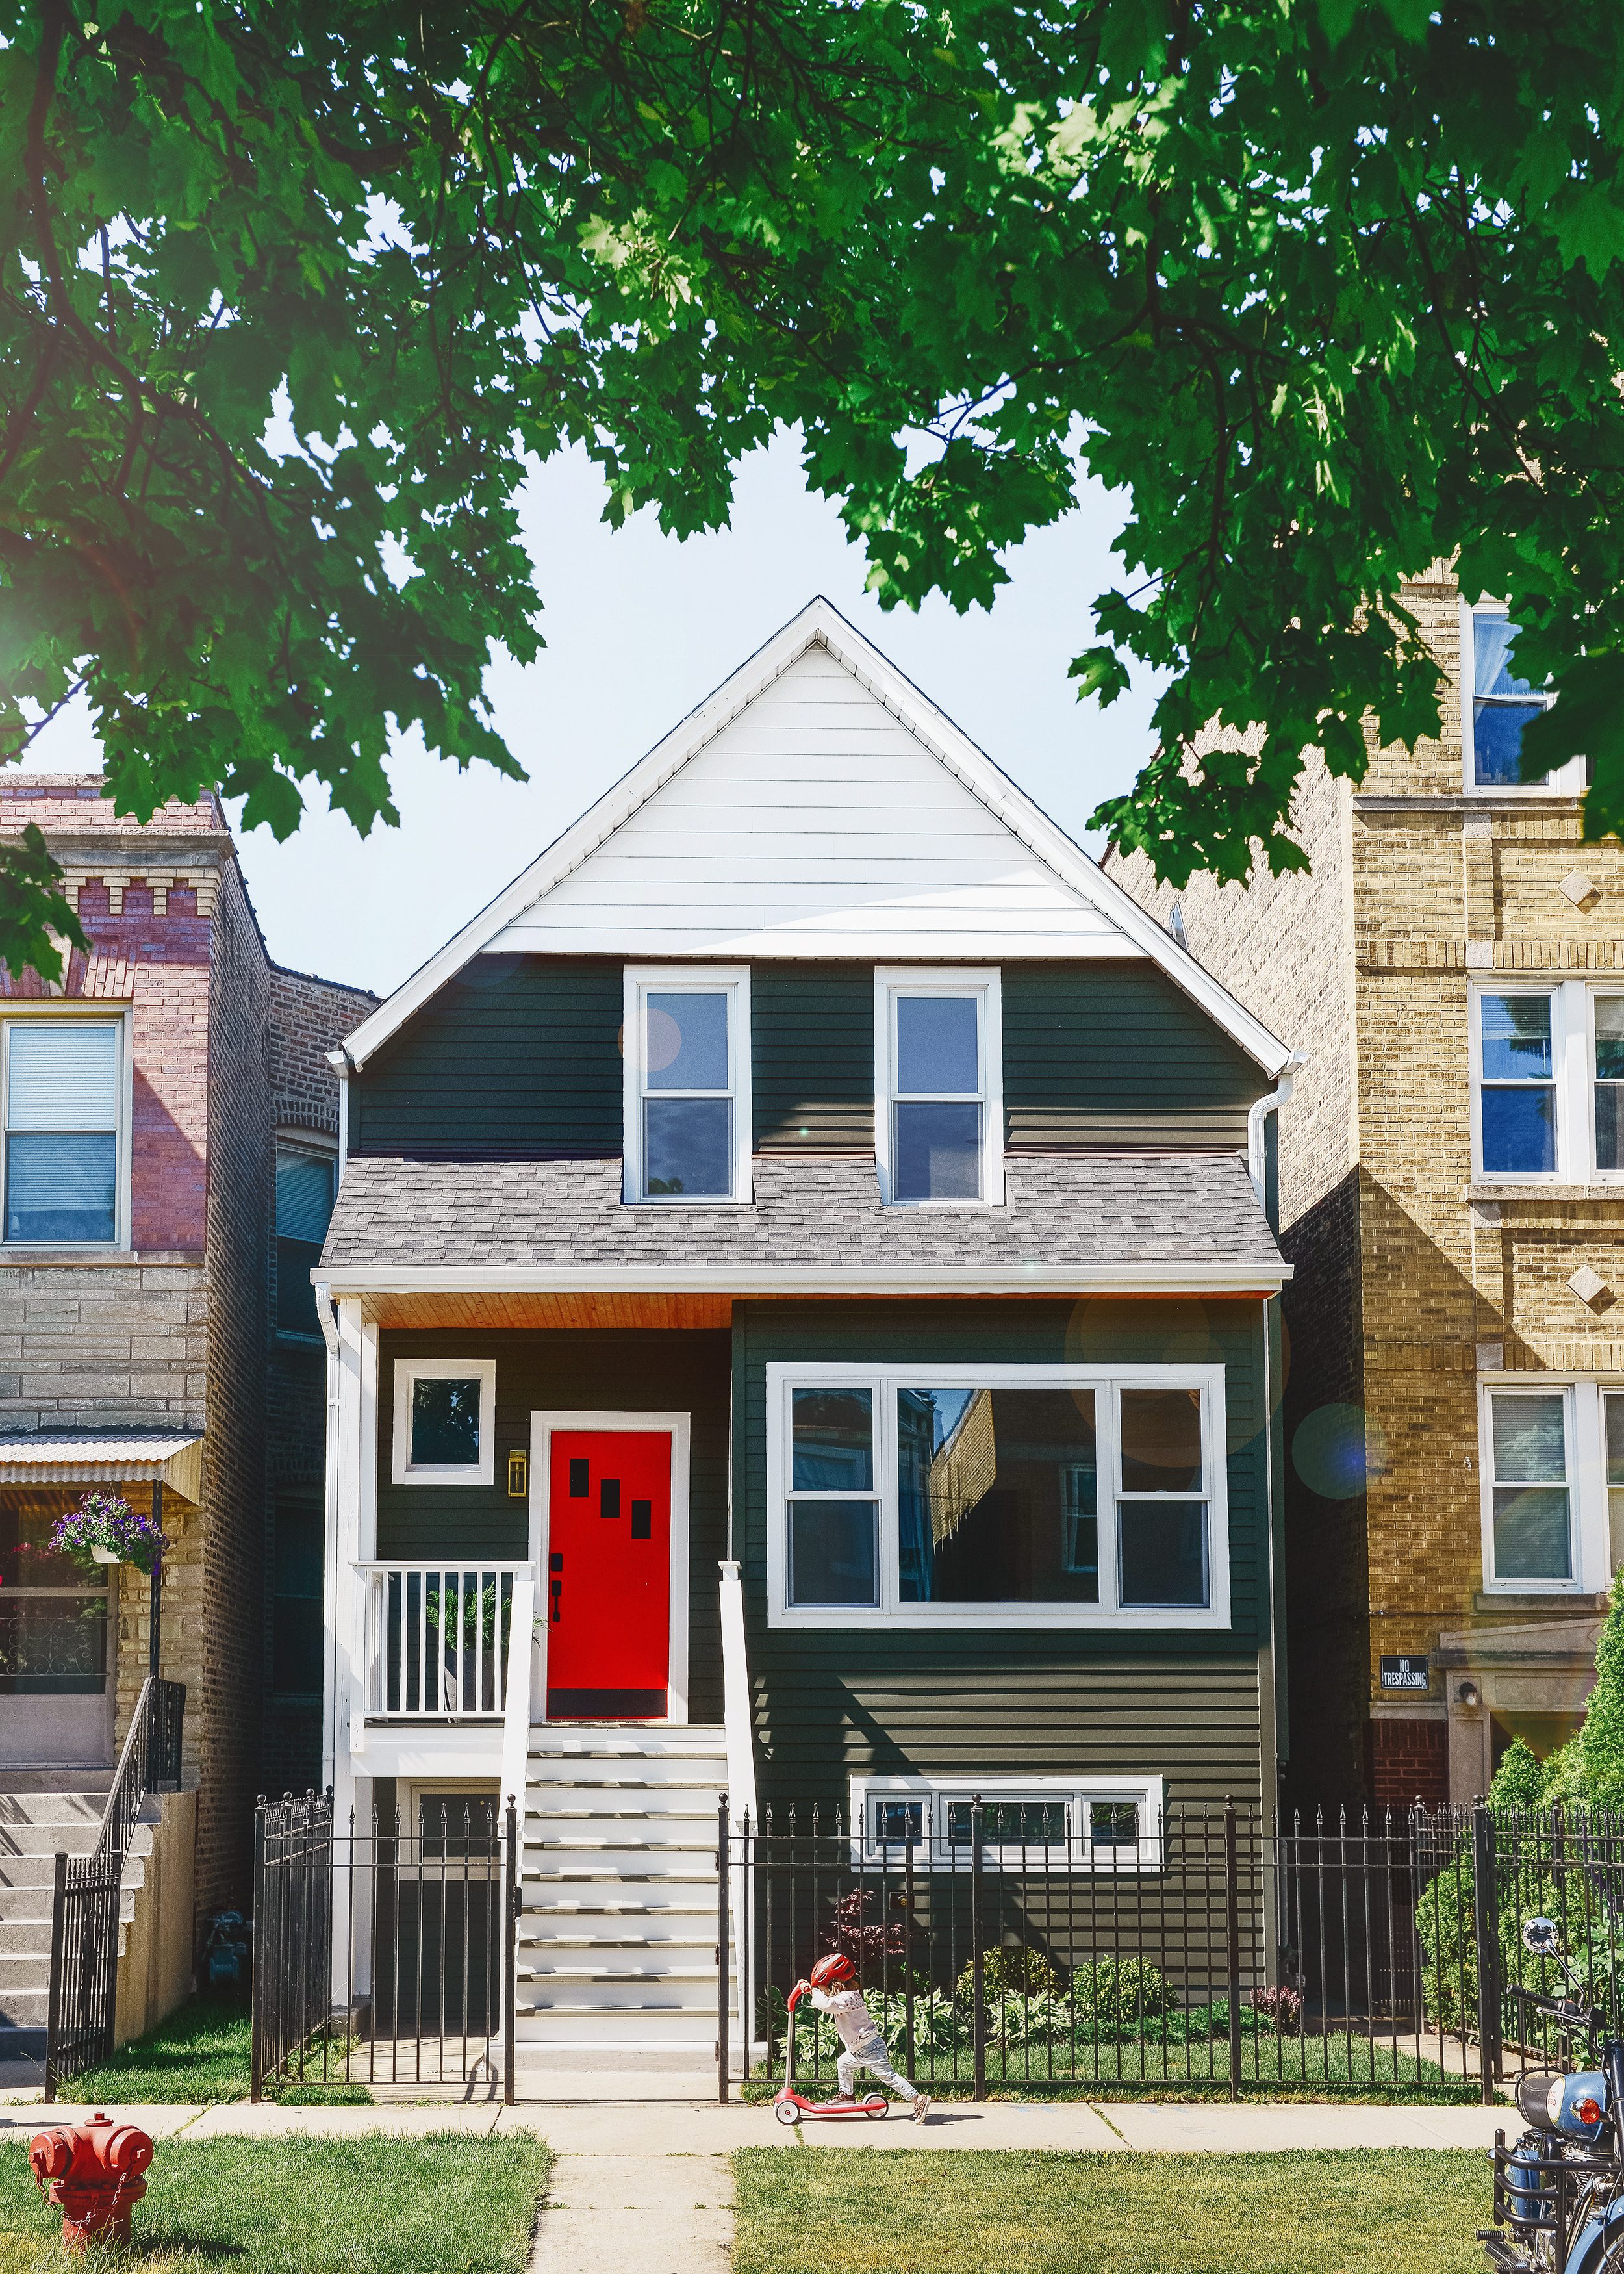
We (mostly I) waffled between shades of deep gray-green for a while. At one point, I was so sure we would paint the home Valspar’s Cosmopolitan Olive, but in the eleventh hour, we had a gut check and landed on Sherwin-Williams Shade Grown. It’s a deep, rich green, but there’s plenty of gray in the color to prevent it from looking too flashy. It feels classic yet updated, and I surprised myself by yearning for a bright red door. We think it works – wedged perfectly between those gorgeous red and yellow brick buildings – and it makes our hearts sing every time we pull up to our beloved Two Flat.
The Color Breakdown
- Shade Grown SW 6188 mixed to Valspar Duramax in flat (main)
- Pure White SW 7005 mixed to HGTV Home by Sherwin-Williams in satin (trim)
- Heartthrob SW 6866 (door)
- Valspar Solid Exterior Stain in November Gray (porch)
- Thompson’s Water Seal Timber Brown Stain (porch ceiling)
We picked up all of our paint supplies from Lowe’s, and we worked with the talented team at Chicago Painter’s, Inc. to get the job done. We interviewed the company’s president, Jim Amatore, while we were selecting colors, and he’s back to answer the one question we received a lot of:
I’m ready to paint the exterior of my house! What can I expect from the professionals during the process?
The First Steps
- Pressure washing: Chicago Painters, Inc. starts with a light pressure washing of the home, which is necessary to clean surfaces. If there’s peeling paint, pressure washing can help remove the flaking paint and prepare surfaces for paint. However, a pressure washer can easily damage wood surfaces, which leads me to…
- Sanding: It’s always good to give a scuff sand to any surface being painted and/or stained. This will open up the pores so the new application coat adheres properly.
Know Your Paint Sheens
Typically, the higher the sheen, the more durability. That said, higher sheens will show more defects. Finding the right balance is important! A good rule of thumb is flat for large, main areas of the home, and satin or semi-gloss for tim, doors, and railings.
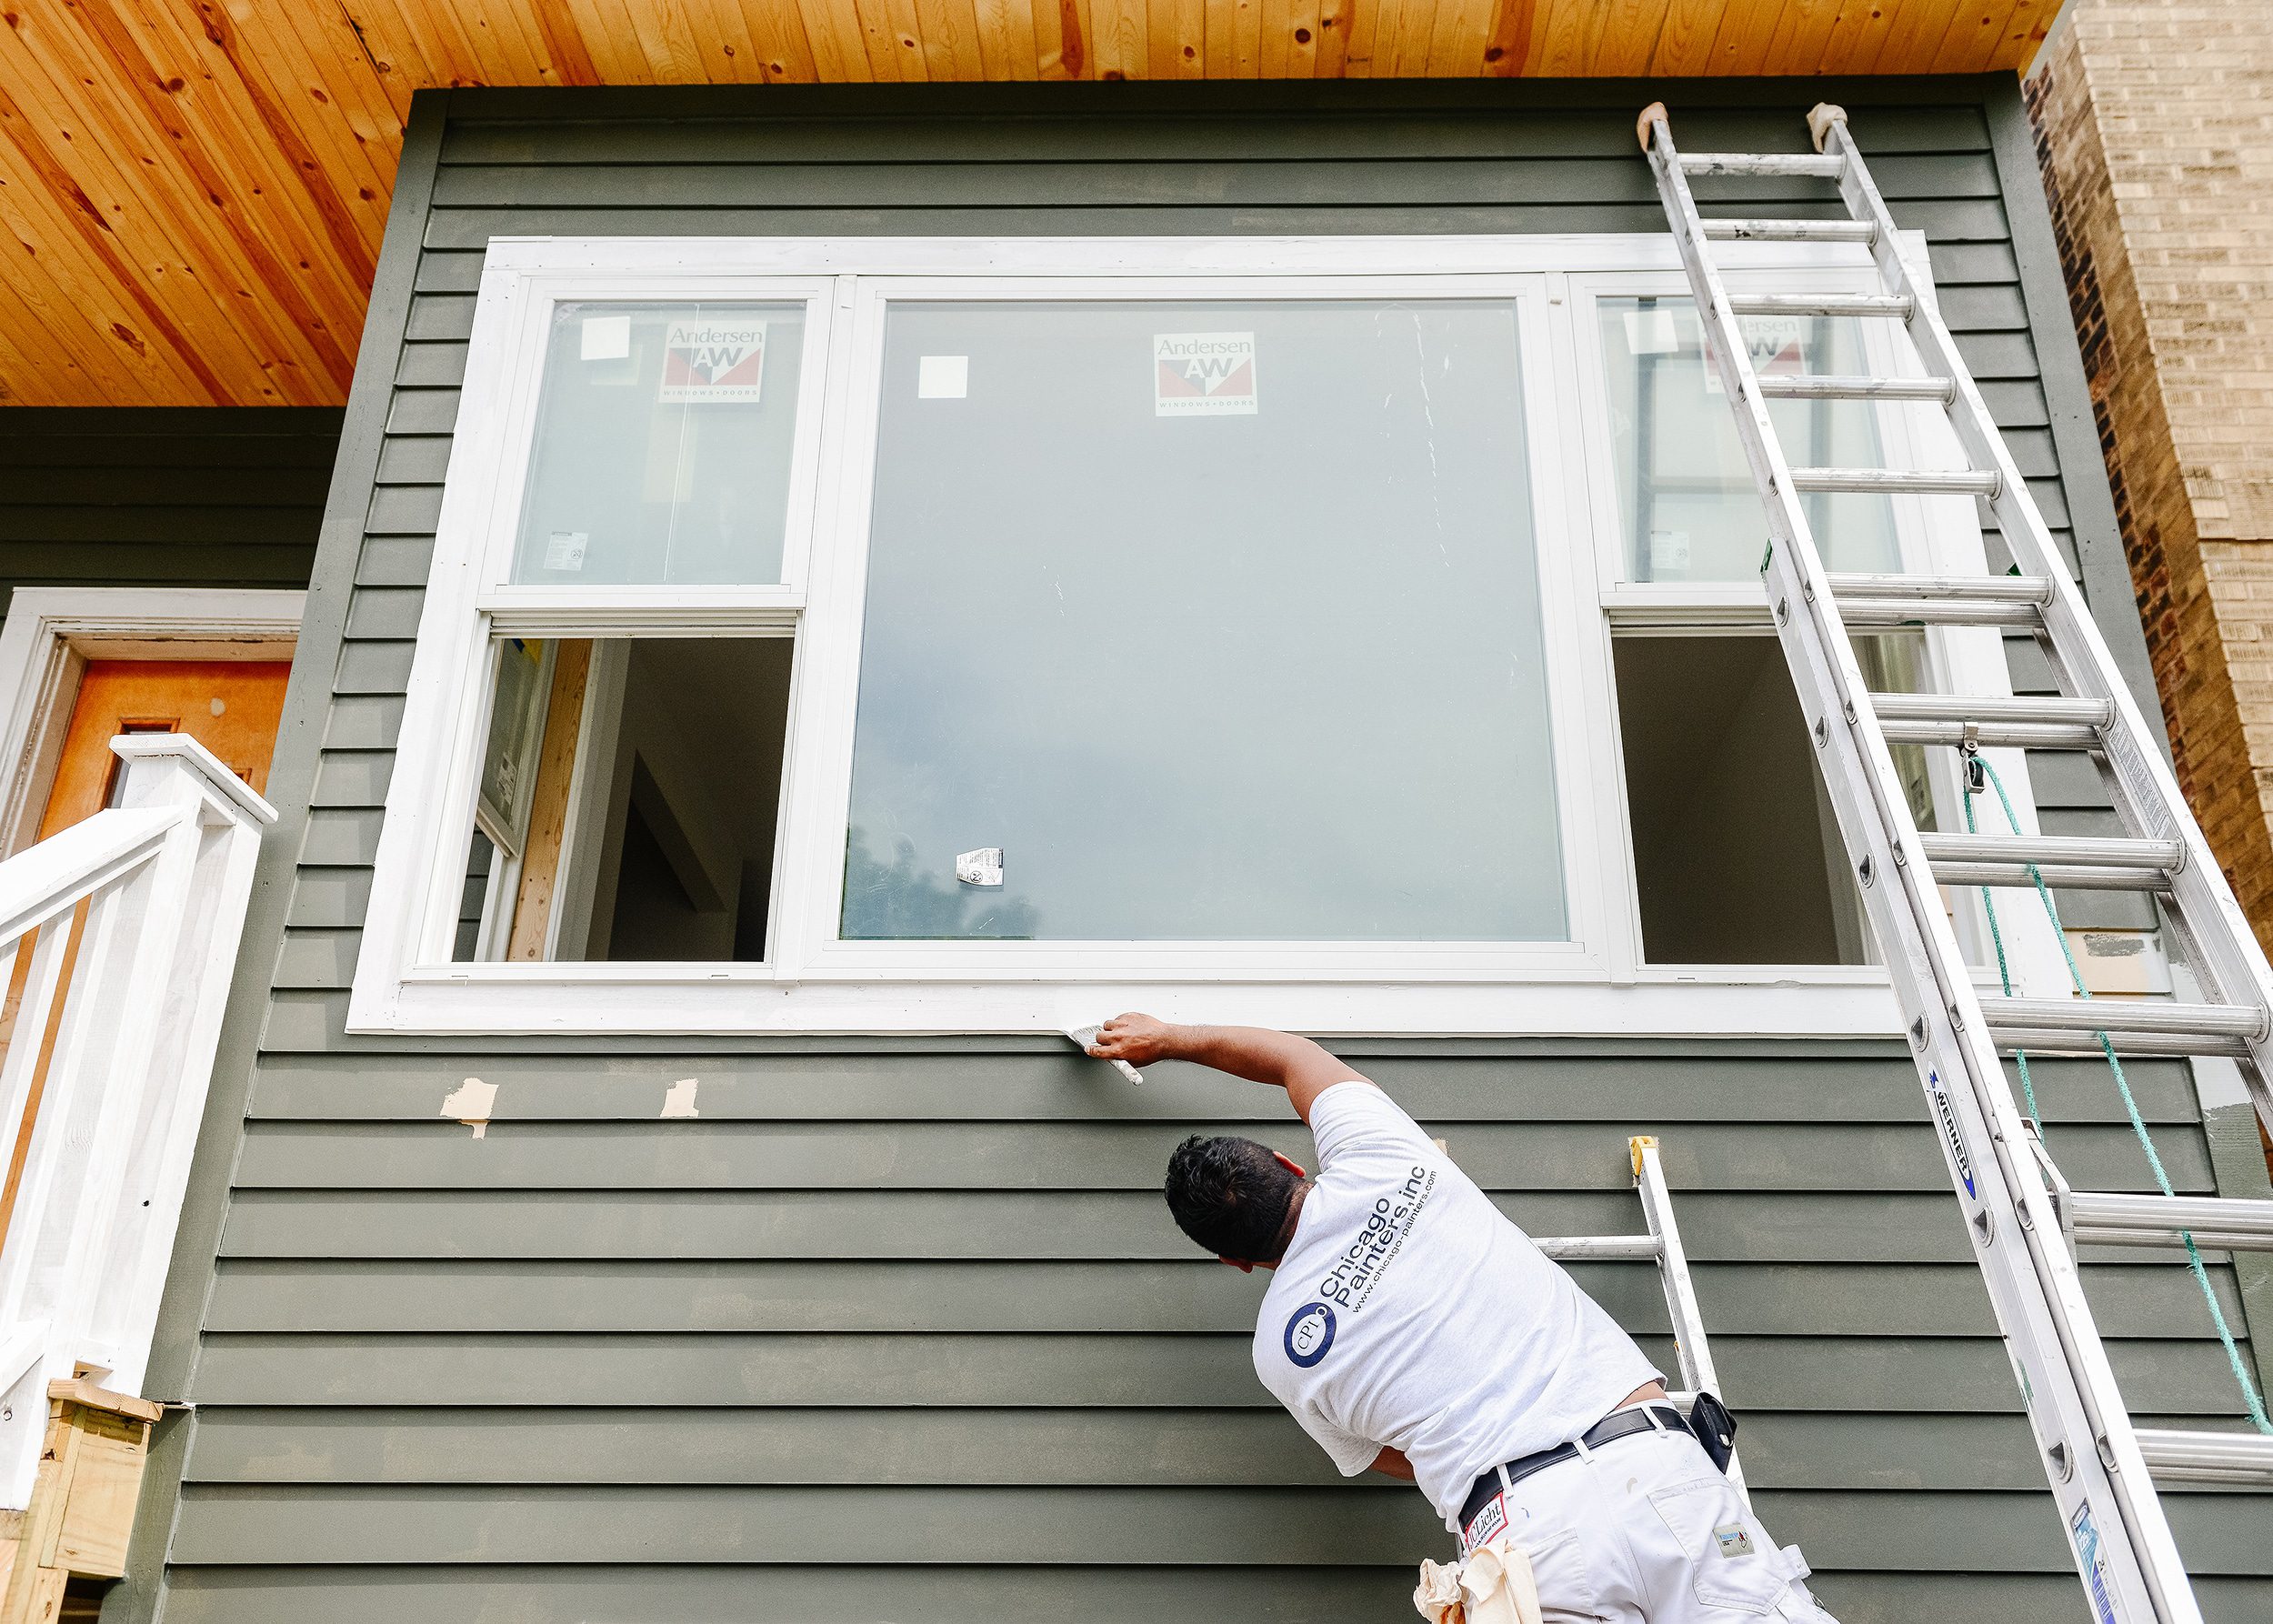
How Many Coats of Paint Are Needed?
Typically, two coats of paint will be the manufacturer recommendation, although some stains and porch paints only require one. (And on the other hand, three coats may be necessary depending on coverage!) Read the manufacturer instructions on any product being used, but in the case of the Two Flat, two coats of paint and stain were applied to all surfaces.
The Job Is Complete! Now What?
Chicago Painters, Inc. offers a 30-day touch up warranty on all painting work provided. For painting metal surfaces, the team will come by annually to inspect for any signs of rust and touch up as needed! For deck staining, it’s recommended to maintain it annually – or every other year, depending on exposure and region – if open to direct sunlight, rain or snow.
Note: Thank you for your insight, Jim! We love the work that the team at Chicago Painters Inc. completed at our Two Flat. Receiving the estimate was quick and painless, their attention to detail was spot on, and they worked quickly and efficiently. If you’re in Chicago, you can get a free estimate right here.
Let’s Landscape!
We love Chicago for so many reasons, but believe it or not, the postage-stamp sized yards are one of them. Not only is it less to maintain, but it’s less material cost and less watering, too! We already built in a great new stoop for front porch hangs, so the plan was to create a small patch of grass with a walkway to the backyard, and keep the focus on plantings. We could only go ‘up’ from our starting point, which was essentially a dirt patch filled with dandelions:
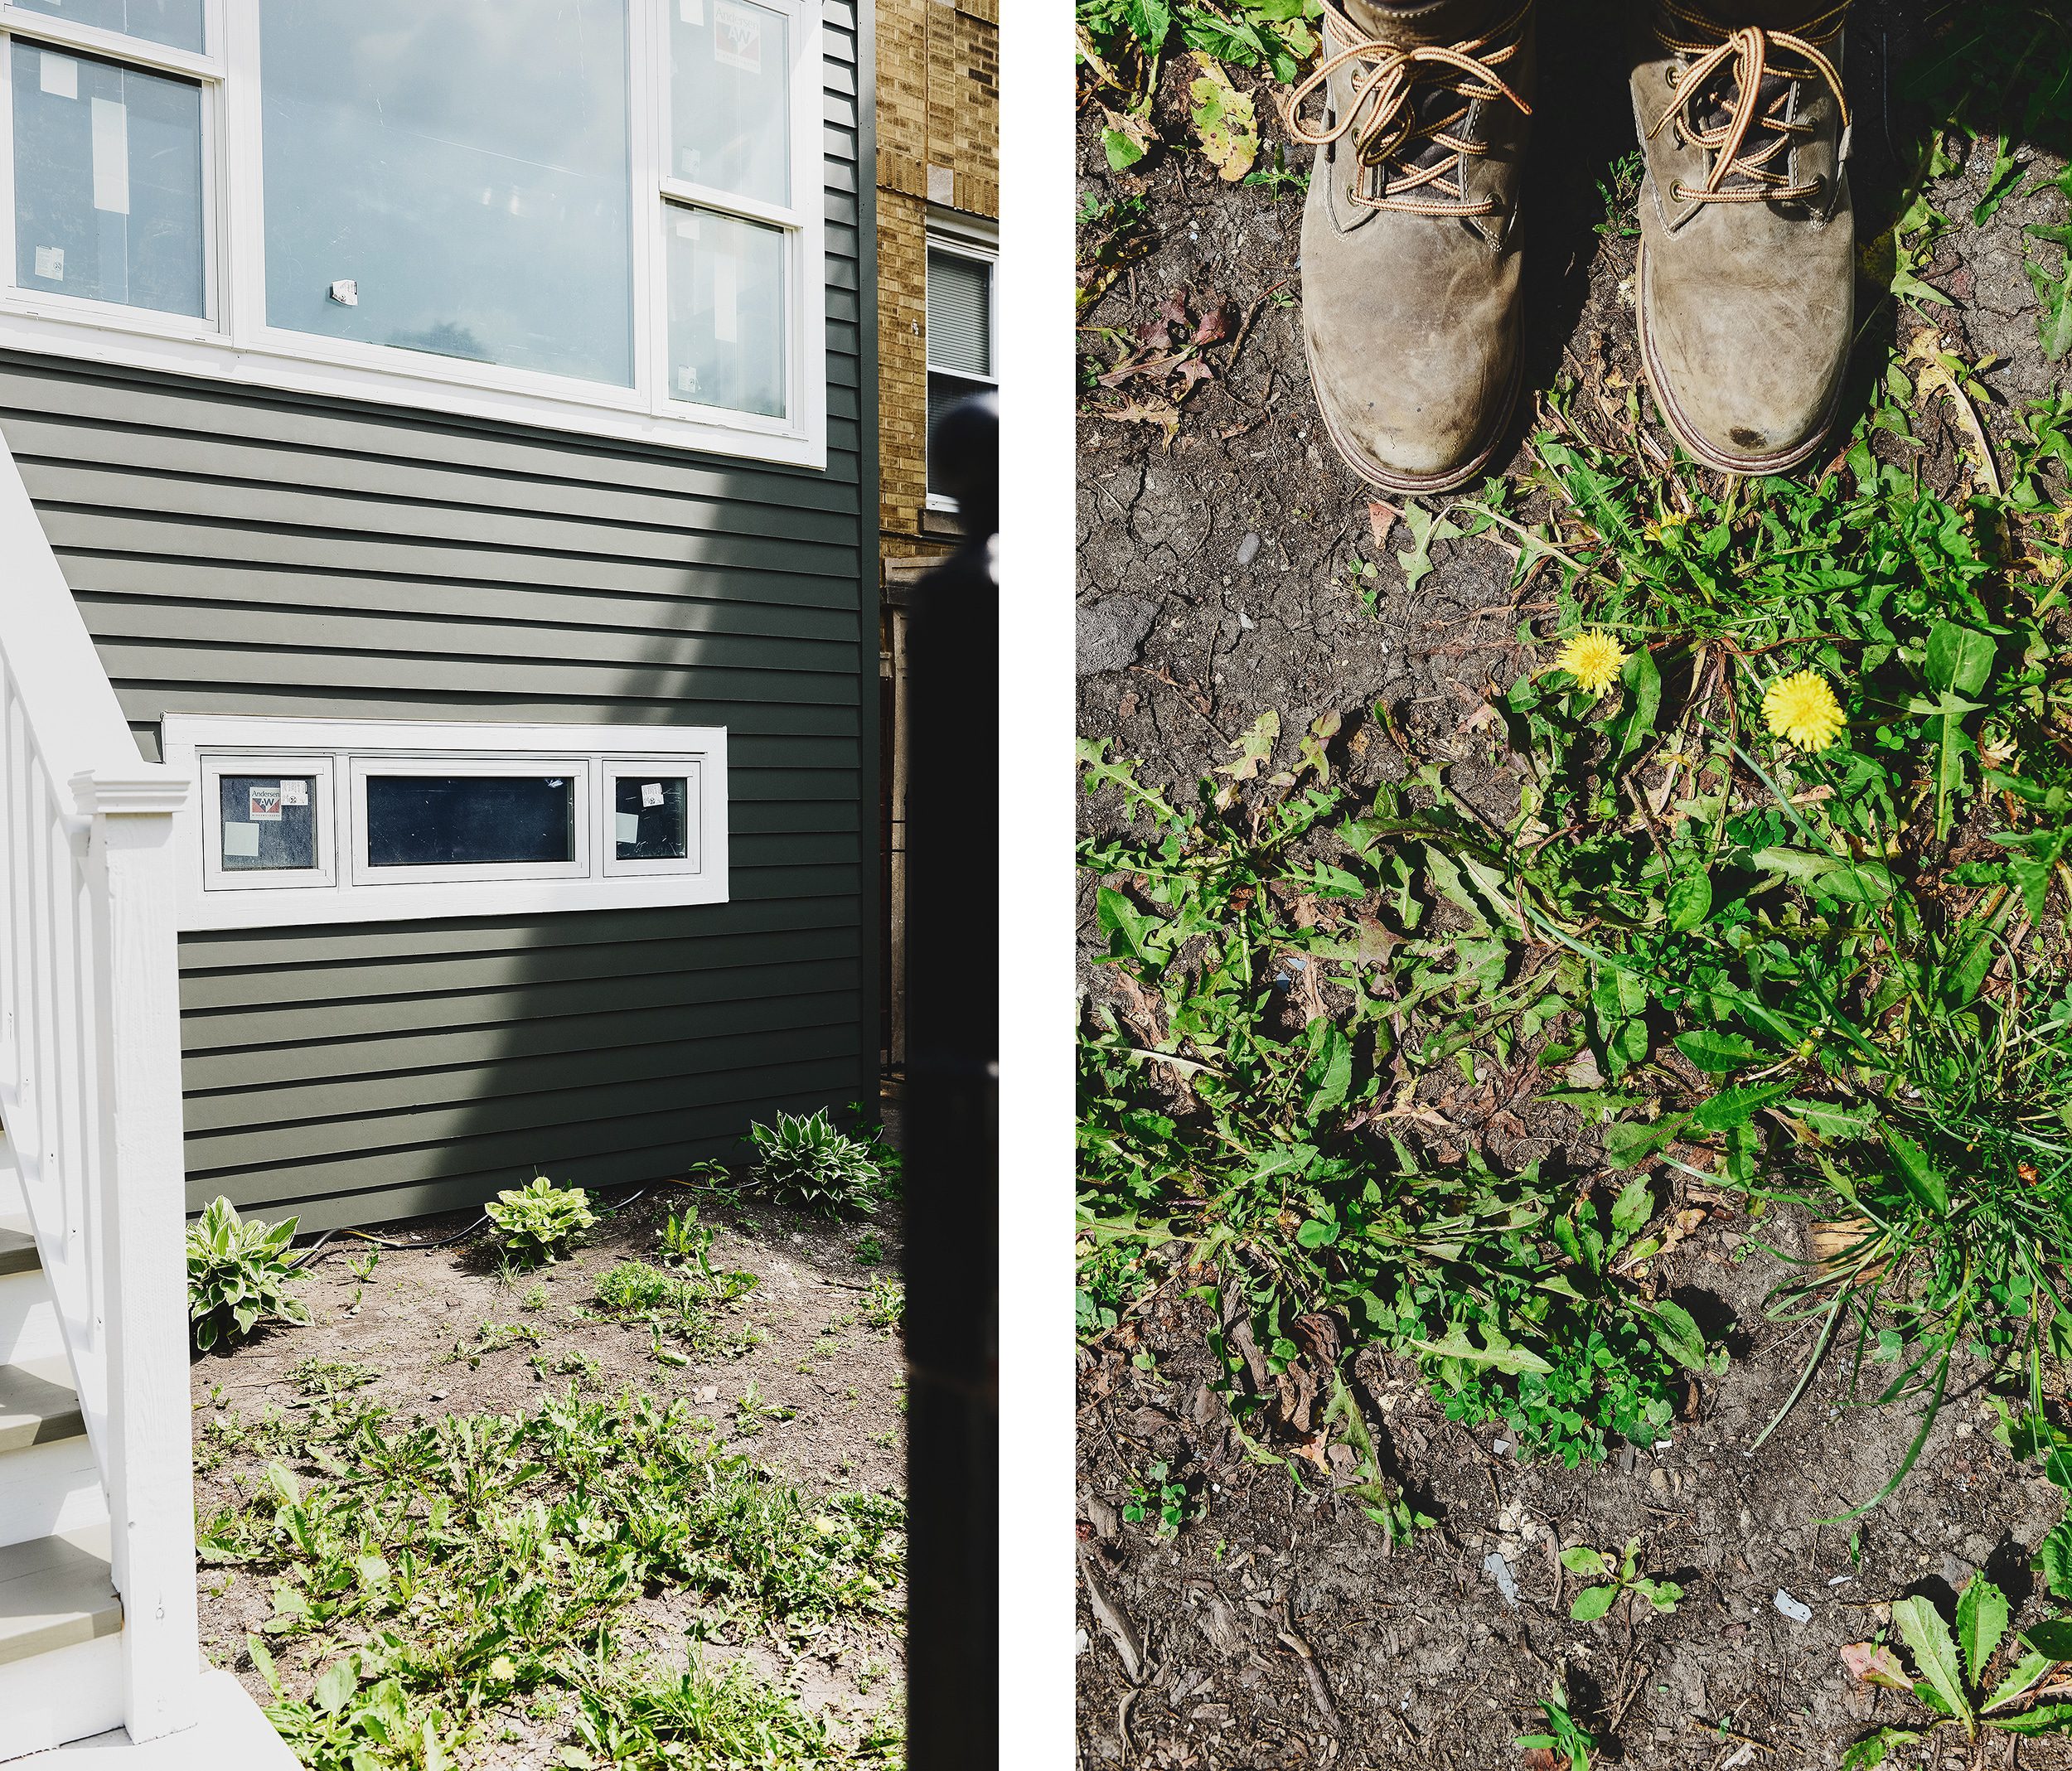
To get to a base level, we tilled up the weeds, raked up debris and smoothed out the patch of dirt that remained.
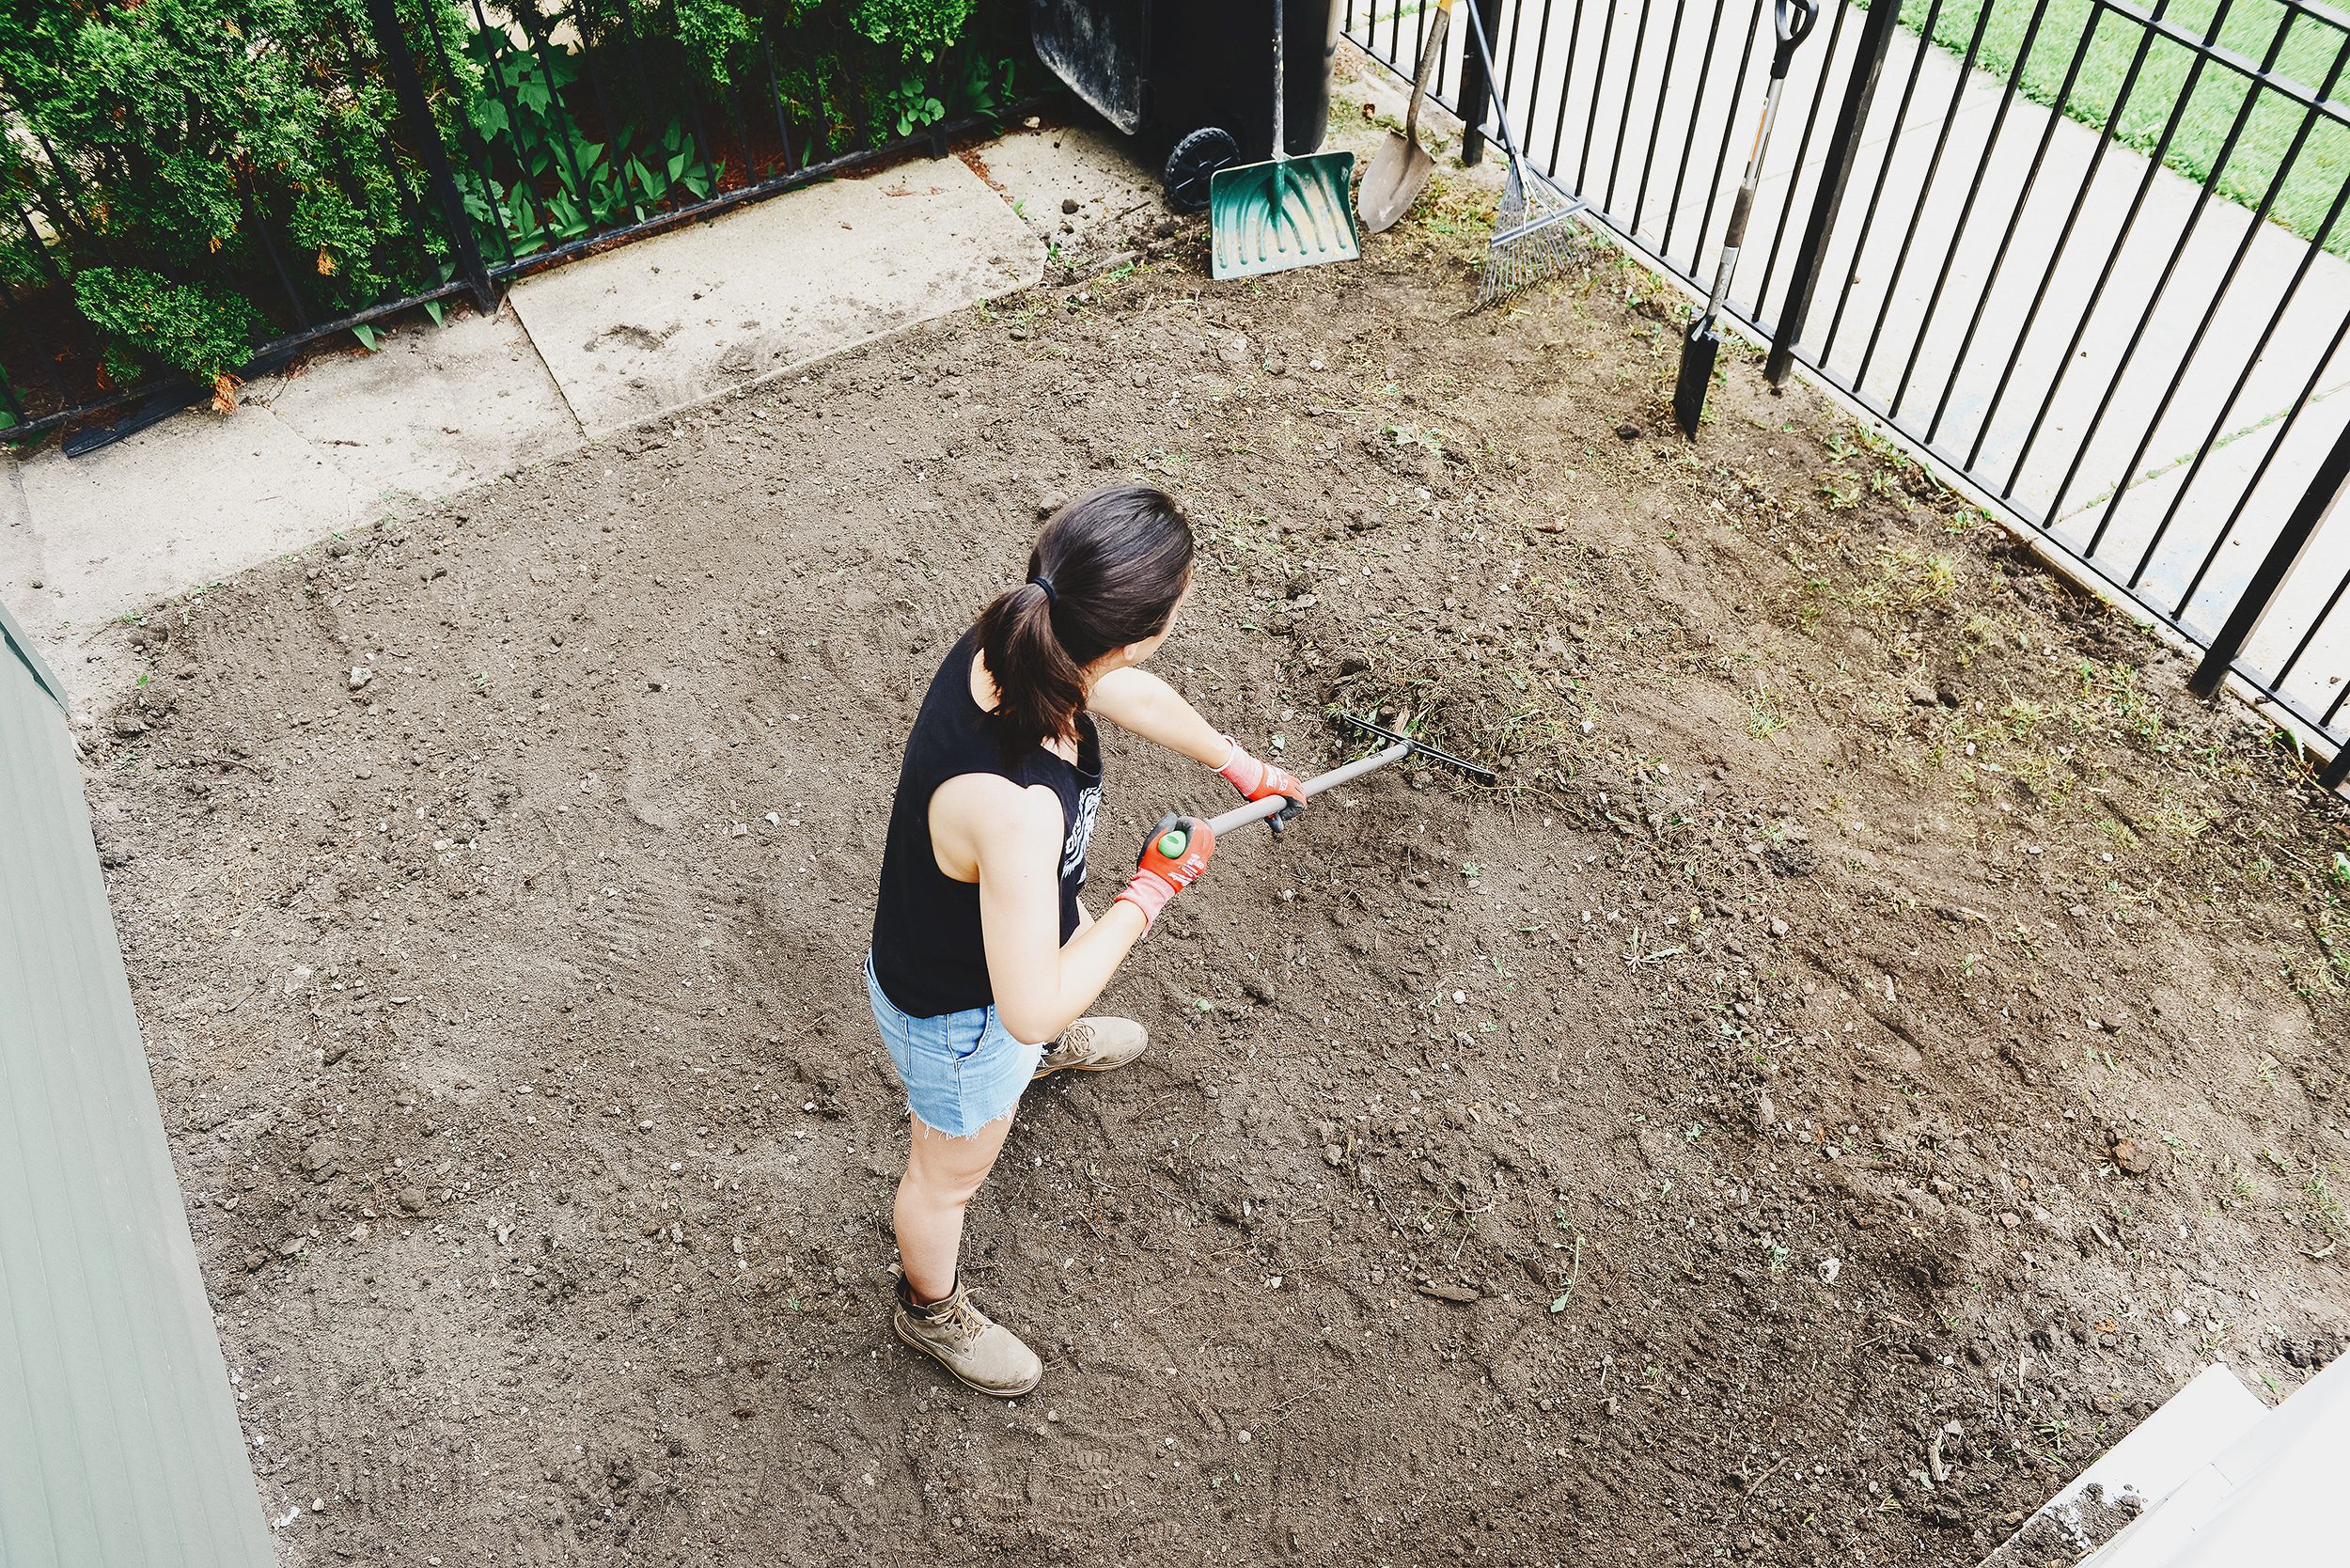
We picked up several rolls of sod from Lowe’s, and to say that I’m now sod’s biggest fan would be an understatement! It felt like cheating. It was almost too easy.
After creating the area where we wanted to grow shrubs and plants, I simply roughed up the soil beneath the sod and laid my pieces as close together as possible. I used a knife to cut around the fence railings and along the curvature of the garden. And… that was it. Instant grass! We’ve been watering every day for several weeks now, and the roots are long (we peeked underneath; we couldn’t help ourselves), and it’s taking to our yard very well.

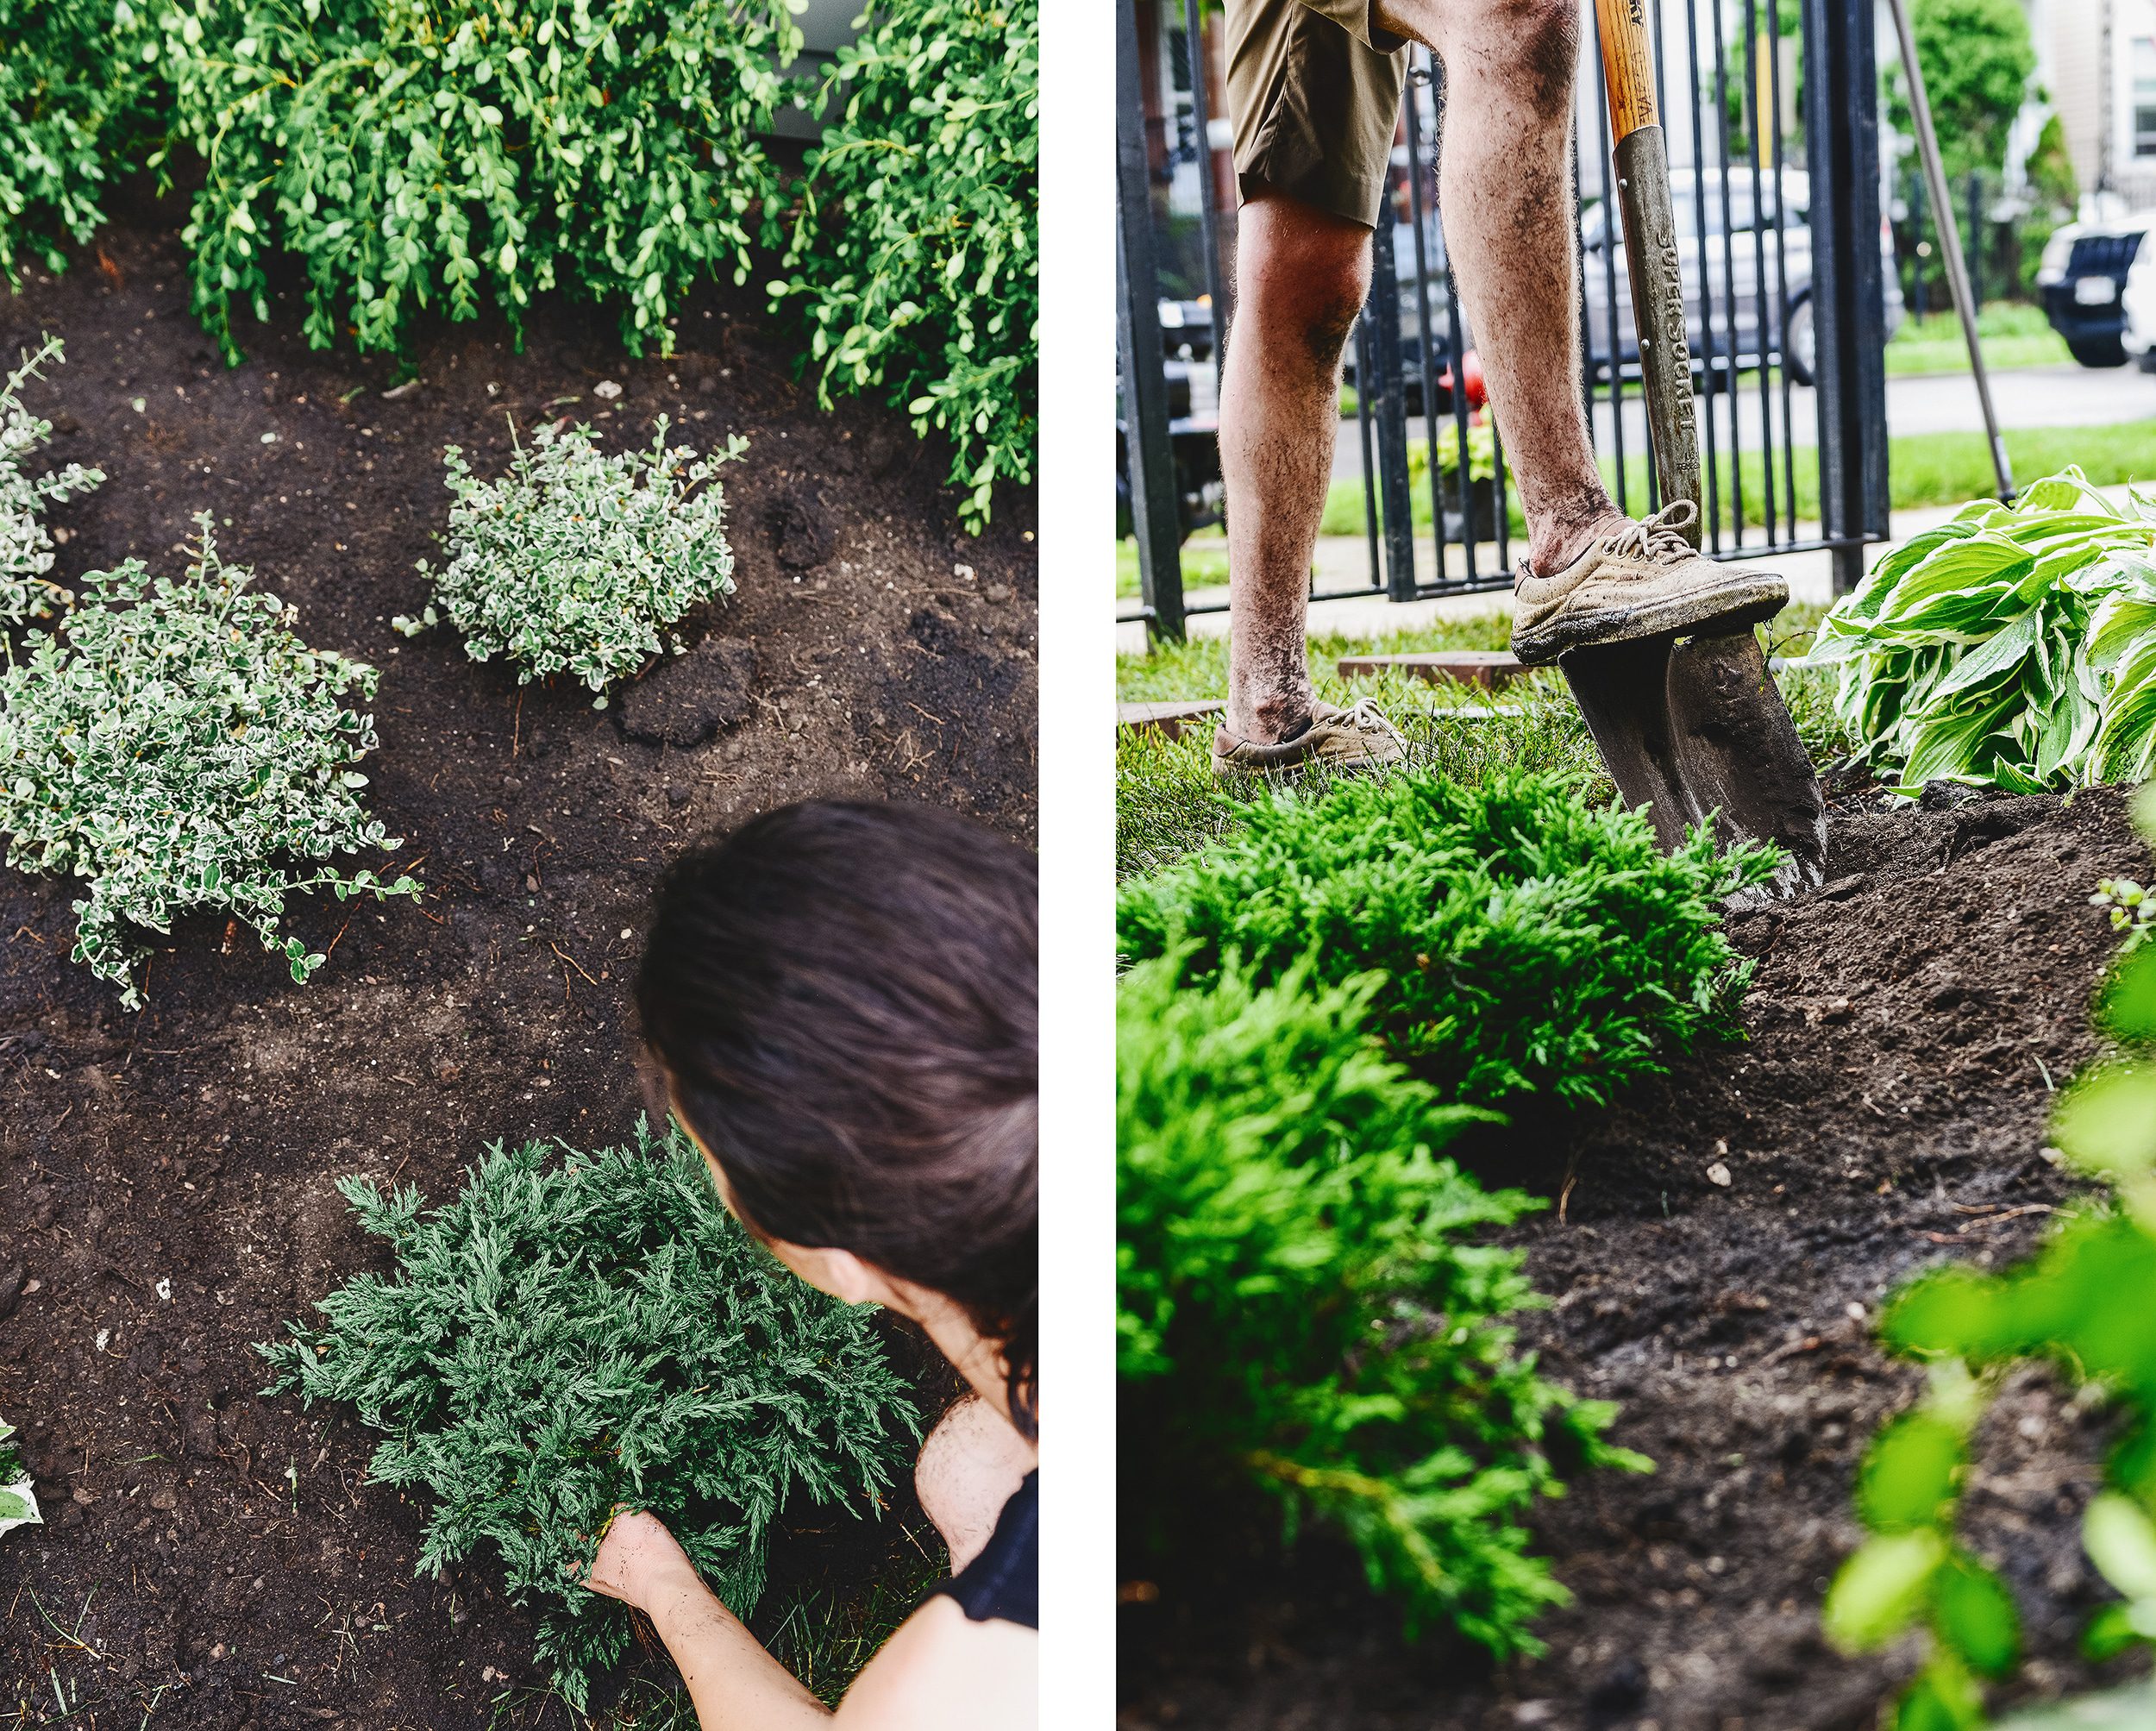
Meanwhile, Scott began digging up the garden to make room for boxwoods, hostas and creeping evergreens. Because sodding our small patch took virtually no time, I jumped in and nestled the plants into their final spot.
A Simple + Sweet Garden
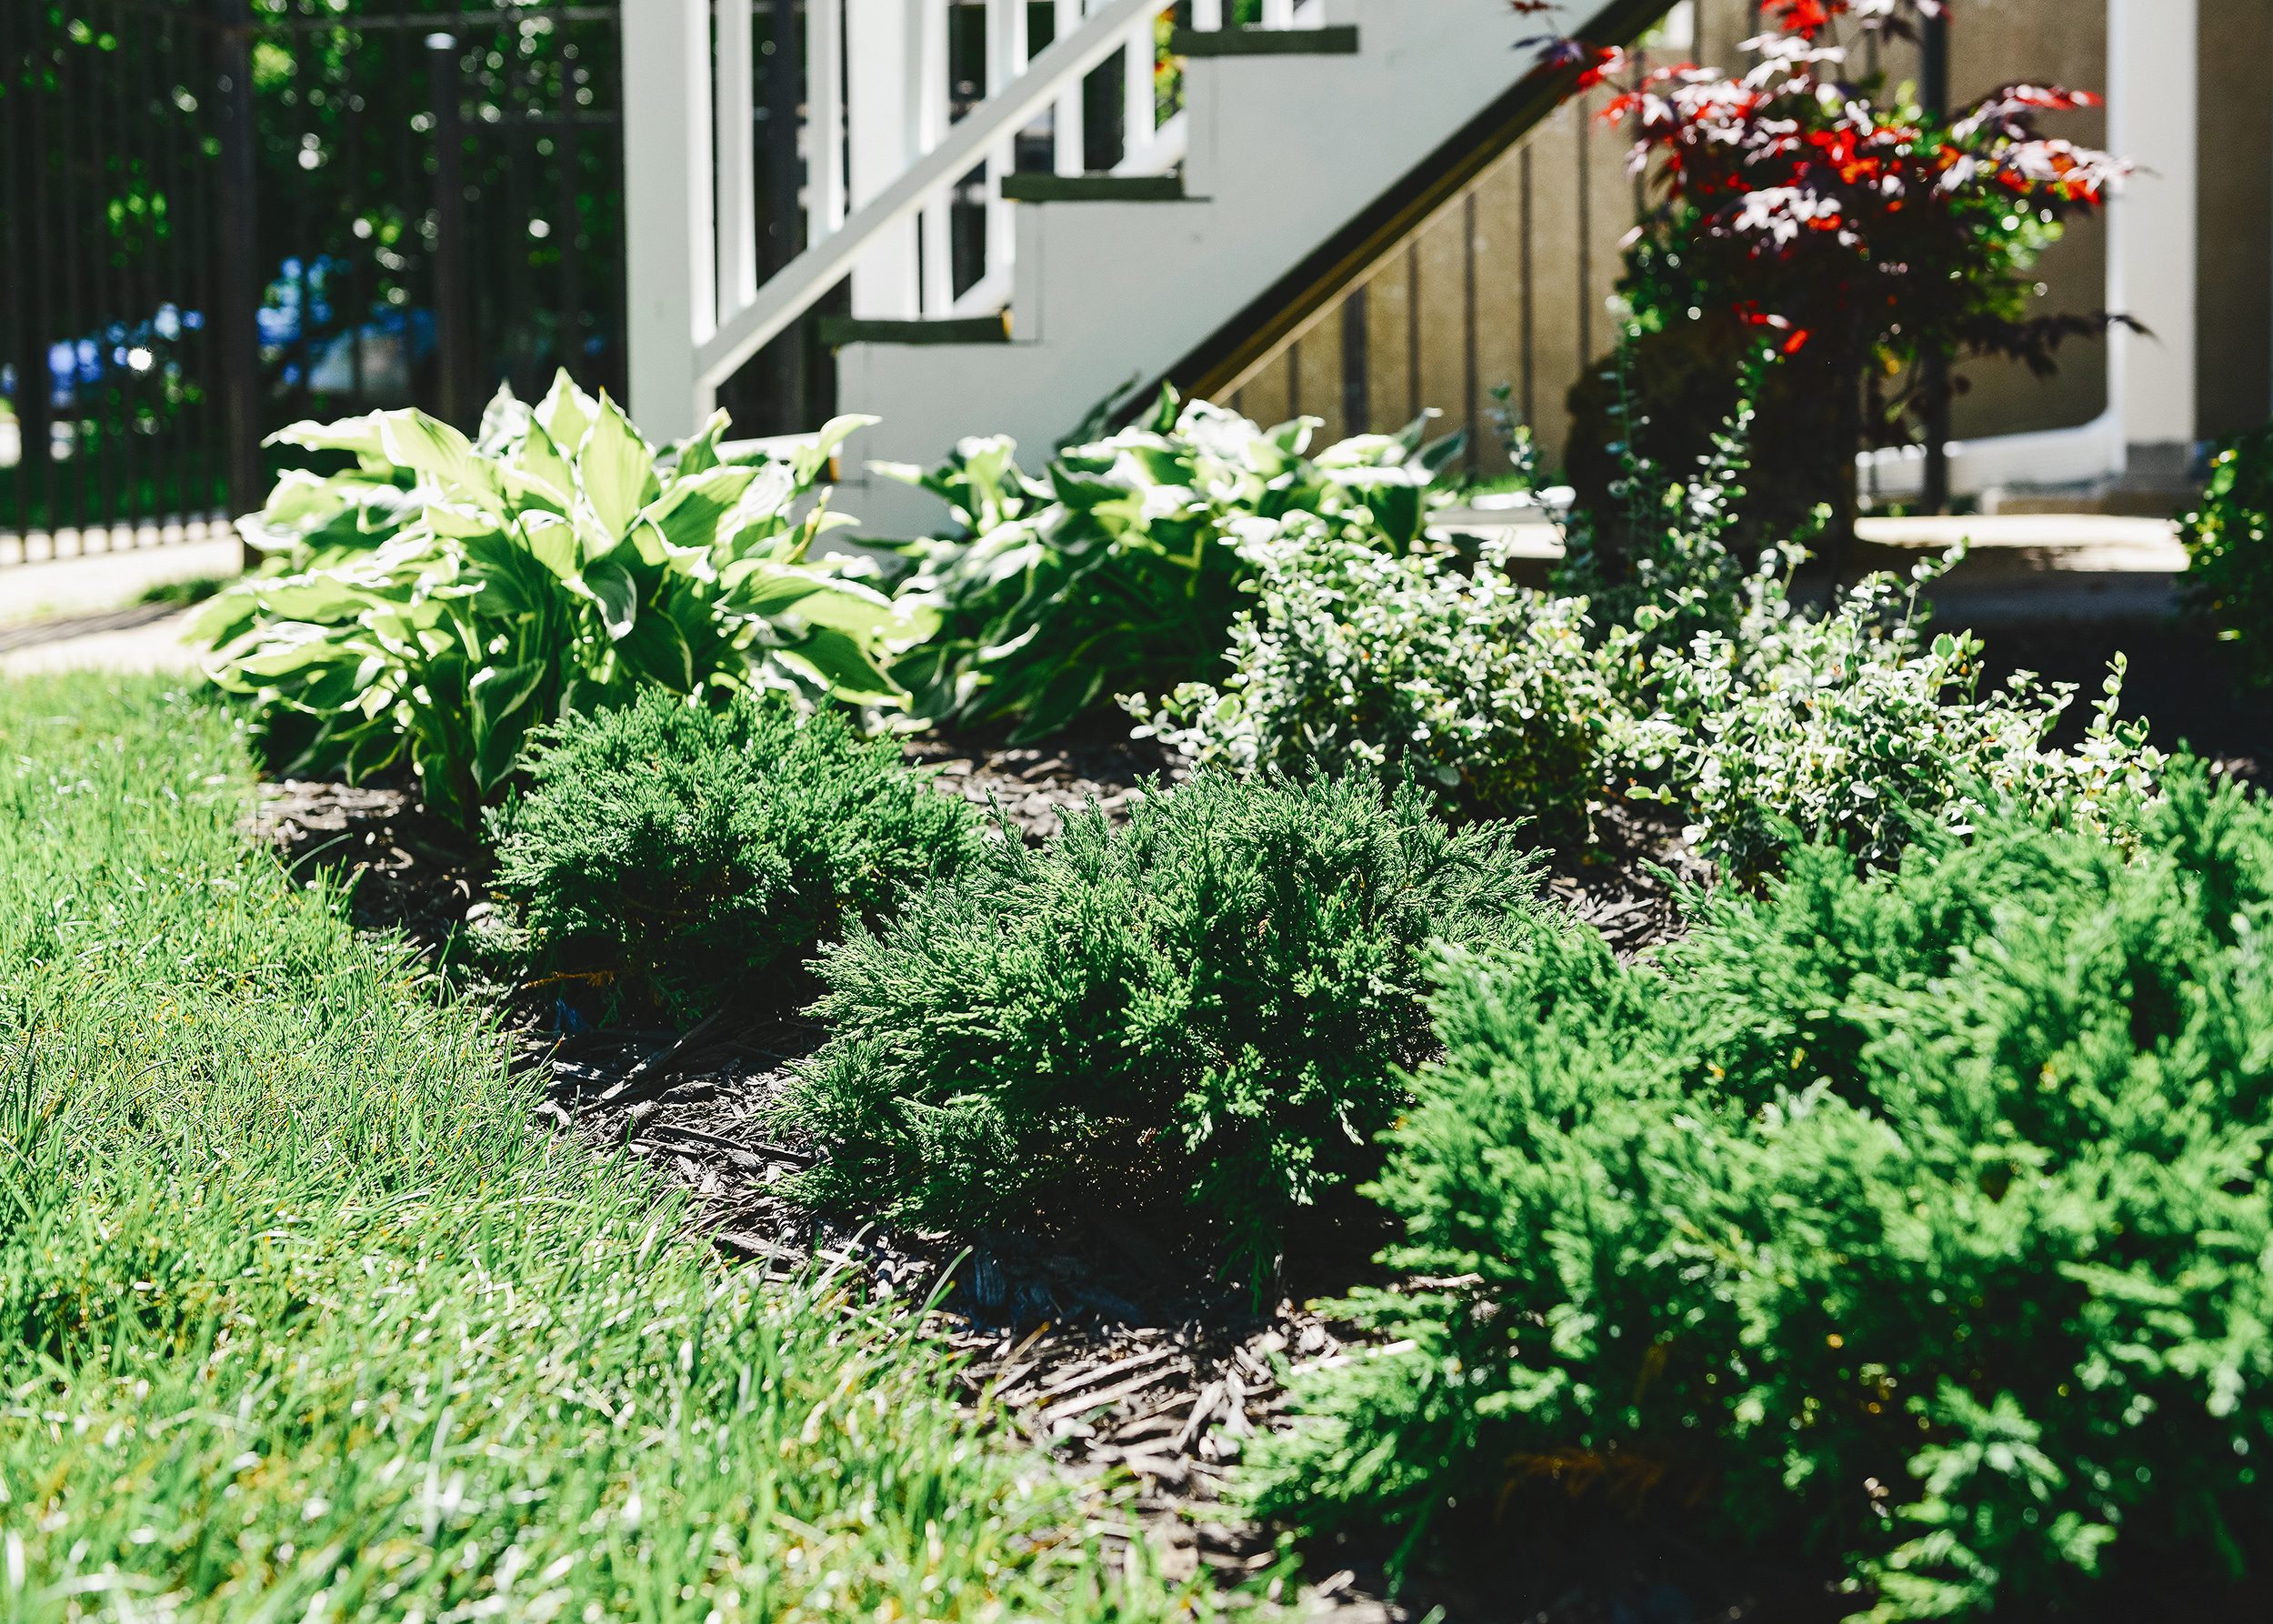
We created a curved garden bed, which naturally leads you from the front to the back yard. We used 12×12 pavers as a pathway, leveled them with the sod, and spaced them apart in a way that feels natural as you walk. (And now we’re totally thinking of doing the same for our own home!)
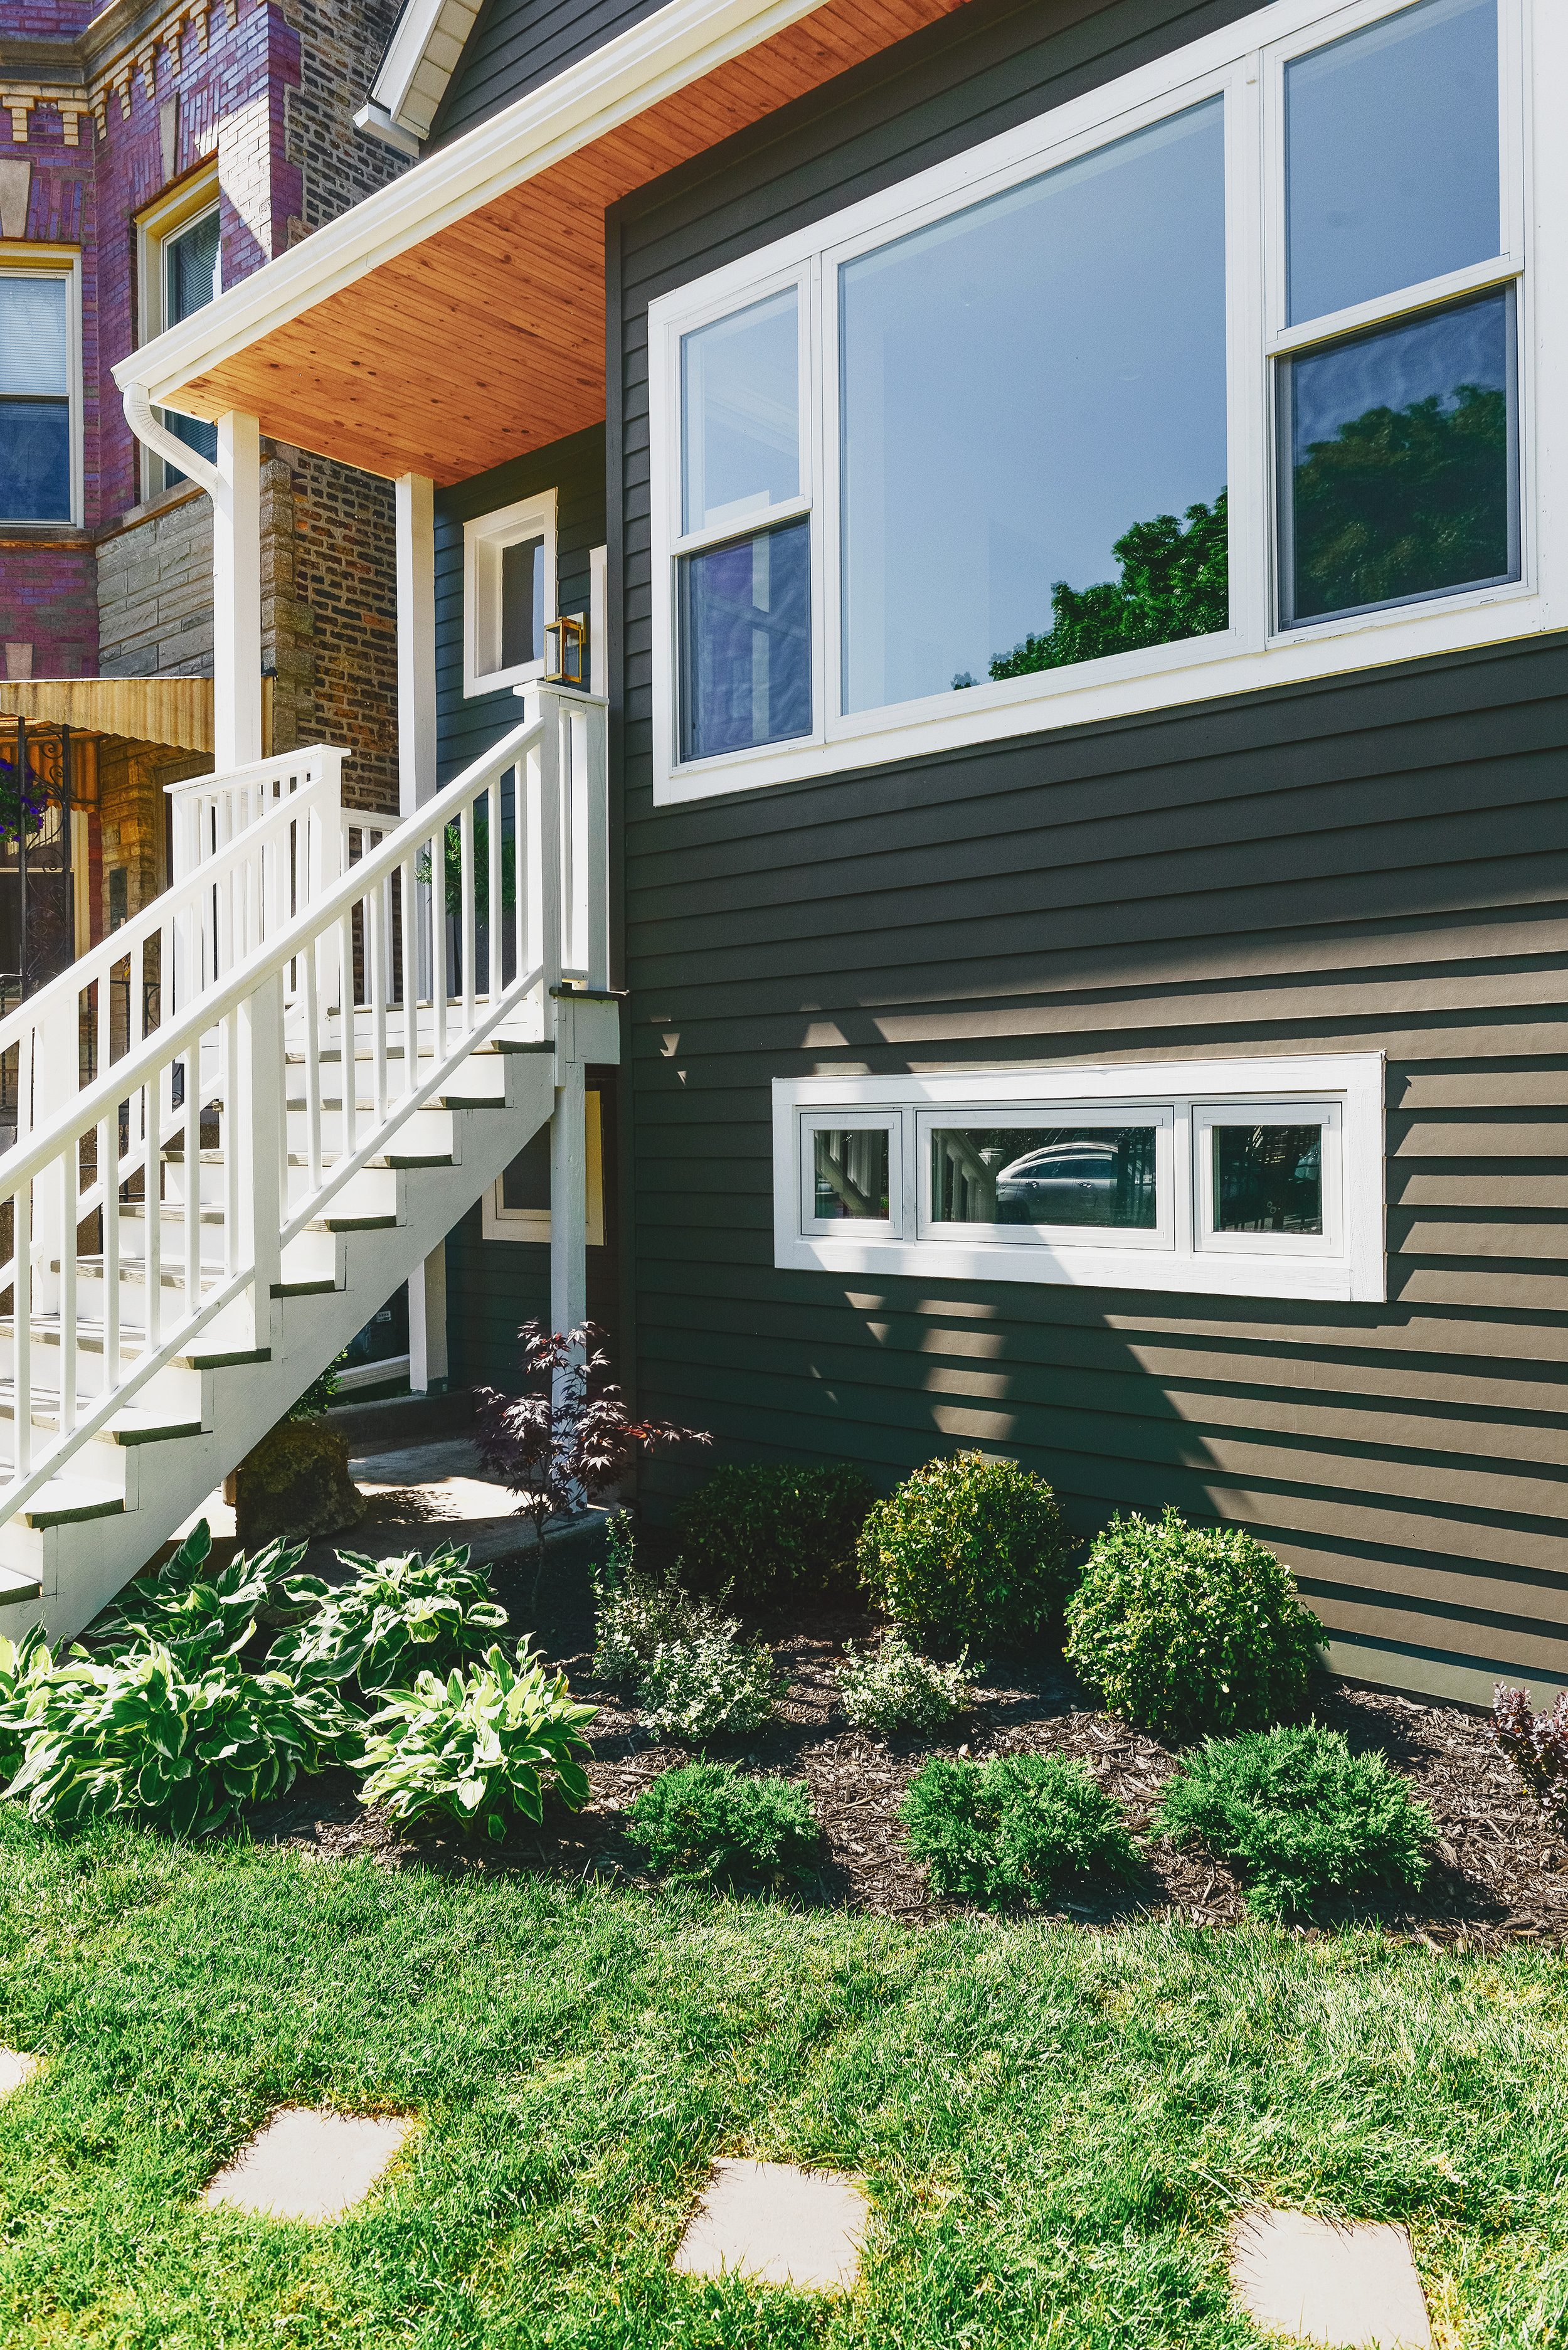
We’ve long loved the vibrant red leaves of a Japanese maple, and we knew the dark green backdrop of the Two Flat was the perfect spot for one to shine. Lowe’s had several varieties, but we read the care instructions until we found one that could handle full sun for this southern-facing yard.
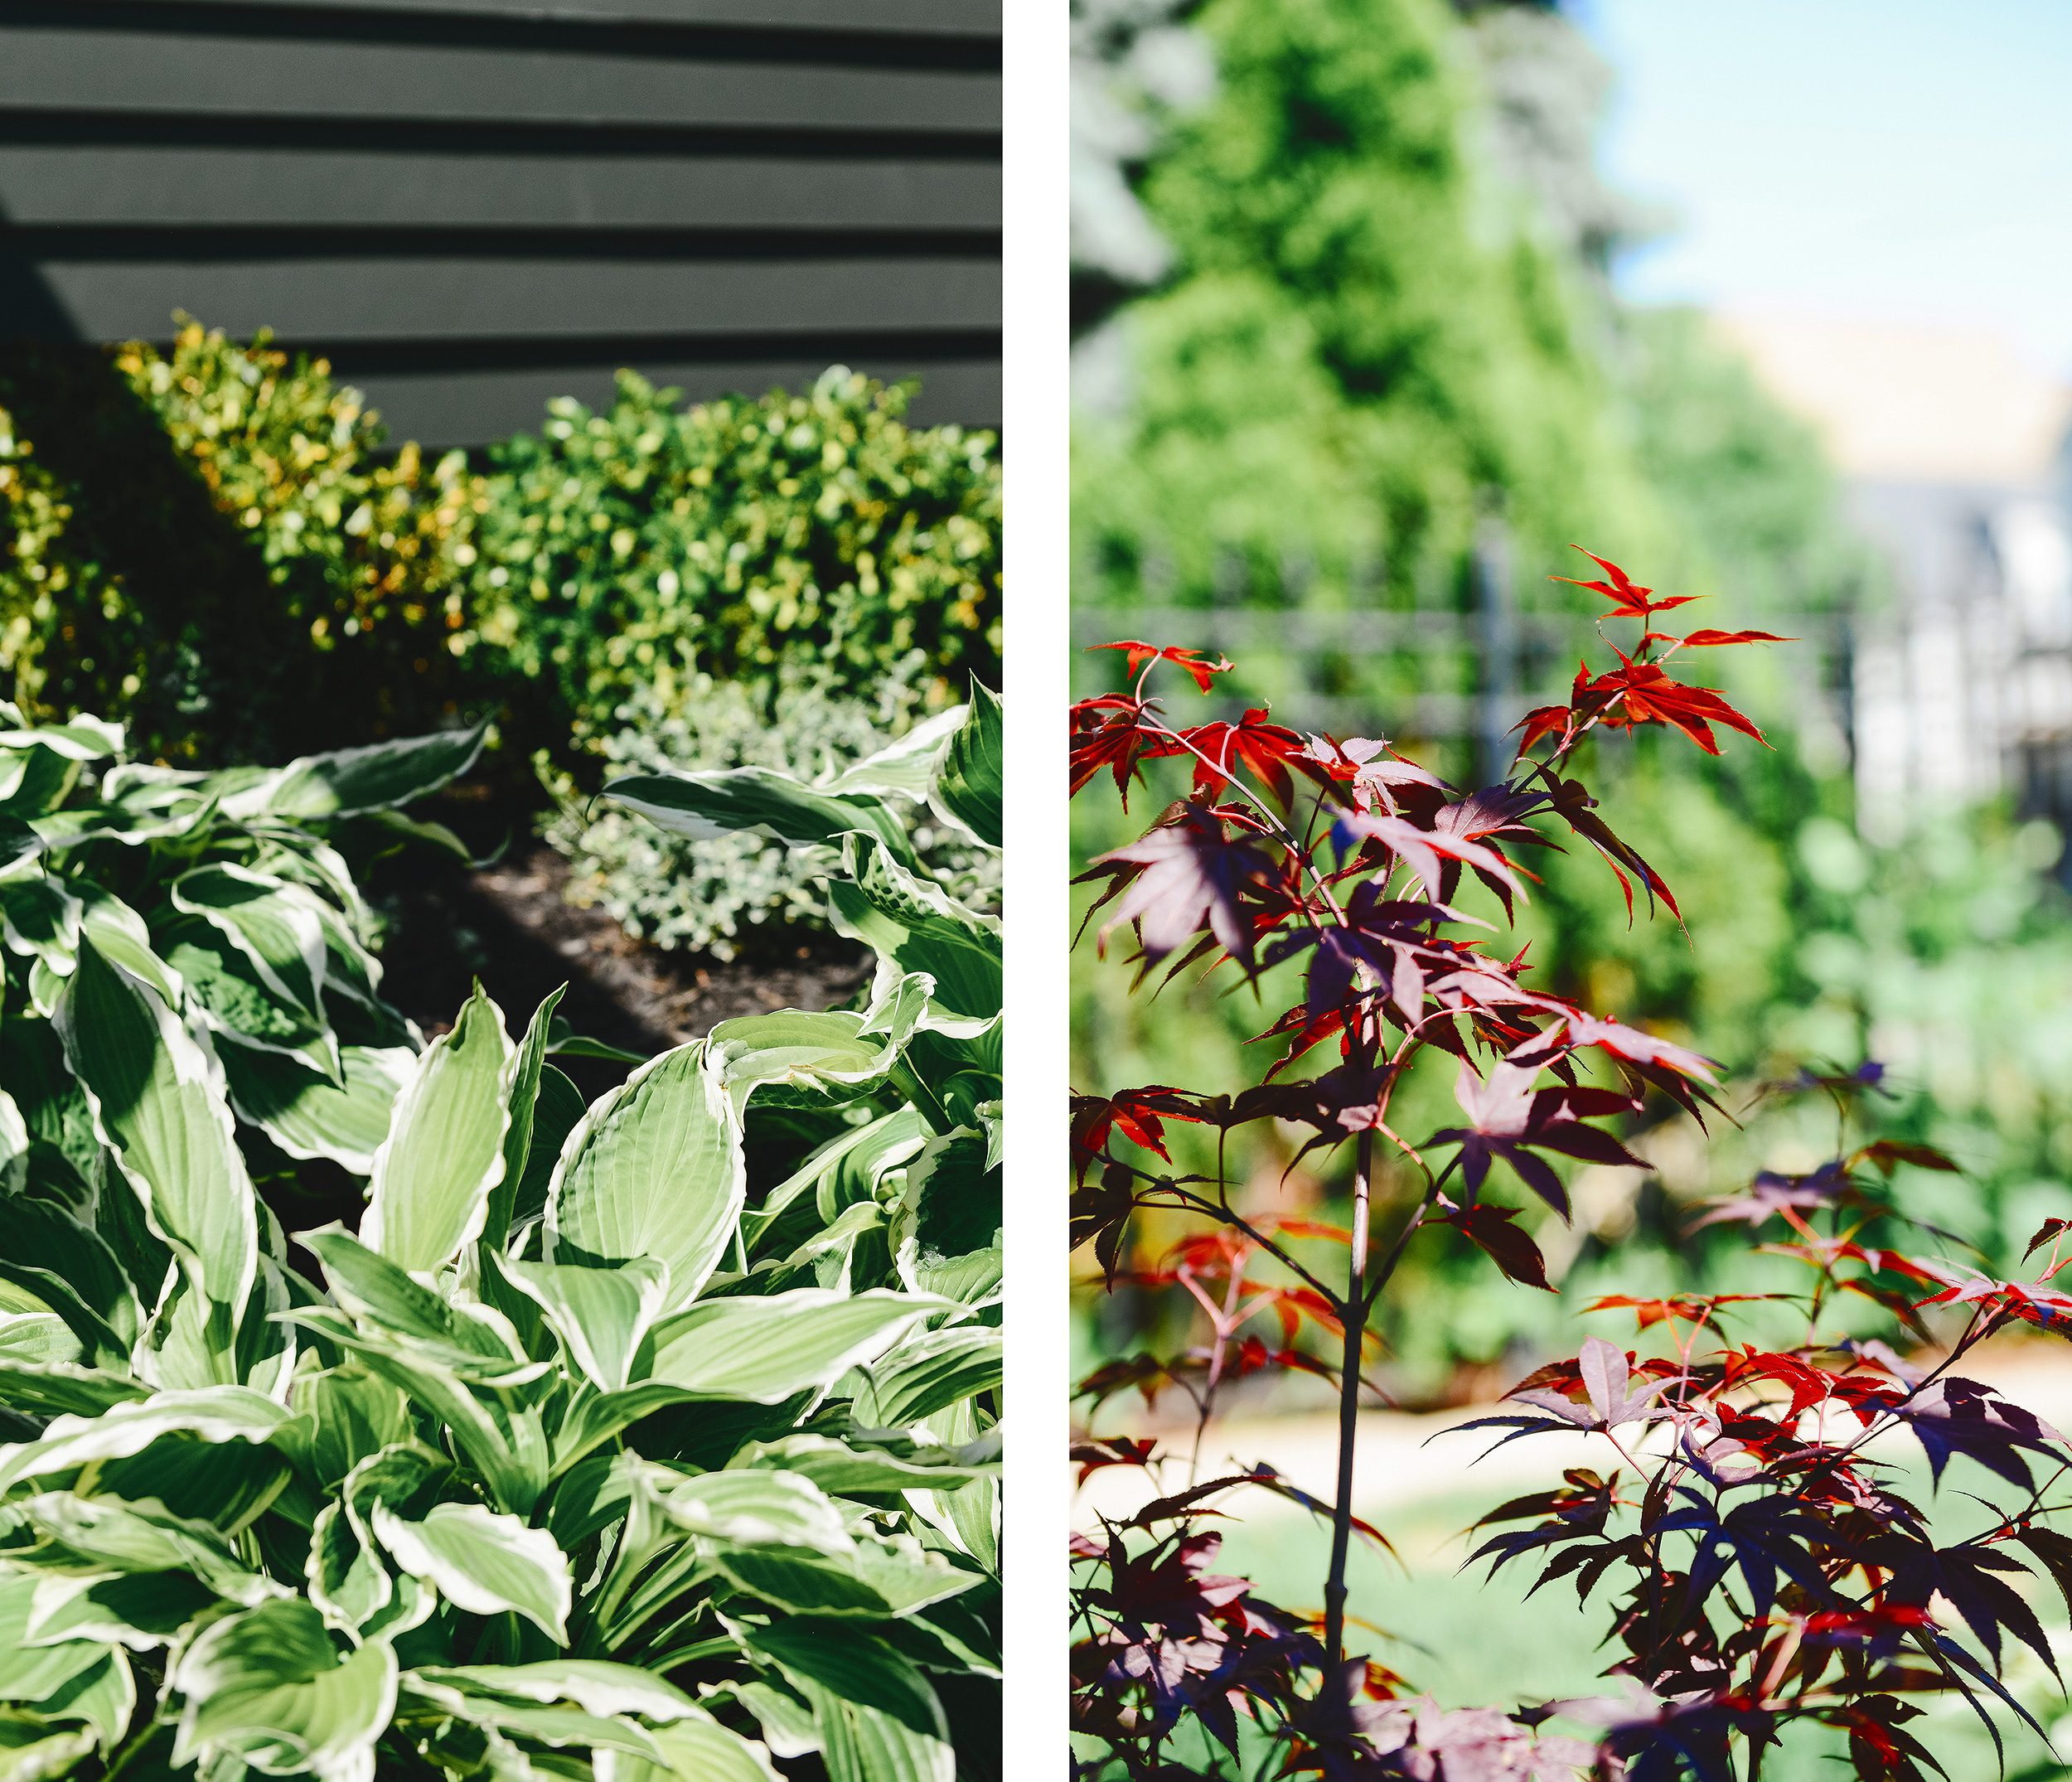
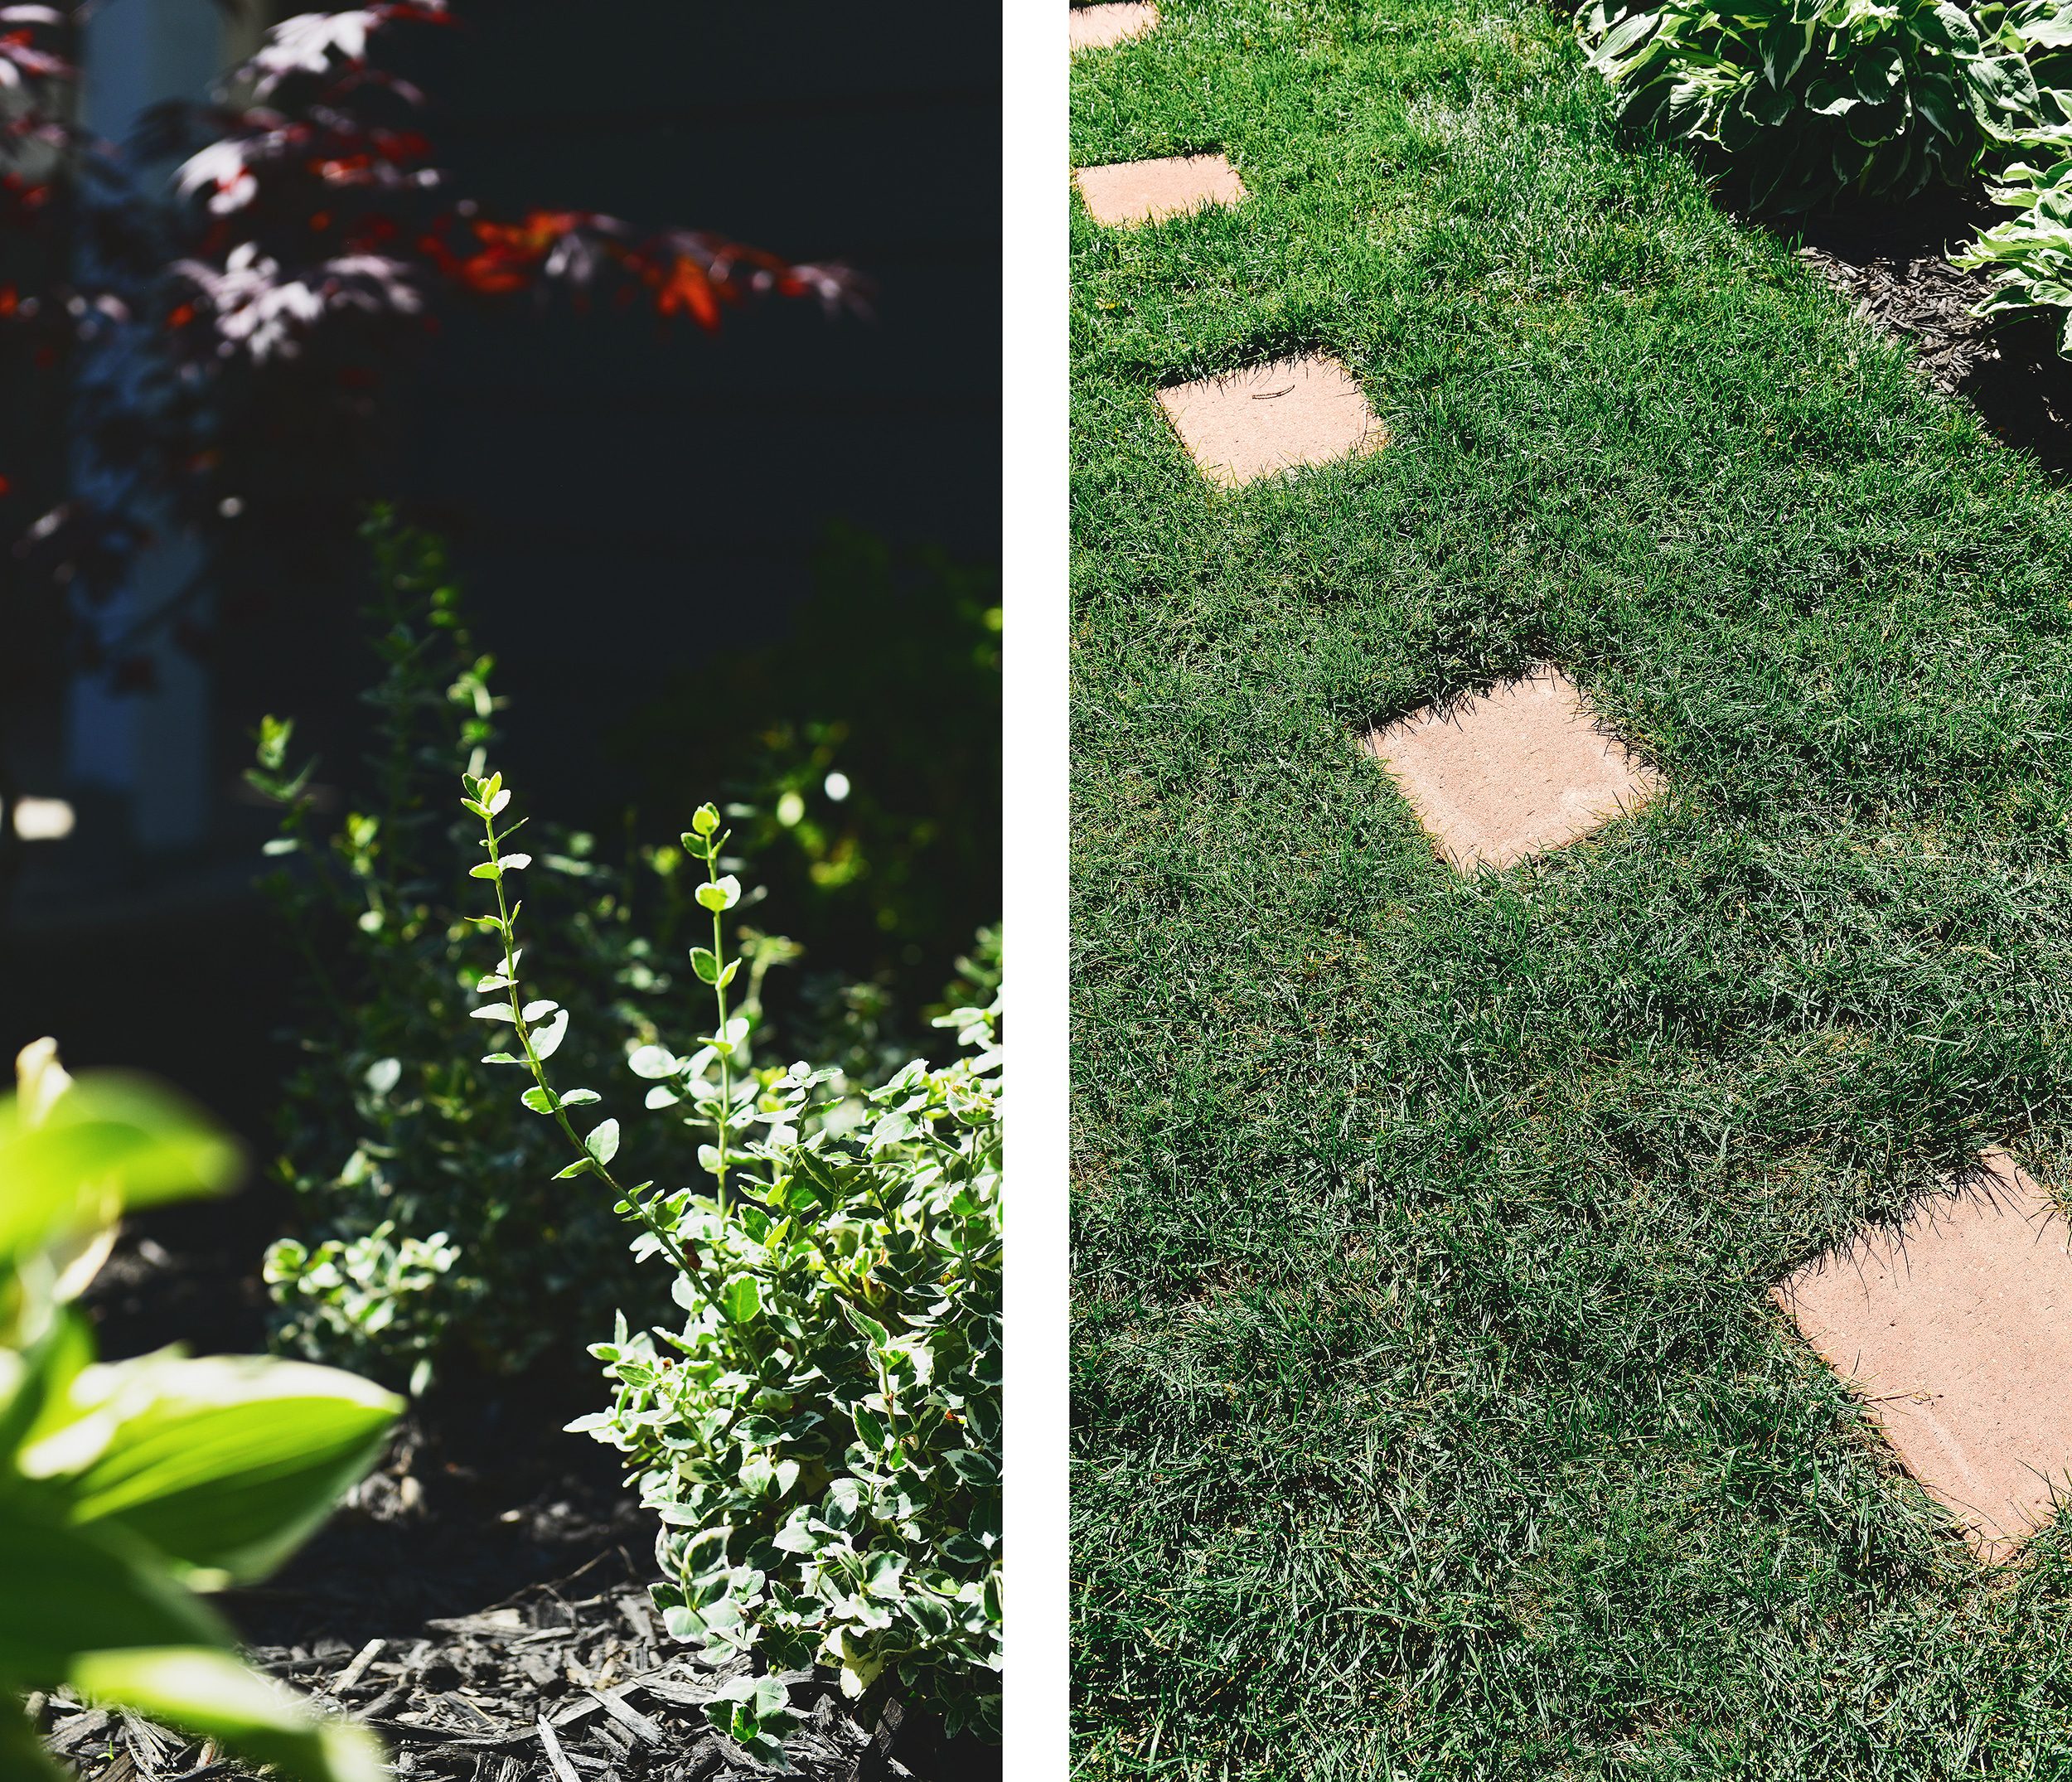
The boxwoods came from our friend’s yard (she no longer wanted them – yes, please!), and the hostas were popping up all over the Two Flat yard. We dug them up and gathered them in a group, and then we peppered in pretty euonymus bushes, juniper ground cover and a purple-y barberry shrub to play off of the Japanese Maple. Simple and sweet.
Our Cheery Front Porch
When I first told Scott that I was craving a red door, he pushed back. (Red? Like a Christmas combo?) But I was relentless, and I showed him photos of what I had in mind – something bright. Like, really bright. Like, if there was such a thing as fluorescent red, I’d want it brighter than that! He gave in (yes!), and after a bit of a debacle with my initial choice (which was Sherwin-Williams Real Red, but it sadly couldn’t be mixed in an exterior grade), we ended up coming home with Heartthrob SW 6188. And yeah, I’m in love.

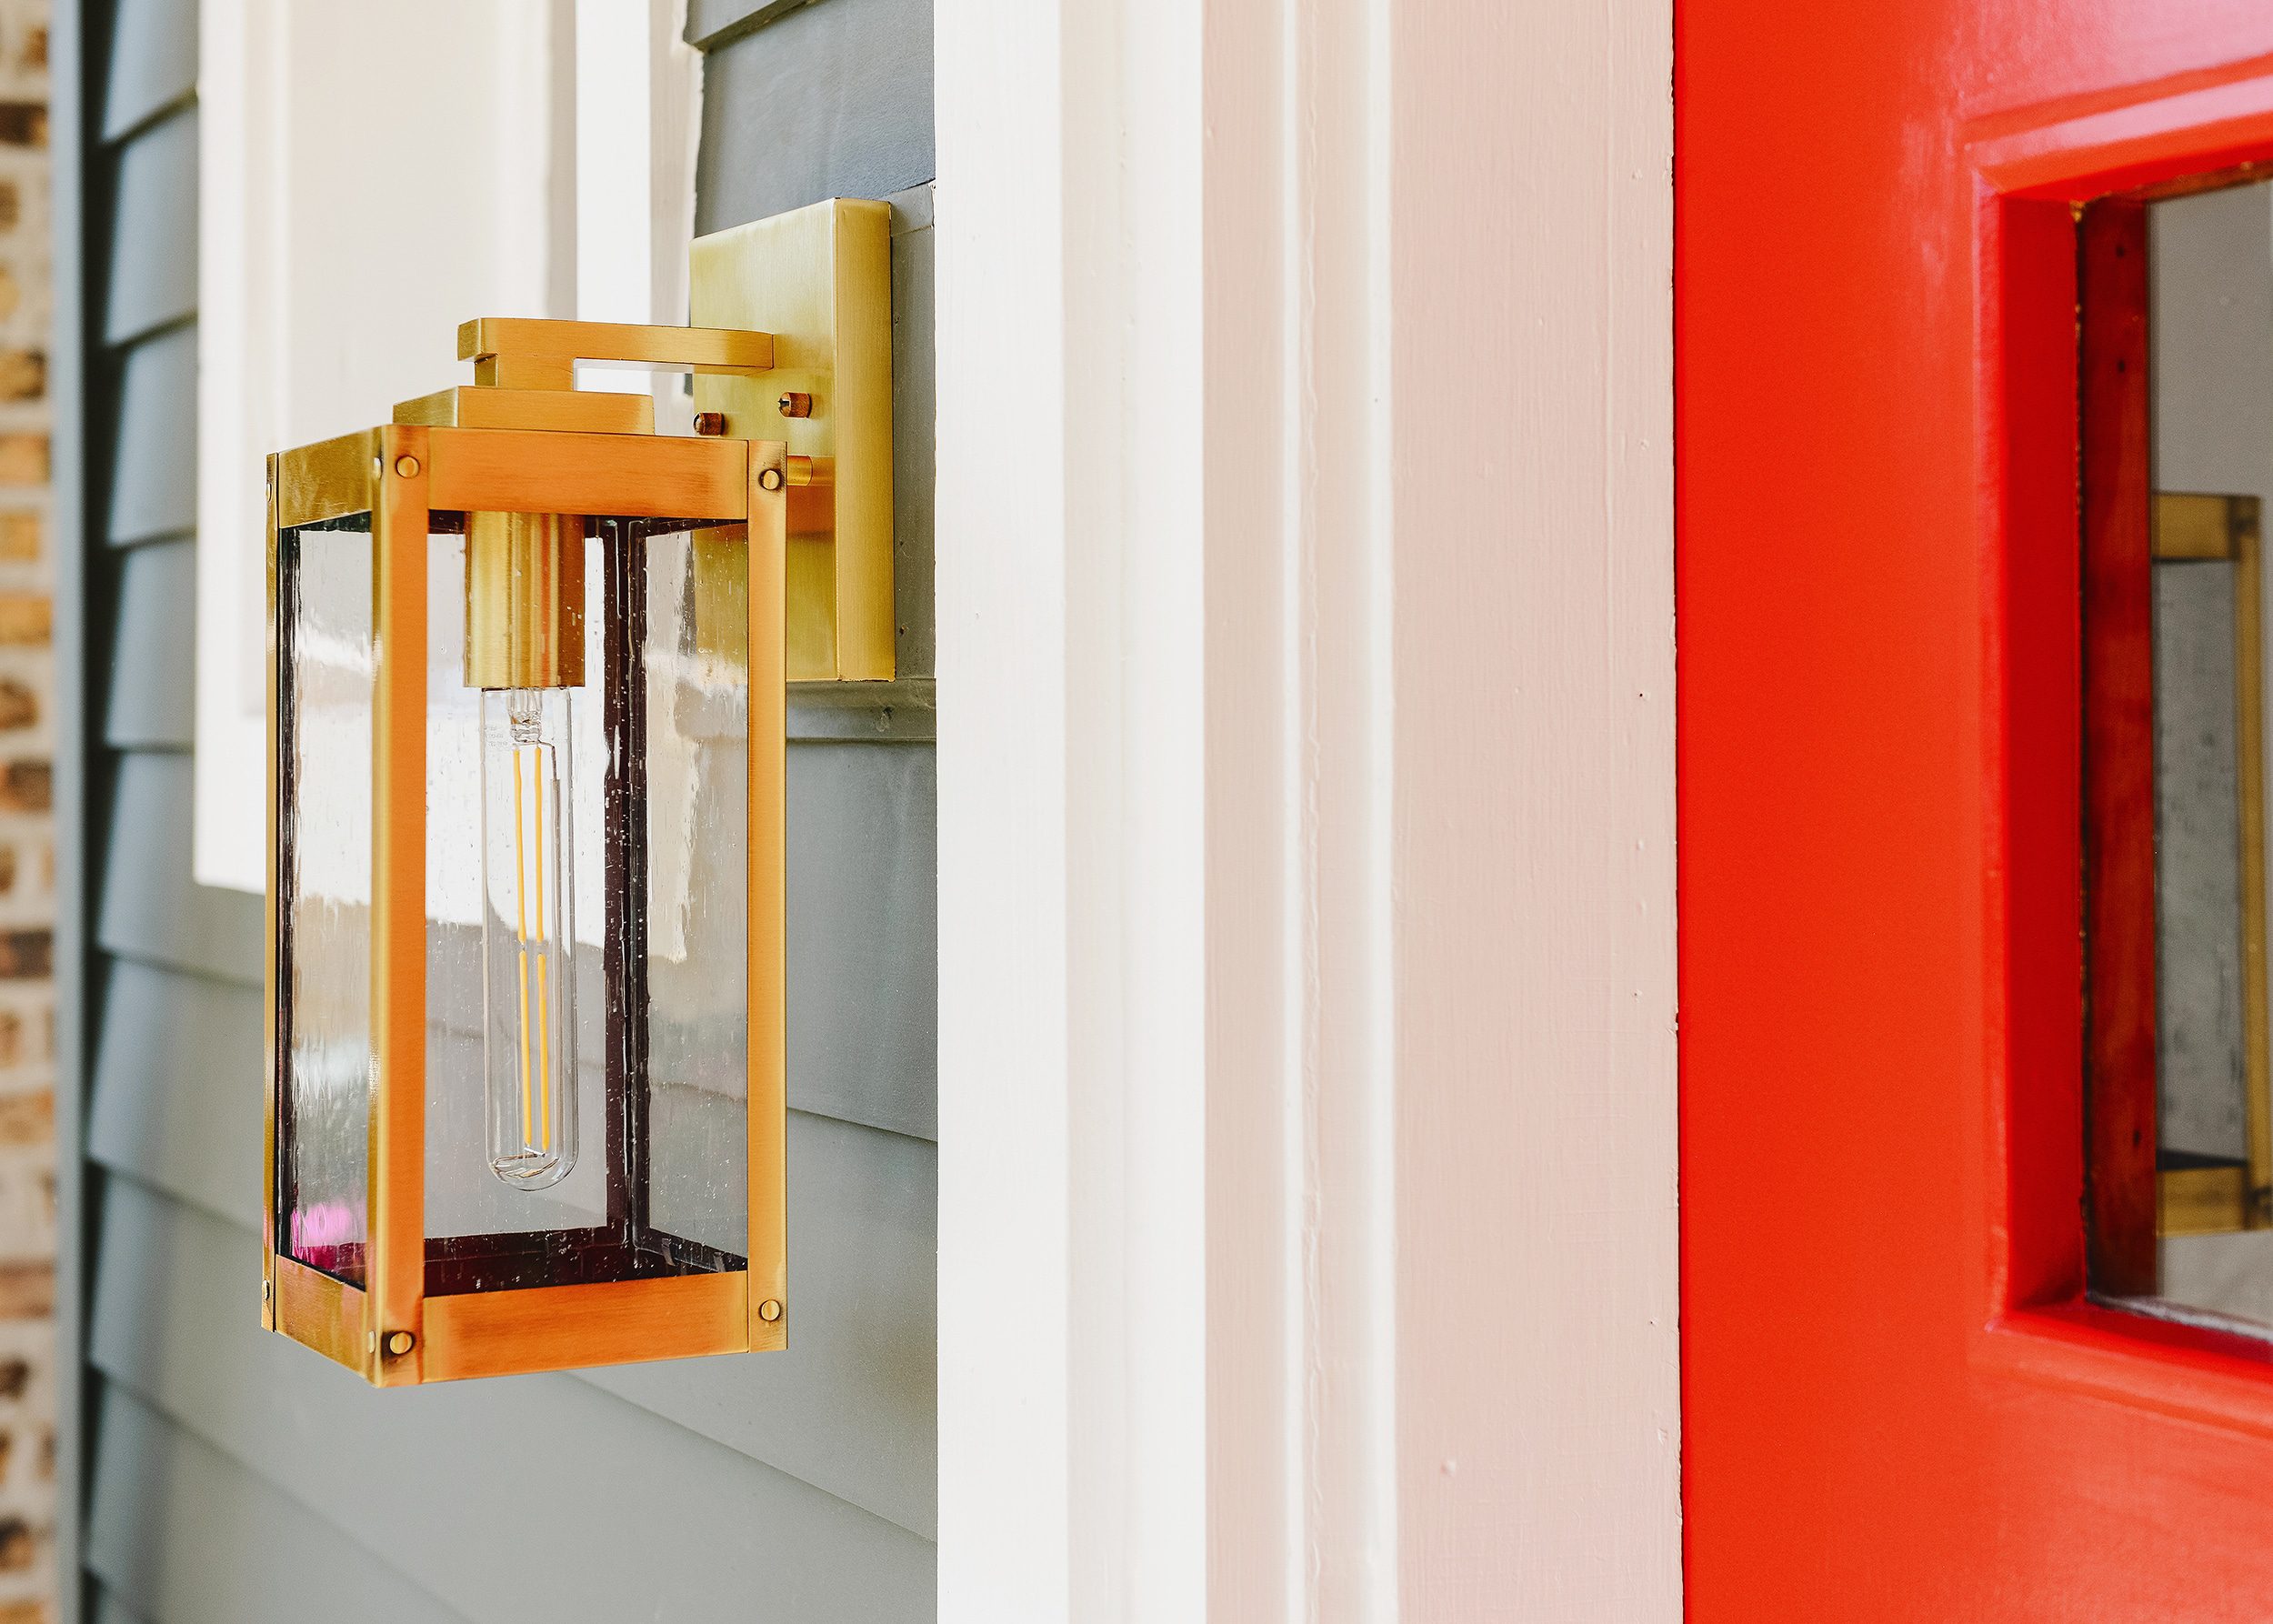
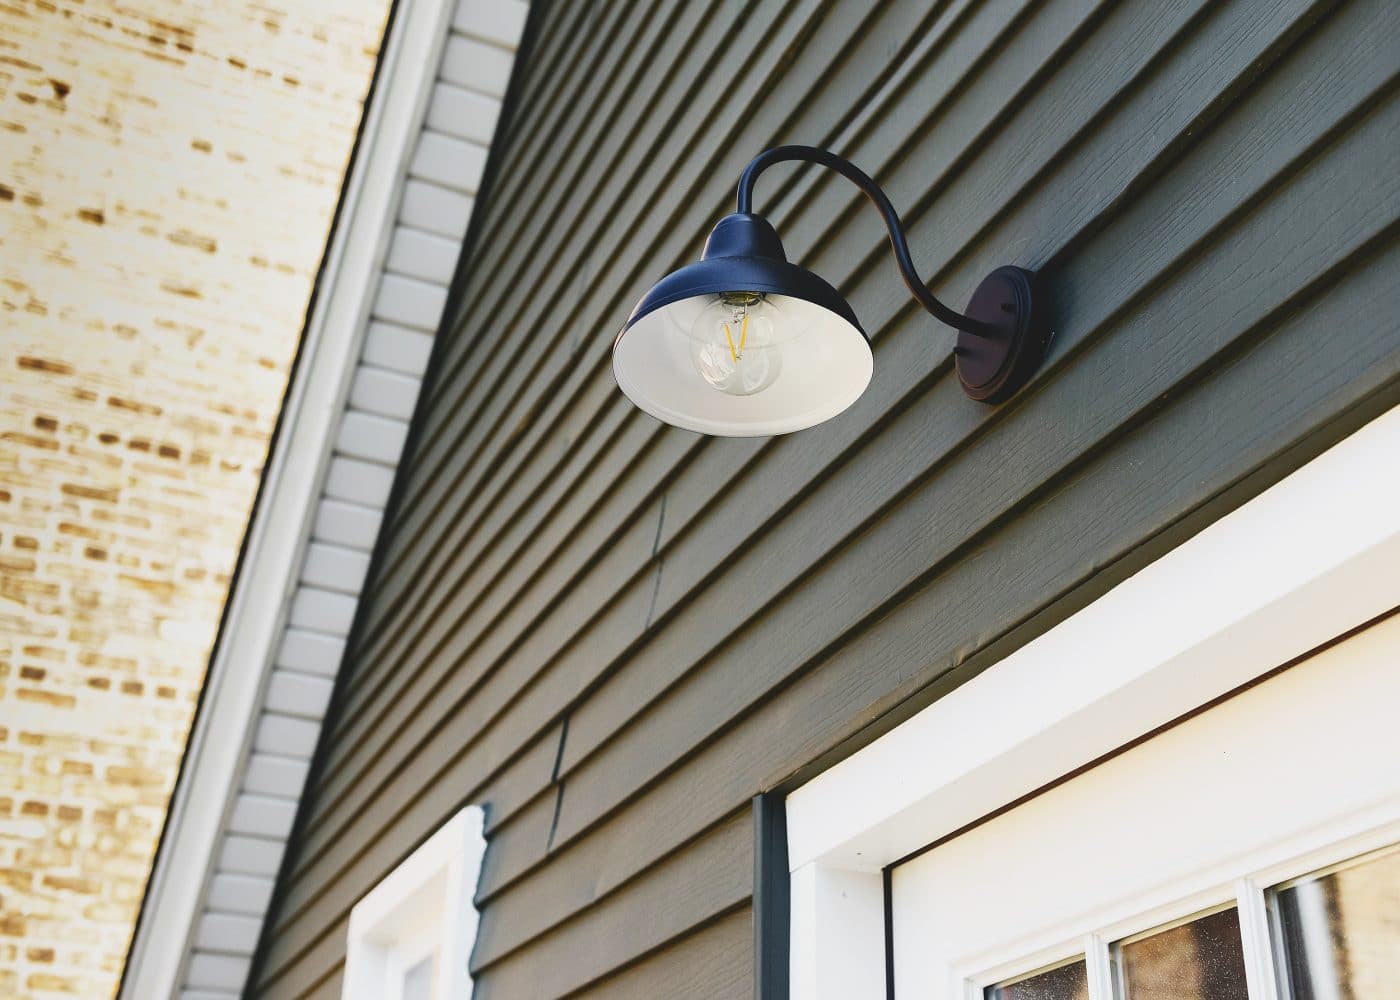
For a touch of shine, we paired it this antique brass sconce, a tall resin planter filled with leafy juniper and a braided coir doormat. All classic elements, but when pushed to their limits – I’m looking at you, vibrant red door! – they feel fresh. Quirky.
The Back Deck
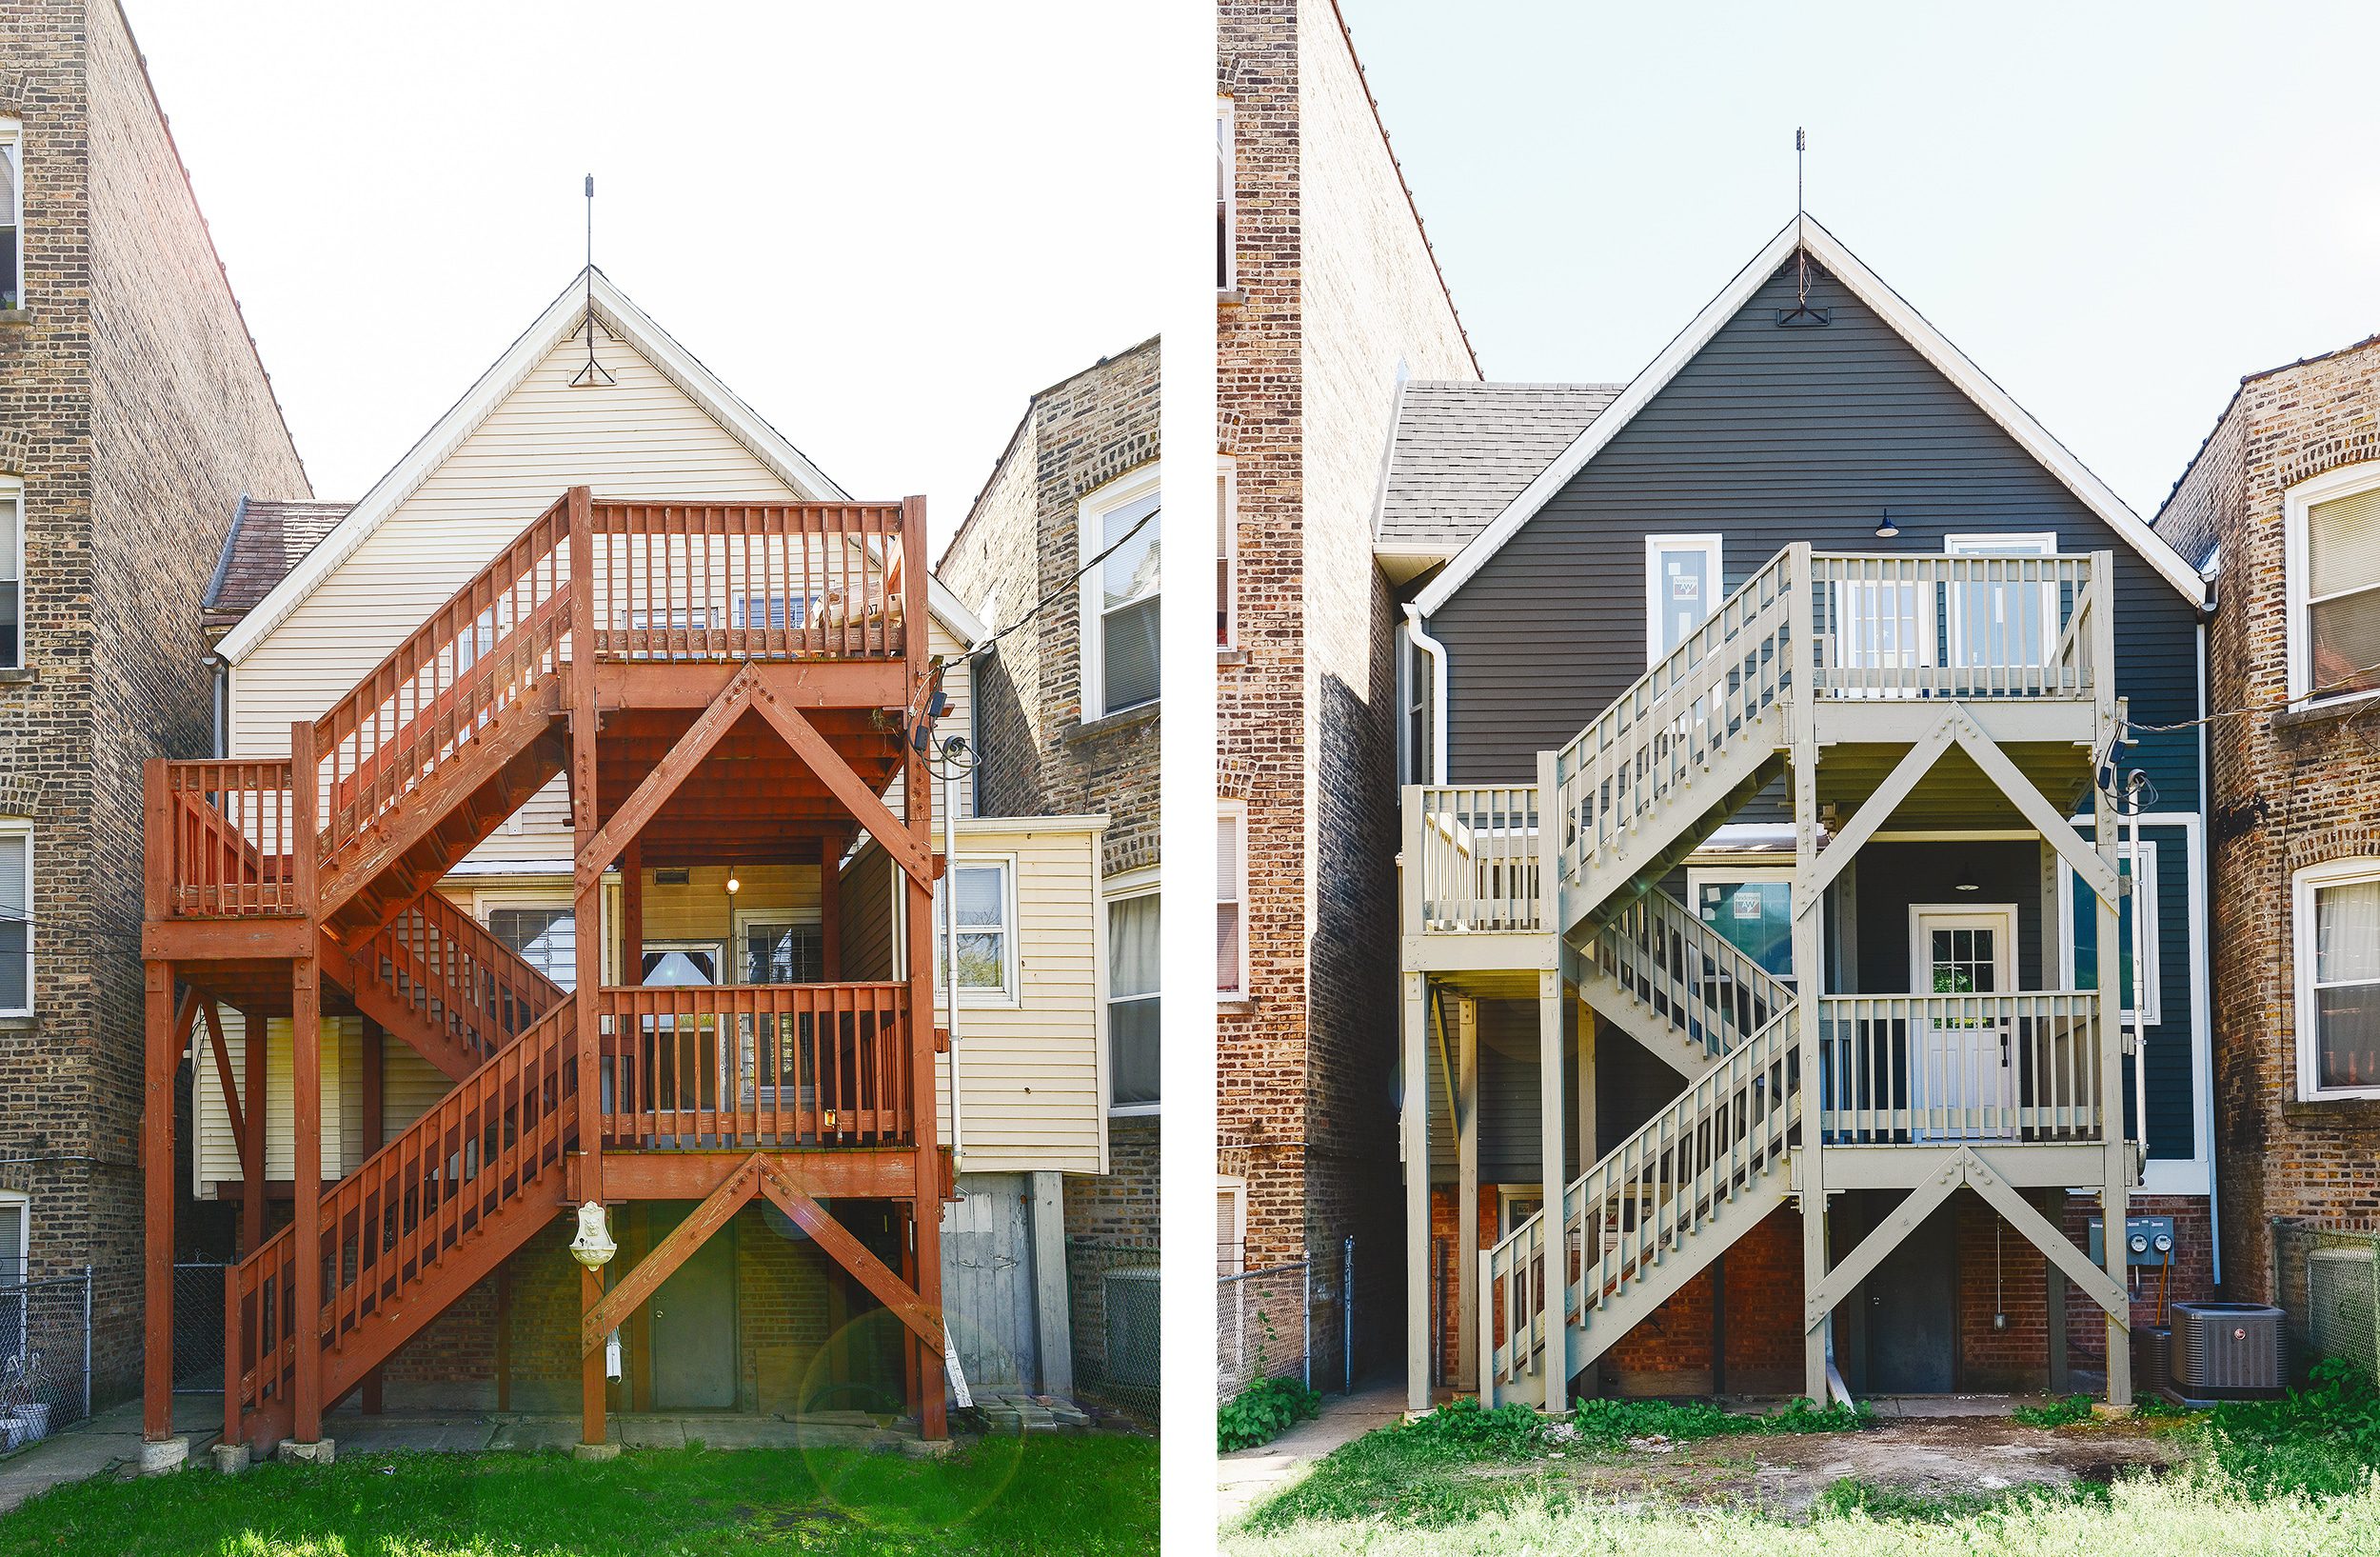
Chicago’s back decks are a staple for any two (or three) flat, and yes, they’re monstrous – but necessary. Not only do they provide a back entrance/exit for each unit, but there’s often times enough space to set up a bistro table and grill. And Chicagoans love their outdoor space, as small as they might be.
We did the best we could with what we had, and we carried over the same solid stain from the front, Valspar November Gray. In this side-by-side before and after, you can see where we removed the giant pantry on the right side of the house! We still have work to do in the back yard (it’s been through a lot during the renovation process), but we’ll get there in time.
Before | After
If we get closer, you can see the gooseneck lighting we added above each back door. I couldn’t believe the price – $40 for two! – and we were surprised at how much we loved them. We used these LED bulbs.
A Warm Welcome
It’s hard to believe how far the exterior of our Two Flat has come in the last year. Our neighbors have been cheering us on (they’re all incredibly kind), which has been the best motivation to keep moving forward. It’s been a labor of love, and worth every second of our time and dedication.
Lowe’s Items In This Post:
Shade Grown SW 6188 mixed to Valspar Duramax exterior paint in flat (main) | Pure White SW 7005 mixed to HGTV Home by Sherwin-Williams in satin (trim) | Heartthrob SW 6866 (door) | Valspar Solid Exterior Stain in November Gray (porch) | Thompson’s Water Seal Timber Brown Exterior Transparent Stain (porch ceiling) | coir doormat | tall resin planter + sea green juniper plant | antique brass outdoor sconce | outdoor gooseneck sconces + LED bulbs | euonymus bushes | juniper ground cover | barberry shrub | Japanese Maple


OMG!!!!! Amazing!!!!! It looks so good. I love love love that you went bold with the door but kept the rest more classic. I also love that you kept the wood beadboard for the porch and stained it instead of painting it. That is on a list of one days for our bungalow, to take off the siding under our roof overhang and see if the original wood is still there. Beautiful job!!!
We hope to do that to our own front porch ceiling one of these days as well!
What a lovely transformation! It’s looking beautiful, Kim and Scott! I’m sure the neighbors are thrilled.
They’re very happy. ????
This is the most beautiful thing I’ve ever seen!
Thank you!
Wow, gorgeous, I want to live there!
We hope to have it available to rent by the end of the summer!
She’s a beauty!
Aaaaaah! Even better than I could have imagined. So thrilled for you all – and now I want to paint something green!
WOW…beautiful!
I grew up in Chicago and am familiar with the style two-flat that y’all have. Honestly, I’ve never been a fan and haven’t been able to really catch the vision you’ve had for the exterior of the building. And then this morning I literally gasped when I saw that first picture. It is GORGEOUS!! I think that style has always looked so chopped up to me and you made it so cohesive and classic and cheerful! Well done, you guys. I look forward to seeing how the rest of your vision for the house comes together. Thanks for sharing the process!
WOW! I am so impressed. I was a little thrown when I saw the red door on your Instagram stories, but it totally works. What a transformation!
Scott was thrown when I suggested it – haha – but once I get an idea in my head…
LOVE the red door! The whole thing looks soooo good… I bet your neighbors are cheering you on… because it looks fantastic!
So beautiful! I love the color!!!
While I was reading this, I was wondering how it would look with the color all the way up into the gable. Then I saw the back of the house. I like that better. Just wondering what your thinking was on your choice.
We went back and forth on that for quite a while. We took into account the other houses in the area, how they were painted and what felt more traditional.
Is that a regional thing? I haven’t seen homes painted 2 tone. I personally prefer all one color but am guessing my preference is based on what I’m used to in the South. I love the pop of color on the door.
I definitely agree about taking the green all the way up to the roofline in the front – looks too chopped up with the white (more so especially come winter). Cedar or a more decorative shingle would have looked nice on the new roof above front porch & window since it’s such a focal point….nice transformation otherwise!
Love the new look! A red door always has my heart. That was one of the first things I did to our front door! Also, just ordered the utility sink used in the tree house bathroom to put in the remodel of the main bathroom of our 1855 farmhouse here in the western suburbs! The minute I saw what you did, I knew that was what we needed! Can’t wait to make it happen!
Wow! It looks so so so incredible!!! Seriously, you chose perfectly. Looks like it was always meant to be those colors.
Meanwhile I am over here having fun learning about the backs of Chicago houses and how these two-story decks are treasured! Fascinating!
They’re necessary beasts!
What a beautiful transformation. The architecture really shines now!!
Stunning!
Ahhh! It’s so stinking adorable! Awesome job :)
Love the color scheme, especially that front door! I’m curious though, what led you to plant the Japanese maple so close to the house? Or is it not as close as it appears? (In Georgia, they tend to grow pretty quickly.)
It’s not as close as it looks! And we chose one that doesn’t get too tall and wide. ????
The red door totally makes this! I also love that you left the wood ceiling of the porch alone. Really beautiful transformation.
That is so pretty, I can’t take my eyes off of the pics! Funny thing, I saw the preview on my phone and thought, ‘well that can’t be the house because the front door is red and YBH doesn’t do that’ lol. I looks breathtaking and so fresh. I can just imagine how happy the neighbors are that you’ve done such a great job.
Hahahaha it felt right for this house!
Wow, what a change! I’ve always loved a colorful front door.
I also have a tiny yard, but mine is in the back. I tried growing grass for several years and it always looked really ratty and more work than I wanted to deal with. Two years ago I ripped out all the grass/weeds and planted ground cover (stepables). It’s mostly creeping jenny, both dark and light green colors. It grows super fast, has filled in completely and I never have to mow or replant again. Totally worth it and maintenance free. It might be a good option in the future, especially for a rental where the tenants might not care for garden maintenance.
Overall, it’s a 1000% improvement! You put a lot of thought and care into your projects and it shows. However, I grew up near Chicago and lived in the city for several years and this just doesn’t scream “Chicago” to me… looks more coastal? I think it’s two things — the bright white trim and gable, and the juxtaposition with the quintessential Chicago brick and stone and metal railing homes next door. I haven’t lived in the area for over a decade though so perhaps I’m misremembering. I’d be curious to see similar non-brick buildings in your neighborhood, if you’re okay with sharing.
I just did a Google Street View tour of my old neighborhood, and there were a lot of light gray and tan/cream siding with white trim, which is I think what I remember the most. There were a few with more contrast siding/trim, but coupled with Victorian architecture with bay windows and ornate details. Anyway, was fun to have a virtual look around! I miss Chicago!