

This is the story of a painted front door, yes, but it’s so much more than that!
It’s sort of silly to keep reminiscing on how far certain areas of our house have come in the last year (while others have remained completely stagnant), but as we check off another to-do on the list, we can’t help but stand back and say, remember when?
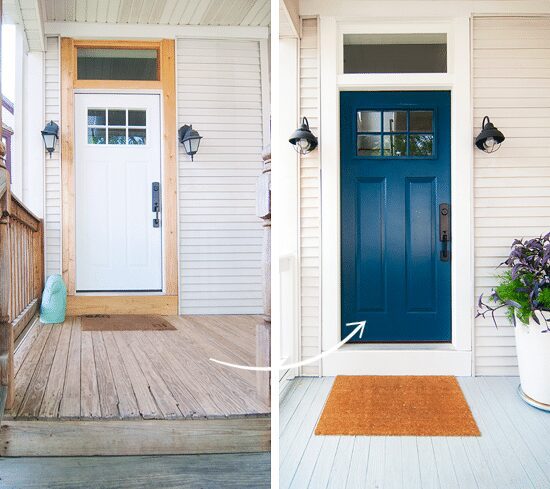
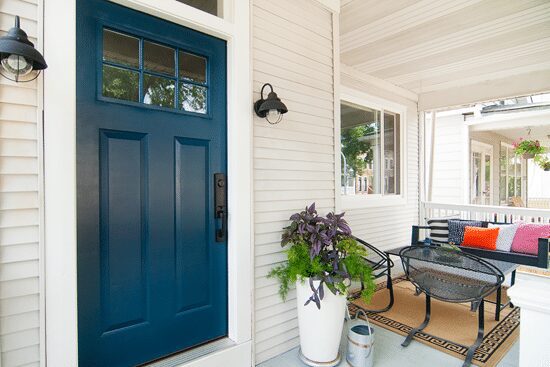
Remember when our front door (and patio, for that matter!) looked like this? And remember when we had our contractors install the new door and transom window, only to find rotted wood, asphalt siding and long forgotten side lights? All of that was almost a year ago, and it’s so easy (and better, probably) to forget that sloppy curb appeal we once had. But the biggest perk of documenting this home’s journey is digging up those old photos, looking up past posts and seeing those long forgotten befores. When it’s easier to see piles of mess around the house, it’s so nice to be reminded of how far you’ve come!
Cheers to that, right?
All that to say, let’s skip the deep archives of the front door’s past and fast forward to where we were at the start of the summer. Raw wood! Broken lights! And now? Blue! A stained patio, working lights, a clean door mat and color!
What you can’t see above is that our transom window does display our address, but I smudged that out because, you know, internet. However, for those wondering, we did move forward with House Number Lab and chose the Americana in matte gold. The numbers are stunning – worth every penny! Many of you suggested we do it this way (thank you!), and since so many old Chicago homes display their address this way, we were sold! Our results didn’t disappoint.
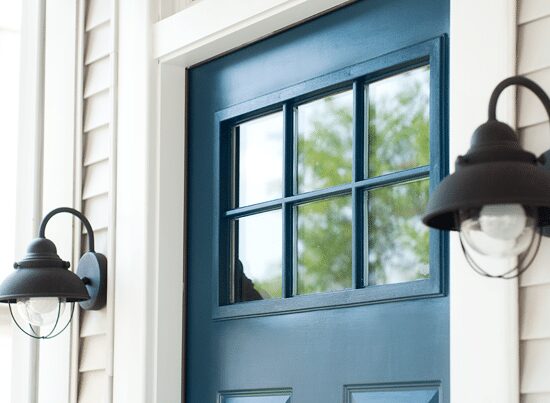
As for the door color, we’ve mentioned a few times that we were leaning towards Farrow & Ball’s Hague Blue, which is the same color we used on our interior closet door. We got it color matched to Sherwin William’s paint, and although we think it reads a bit more blue than the Farrow & Ball swatch, it’s no matter! It’s a navy that we’re loving.
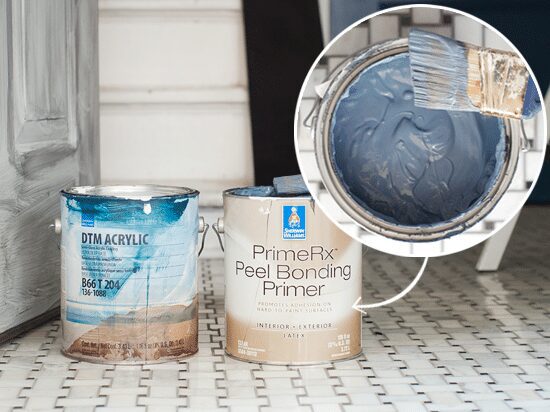
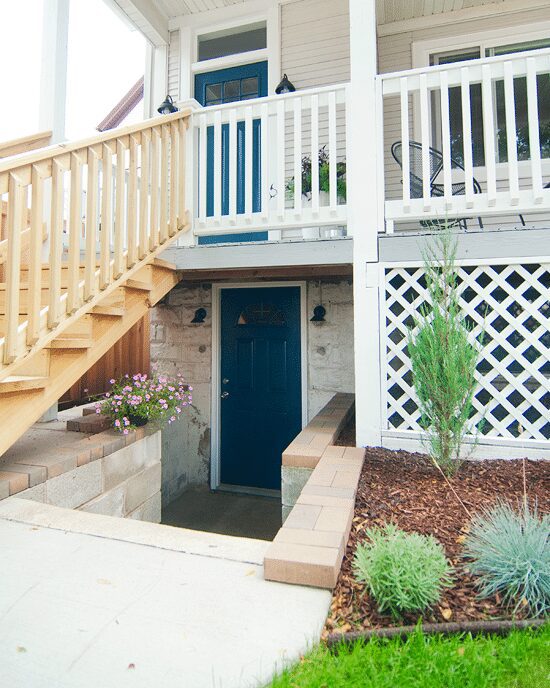
Last fall, we actually painted our garden unit’s door this same color, so now we finally have a matching pair of doors! This was before the worst winter ever, and we used PrimeRx Peel Bonding Primer tinted to a medium gray (an adhesion promoter) and DTM Acrylic for the color. The primer is extremely thick, which was unexpected the first time I used it, but it really does the job! Since this combination lasted through the never ending cold without any flaking or peeling (there were several days in a row of double digits below zero), we felt confident using the same on our front door, too.
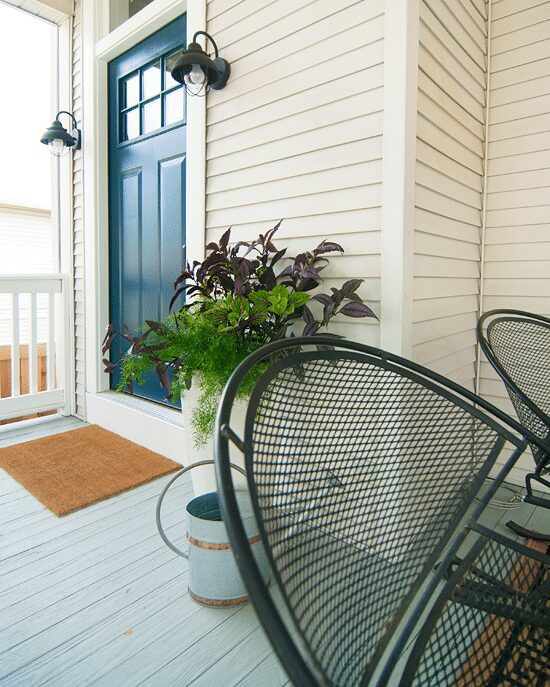
With the door finally painted, it’s extra (extra!) nice to sit on our porch swing – the best seat in the house! Our potted plants are growing like weeds (good weeds?), and so far, our porch stain has been completely scratch resistant to the pups. The only downside is that the lighter color gray does show footprints more than we’d like (we feared it would), but honestly, it’s the outdoors! It’s to be expected.
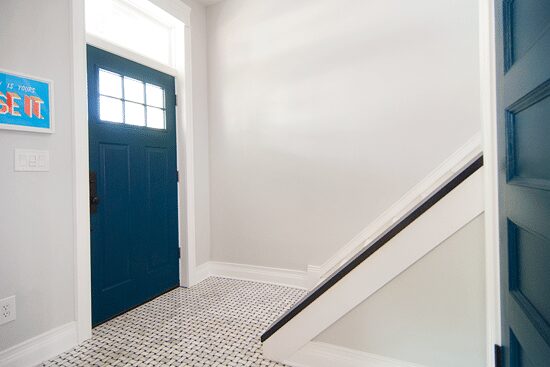
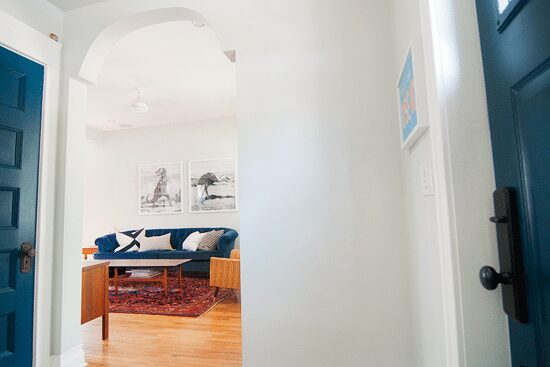
You might remember when we debated painting the interior of our door the same navy blue as the closet (although, I believe we were between a few different colors at the time), and we decided to just go for it! It adds a much needed dose of contrast in the entryway, and we especially love how all the navy blues tie together – from the doors to the couch and back again. (Too much navy? Never!)
While painting, I made the decision to not tape off the mullions from the glass, and you know what? I’m not convinced that was the best choice. It was a nightmare scraping the paint from the windows without needing to do a bit of touch-up after the fact, but I think in the end, you just can’t win with a handful of teeny windows. Even though a headache ensued and there was more foul language than I’d care to admit, it turned out alright in the end! (As it typically does; just breathe!)
And now that this to-do has been officially crossed off, this leaves just one more item for the outdoors – the pee pit!
• Paint/Stain the porch floor
• Finish the staircase hand rail
• Top the downstairs cinder blocks with caps
• Garden!
• Install a path from the pavement to the side of our home, alongside the garden (NOPE)
• Porch swing!
• Paint the front door
• Paint the staircase – that is, once the pressure treated wood has dried (next year?)
• Make a “pee pit” for Jack + CC
Scott has already made me slightly nervous by suggesting that I’m underestimating the amount of gravel and strength needed even for our small pit plans (me? Underestimate? Ha!), so we’ll see. If all goes well, we’ll get it completed this coming weekend and really check off the exterior list – that is, for this year!


The equity from the exterior alone is mind-blowing. What a gorgeous house you are creating over there.
Ok, I’ve got to ask, what the heck is a pee pit?
A place just for Jack and CC to do their business, rather than in the grass or all over our new boxwoods!
Isn’t it amazing what a little bit of paint can do! LOVE this transformation and the colour is SO gorgeous!!!
The blue is really working well with all the other exterior elements – even the plants in the front yard (bringing out their slightly blue tinge)!
Love, Love, Love. It looks fantastic. My main question is about this “Pee Pit”…is it like a dog urinal? Are they used to urinating/defecating on gravel? I can’t help but imagine a stinky hole when I picture this pit. I hope I am wrong! :)
Ha, that would be grosss… it’s mostly for pee for the front yard (we’ll be making a larger one next year hopefully for the back yard), but it’s not a hole, exactly. Once we figure it out ourselves this weekend, we’ll definitely share the process!
love the transformation!!! what’s the name of the color you used on the door?
Thanks, Monika! It’s Hague Blue, a Farrow & Ball color that we had color matched to Sherwin William’s paint. They have the Farrow & Ball catalog in their system, so all we needed to do was give them the name of the color we wanted, and they could mix it up!
I love that blue, it looks amazing! I’m convinced, everyone needs to paint something Hague Blue.
I love that door, it’s the perfect pop of color!
I can’t wait to see what you do for the pee pit, that’s something that Boomer really needs.
The front of the house is looking lovely. The doors look stunning and as everyone else has said, I love the colour. Very good choice.
That’s the perfect color! LOVE the blue! It makes such a huge difference.
So, so good!!!! Love seeing the transformation :)
That blue – so perfect! You and Scott and the 4-legged babes are going to have so much enjoyment on that beautiful porch this fall when the weather is perfect for being outside. Happy constructing this weekend!!
Wow! That looks amazing!! I have a question regarding the primer you used on the door. What benefits does it have over a regular primer?? I am going to be re-finishing our front door (inside and out) due to a terrible job done by the original house painter 7 years ago (he used the wrong paint and it STILL HASN’T DRIED/CURED!!! It is still tacky and comes off on your fingers after 7 years, its unbelievable!) and I want it to last this time.
That is insane! Wow.
The PrimeRx was recommended to us by Sherwin Williams. When we bought our door, it specifically said that an “adhesion promoter must be used,” and that’s what the employee at SW told us would do the trick! Even though it’s super thick in the can, it spreads easily, and because the garden unit door still looks freshly painted (especially after that beast of a winter), we’re thinking it really works!
What a great view of how all the blues tie together in the interior! You’ve got me eyeing all of our plain doors now…
it looks AMAZING!!!
Soooo pretty!!!!
Also, good to know about prime Rx, I’ve been putting off painting our interior doors because I just know it’ll be such a pain to sand and prime.
LOVE the navy door! (I have a navy door also, so I might be biased) It looks so fresh and is such a happy, yet “sturdy” color. And those lights are perfect! It is easy to forget all the progress you make unless you look back at old pictures. We always have a tendency to just focus on what still needs to be done…You guys have done a lot!
Hi! Just curious if you used Windex on the window panes in the door before attempting to scrap off paint? I only ask because Katie at Bower Power just posted about this exact thing! She said at the end of her post that she would never tape up windows again. I would still be SOOO hesitant not to tape, so if you tried the Windex method, and it didn’t work for you, then I would know I don’t want to try! If you hadn’t heard of this method, maybe something to try in the future?
Ack! We would have loved trying out that trick! I will definitely have to keep that in mind for the future. If I were you, I’d definitely give it a try – or if you do decide to tape, pull off the tape while your paint is still wet so you don’t risk pulling up paint that you want to stay.
So lovey and I’m completely smitten with that shade of navy. I had been considering painting my front door in glossy black but definitely am reconsidering this gorgeous shade now. As for your perennials which are awesome by the way, think of them as ‘weeds you actually bought.’ They do better that way. :)
OH this is beautiful. I love that shade of navy and I need to find something that I can paint this colour in my apartment.
I’m really excited to see your DIY for this pee pit. We don’t have a large back yard at the moment (until we have the funds to rip out and rebuild one of the decks we have in the back of our new house — yes there are multiple back there!) and I want to get her to do her duty in one section so we can enjoy what we do have without any of that business everywhere.
Can’t wait to see it! (Who knew someone could get so excited about a place to do the deed?)
We’re just as excited. Who knew?!
Elegant entry!
Just wanted to send you a thank you for the inspiration. We just spent the weekend painting the inside and outside of our entry door a very similar blue. I’m in love it with it! I hope you’re still enjoying your blue doors.
Awesome! Yes, we are still very much in love with the blue – it feels so classic while still being such a saturated color. Couldn’t be happier!
I love the door!!! I am considering buying this door to replace my current one, but was curious about the color white it comes in: If I wanted to keep it white, would I have to still go through the process of painting it?
Great question – I think that YES, it would still need to be painted. The white is only primer, so it’s a flat finish that would show scuffs very easily. If you wanted a white look, I would still paint it white in a satin or semi-gloss to give it a finished look. Not to mention, it’ll be much more durable!
Thank you so much! Greatly appreciated!
[…] Source – Yellow Brick Home […]
love this! What color is the trim and body of the house? Thank you!
Hi Katie! The trim is Designer White by Valspar, and the body of the house was this color when we got it… sorry, I have no idea! It’s a super soft greige sort of color, and to be honest, it’s not our favorite! When we eventually pull down all the siding and reconsider our options, we’d like to go darker.
Just found this page because we are re-painting our house soon and doing Hague Blue on the shutters and door as well! I’m torn as to what color to do for the body of the house- what are you going to go with when you do re-paint it?? Dying to know!
I have a similar door without a storm door. I have not painted it yet because I fear it will stick when t meets the door jamb.
Did you paint your door in place or remove from the hinges? How did you paint it and allow to cure before shutting it? Did it stick?
Thanks for any tips!
Pat
Hi Pat! I painted the door right on the hinges, since I was painting both sides, this made it a lot easier. To make sure it cures, I start pretty early in the morning. The primer dries very, very fast, and once that’s good to go, I put on the first coat of paint, and by then, it’s usually time for lunch. Afterwards, I revisit for a second coat of paint, and I’m done around 3 at the latest. We keep the door cracked all day, and we don’t close it until RIGHT before we go to bed. We didn’t have any jamb sticking issues at all!
I know this is a super old post– but we are drawing inspiration from you as we look to replace our own front door. Do you miss having a screen door or storm door there? I’m debating getting rid of our storm door– wondering what your thought process was on that! :)
It is something we’ve debated putting back on, but I also love not having the hassle of having to open two doors, since this is our main entrance! I think it depends on how often you think you might want to leave your front door open to allow a breeze in. In our case, it didn’t matter too much, but it’s still something we’re open to down the road should anything change!
Hi there! I know this post is super old but I stumbled across your stunning front door searching for what sheen to use on ours. Can you tell me whether you used high gloss, semi gloss or satin on yours, it’s lovely. Thank you!
Hi Kellie, I believe we used semi-gloss :)
Thank you!
Hi Kim! I love your door! The blue pops so nicely. Is there a Benjamin Moore color match?