

With the kitchen and nook checked off our list, we were asked earlier this week if that completes our first floor, and if so, what’s next? Well, we’re thisclose, with the exception being a teeny bathroom that’ll have to wait. In the meantime, we’ve been kicking out a handful of things that we’ve been meaning to do for a while – pruning our house plants, potting new, deep cleaning area rugs (so wonderfully satisfying!) and making piles to donate or sell as we purge, purge, purge. (Apparently our spring cleaning memo came late this year? Just kidding, purging is, like, my favorite thing ever.)
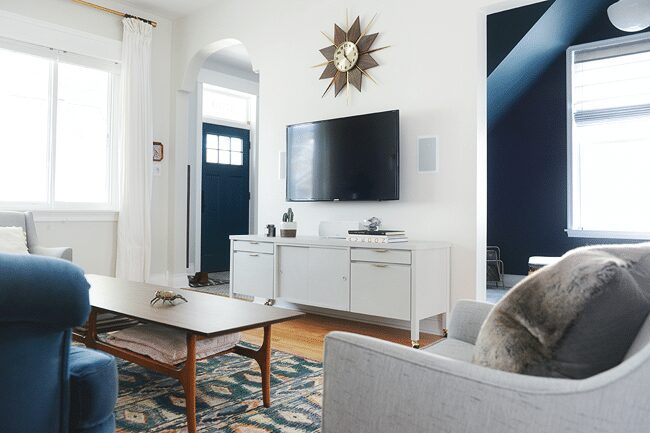
Most recently, we finally set aside time this past Sunday to update our media center, and you guys, what a difference that made to the whole first floor! You might remember a long, long time ago, we bought this credenza, made a few alterations to fit our things and then made a few more while upgrading our speaker system. Out of curiosity, I looked back on that first post, and I made mention that we were thinking of painting it – 2 years ago:
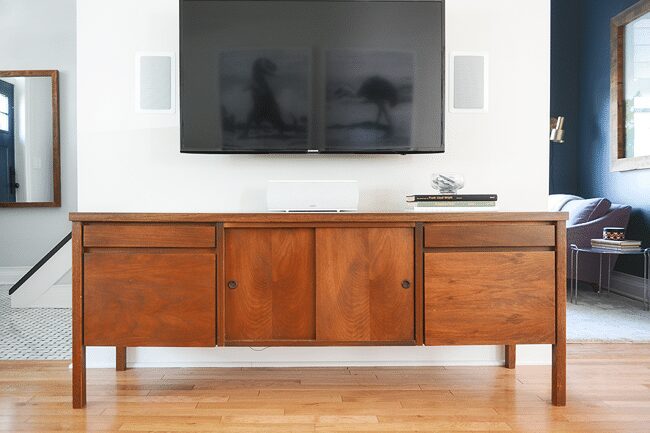
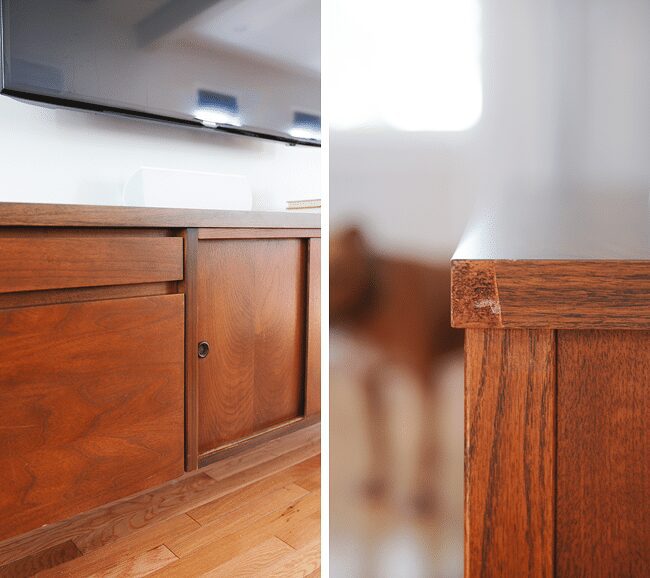
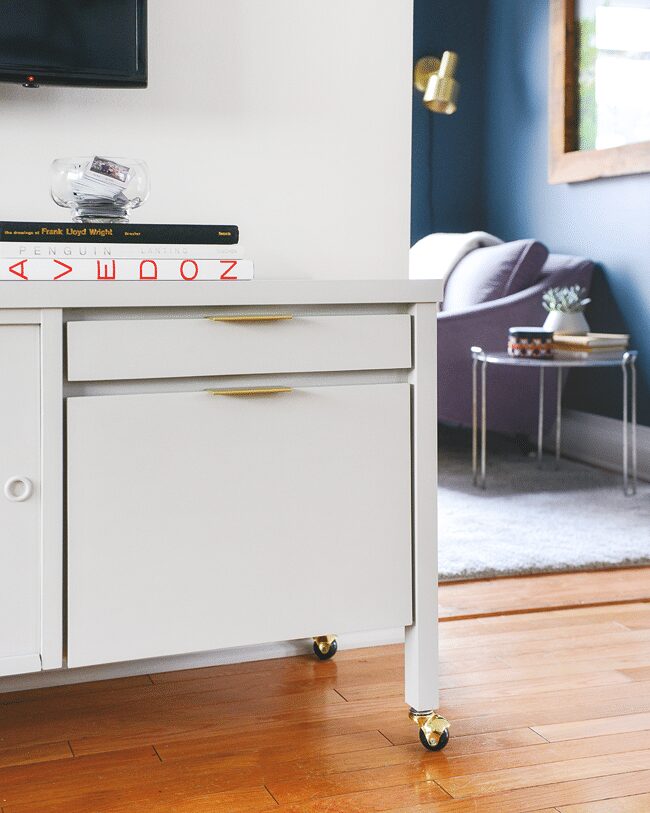
This piece was a steal at about $60 from Jubilee Furniture (city locals, you must go!), but here’s the thing: It’s not real wood. The entire top and drawer/sliding door fronts are all a laminate veneer, with only the legs boasting a thin wood veneer. We’ve never loved the orangey tone, but it’s served us well for the last couple of years, and we’ve always loved the slim, simple shape. It’s built with a strong, hefty weight to it, and it’s the perfect size for our space.
Jumping back to last month, I attended an Amy Howard workshop in Memphis alongside fellow Ace Hardware bloggers, which was, without a doubt, one of the most eye-opening workshops I’ve ever been a part of, as we got to play firsthand with her artisan quality paints, patinas and waxes. DIY game changers, for sure! Amy Howard is a long time furniture designer (and an all around warm, inspiring woman) that created her signature chalk-based product, One Step Paint, and has, in turn, flipped my world upside down! Her new product line has since debuted at Ace Hardwares across the country, and as cliché as this must sound, the possibilities are endless – from ultra matte finishes to high gloss, from painting glass to veneers to fabric, she’s got it covered.
But! The One Step Paint, my goodness. At the beginning of the workshop, she asked each of us to share what we were most excited to learn, and I admitted that I needed to see this One Step Paint up close; could it really be one step?, I asked. We’ve painted a lot of pieces that have held up incredibly well over the years (not without trial and error, of course), and just when we thought we got our three-part-system down to a science, Amy threw a wrench in our plans – in the best possible way.
And so the media center received yet another makeover, this time with One Step Paint + wax!
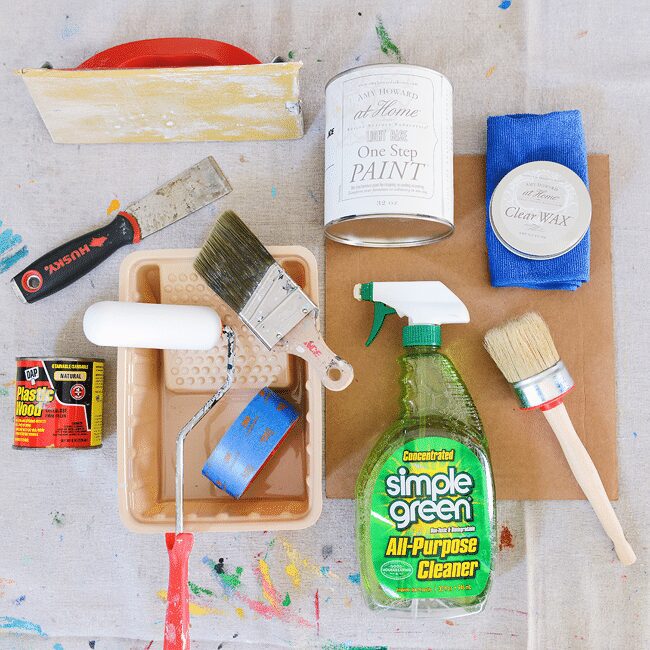
SUPPLIES + TOOLS USED
Amy Howard at Home One Step Paint
Amy Howard at Home Clear Wax
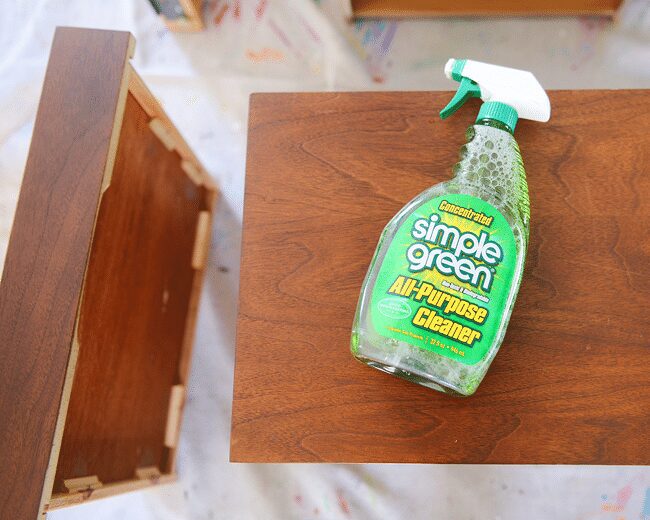
Diluted Simple Green
Painters tape
Wood filler + putty knife
Fine grit sandpaper
2″ angled paint brush
4″ mini roller + tray
Amy Howard at Home 2″ round brush
Spare cardboard
Clean lint-free rags
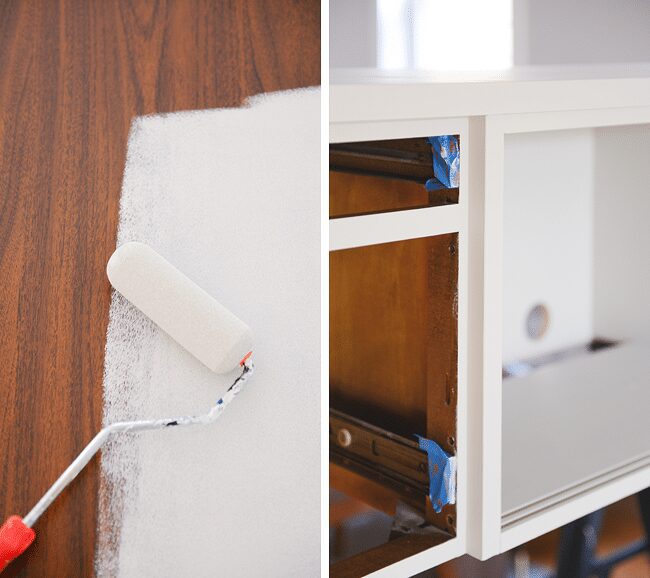
WHAT WE DID. The day before painting, I filled dents and missing veneer with wood filler and sanded those parts smooth with fine grit paper. Once that was done, we took out all the drawers, taped off the drawer glides and used diluted Simple Green to wash everything down. Once dry, I followed up with clean water to get rid of any remaining residue. Because One Step Paint is a no VOC formula, we laid down drop cloths to prevent drips on our rugs and set the credenza up in our living room. (Note: Simple Green is a degreaser that typically comes in a concentrated form. Always dilute following label instructions before using.)
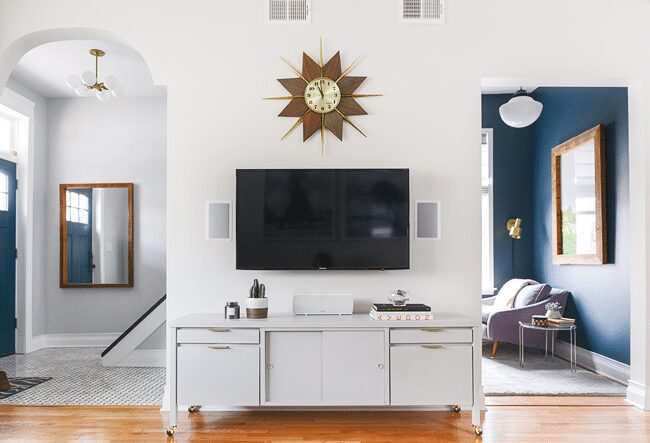
We wanted a color that would lighten the room, and although the One Step Paint has pre-mixed colors available, it can still be tinted to any color you like! We considered pure white, but after staring at swatches for two days straight, we landed on a gray-like off-white, Valspar’s Shrouded Lace. We liked that the color gives off a monochromatic vibe with our walls (although it is a teensy shade darker), giving it a slightly modern edge.
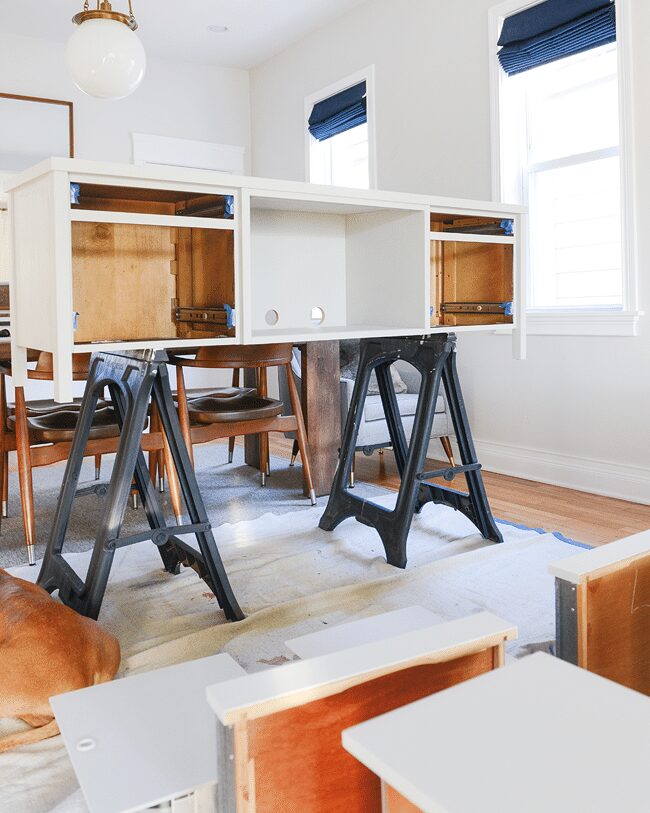
I used a 2″ angled brush to get in the corners and a 4″ mini foam roller to cover the larger flat surfaces. With One Step Paint, there is no need for priming OR sanding (although I’ve since converted, this is where my hesitation showed through during the workshop!), but because the credenza is dark, I did go over everything with two coats, plus a third on the top and sides. The paint dries incredibly quick, so much so, that once I was done with round one, I could go back and continue with the second layer!
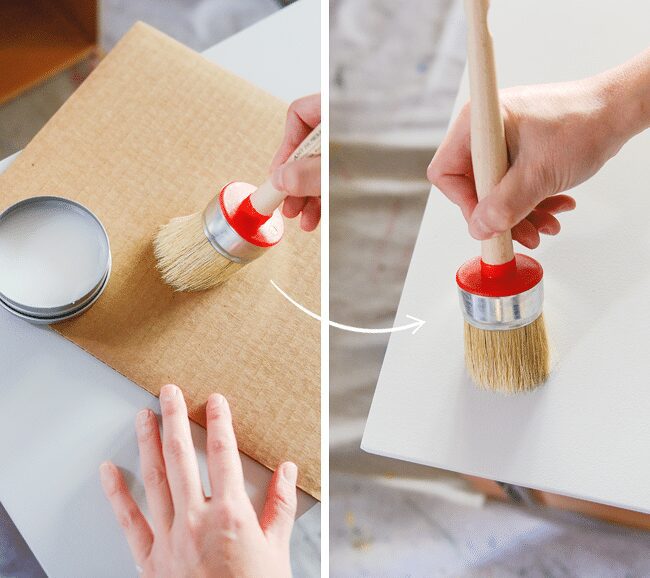
And that’s it – if you’d like! If you enjoy the pure matte look, you can call it a day, but we pushed on with clear wax to give it a satin sheen. I’d never used wax before the workshop, and I learned that the trick is to use it with a gentle touch. We picked up Amy’s 2″ round brush from Ace, which was helpful for our large piece. To use, I lightly swirled my brush in the wax, and I off-loaded the excess on a sheet of cardboard. From there, I made quick criss-crossed motions with my wrist as I covered the credenza, continuing to swirl, off-load and criss-cross until finished. Tip: Never, ever go from the wax to the furniture. Always off-load the wax to prevent unnecessary build up. A little goes a long way! When done, clean your wax brush by soaking in mineral spirits and following up with a warm, soapy water rinse.

After an hour, I used a soft (lint-free!) microfiber rag to buff the surface, and the credenza was done. I feel as though there should be more to say, but it really is that easy! The One Step paint feels fool-proof; the consistency is slightly thicker than your usual latex-based formula, and the matte finish helps to conceal flaws. The wax coating gives it a silky feel, and it hardened up nicely.
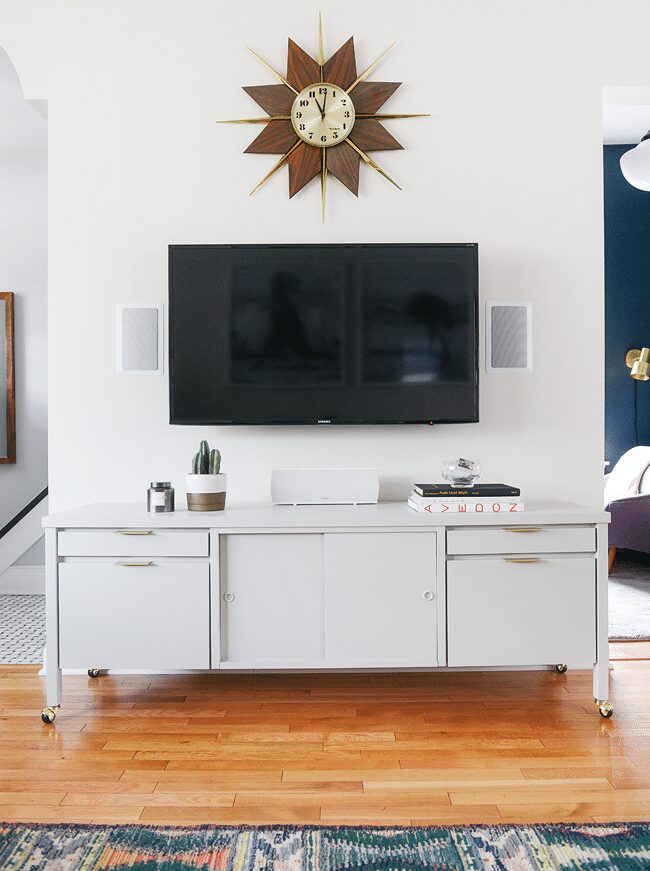
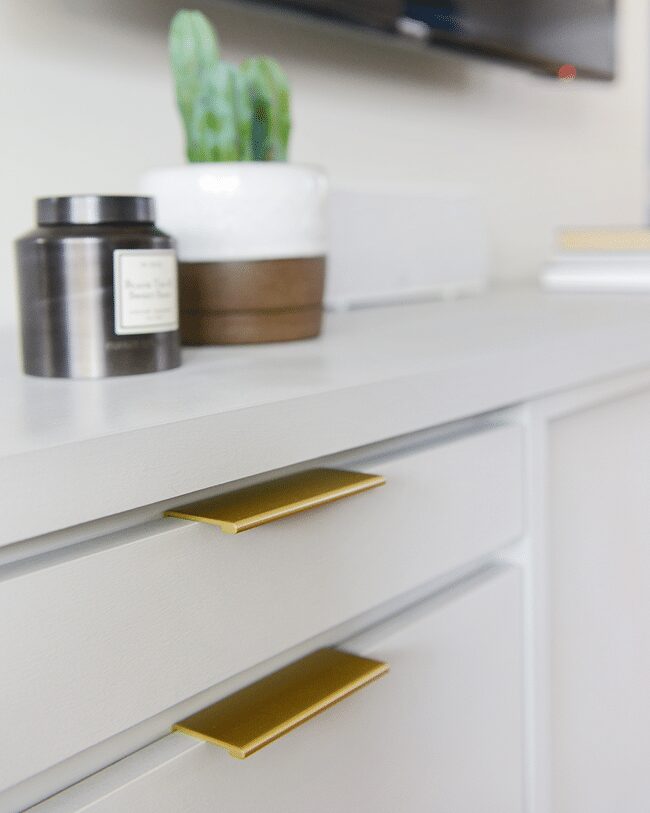
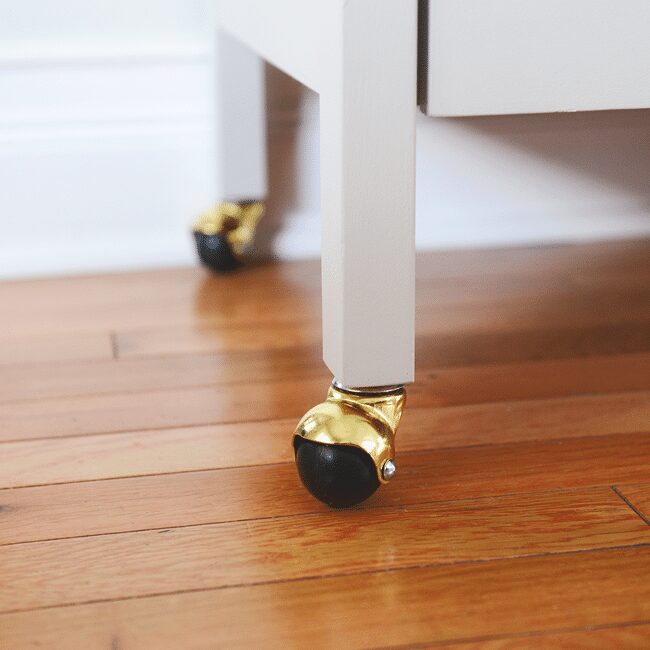
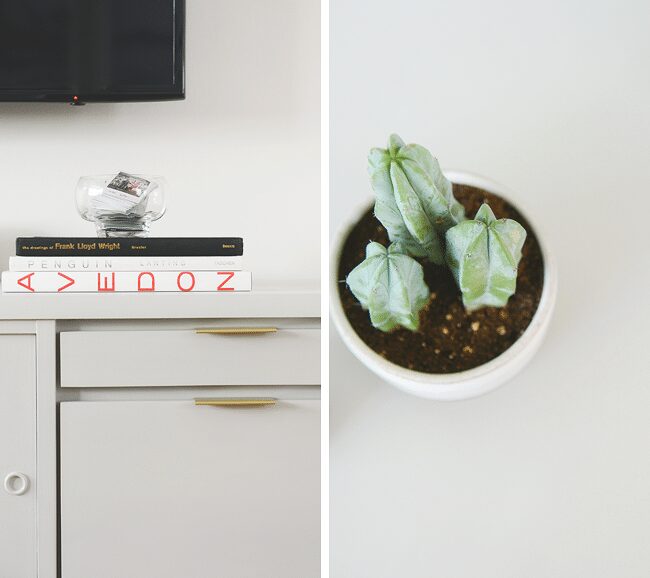
We also added hardware with these edge pulls (and a dose of gold spray paint for good measure!), and if it looks lower to you, it’s because we cut the legs down for a sleeker look before adding these casters, too. (The cute planter was picked up at Humboldt House!)
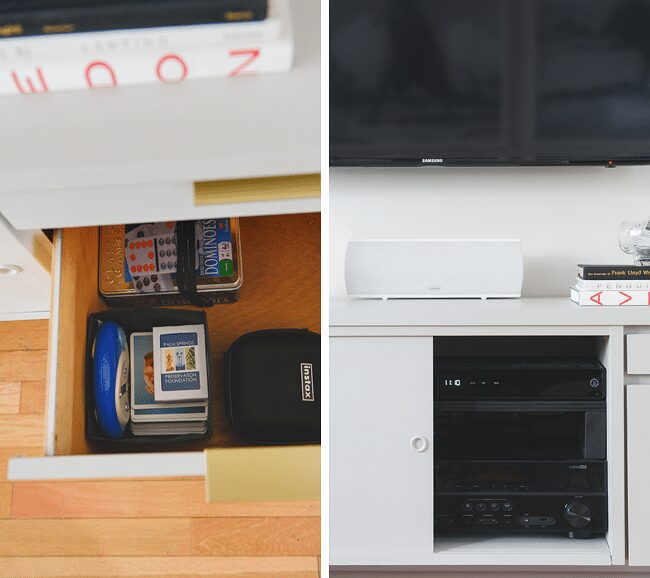
Inside the drawers, we stash games and extra cables (for connecting our laptop to the television, for example), and our receiver and cable box sit in the middle:
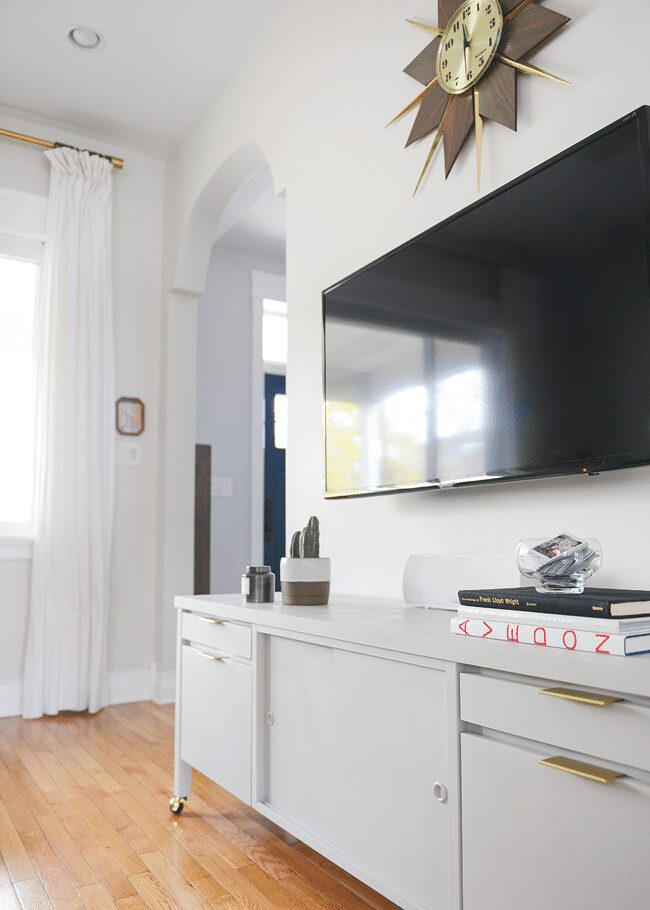
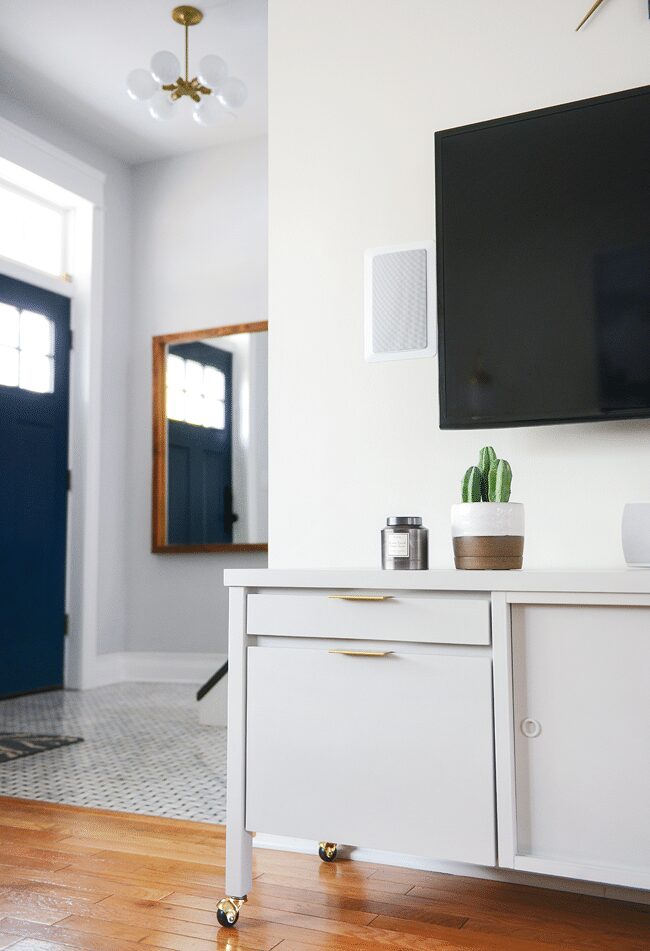
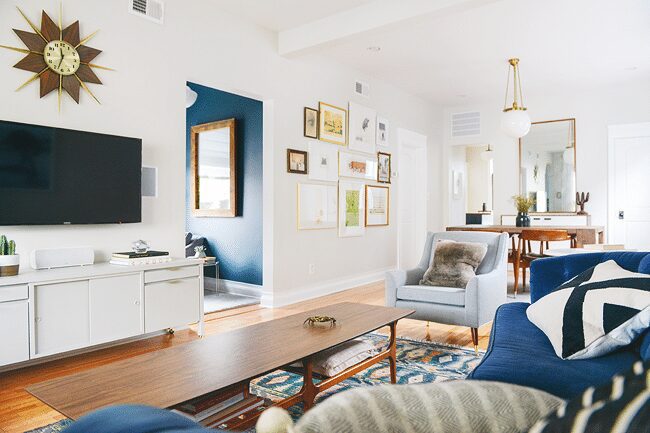
One of the best parts of keeping an online journal? We love to look back and see where these rooms started! In calling the living room done (not counting impending tweaks, you know?), I couldn’t help but dig up these old photos before we reconfigured a few things. Below, you’ll see how this room looked before we moved in versus today, as well as get a sense of how the living area connects to the entry and nook:
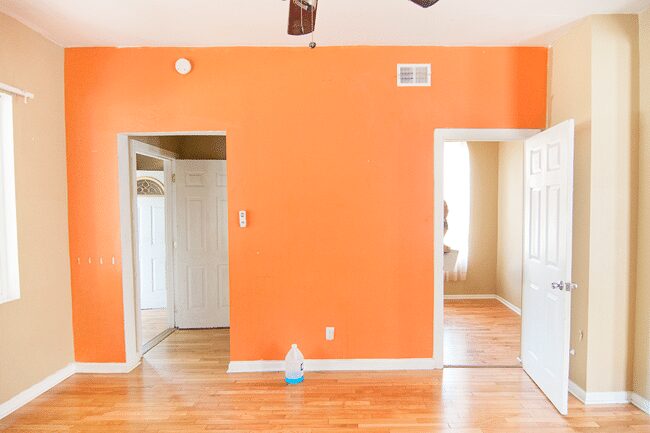
Here’s an angle taken from the dining room, but this obviously shows that chaotic, somewhat-stressful, somewhat-hopeful state during construction! Just looking at this photo, I can feel the dust hanging in the air:

Living room, you’ve come a very, very, very long way!
If you’d like to lean more about Amy Howard products, she’s hosting a free live workshop with Ace Hardware today, Thursday, October 22nd, at 12pm CST. You can register right here and see how Amy rescues furniture using her signature One Step Paint! In addition, you can enter Amy Howard at Home Sweepstakes to win $500 to Ace + a Memphis trip for two and attend the workshop in person – a real treat, truly.
And, and! Together with the Ace crew, we’re giving away a $100 Ace Hardware gift card to one lucky reader! The giveaway runs through Wednesday, October 28th at 5pm CST; simply enter using the Rafflecopter widget below. The winner will be announced within this post by Wednesday evening. Good luck and happy entering!
We’re excited to be collaborating with Ace Hardware as a part of their Ace Blogger Panel! Ace has provided us with compensation and the materials necessary to complete this project (hey, thanks, Ace!), and all opinions are our own. See all the blogger projects on the Ace Pinterest page.


Wow — that looks amazing! The new pulls and casters are the *perfect* finishing touch.
Wow! Love it. I usually am not a fan of painted wood but this is fantastic!
I saw the Amy Howard paint pop up in our ace, so I’ve been curious about how well it works! I’m looking around the house wondering what I can paint, now!
The One Step paint can be used in anything with no sanding – ceramic, glass, fabric, veneers… It’s nuts, I tell you!
So use on Ikea furniture….?
Yup! No priming or sanding either! This credenza is basically a well made ikea piece when you consider the veneer. :)
I just got so excited! I’ve hated our dark IKEA dresser almost ever since we bought it. Since I’ve yet to find a replacement, I’m totally painting it this weekend!! THANK YOU!
This is actually perfect! My tv and stereo sits on an Ikea piece that is functional but looks very out of place in my house. I haven’t known what to do with it because of the veneer, and now I have an idea. The tip I’ve been waiting for, hooray!
That sounds amazing! We have some projects that that paint would be so useful for!
After I saw the commercial for this paint I was hoping that you would do a review before I gave it a go! Thanks!!
Amy also gives in depth tutorials on her blog including you tube videos as well! Have fun!
This process looks PERFECT for some pieces we are wanting to freshen up! Exciting!!
Ack, I used wax once and it was disaster…wish I realized that less is more! Where was this post a year ago? ;)
Always off load the wax on cardboard! I was tempted to add more, but it’s not necessary at all.
you did an excellent job on your project.
I’ve been really wanting to try some chalk paint! I have a console table I’ve been debating sanding and restaining or painting a fun color!
This looks incredible. It makes a statement without overwhelming the space. The color really complements the walls and lightens the whole room up! Love a matte piece of furniture.
This looks awesome!! Definitely going to look into this paint line – thank you!!
We have two wooden crates that we use for our daughter’s book bins. I have been thinking about adding casters so they can be easily moved around. Is this tough? Any advice on type of caster?
I’d get casters with screw in plates rather than stems (which we used here). Your hardware store will have them in a ton of sizes and because it’s on a plate, it’ll be super easy to install – typically 4 small screws per caster!
Looks great – will definitely have to try this line of paints.
i just want it to be friday!!!
Lovely, thanks for the post!
I have a table that’s veneer…that’s been (poorly) painted. But a sunscreen dribble actually ate through the paint and poly on the top (yikes!) and has me itching to come up with a new solution for the table. Would this stand up to daily dining table use? And painting over paint and poly? Or better to strip it first? I’m not sure what I’d find under the existing paint, since it came that way from the Craigslist seller. Thanks for sharing your insights!
Hi Jessica,
If you’re concerned about daily use, I highly recommend treating it with wax for your final step! The can does say that the wax should be applied about once a year if it’s a high use piece of furniture, but I imagine you could just dust the top if it gets worn down. I think an advantage to waxing (instead of my usual poly) is that if it gets scuffed or worn down, you can blend in a little more paint and wax, rather than having to STRIP the whole thing again.
I don’t think stripping would be necessary, but I would go over any imperfections with wood filler and sand those parts down. Going over the paint/poly finish that’s there already is no problem either! I think you’ll be very pleasantly surprised with the durability of the One Step paint! Also, Amy Howard has super in depth You Tube tutorials if you want to see it in action. :)
The gold painted hardware is so dreamy! Everything looks so fantastic :)
What’s on my mind today? I’m still basking in the nerdy bliss that is (was?) “Back to the Future Day”. Great Scott!!!
So glad you posted this when you did! I literally just bought that one step paint but have been to scared to try it…. now im back to being excited to try it.
I couldn’t help buy notice the new living room rug? What happened to the bright Persian one? If youre selling it I WANT IT. for real though ;)
Yup, we picked it up form a local vintage shop (it’s a bit bigger for this space), and we moved the other one upstairs! Sorry, not selling. We love them both equally. :)
Makes the room look more pulled together, but I kind of like the orangey fake wood tone. :P
Yes, the LR rug, where did it come from???
It came from a local vintage shop, West Town Re-Up: https://instagram.com/p/8TL3NIS6DK/
What an inspiring space! I really like the color you chose – subtle but makes a bigger impact than pure white in my opinion! This is timely since I have a dresser in need of paint. It’s for a nursery, and since I’m expecting, I’m interested in this since you mentioned there are no VOCs. Do you know if there are still no VOCs after it’s tinted? Or perhaps you know where I can look to find the answer? Thanks!!
Oh, that’s a good question… I don’t think I can answer that honestly, so I would ask the paint counter at Ace. I will say that it was very refreshing to be able to paint something so large in our living room, and it smelled as though I wasn’t painting at all, ha!
Oh Kim! What a great choice to go monochromatic with the soft gray! It’s so mod and streamlined and elegant! And those gold pulls are amazing – I’m bookmarking them for future inspiration!
You and ACE make great partners.
oh my goodness, your living room has come a LONG way!! looks beautiful!
i just saw her commercial on tv yesterday.
Now your grandparents’ clock gets more attention .
YES! I think that’s definitely one of the perks of this makeover, too.
Does this paint work on cabinets? We’ve been looking for a good cabinet paint, and this sounds right up our alley!
Hey Hailey! It’s SUPER durable, but it is a matte finish. So if you were doing with this cabinets, I’d definitely use the wax to finish – or if you want something even more crazy durable, I’d just go forward with a water based poly to seal it one time and be done with it!
I love the rug! The Ashley Howard paint looks great and way easier. Would love to try it.
That looks amazing! Do you think it would work well for kitchen cabinets, too?
Amy has said she uses them for kitchen cabinets, but keep in mind that the paint itself is a matte finish, so you’d want to seal it with the clear wax or a poly (water-based is our preference, since it doesn’t yellow over time).
The gold pulls were the perfect finishing touch! I have a couple dressers that need redone, so i think this paint might be perfect.
Y’all. I have been looking for a media cabinet and it’s The Worst! This gives me hope that I’ll find something out there!
I really like how that came out. I also like that you added the casters. Makes it look like a different piece of furniture.
We have an Ace Hardware store very close to us!
I LOVE LOVE LOVE this transformation! the room is looking so great and pulled together (PS love that rug and the color of the nook- its such a cozy contrast to the living room!
isn’t it weird being an adult and looking at your home and saying, wow- we made this happen! my husband and i just renovated our dining/kitchen and whoa doggy, it was a task! but we did it, together, and we love the feeling of our achievements!
the credenza looks great! i have never used that wax before, but i have a bookshelf i painted 5 or so years ago and need to paint again- How does the wax do with things sitting on the shelf? will it get on anything i put on the shelves? Thanks for all the info!
Thanks, Allison!
I was a little worried about the wax too, but it dries really hard, and I waited a day to put the books and planter on the credenza. Later that night, I checked to see if there’s any residue on the books or if the books would leave a mark on the wax, but nope! All was good and perfect!
I love how you opened the space! Looks great.
This is really inspiring me to re-tackle my first DIY (disaster), which is currently tucked between a wall and a sofa with my mistakes hidden from the world.
I have a dresser that we’ve been using as our media console. It needs a paint job, but I have been so overwhelmed by the prospect. Not now. Thanks for sharing!
Ok. It’s done. First Deuce Cities posted their update with Amy Howard now you. I clearly have to pick this up. At first I got nervous about you painting that lovely wood credenza then saw the after. I love it. Also – your new rug in the living room is killing me. I should not have this much rug envy but…
Her table and bench is good, right?!
If it makes you feel any better, the credenza is a laminate veneer. It would pain me to paint really beautiful wood that could be sanded and re-stained!
I really like this piece in white. Looks beautiful!
Love the finished product! Would this work on a wood bathroom cabinet? We are looking at a house that needs some love and if we could cut down some of the work on the projects that would be awesome, especially if it was a product that would hold up!
It absolutely would! It works on wood, veneer, fabric, glass, ceramic… I mean, it’s just crazy.
I’m a big fan of chalk paint and wax, but I haven’t tried this brand yet. It might be next on my list!
I’ve wanted to try chalk paint, now that Ace carries it, I’m all in! Thanks for the great post highlighting how simple it is.
WHOA. That last set of pics is just incredible. Holy smokes, you guys must be so proud looking back at all that work.
Aw, thanks, Jenn. It is weirdly fun looking at those before photos, not really knowing where we’d end up!
Looks fantastic – love the before and after shots of the room.
The finished product looks great.
I’m so intrigued! We’re still getting the bigger pieces of our home put together, but I’m definitely keeping this in mind when it’s time to look at the details!
I’ve been seeing this all over my blogs… looks interesting.
This looks great, and I love that shade of grey. Every time I see those dinosaur posters of yours, I wish I could find a copy of that book you used. I love, love, love dinosaurs!
You can get it new or used on Amazon!
Your home has come such a long way, looks great! This makes me want to tackle painting my media console :)
This is so exciting – I often put off painting pieces because of the long process… but this might just change my life!
Brilliant! I really want to paint our kitchen cabinets but have been agonizing over the process since we did it in our last house. If we could skip the whole sanding and priming steps and just add a coat or two of poly at the end would be awesome. Now I have to convince my husband we can do it before Thanksgiving. Nice post!
What a reveal! That piece looks awesome and is inspiring me to repaint a flea market find in desperate need of a makeover.
I love this and plan to try it. Thank you for bringing us new and creative ideas.
Your LR is fantastic! Can I move in? :) Also, will you please post your rug deep-cleaning secrets? Thanks!
I’ll be writing a post for the Bali Blinds blog on our rug cleaning secrets (hint: it’s super easy), and I always share those links via our Facebook and/or Instagram page!
Looks great! Love the gold pulls!
What a great transformation! I love the gold accents on the console. :)
I love it! And I love the fact that you can use her paint on laminate veneer, I have some little girls bedroom furniture I wondered how I was going to update because they have laminate wood veneer tops – you have inspired me!
i absolutely love your style! i found this blog by chance and am so happy that i did :)
the progress you’ve made on your house is so impressive and inspires me to make my own fixer-upper just as beautiful! little steps forward are so rewarding.
Thanks for commenting, Mary! So happy you found us!
I bought Valspar paint at Ace Hardware for my front door. It’s was the easiest home project to date! We went from dark red to medium grey in only two coats. Love Ace!!!
We have so many projects we’d love to do, but budget is an issue. Paint is definitely the plan for lots of those things. One-Step would be great with 2 kiddos keeping us busy!
Love that you painted it white! I’ve been contemplating painting my bed frame white. It’s actually the same color as your credenza, just a little lighter, and I think this is the final push I needed. Thanks!
Josh | The Kentucky Gent
http://thekentuckygent.com
I saw you post about this wonderful one step paint a few weeks ago and am going to give it a try to paint a bedside table and a dresser. I’ve put off this project for a long time because, similar to you, it is mostly veneer and I really didn’t want to take the time to do it. I am so looking forward to trying this product! Now what color to choose…
I love the drawer pulls!
Would this work on varnished oak? I’ve been wanting to refinish an old table with water damage, and this may be the solution!
I think it would. The old fashioned girl in me would suggest giving the varnish an overall quick sand with 220 grit sandpaper, but I bet Amy would tell me to skip that step! Even without the sanding, I think you’d be fine, really.
love the made over look of this piece and its like it was made for that wall!
I’m so tempted to try this on my dining room table but I worry about scratches! Maybe I can find a smaller piece to try it on first!
I love seeing the transformation. Especially when there is no drywall!
Oh that looks amazing! I love the color you chose, and love all the storage it will have! I have a old wooden corner hutch in my kitchen I would love to do that too! Turned out so beautiful!
I have a dresser I would love to paint!
Ooo, very pretty. :)
Where was this post 3 years ago when I went nuts painting all of our furniture :) Super great to know! I did miss the pet photos in this post, though. I don’t think I could get a photo without a stray tail or nose in our house. We have three animals as well. 2 cats and a dog – all from our local humane society. So. Much. Fur.
We hear you on the fur! Thank you for rescuing your pets! :)
Gonna go buy all my amy howard painting supplies as soon as I win this drawing!
You totally sold me.
I’m loving how the front door color ties in with the new nook color.
I am been looking for a credenza exactly like that one for ages. Hopefully one will pop up soon in my hometown!
perfect timing… my daughter was just talking about doing a similar project… great tips! thanks
I like the atmosphere of ace hardware much more than the other stores.
I like Ace Hardware stores. Thank you for the giveaway!
Paint is the cheapest way to completely transform a house. A new coat of paint makes the room look brand new, and it will cost you under $50.
I love how clean and light everything looks. I strive to make out home similar.
I have been wanting to paint a headboard and just watched the Amy Howard video. I have only painted one piece of furniture in my life and I used latex paint. No matter what I did, I have visible brush strokes. So question, how is the paint in regards to brush strokes? I am definitely an inexperienced furniture painter. Thanks for the awesome giveaway
Hi Roxanna,
I use a foam roller to avoid brush strokes, and the key is to not overwork the paint! The good news is that the matte finish is VERY forgiving.
Nicely done! Third time’s a charm, right?
I like the shortened legs and casters, but mostly I love learning that a laminate veneer can be made to look so lovely.
Thanks for the give-away!
Wow! What a transformation! I’ve been looking for a similar credenza for our living room and am now inspired to look for one that I can makeover with some paint rather than something from a big boxed store..which are pretty hefty in price for the size we’re looking for. Thanks for the inspiration!
I would love to paint our dresser! Thank you!
I would like to say that I am excited about making pecan pie for this upcoming event this weekend for sure
DELICIOUS.
Well you’ve convinced me to try this paint and on laminate veneer! My daughter-in-law and I have a nursery/toddler room to makeover before she has her second child. Hoping the painted projects will hold up to a child’s room. But I missed exactly what the process is to tint the paint…? I’ll go to Ace to check on it and read the prior comments, but that’s my only question. Love your blog and your house!
Thanks, Susan! Just choose any color you want from the Paint Studio at Ace – have fun browsing all the colors! – and ask the guy at the paint color to mix it to Amy Howard One Step Paint. That’s it! She also has a lot of beautiful colors pre-mixed to choose from.
Would it be hard to use this on a bookcase? I’m wondering if the wax application is easier on a flat surface.
You’d have more corners to paint, but I don’t see why it would make it any more difficult! There’s no priming or sanding, so you wouldn’t have to worry about dirtying multiple brushes or rollers, and the paint dries VERY quickly. Waxing will take a little longer, but as long as you follow the instructions, you’ll have a very durable piece on your hands.
It looks epic! I’m not sure we have that brand here in the UK though :(. Can I ask what spray paint you used on the pulls? I don’t know enough about spray painting metal and am unsure about the paint scratching off easily?
Hi Lucy, we just used Rustoleum brand, and the label on the can specifically says it covers metal. If we were going to cover something very large that would be touched ALL the time, Amy Howard does make high end furniture lacquers as well!
I wish I had your vision.
My boyfriend and I are thisclose to buying our first home–we’re under contract now! I know that gift card could go a long way. ;) Love seeing all your tweaks and changes–big and small!–and can’t wait for everything to come!
Congrats on your first home! Very exciting!
I’ve been curious about chalk paint – thanks so much for the inside scoop!
I could really use some new paint for my kitchen.
Today I am sorting out how I want to re-do my upstairs bathroom! Finally! Thank you for the wonderful giveaway.
Erin
ErinLoves2Run at gmail dot com
Definitely need to do something like this with our media center. Would really like built-ins, but the cost is too much. Maybe I will do some painting!
Just did a DNA test on our “boxer/pit” mix, only to find out she’s a full blood American Bull Dog! We had no idea! Time to start researching a new breed!
So fun! We found out that our Chunky girl is half American Bull Dog. SO CUTE.
This room! LOVE it…I couldn’t get into it with that reddish rug you had in there. it’s just not my style, and that’s ok. but now…I really love the new rug, the new media console. it just flows a bit better for me. with the blue nook in the back? looks really amazing.
Thanks for showing your process! The paint sounds amazing!
Love how it is all coming together!
Awesome job guys! I turned a old french dresser into my media station also. Love it! Hugs!
Looks great– I love the color!
I’ve come to the conclusion that one of my favorite things about your home/style is that while it all feels collected and styled, it doesn’t feel cluttered. It’s very impressive! I feel like the line is so thin.
I have mid-century style dresser that got pretty scratched up in a cross-country move (from Memphis actually!) I was hesitant to try painting it since it is veneer. Thanks for reviewing this type of paint! I’m excited to try it out.
I am really craving chocolate chip cookies!
I love the touch of gold. It looks great!
Thank you very much for sharing your talents, skills and home with everyone. Your remodeling and decorating ability is outstanding. As for me and probably many who are also overwhelmed and challenged by creating our own dream home, your help is invaluable.
This post has convinced me to try to redo a piece of laminate furniture we have hidden in the attic. I am so excited!
So sweet, Tracy, thank you very much. This paint is just the cure for hidden away laminate furniture!
That paint sounds pretty nifty!
What a huge difference the room looks with the walls opened up! So worth it. Looks great.
Wow! I love everything about your home/makeover. Thank you so much for sharing the transformation and also for offering such a wonderful giveaway.
Right now I am thinking about getting prepared for the winter months. I love the work you did in your house.
That star clock (or would it be called a sunburst clock? I’m not great with terminology…) is so neat, do you mind sharing where you got it?
Hi Lee! It belonged to my grandparents, and it’s one of my favorite things in this house (besides the husband and pets!): https://yellowbrickhome.com/2011/03/10/a-new-ticker/
This turned out really fantastic, love it!
Right now I’m chuckling to myself because that orange wall you guys got rid of? That’s almost EXACTLY what I’m wanting to add to my house right now, a big bold pop of color!
We used to have an orange wall in our last house, and oddly enough, it still is my favorite color. Go for it, Tina!
That looks great! There is a wall in our house and we have similar plans to open things up a bit.
Thank you for the wonderful giveaway!
I love how cohesive everything is looking – what a long way you’ve come! Perhaps I missed it on an earlier blog post – did you hide the cables from the tv/accessories in the wall?
We did! :) Info here > https://yellowbrickhome.com/2014/02/17/media-makeover/
I’m browsing spring seed catalogs, planning my spring garden.
This is the second blog that has featured Amy’s products and it’s convinced me that this is the paint I want to use for my next furniture makeover!
I’m so impressed with this paint! It really is a game changer!
I would love to try this!
On my mind today: Fall is finally in Texas!
WOW! You are really good at choosing paint colors. The color you chose for the credenza is so good. Can you maybe do a post about how you whittle the colors down and why you go in the directions that you go? Amazing.
Thanks, Melissa! The biggest tip I have is just seeing the colors in your home. The easy way to do this is with paint chips, but I wrote a more detailed post at the start of this year! https://yellowbrickhome.com/2015/01/08/white-white-white/
You did a nice job on that credenza! I wish I could do that well on some of my projects! LOL.
I’m a fan of chalky paints. Love the tutorial you provide and the one’s at Amy Howard’s site as well. Very informative and instructional and helped me better my painting techniques and I look forward to finding the Amy Howard product line at my local Ace Hardware store.
I love this! I’m always too wimpy to attempt painting furniture, but these products seem like they could really help.
I love the look of the whole living room! We’re in escrow on our first home and I can’t wait to use some of your tips & tricks to really make it ours :) Thanks for the chance to win!
Wow – those before and afters are incredible.
You’ve probably mentioned this before, but is that clock a vintage find or a reproduction? I love it!
Thanks, Allyson – it’s vintage, having belonged to my grandparents. :) https://yellowbrickhome.com/2011/03/10/a-new-ticker/
i defintely would like to try these products on a few furniture pieces we have
Well now you have me thinking about painting my bedroom.
beautiful! i love those casters on it!
Love the transformation of the cabinet as well as the whole downstairs. You two have done an amazing job! But I have to say…where are CC and Jack!? A post without them just doesn’t feel right without at least one picture. ;)
Haha, have we become those crazy pet people?! I thought maybe you guys might be overloaded with too many unnecessary Jack and CC photos. Lesson learned. ;)
This is inspiring. I have a tricky piece to paint and the thought of getting it completed in less steps makes me want to run out and buy this immediately.
Still nervous about the no sanding part but I can’t wait to try this on great grandma’s dresser that I’m converting to a kitchen island!
Love the color and the pulls!
I love how your project turned out!
Entered the Rafflecopter as “Wild Orchid”
Thanks for the chance to win!
wildorchid985 AT gmail DOT com
first time visiting this blog and I love your content.
instant follower :)
Such a very long way – so inspirational! :) Can’t believe this is the same piece, love it!
Ooooo…. I might have to check out that paint since it looks so good in your space! Thank you.
I would love to win this! Thanks for the giveaway.
I love the color you chose!
My sister has a similar piece, it’s laminate too. I’ve suggested painting it to her before but seeing this might push her over to that side! Plus, the hardware you chose was spot on!
How well has this paint held up? Have you had to recoat or touch up at all?
I haven’t touched it up OR re-waxed it – yet! There is one tiny chip on the bottom (less than 1/2″ around) that I have been meaning to touch up, and I mean just re-wax it for extra protection. Overall, it’s INSANE how well it has held up!