

We’re showcasing a quick and cost-effective backyard fire pit build that can be accomplished in a weekend. Nothing extends outdoor season like the warm glow of a classic bonfire.
Whether it’s a chilly summer evening or cooler weather on the way, we’re always looking to extend the usability of our outdoor spaces, and what better way to keep warm outdoors than a good old-fashioned fire pit? Our DIY pit came together in one day, and it cost right around $450. Here’s how!
This resource was originally published in October of 2018 and has been fully updated. We hope it provides you with inspiration to take on your own projects to create a home you love. For more, you can view every post according to house and room right here. Thank you for enjoying our virtual home!
In This Post
Tools + Supplies Used for a 15′ pit
Fire pit kit
Stick + string
Spray paint
Spade
Tiller (Incredibly helpful, but technically not necessary)
Steel garden rake
Wheelbarrow (for haul away and material transport)
Metal landscape edging
Tape measure
Hammer or mallet
Landscape fabric/weed screen
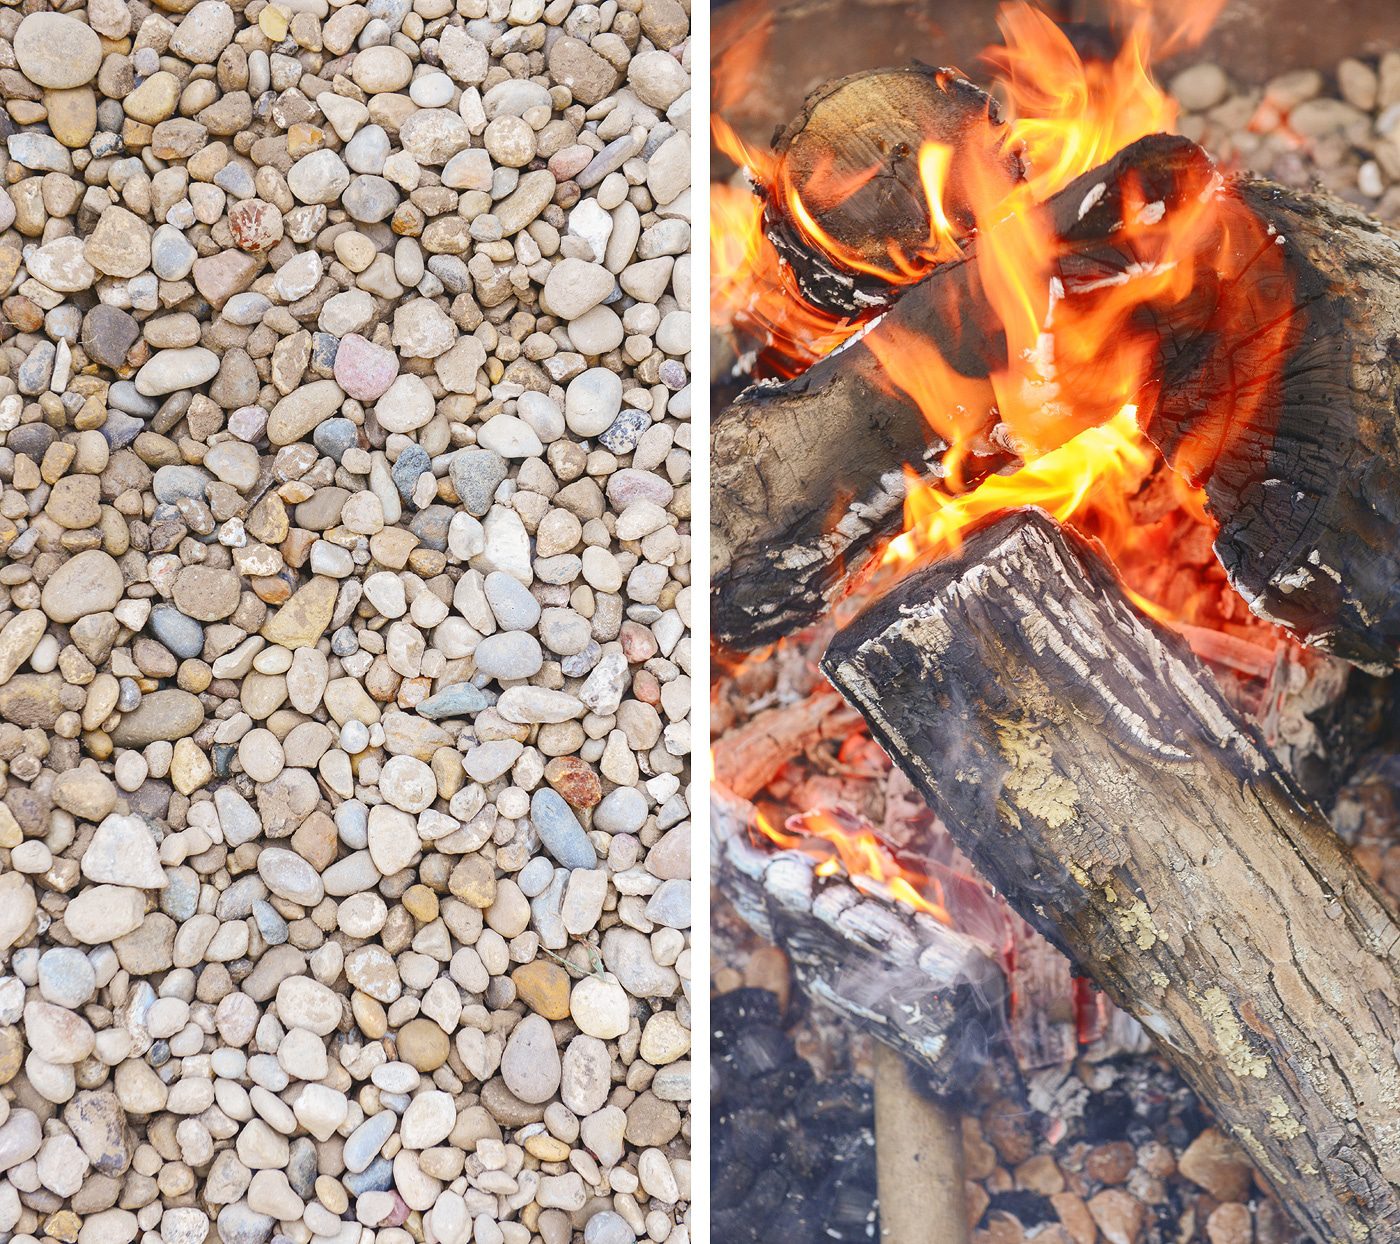
50-60 bags decorative gravel (we used yellow river rock)
Level
Landscape block adhesive (we used 1 x 28 oz tube)
Laying the Foundation
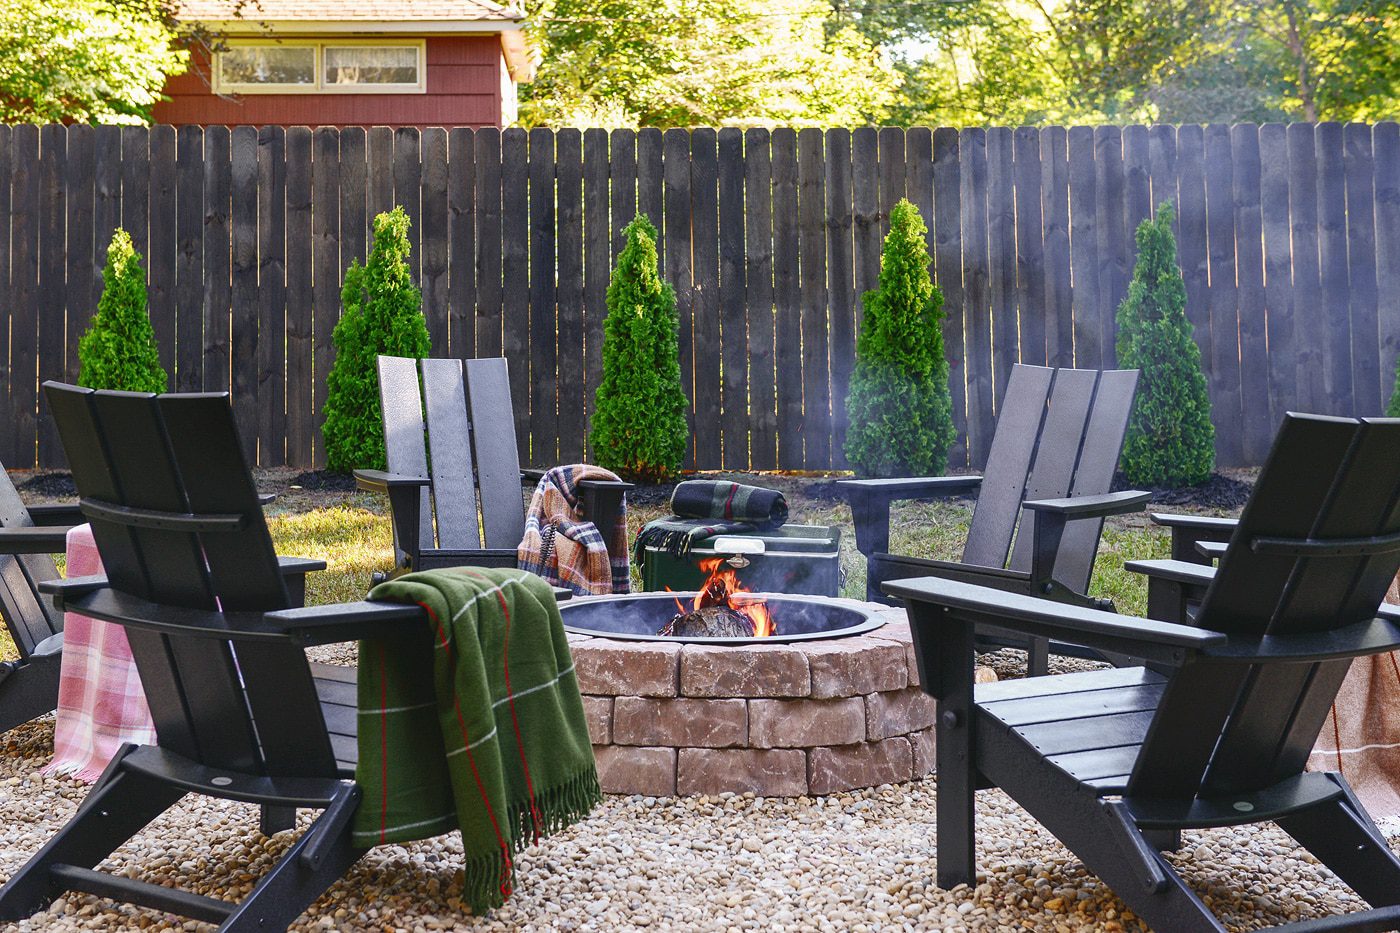
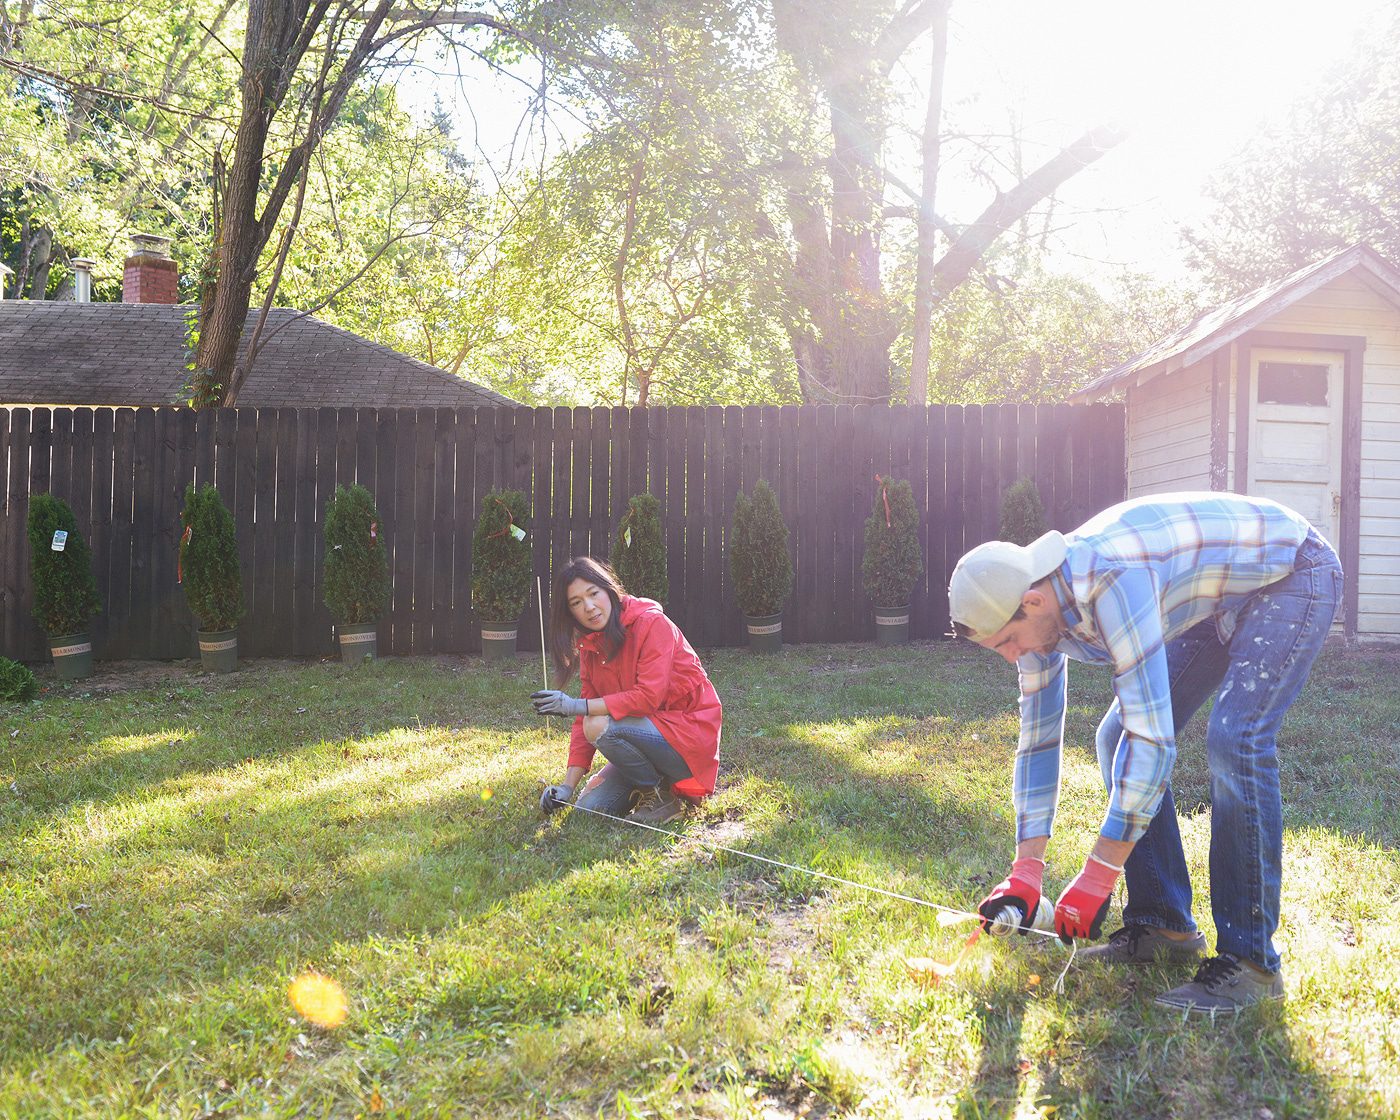
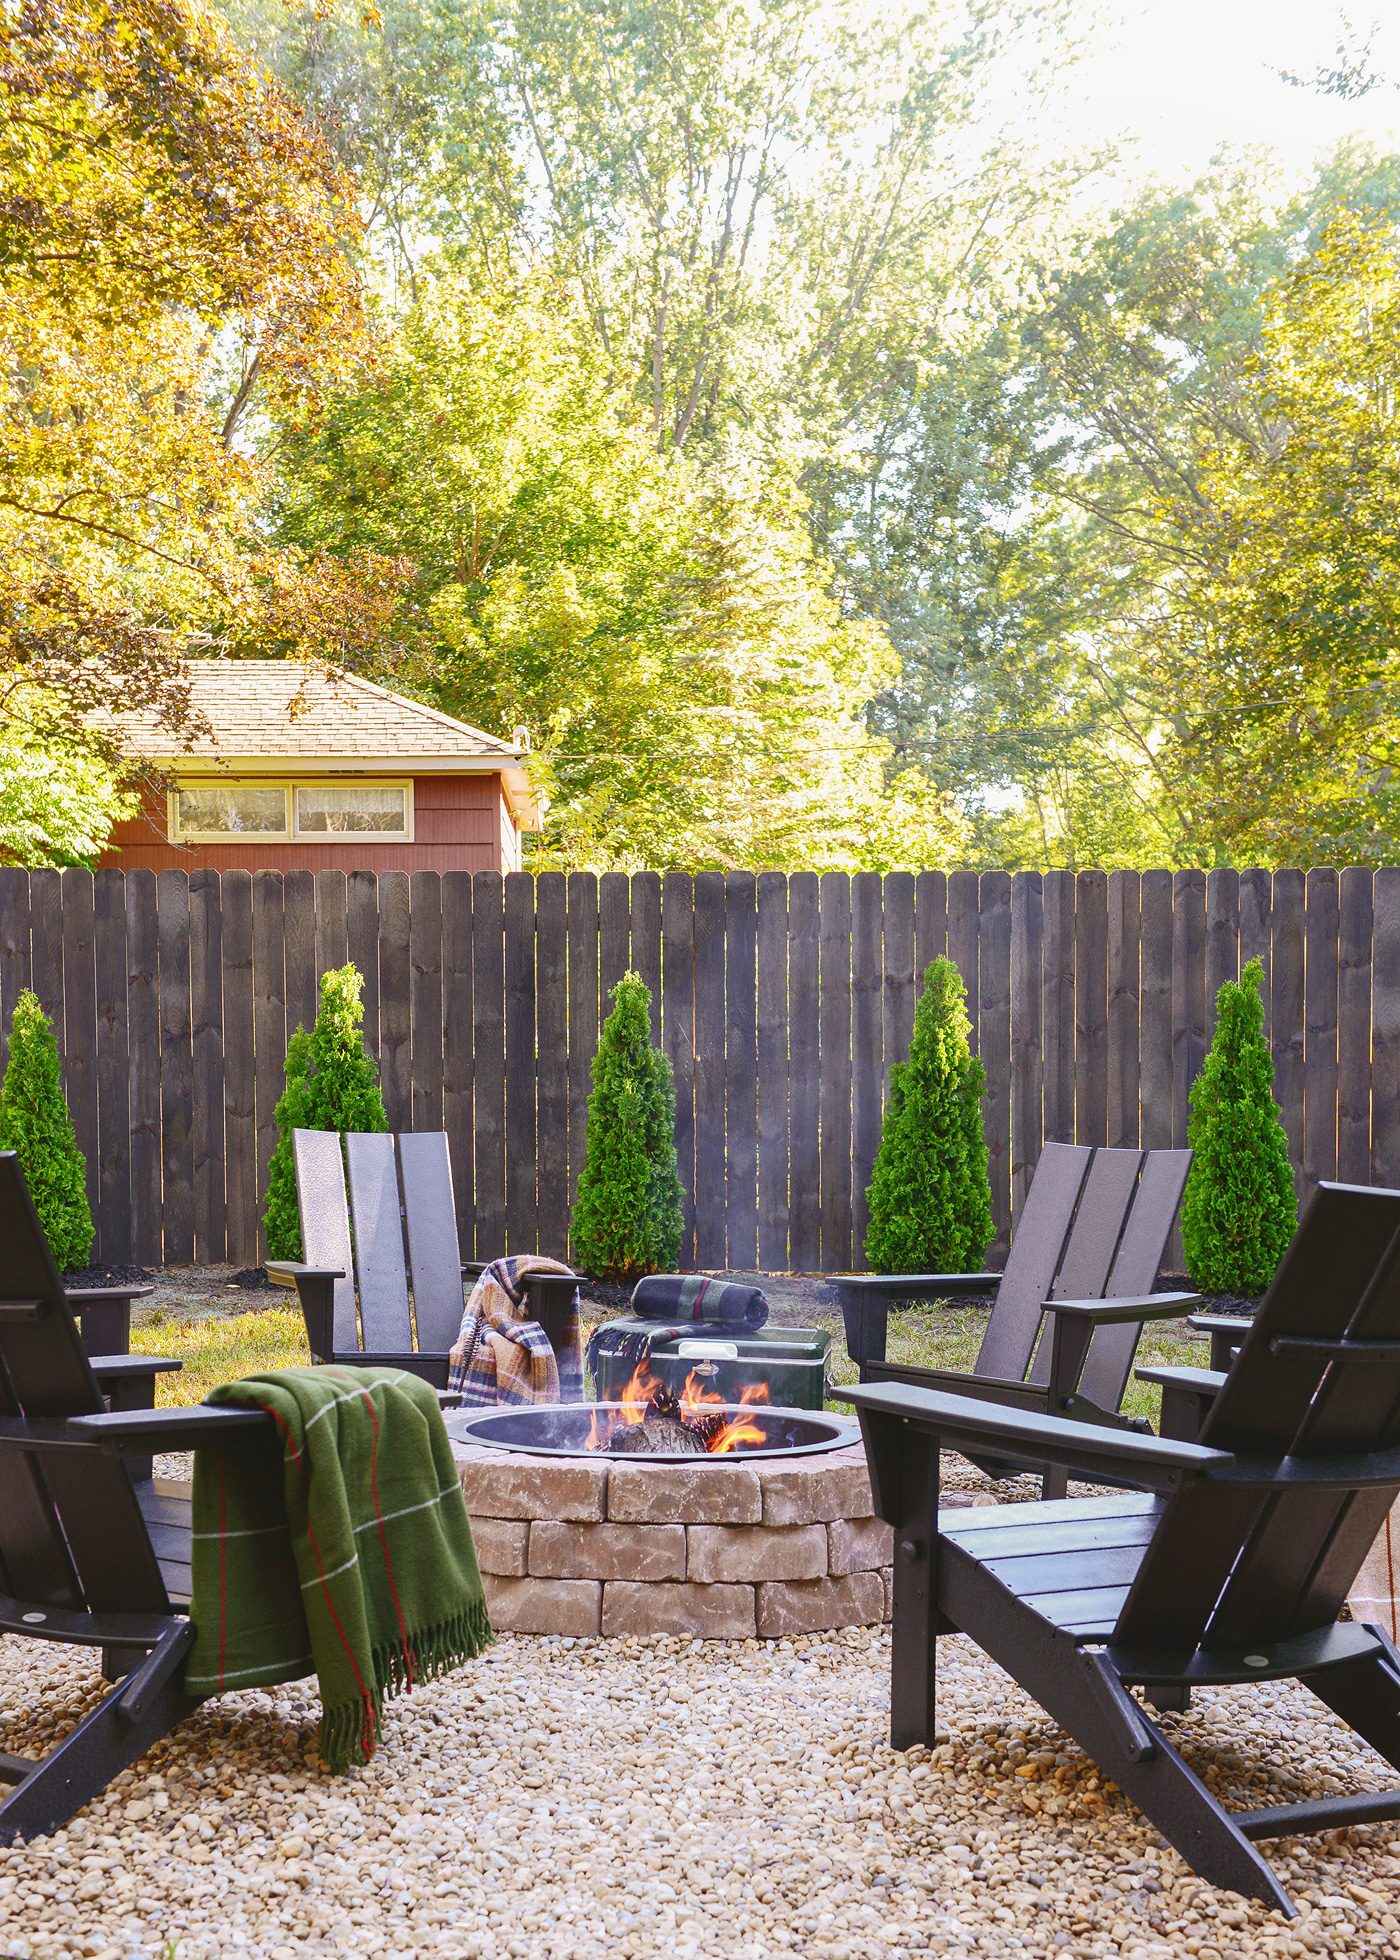
We wanted the ring around our fire pit to comfortably accommodate six deep and cozy Adirondack chairs (similar), with additional breathing room for a cooler and a log stool or two. After staging our chairs in the grass, we determined that a 15′ diameter circle would be a nice size to surround our not-quite-4′ fire pit kit.
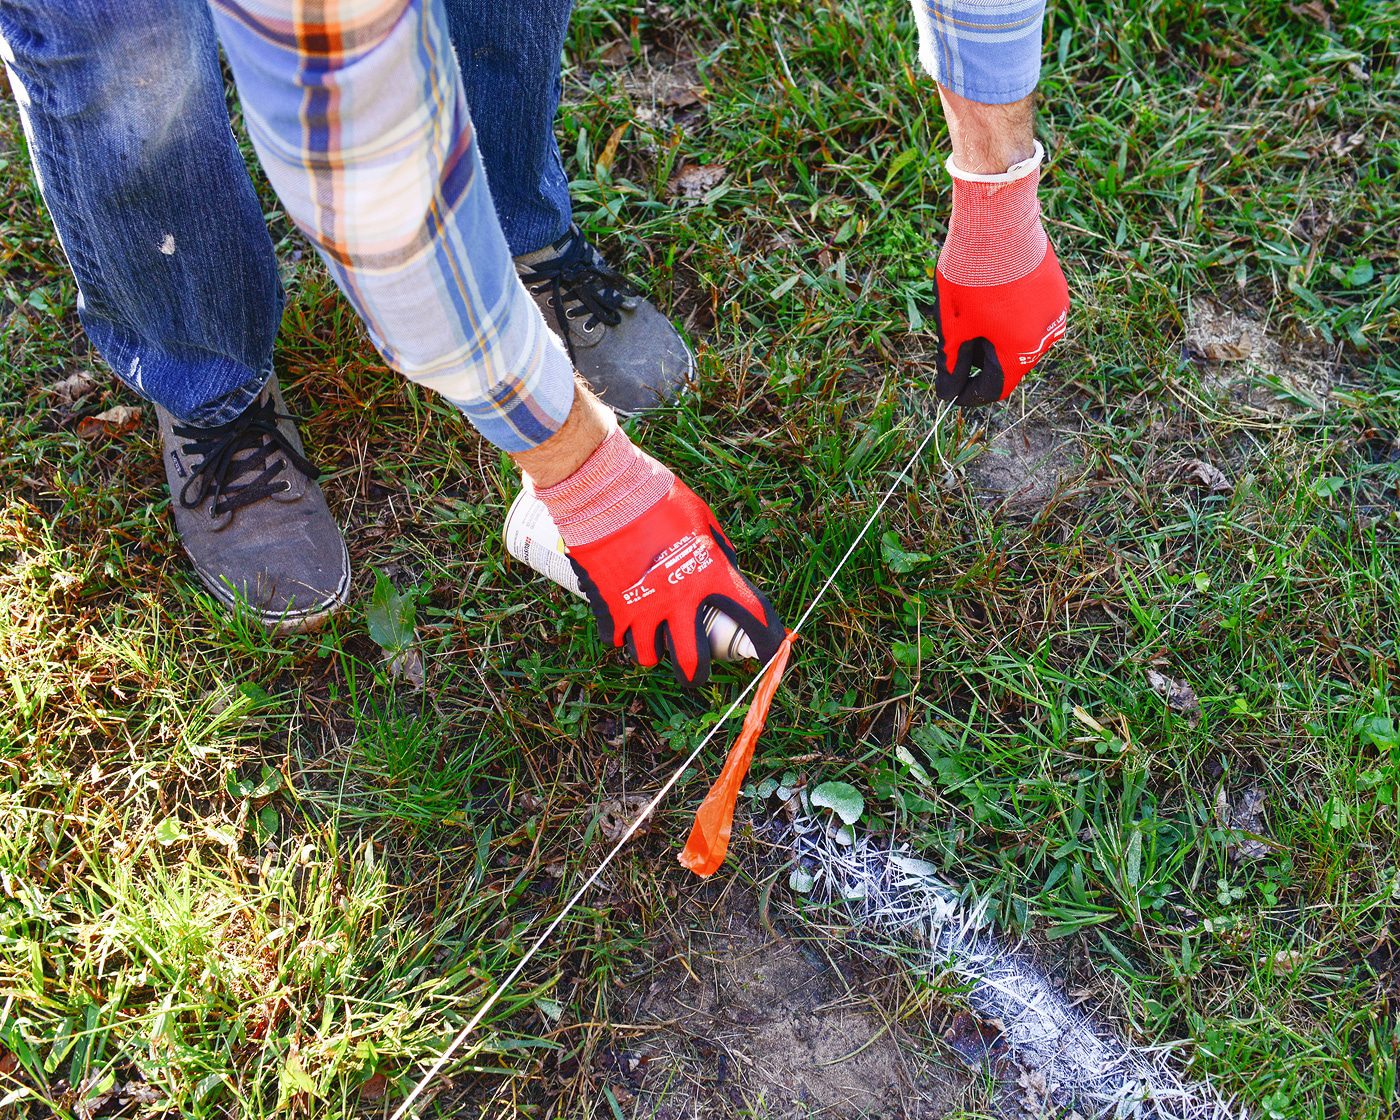
We used a tape measure to determine a fairly flat central point in the yard and marked it with a bamboo stake. We then looped a string around the stake, measured out to 7 1/2′ (you know, half of 15′) and tied a small flag to the string. Walking slowly backwards, we held a can of white spray paint at the flag and quickly laid out a perfect 15′ circle.
Using our flat-blade spade, we then edged around our spray paint line. Consistency here was very helpful – we opted to stay outside the spray paint line and our circle turned out perfectly. (Our helper pittie-mix, Roo, sped things up dramatically!)
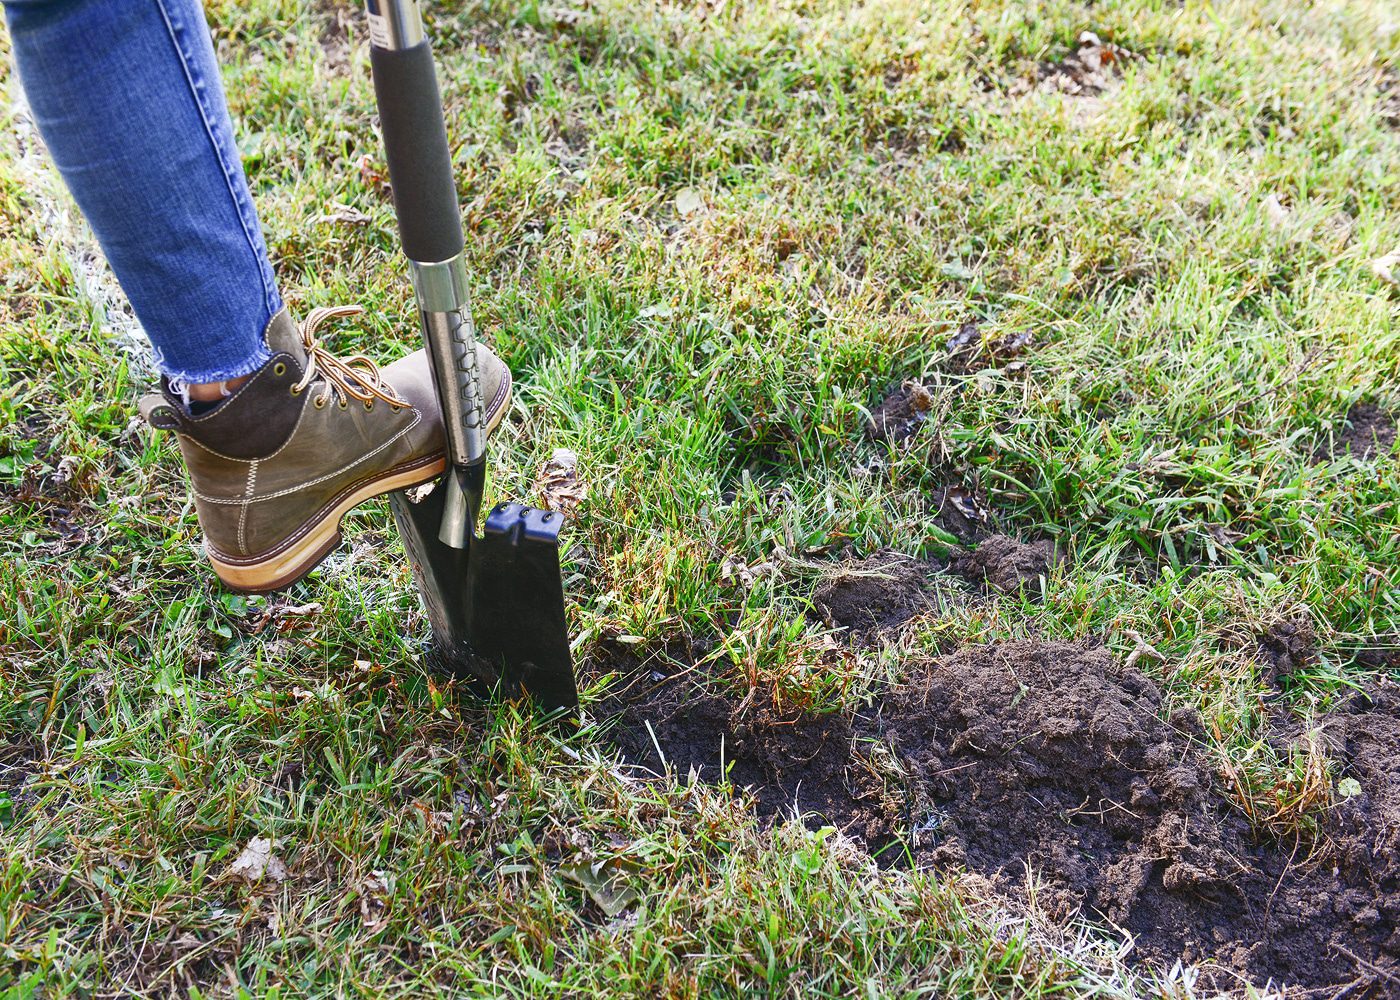
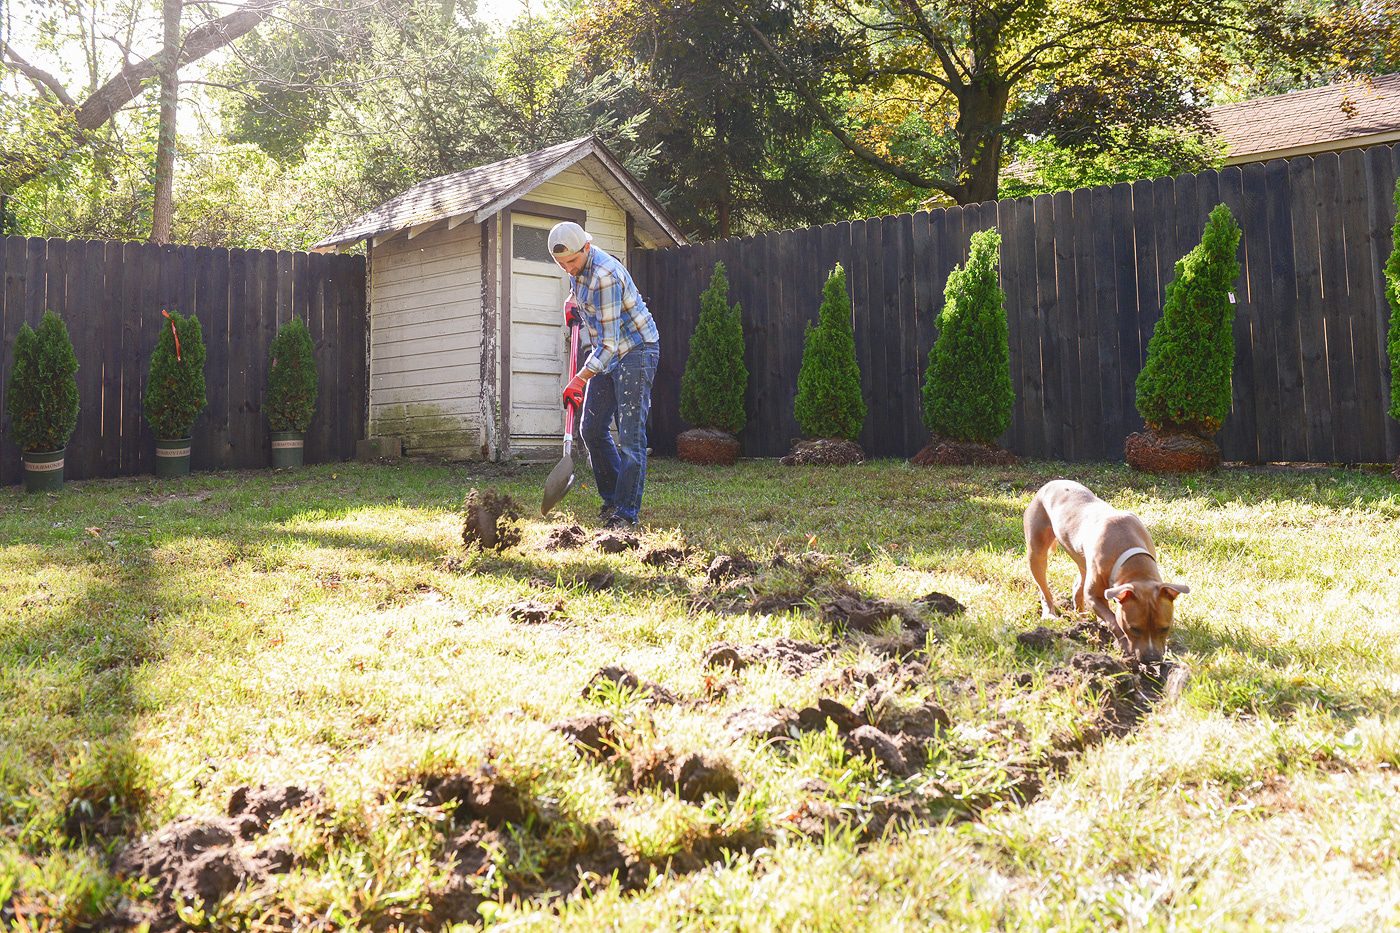
After we had our circle completely edged (and Roo had inspected our work), we brought out the big guns by using our tiller. While a tiller is not completely necessary for this part of the project, the ability to cut into the soil at a consistent 2″ depth was hugely helpful and kept things closer to level. The tilled soil is also much, much easier to scoop out of the ring and spread to other low spots in your yard or repurpose as you see fit. Once the ring was completely tilled, we removed the excess soil and raked the exposed dirt as level and compact as possible. Note: If you don’t own a tiller or have no future need for one, they can also be rented from most big box stores or tool rental shops.

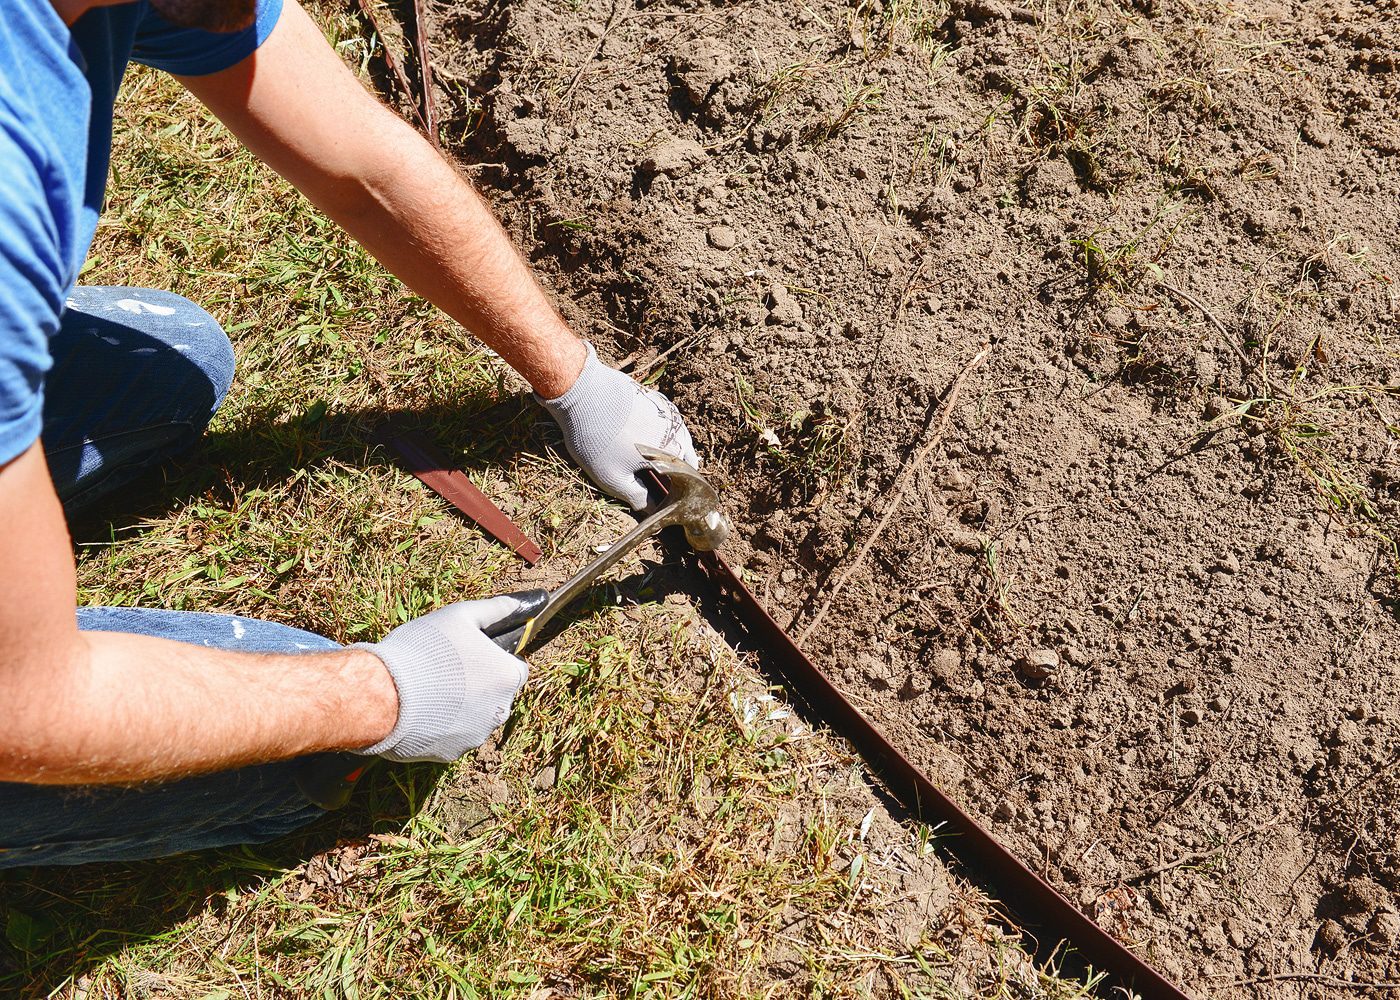
Using a claw hammer and a block of scrap wood (a rubber mallet would work just as well here if you have one!), we installed our metal landscape edging with the included stakes. It’s important that the edging sits flush with the surface of the grass to ensure that it’s not a tripping hazard.
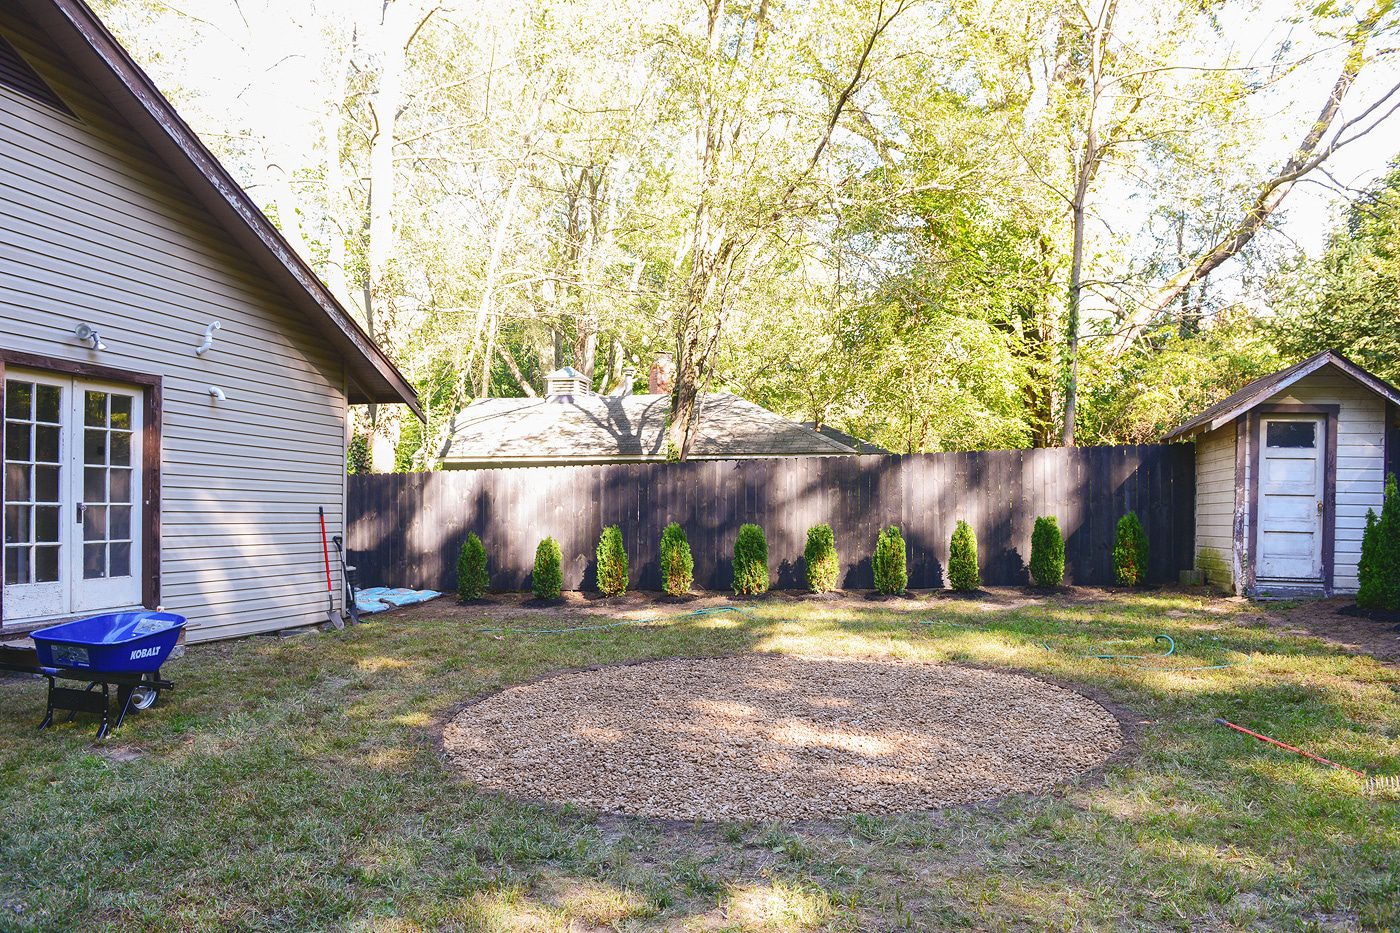
After our edging was complete, we laid down slightly overlapping strips of landscape fabric to keep pesky weeds from popping through our gravel layer. A handful of landscape pins kept the fabric from flopping around and ensured that those future weeds won’t peek up through any gaps.

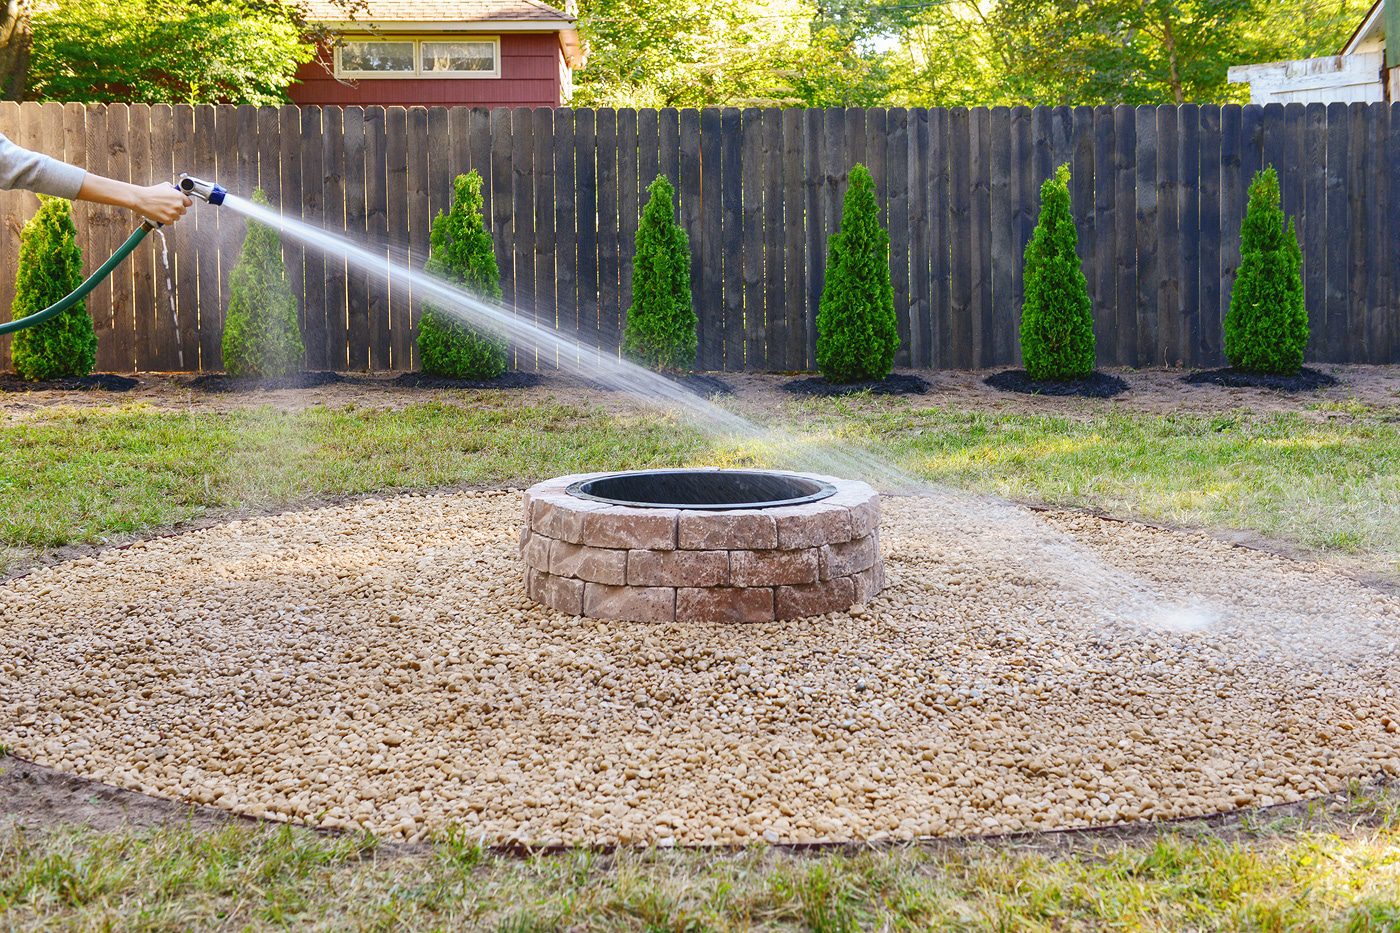
With the fabric secured tightly in place, we were finally ready for gravel! We needed close to 60 bags of gravel for our depth of around 2″. If that sounds like a lot, it is, but this ensured that we had a thick, even layer. After laying the bags in rows, we used a utility knife to split the (many, many) bags open, and then we dumped them in place and spread them out with our steel garden rake. That brought us to this beautifully round patch of gravel:
Building the Fire Pit
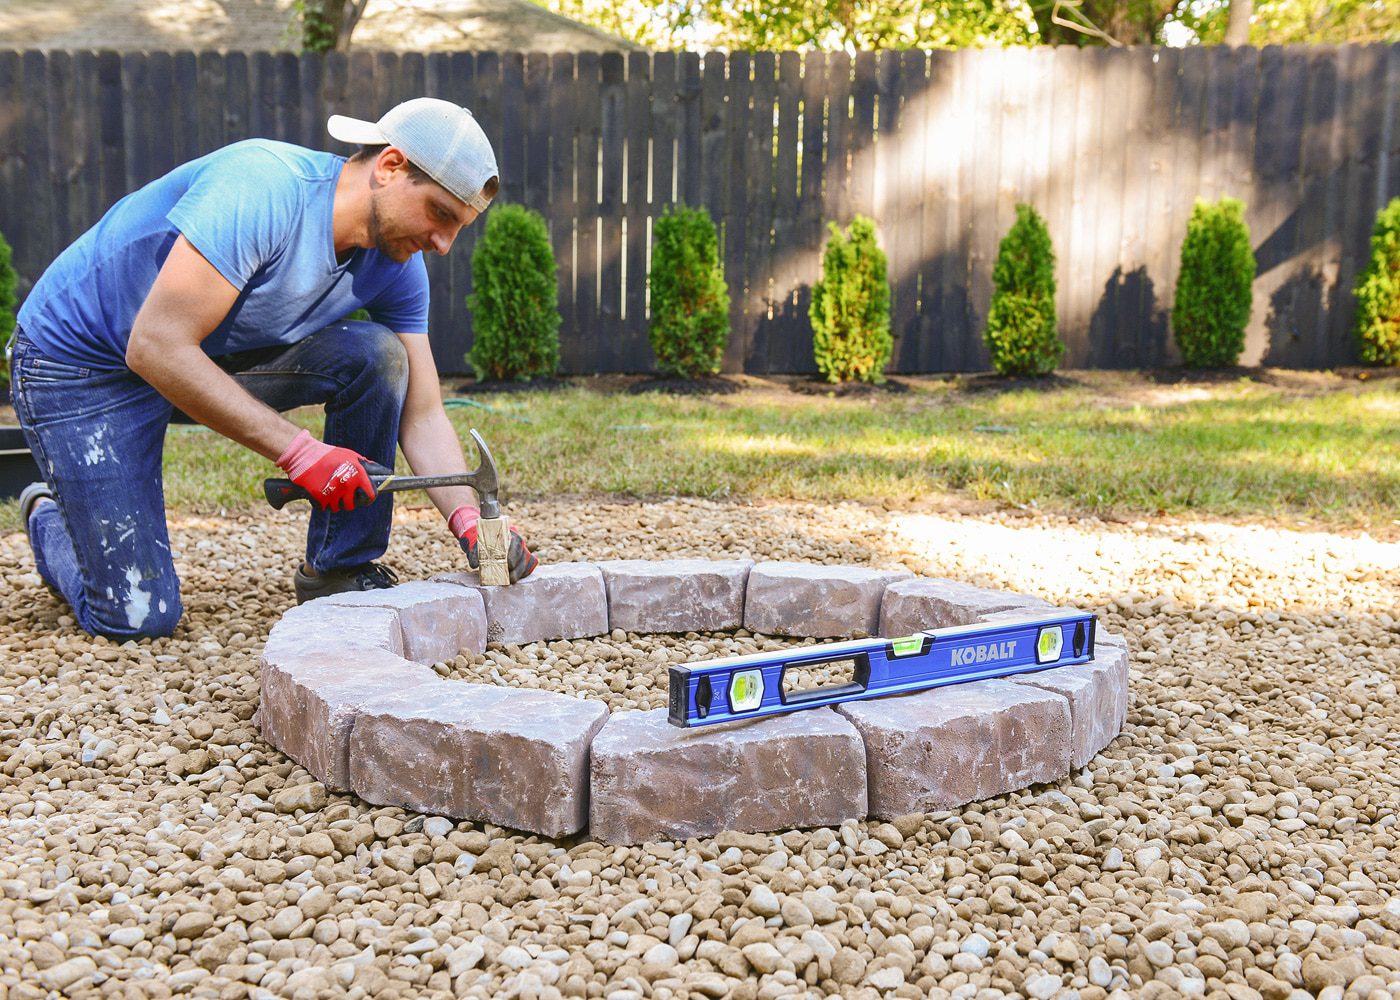
With our groundwork in place, it was time to build the pit! Roo jumped away in pure glee as we used the steel insert from the fire pit kit to find our center mark with some simple measurements.
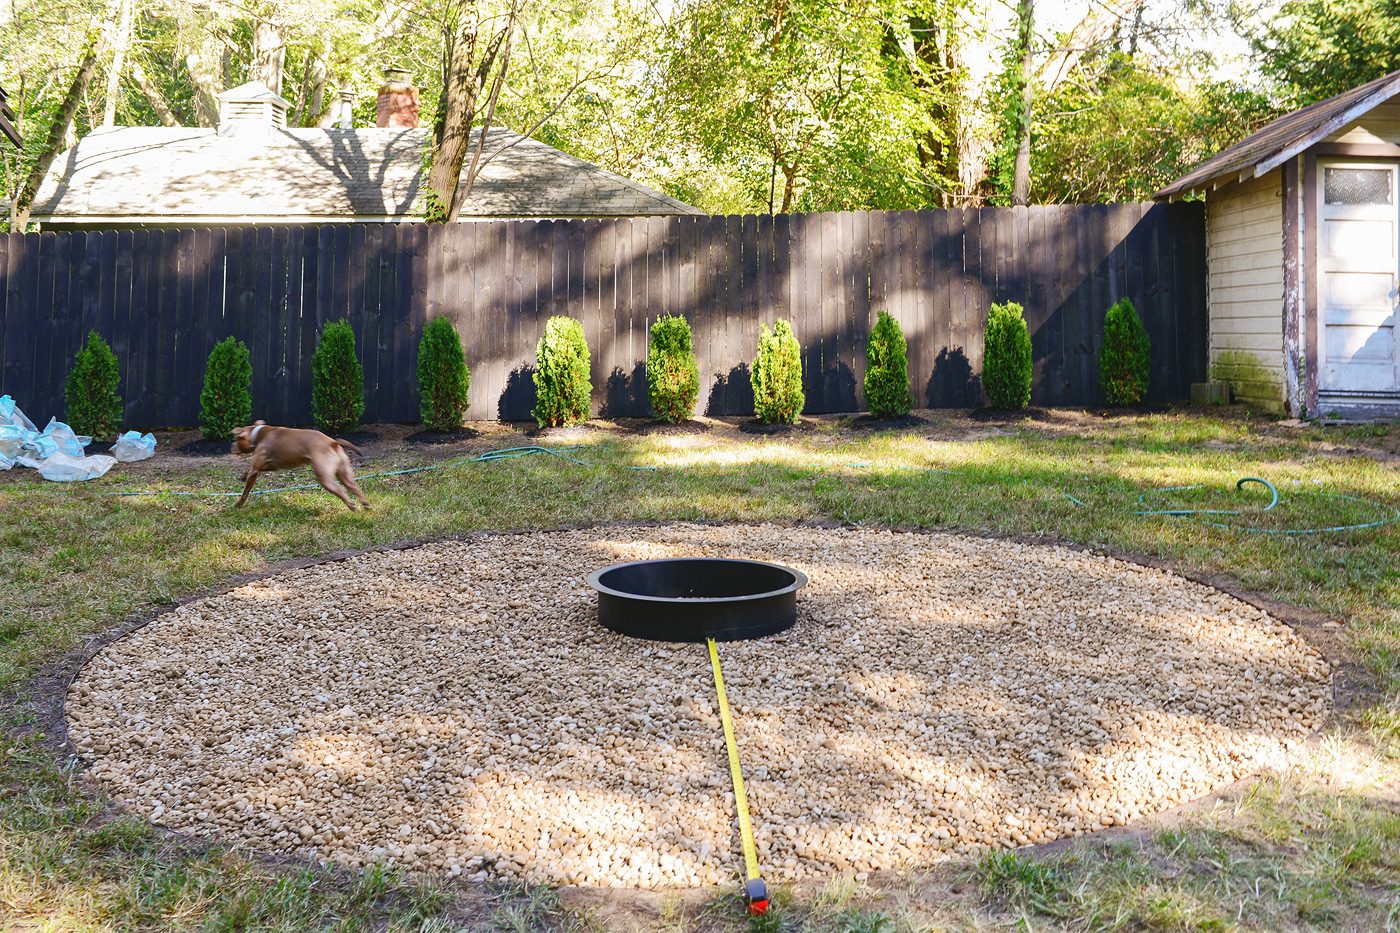
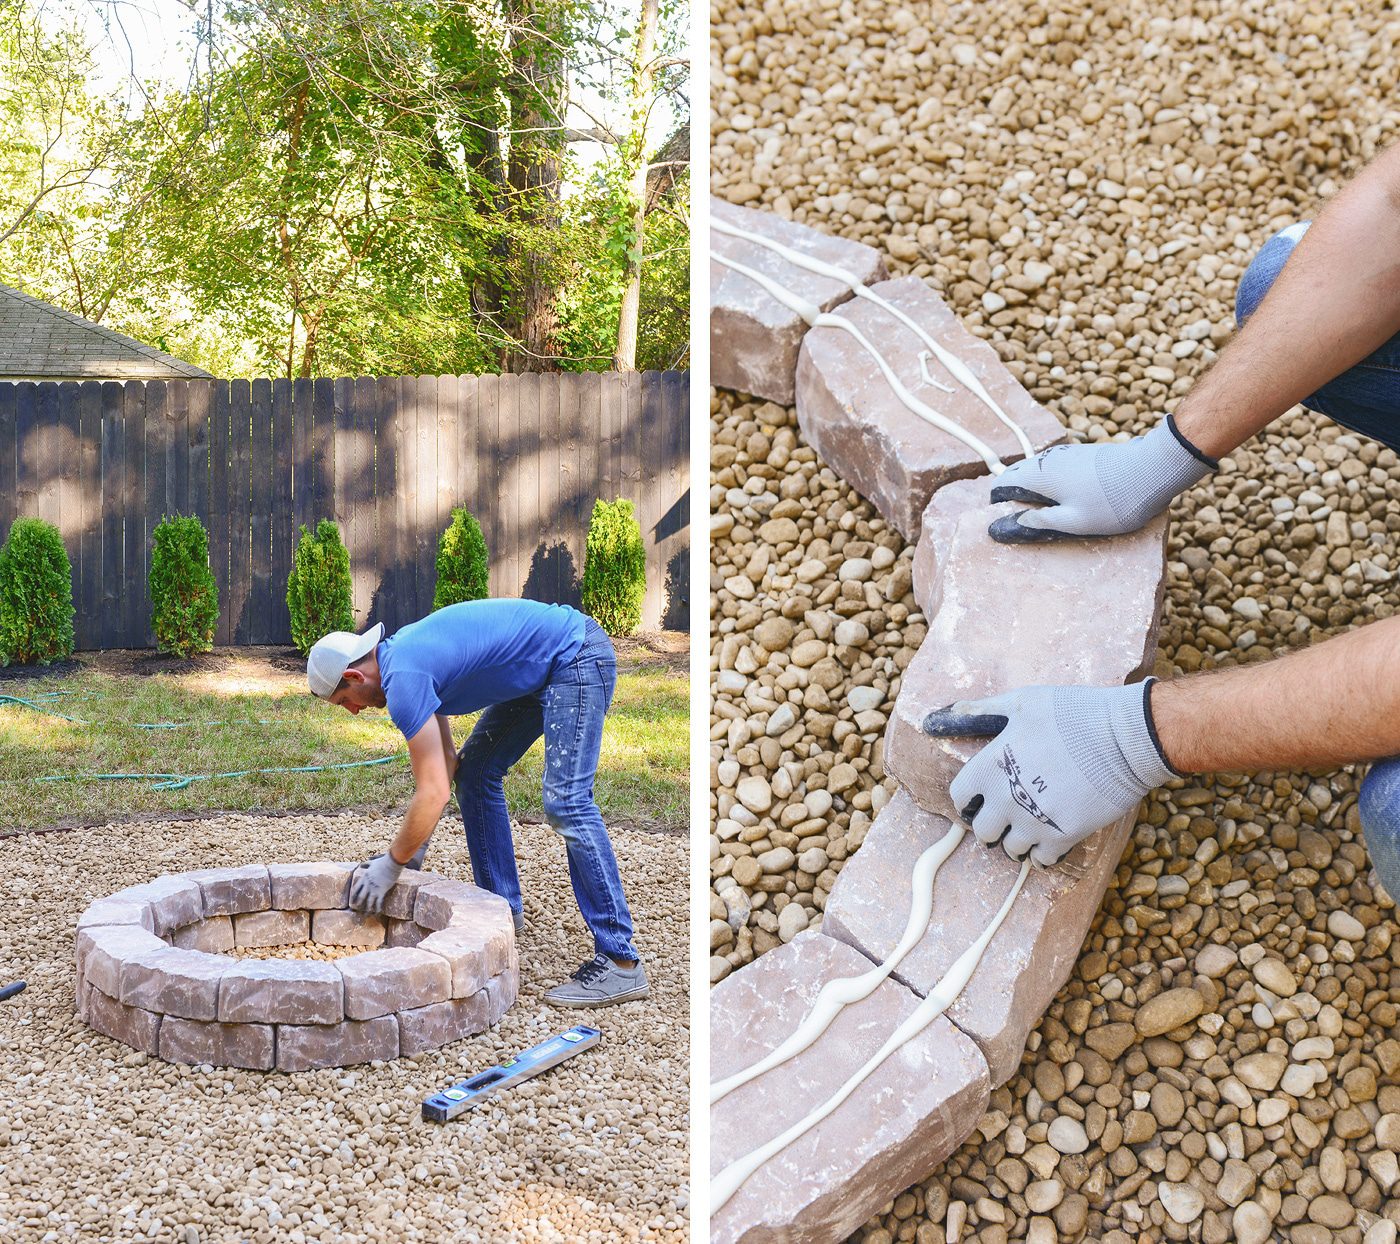
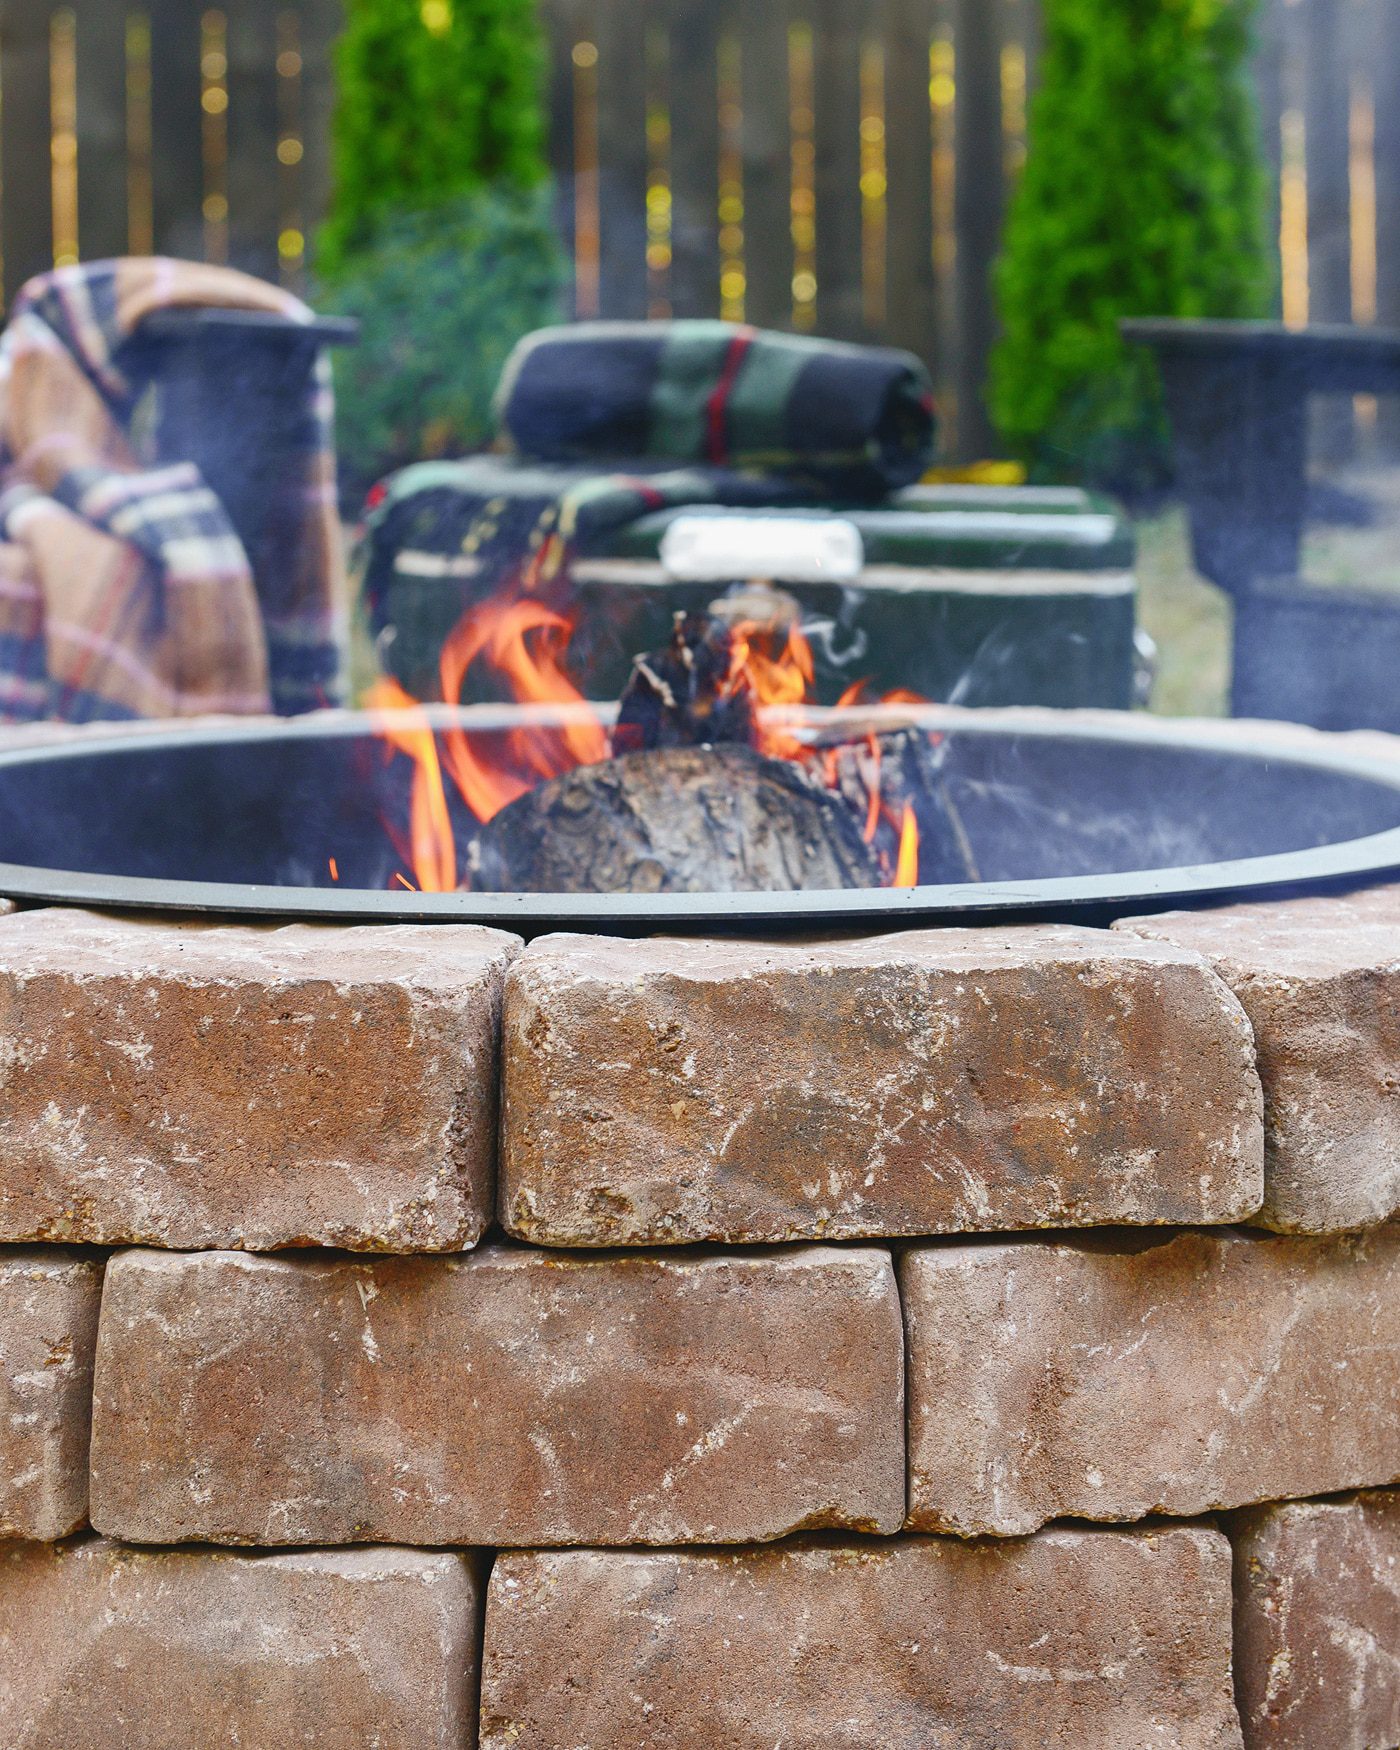
Leaving the ring in place, we built the first row of the blocks around it and then popped the ring out and checked for rough level on our first row. A few low spots needed a lift from some extra gravel underneath and a few high spots got tapped down with a hammer and a block of scrap wood. Note: The blocks in our kit have a smooth side and textured top side. The smooth side always faces down for easy stacking.
Before laying down the second row, we applied construction adhesive and staggered the joints for looks and stability.
With the second row in place, we inserted the metal ring again, checked for level again and made a few tiny adjustments to keep things as close to perfect as possible.
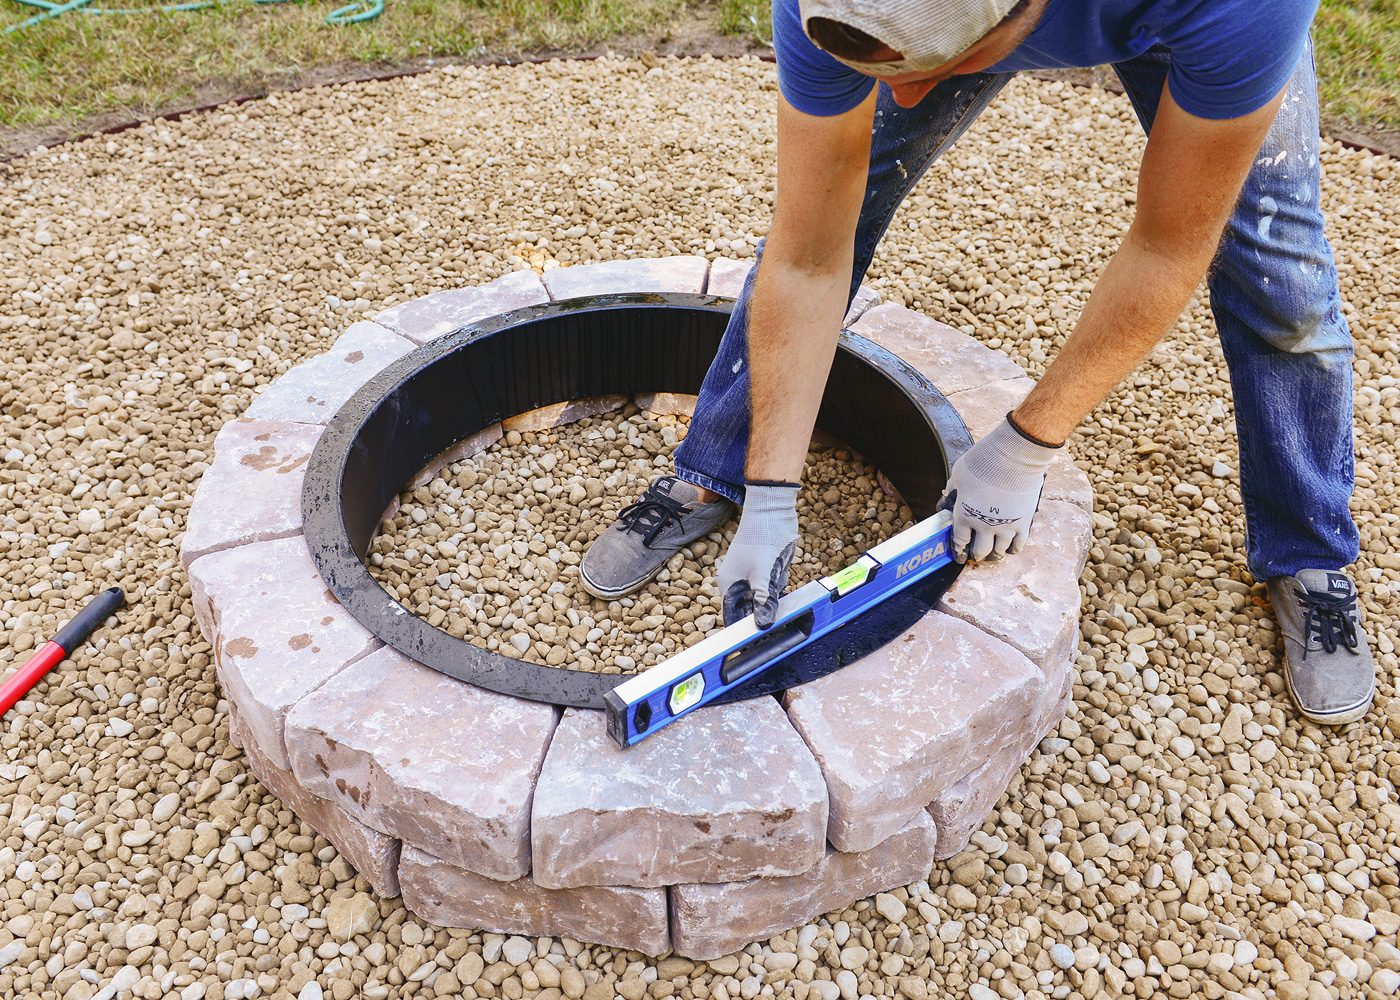
Finally, we pulled the ring one more time, repeated the previous step with the third row of blocks and we were all set! Once the final row was in place, the ring insert was put back into place for good.
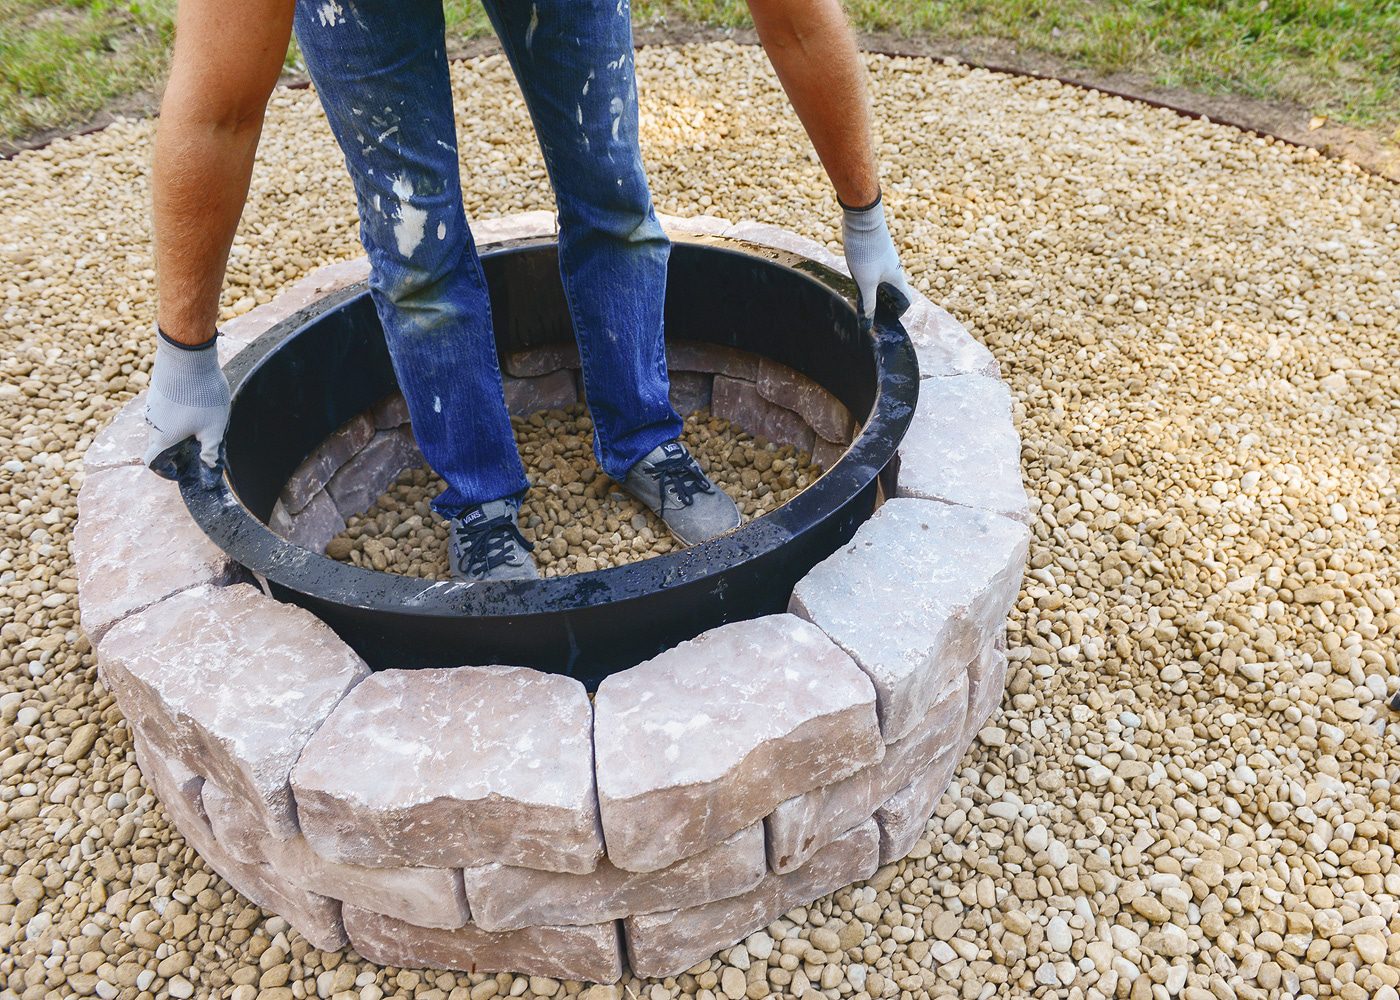
To keep dust and dirt at bay, we rinsed everything down with a healthy amount of water. The gravel bags can get fairly dirty in transit, so if there’s not any rain in the forecast, you may need to repeat this step a few times. Once everything is nice and cleaned up, you have a fire pit!
Weather in southwest Michigan fluctuates drastically between seasons, so it was important that the chairs we selected could not only withstand the elements and temperature swings, but ideally, they would also fold up and be stashed away during the coldest winter months. We landed on modern Adirondack chairs (similar) that fit the bill perfectly. They’re made from recycled plastic, and several of you chimed in throughout our yard makeover praising the strength, durability and fade resistance of Polywood.
Note: These Polywood chairs have now been in place for nearly 7 years and they still look brand new! We’ve since added polywood rocking chairs and loveseats to the front yard of this home and we can’t recommend them enough.
These chairs are, without a doubt, the most comfortable Adirondack chairs we’ve ever sat in! The arms are perfectly flat and offer a wide enough space to keep a drink and a small plate full of snacks within reach and the seat backs are angled perfectly. We intend to keep the chairs in place until the weather gets unbearable, then stash them along the back side of the house under furniture covers to keep them looking their best. These chairs have been left outside through 7 incredibly harsh years of Michigan winters and summers. They’re perfect. No notes.
When not in use, we store our cooler in a covered deck box that we keep tucked alongside the front of the house. Otherwise, our 15′ ring boasts plenty of space for the cooler to stay within easy reach during relaxing evenings by the fire. (Bonus, it’s sturdy enough to double as additional seating!)
The fire pit lends a wonderful focal point to the backyard at our little Tree House, and now that our Chicago backyard has its fireplace gas-delivery system all updated, we’re doubly ready to extend the fall season as long as Mother Nature will allow! We find that our gas fireplace is great for quick evenings by the fire after a long work day in Chicago, but we’ve come to prefer the crackle, pop and smoky aroma of a wood burning fireplace in our little Tree House getaway.
We’d love to know: Which type of fire do you prefer? The convenience of gas or the smoky goodness of wood?
PS: If you’re on the hunt for other outdoor DIYs, here’s a giant Jenga and rope swing. Both projects can be completed in an afternoon!
In This Post:
fire pit kit | modern Adirondack chairs (similar)| blankets | cooler | Kim’s coat + work boots | baby carrier


Both, always both. Though I’m more wary of wood fire pits ever since high school, when an old friend’s dad watched us struggle with starting a fire and was like, “wait, I got this” and came back with a watering can of… gasoline! I swear the flame was 12 feet high hahahaha. No one died but it was definitely a holy sh*t!!!! moment.
I need a fire pit in my life again though, just maybe this time minus the gasoline!
Oh, man! I think we’ve all had one of those fire pit moments… right?! We’ve all learned a lot since then!
I love your backyard! how beautiful!
Thank you, Ellen!
This looks like the best possible way to spend an autumn evening – I’m so impressed it was all accomplished in just one day! Here the mosquitoes are the biggest menace, well into October – do you guys have similar issues in Michigan, and if so, any tips for keeping them at bay?
Thanks Julie! Mosquitoes are a HUGE problem in SW Michigan as well. We’ve been utilizing a company called Mosquito Squad to treat for ticks and mosquitoes every three weeks this summer. It has helped a TON, but when you get to about the 2.5 week mark, you really can tell that they’re starting to come back. Yet another reason to build a wood-burning fire pit – the smoke helps to keep them away as well!
How have you found cleaning the ash/fire debris from the pit post-fire with the gravel at the bottom? Inquiring minds want to know!
We haven’t gotten to the point of excess debris – yet! – but once we do, we’ll scoop the extra and rinse most of it down through the gravel. :)
Where did Roo come from? Do you have a new dog??
That’s our friends’ dog! But we might take him away if they turn their backs long enough… he’s a sweetheart.
What color are your Adirondack chairs? Is that the black? Also… have they held up?
Yup! They’re black Polywood chairs and have held up amazingly well in the 8 or 9 months that we’ve had them!
Inspired by YellowBrickHome, I also bought black Polywood chairs (in a slightly different style), and mine held up great through a Chicago winter (when I forgot to put them in the garage).
Love hearing this! We’ve yet to store ours away ???? and they still look brand new.
[…] via: yellow brick home, stylemepretty, Houzz, Homify, Authenteak, Erin […]
Hi! I love the way this fire pit looks and will probably be doing something similar in my backyard. I had one question – have you had to worry about the weedblock fabric melting and/or catching fire under the fire pit? Thanks very much. :)
No issues whatsoever!
Hi!! I looove this so much. Question..did you remove the sod before you tilled?
Tilling digs up all the grass!
This may be obvious, but why create the large circle of gravel? I’m thinking of making something similar but might leave grass or woodchips. It does look great though!
Good question! The gravel keeps things nice and neat – think of it like an area rug for your fire pit. ???? We rinse off the pit after using it, and grass would get soggy/muddy, whereas the gravel will drain nicely. (Wood chips would be a fire hazard, so please avoid using that!)
Do you remember how much edging it took to make the circle of your size? Thanks!
[…] Source by jlclark628 […]
Looks great! You can also drill vent holes in the pit base for more air flow and less smoke, i.e. the fire burns cleaner. This looks like a real cozy place with the washed gravel.
Do the black chairs get hot in the summer, though? Kind of like getting a leather interior car with shorts on ????
[…] First I read about how better DIYers tackled this project at the Yellow Brick Home […]
[…] Photo from Yellow Brick Home […]