

This post is in partnership with Lowe’s.
A few months ago, Chris and Julia asked us to be a part of their Dream Team. This team would help one homeowner transform a kitchen or bath, and together, we’d knock out a the renovation in just a few short days for this year’s Lowe’s Spring Makeover. Having completed a similar whirlwind renovation last year, Scott and I were saying yes! before we even heard the details, but as the story unraveled, it only got better! Also part of the team was our friend (and renovation guru) Daniel of Manhattan Nest and Chris’s brother Brandon, who, as it turns out – and not surprisingly! – is every bit as handy as Chris. Chris and Julia spearheaded the project, and it was all hands on deck.
After more than 2,000 applications poured in, it was decided that we would be headed to Baltimore to renovate Nate and Aura’s kitchen! It’s hard to believe that we wrapped a kitchen renovation in less than four days, but our team of six + the homeowners brought every last ounce of energy we had. It was a whirlwind trip in every sense of the word, with minimal sleep, too much fun and a lot of drywalling, painting, tiling, trimming and all-around-project-ing. No detail was too small, and we all rallied together to carry out the plans that Chris and Julia pulled together.
We couldn’t be more excited to share the transformation from top to bottom today, but we also want to send out a huge thank you! to everyone who cheered us on as our Stories unraveled at all hours of the day! It was really fun, sweet and motivating to receive all your encouragement. (I put together a little reel of our Story clips right here, too!)
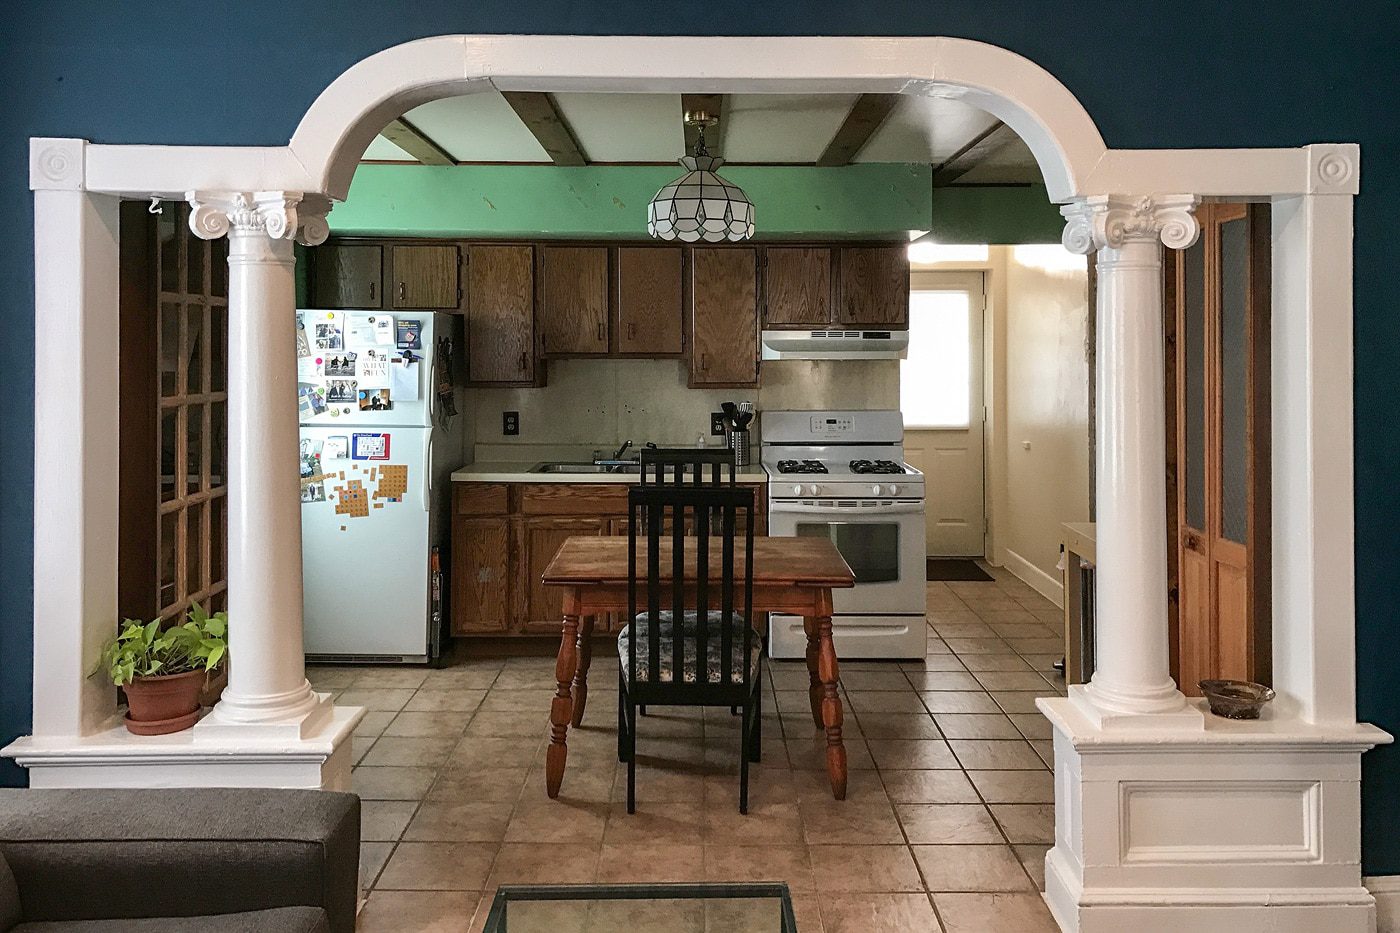
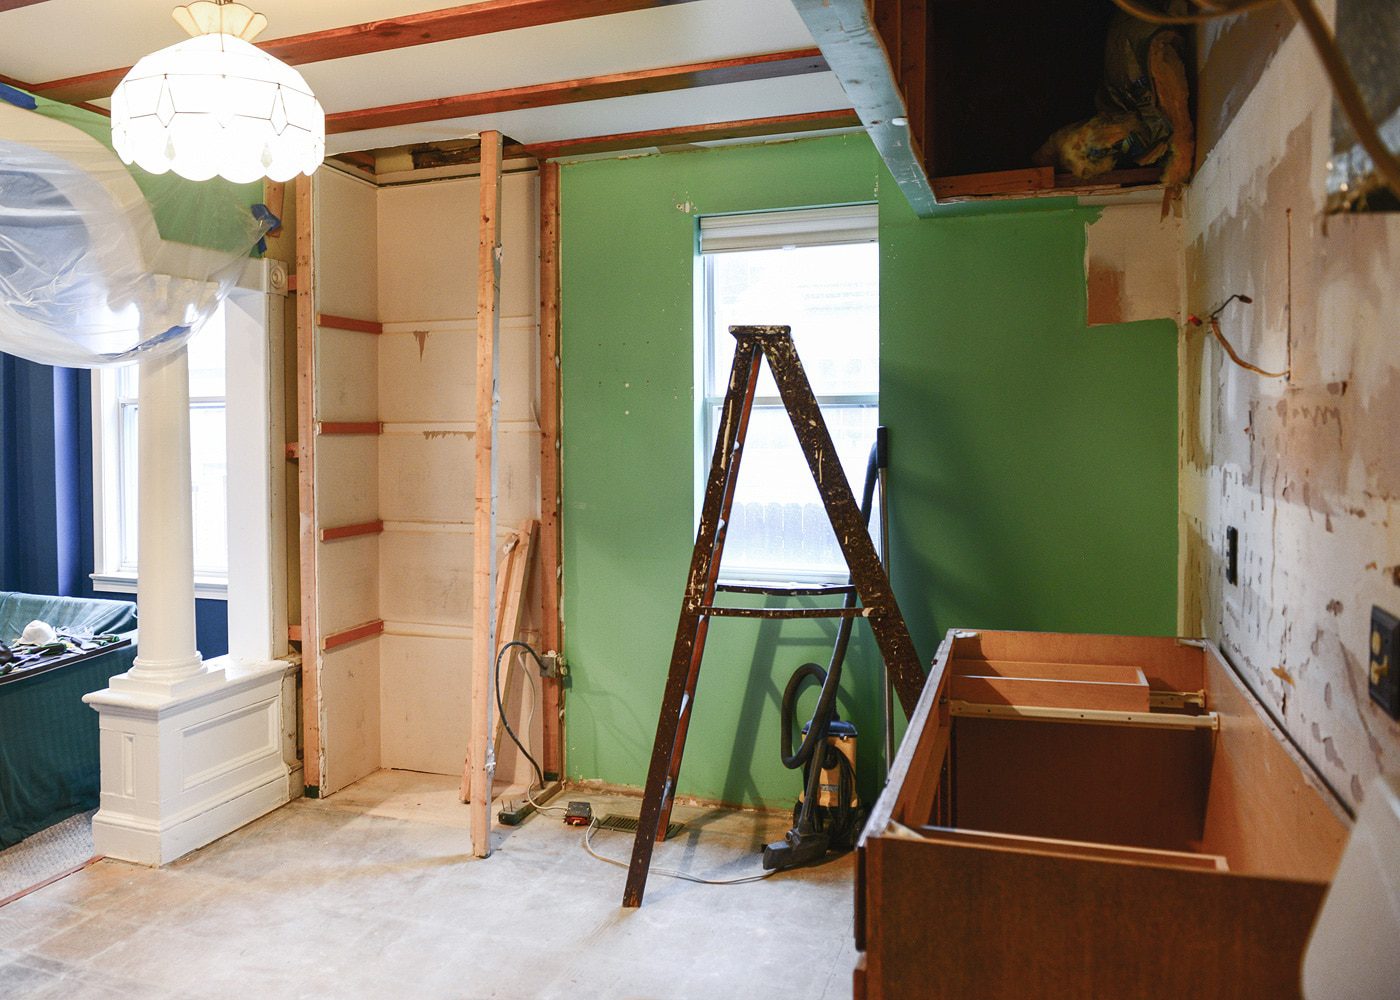
There are few things more satisfying than a good before and after, so I’m going to dive right in! Nate and Aura’s kitchen had a lot of mysteries, including an oddly low ceiling (compared to the other rooms in their home), too-deep cabinet soffits and 1-by faux beams. Here’s where they started:
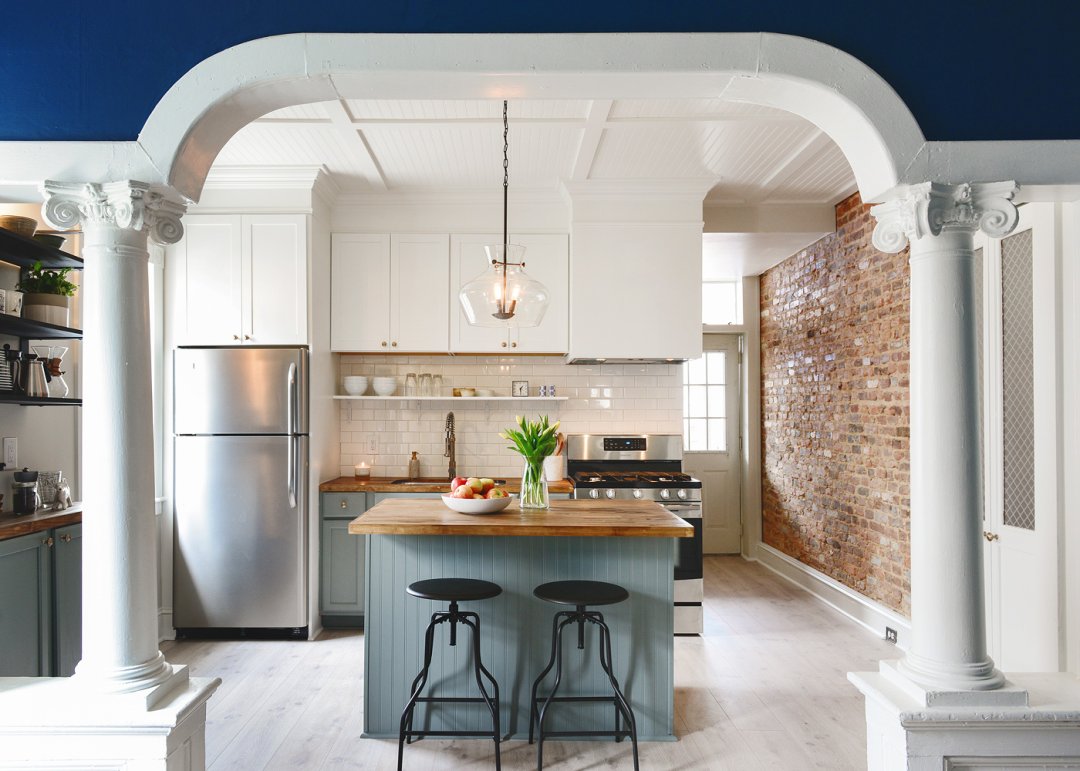
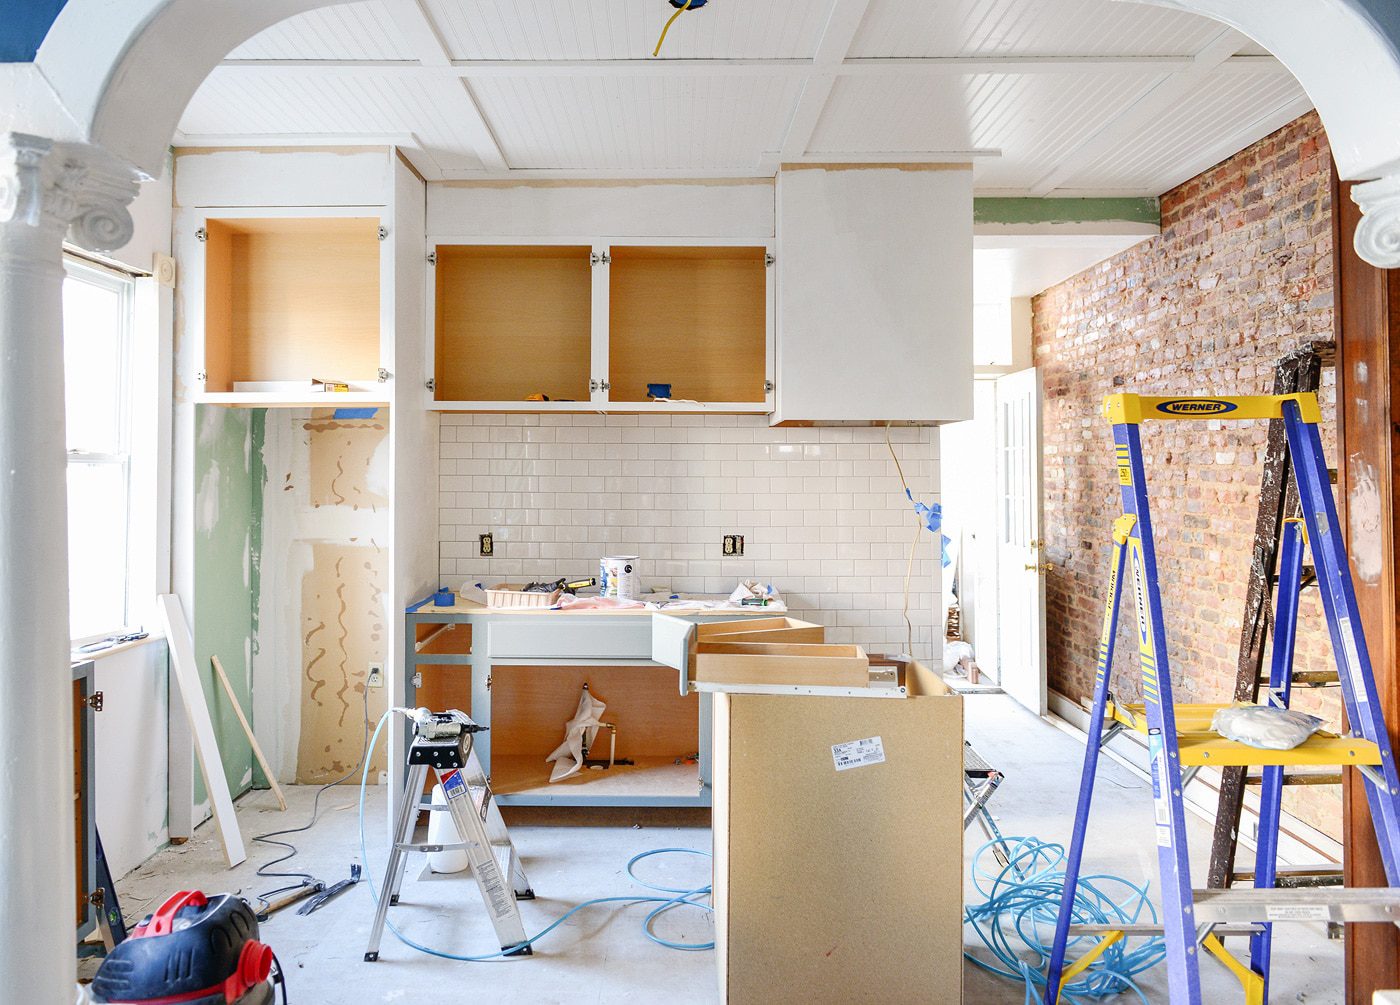
A lot of surprises were quickly uncovered, most of which were really, really good. Nate and Aura discovered a brick wall beneath the plaster, the ceiling was dropped by an entire foot, and luckily, those soffits were empty. But while all that news was great, it also meant a quick change of plans! Taller cabinets were ordered to compensate for the new room height and beadboard would be used to cover the damaged ceiling. While all of this required more demo – and in turn, more finish work – than what we originally planned for, we are absolutely thrilled with the results!:
Note: All items are listed at the bottom of this post, or scroll over image(s) for sources.
Let’s jump back, so we can see how we got from A to B (to G to Z!). Nate and Aura were able to uncover the brick and rip out the existing tile floor before we arrived, leaving us with this clean slate:
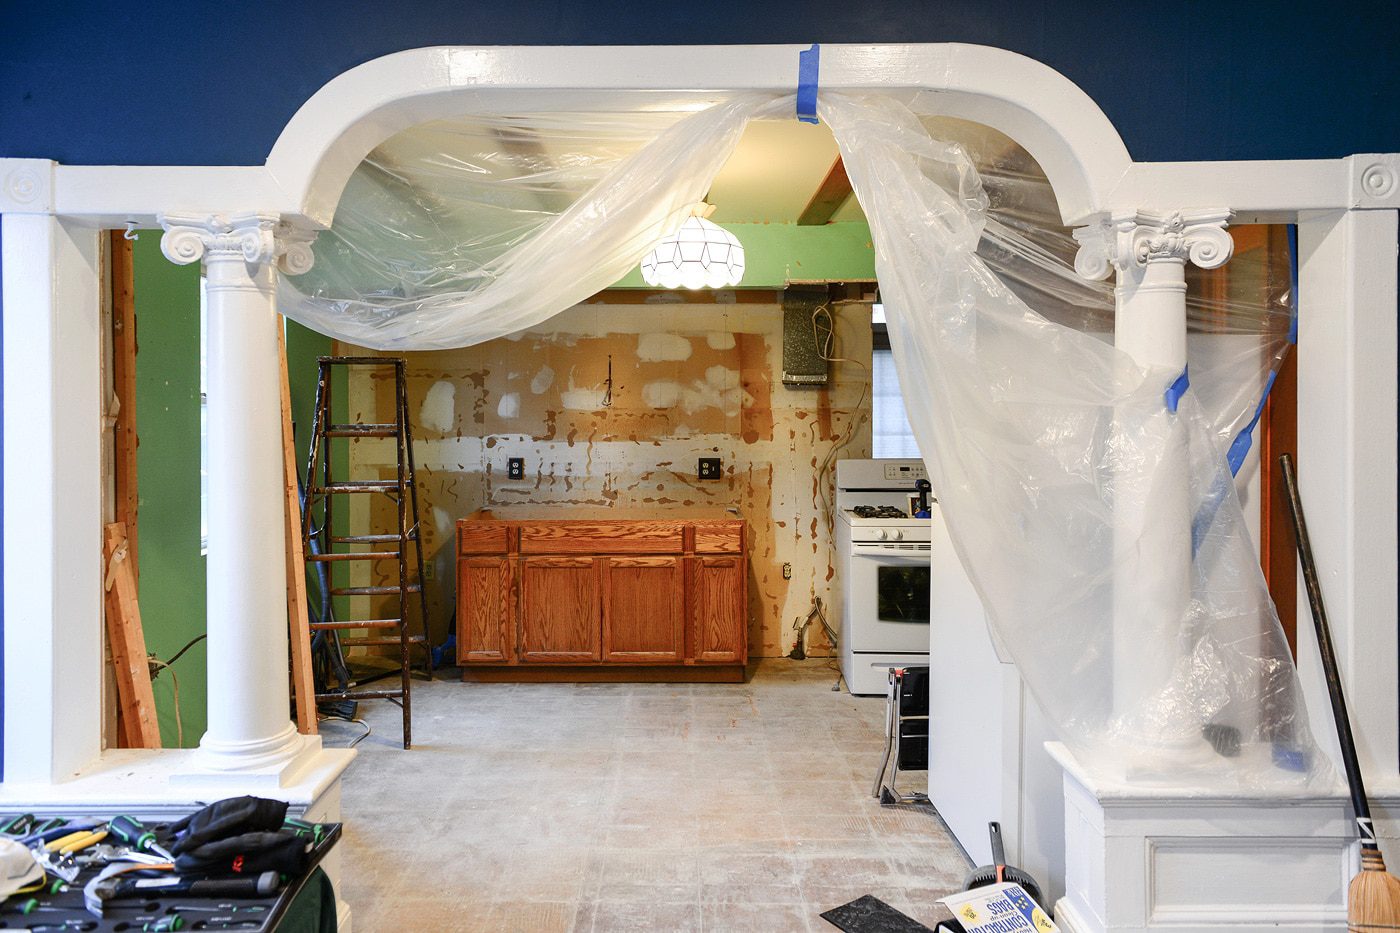
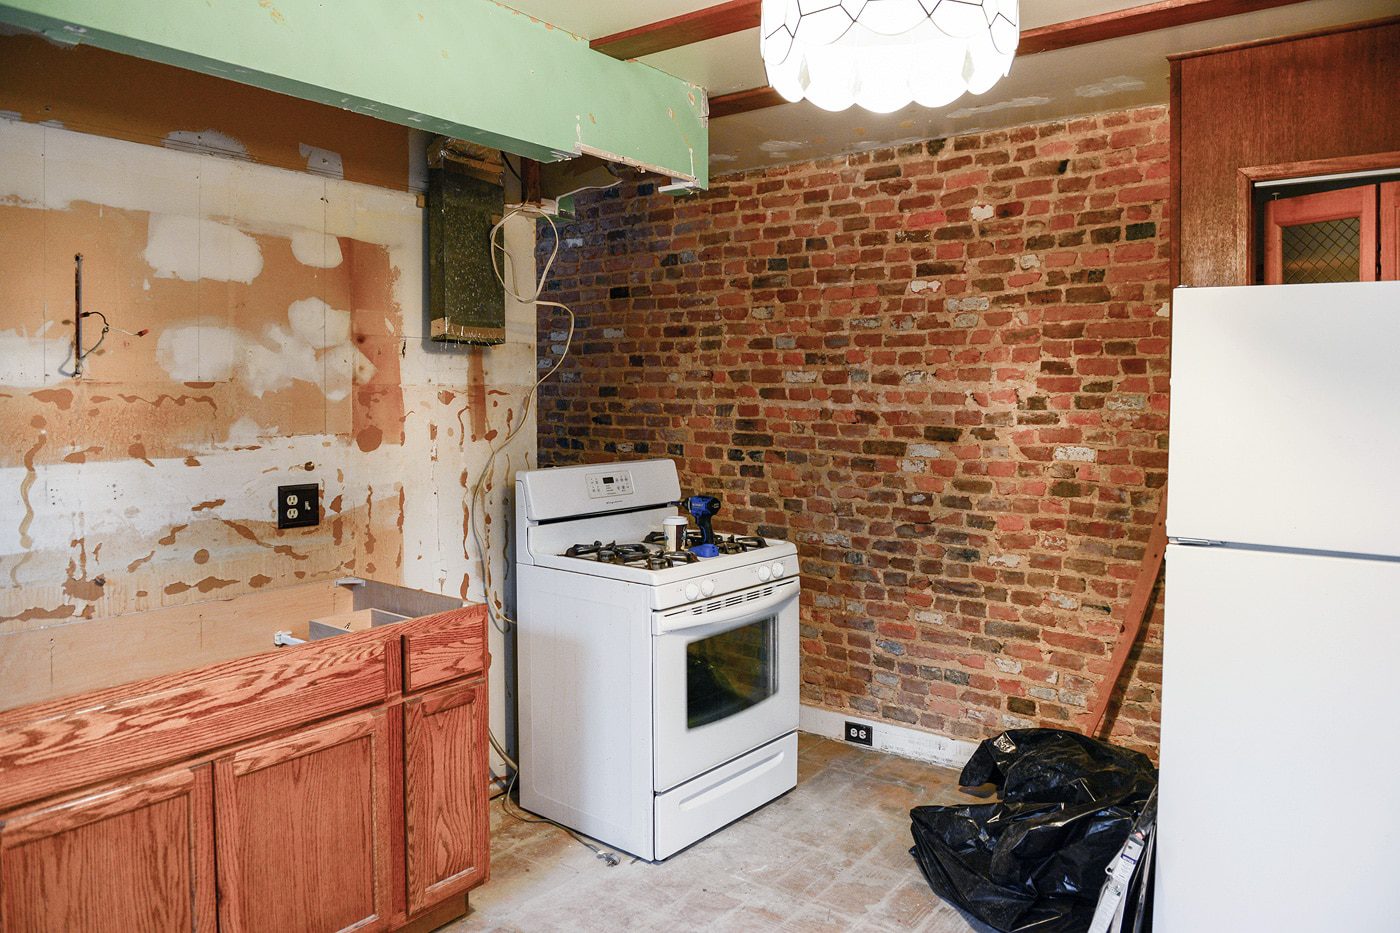
We all jumped in, easily pulling down the 2x4s that held the dropped ceiling in place and removing an awkward pantry. At one point in this home’s history, there was a window where that pantry was, but it had since been completely bricked over from the exterior (sad!). You can see it below, on the left:

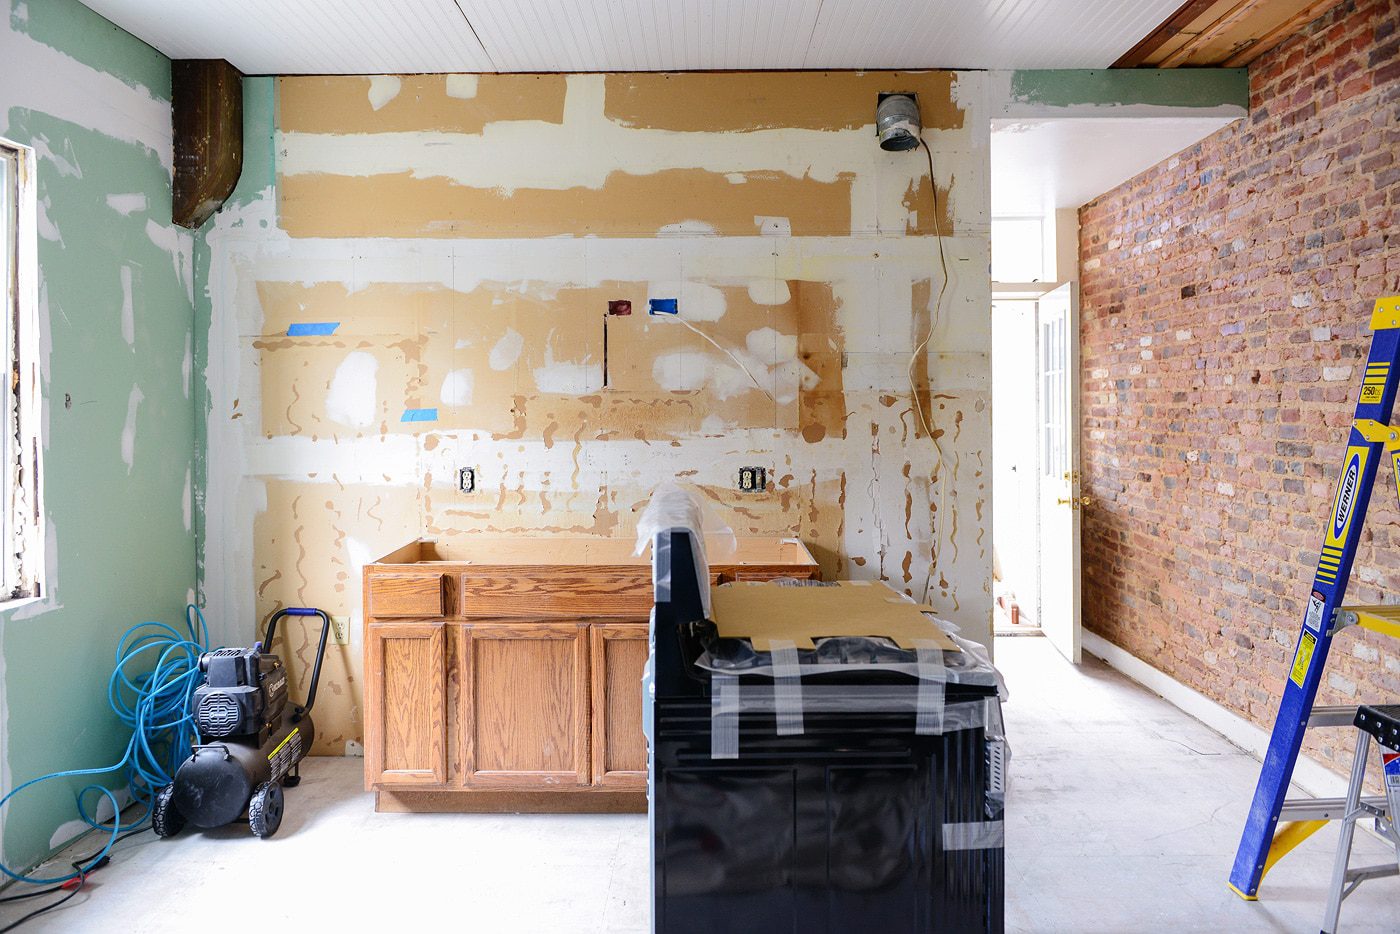
While day one brought a lot of demolition, every day that followed brought more and more impact. Drywall! Boom. Cabinets! Boom. Ceilings! Boom. Every completed task brought more motivation, more eagerness to cross the finish line.
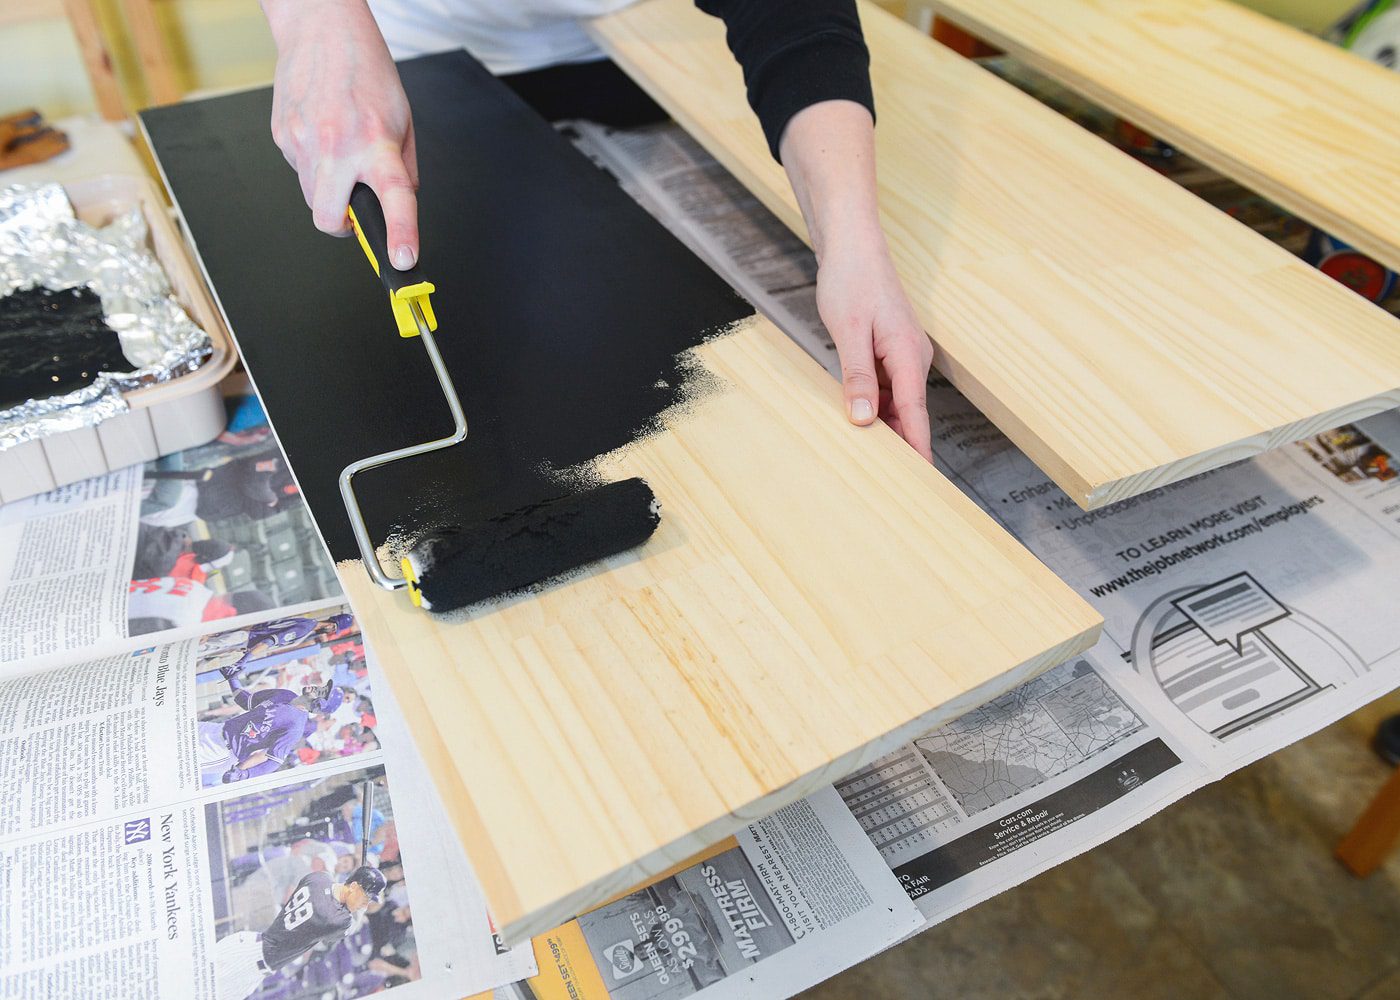
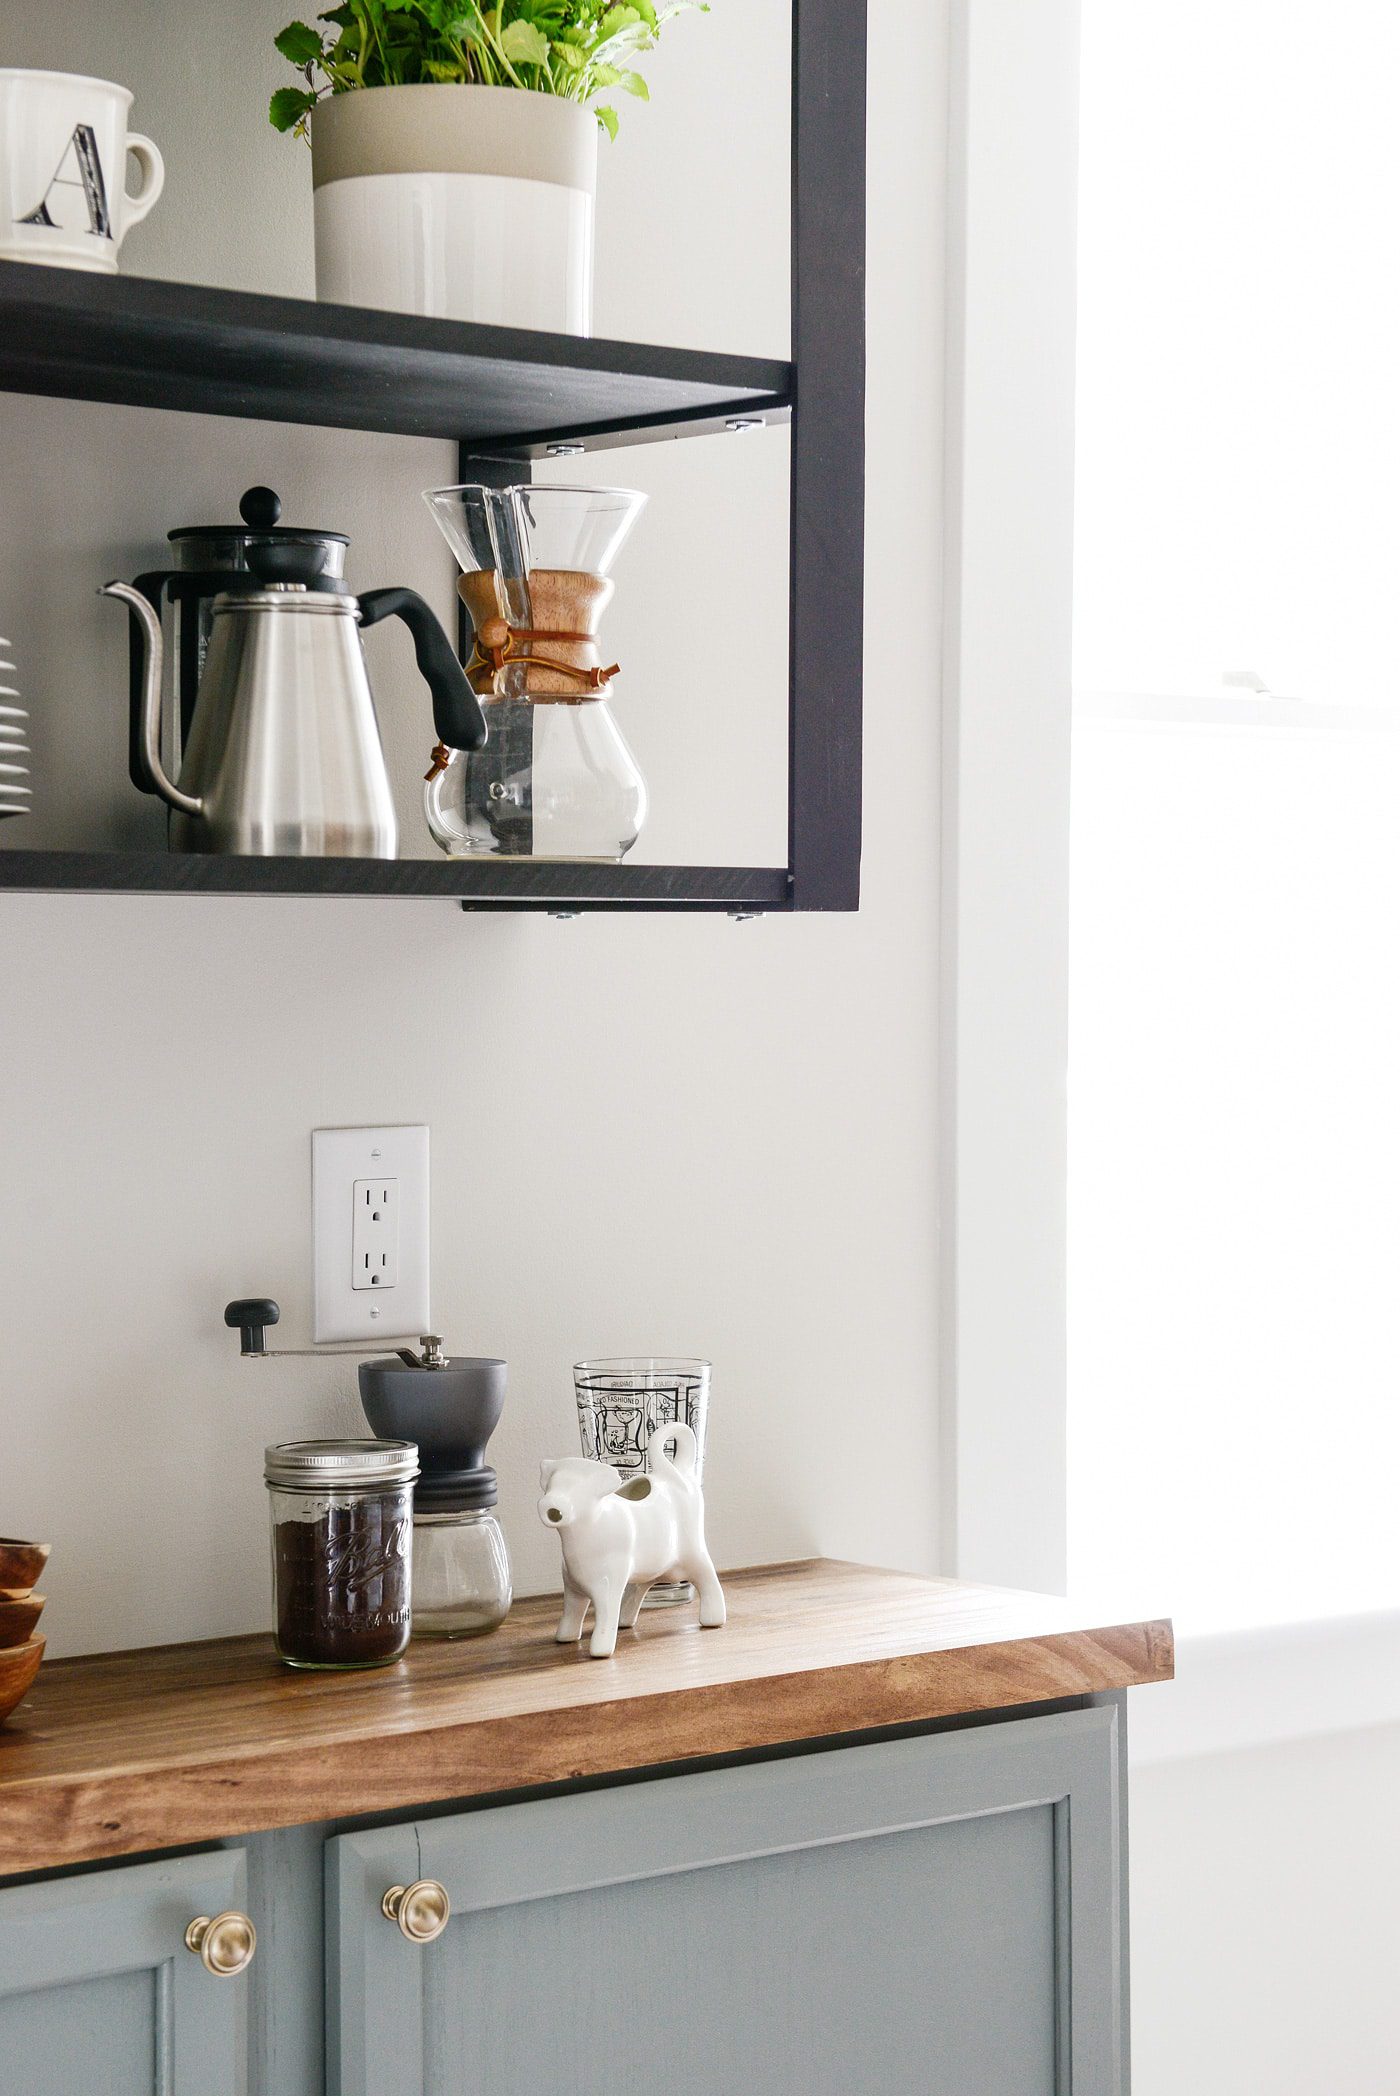
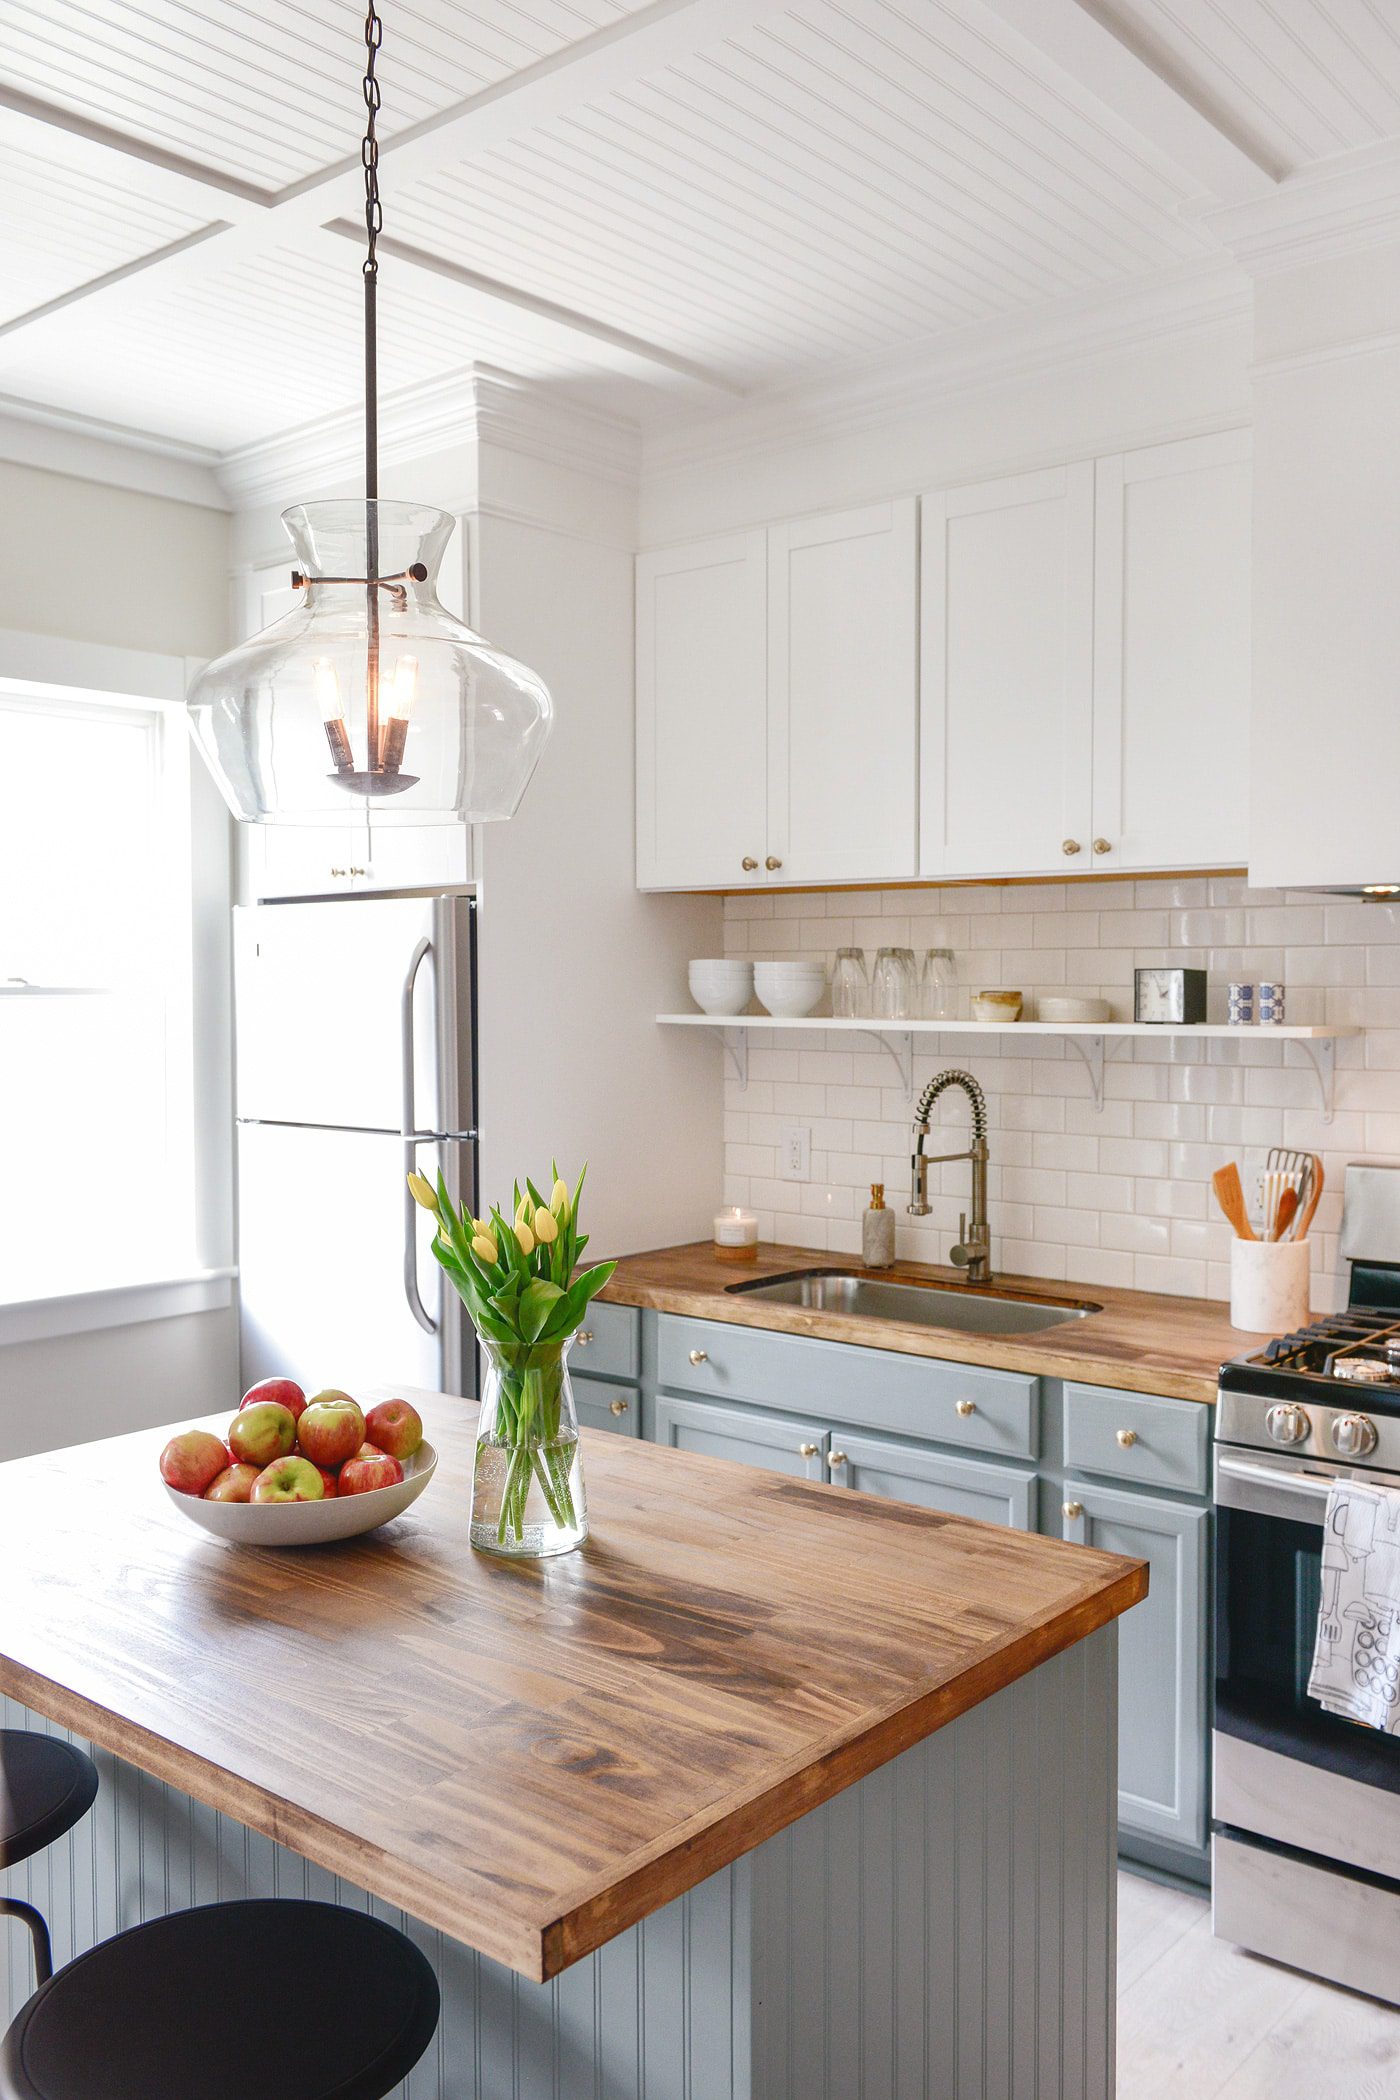
In-between the larger to-dos, smaller projects (that all add up!) were constantly humming along in the background. The crown molding and beadboard ceilings were painted in a satin finish using Valspar paint that was color matched to the white of the upper cabinets. The original columns were also painted in the same satin finish, knocking down the high gloss that was once there. Keeping in the painting theme, these shelving brackets for the coffee station were sprayed a matte black, and these project panels (used for the shelves) were also painted black:

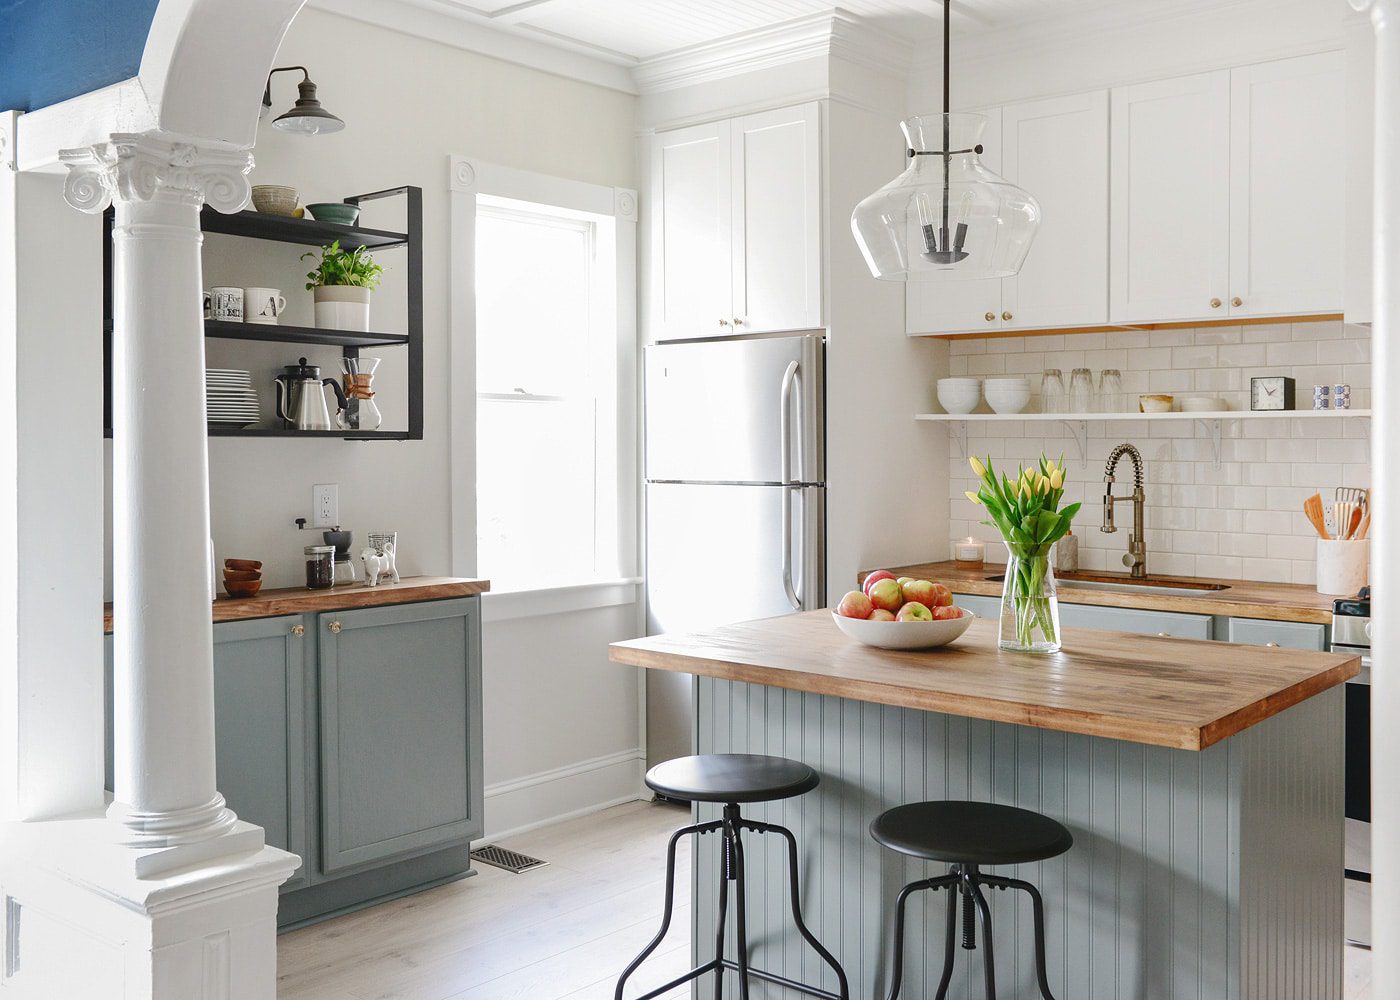
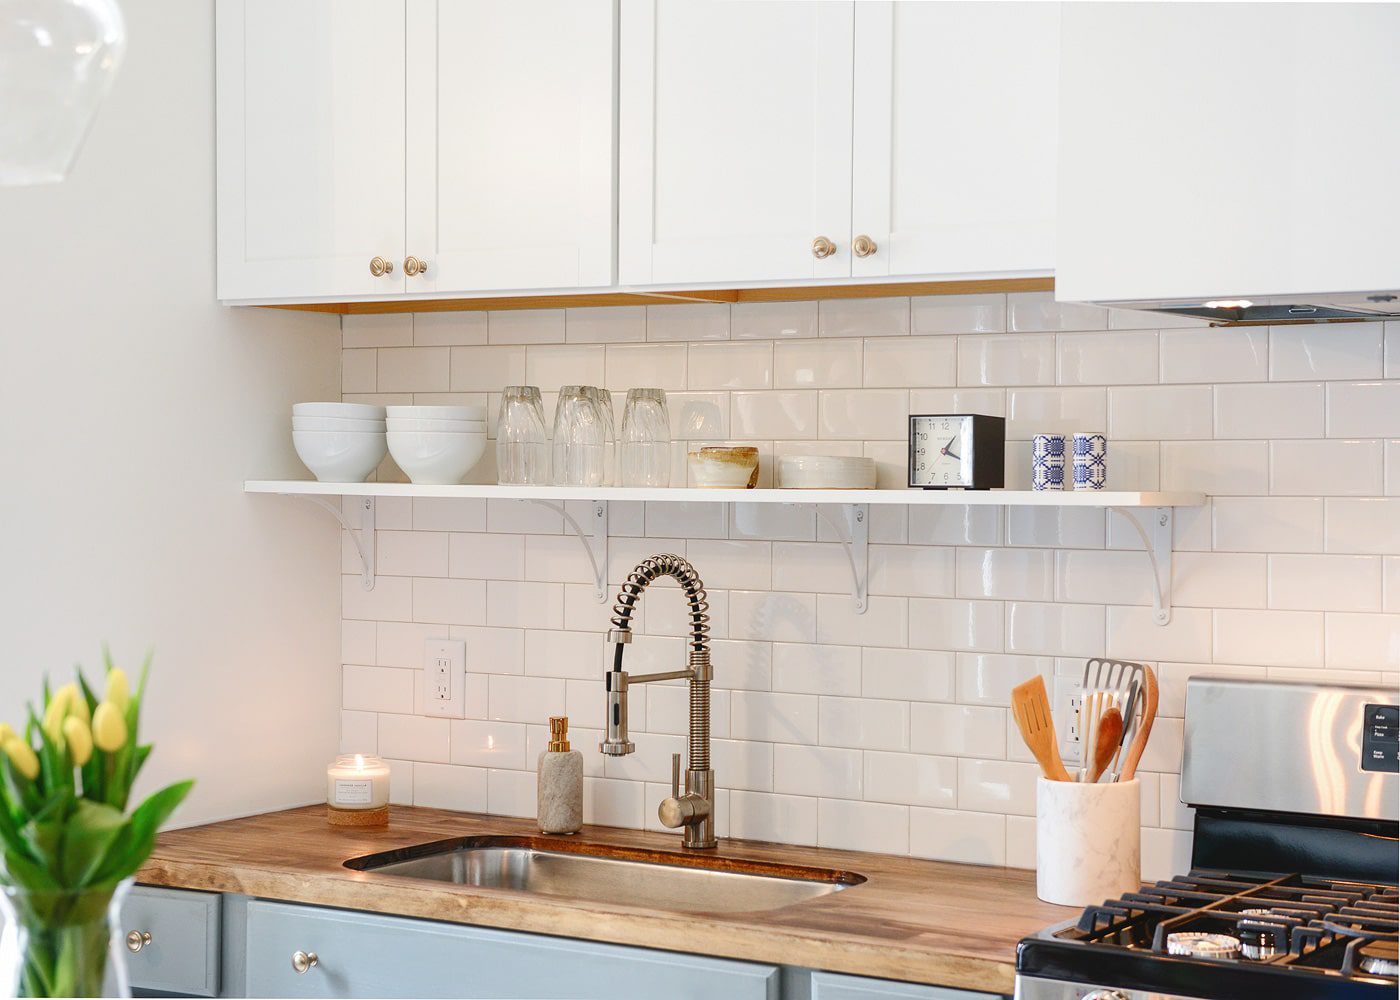
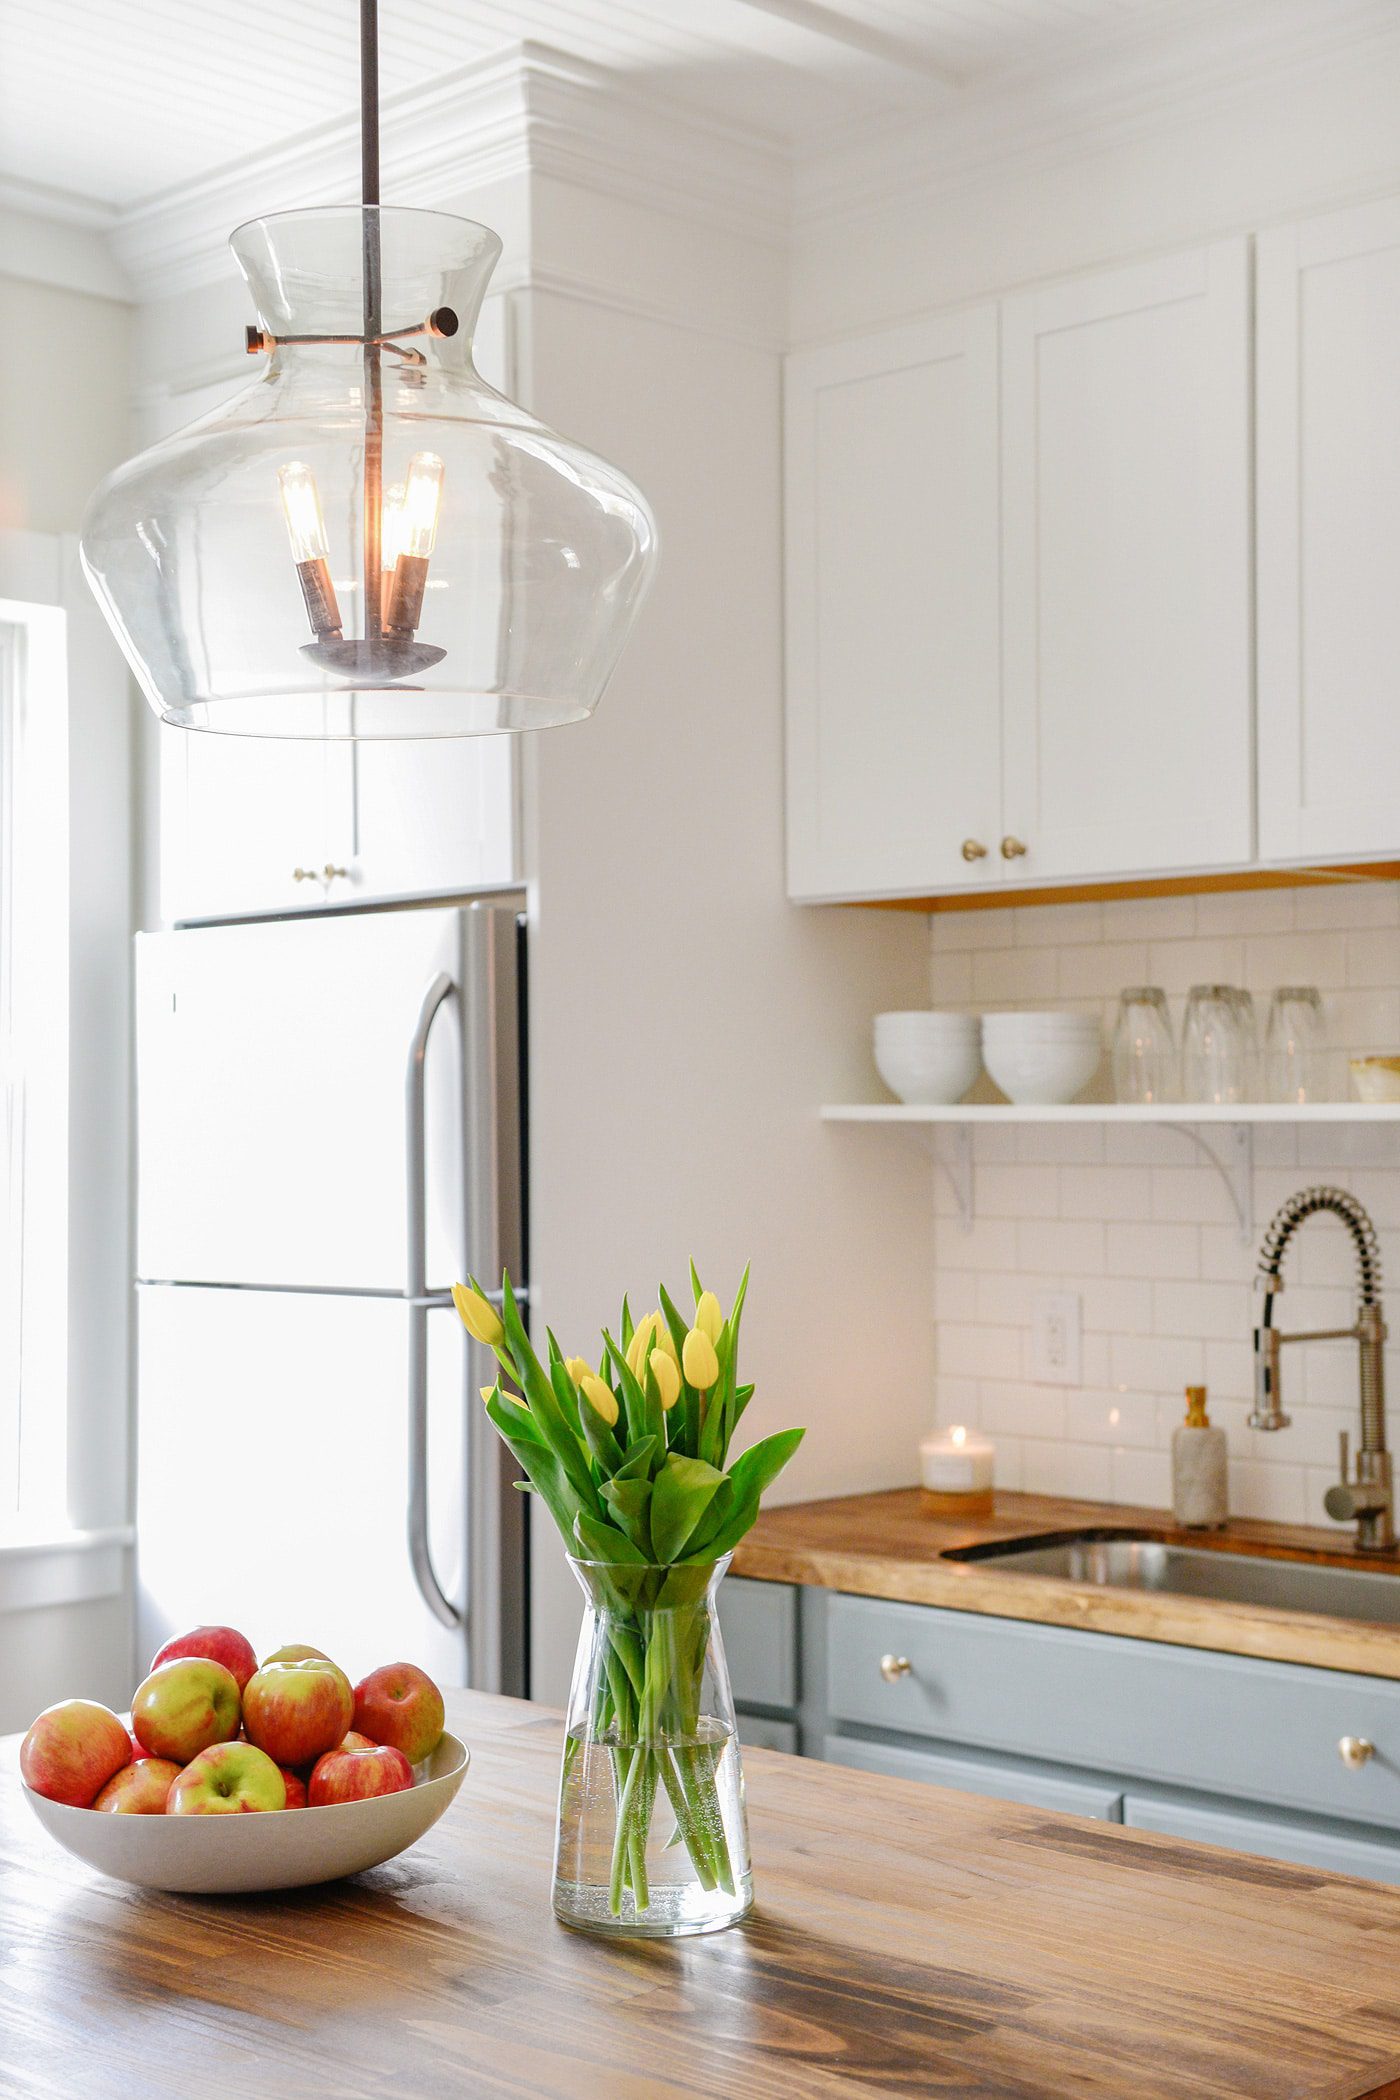
All of the lower cabinets were painted in Valspar’s Beguile in a satin finish, a super pretty gray-green that I’m trying to find a use for in our home now! While the doors and drawers were set aside to dry, the girls tag teamed the subway tile backsplash, in-between caulking and spackling every last nail hole, pock and seam in the room:
The last evening in Baltimore was our latest night yet, and while Chris and Brandon laid the flooring, the rest of us focused on staining and sealing the countertops, installing cabinet hardware and hanging lights. The fourth and final day was a short one, with only a handful of hours to pull everything together, but every last item on our list was completed – and then some. That last morning was a flurry of baseboards, paint touch-ups, plumbing and cleaning.
Finally, we could all take a step back, and you could almost feel each and every one of us taking in a collective breath. Together, we had done it!

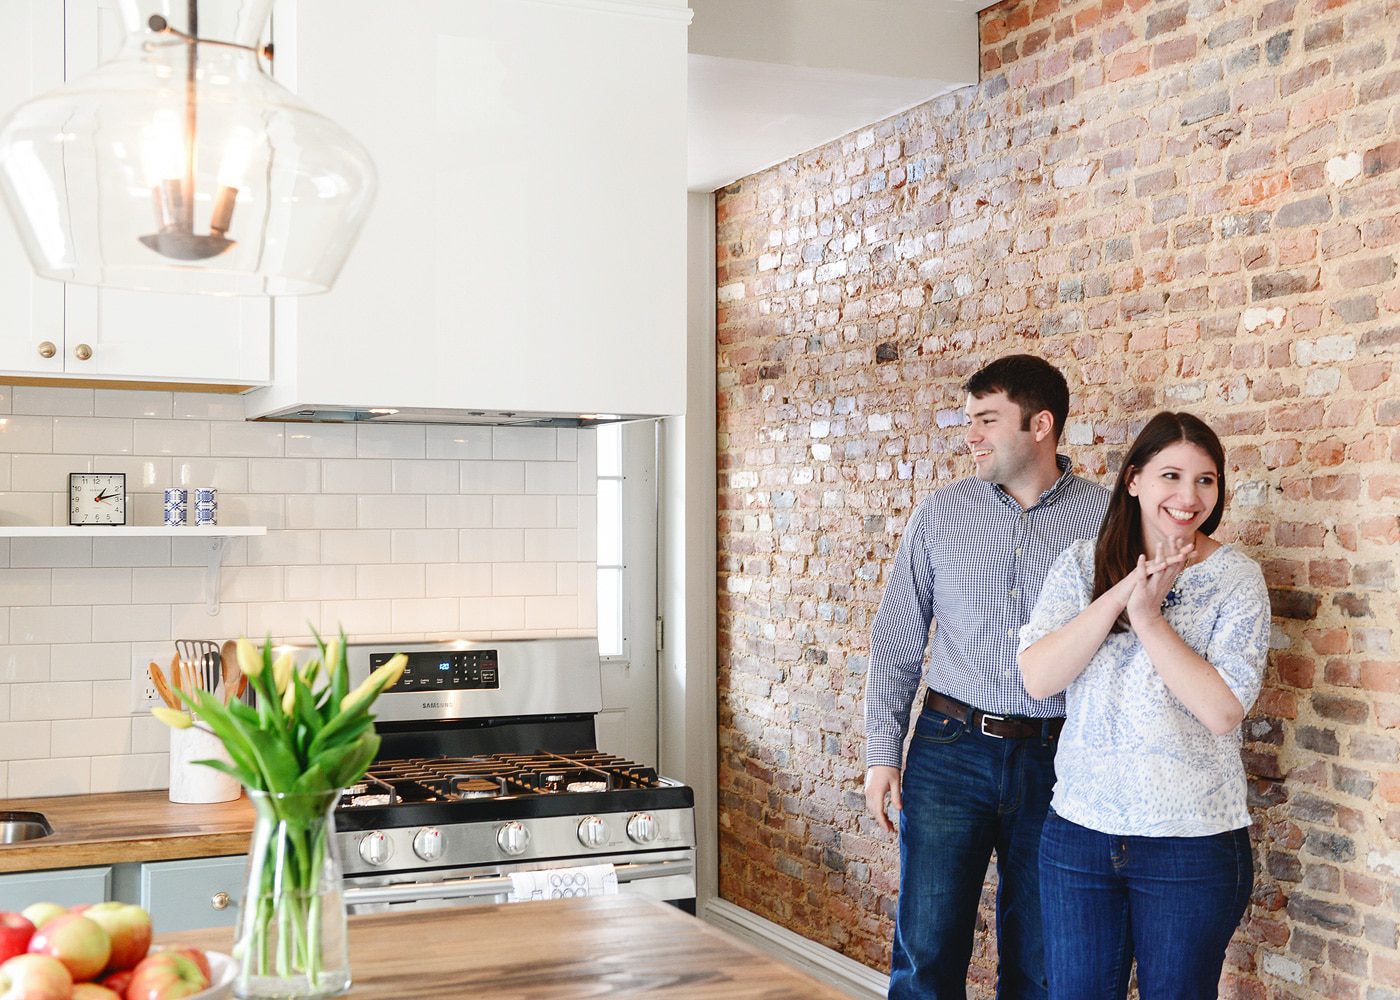
Starting on our last full day, Julia had asked Nate and Aura to treat themselves to a day off. We wanted to surprise them with a room they wouldn’t recognize, and the day of the reveal, we watched as Aura cupped her hands over her mouth and Nate perma-smiled. They ran their hands over the counters, pointed out the dishwasher and turned the faucet on and off. There may have been some choking up happening, too – us and them!


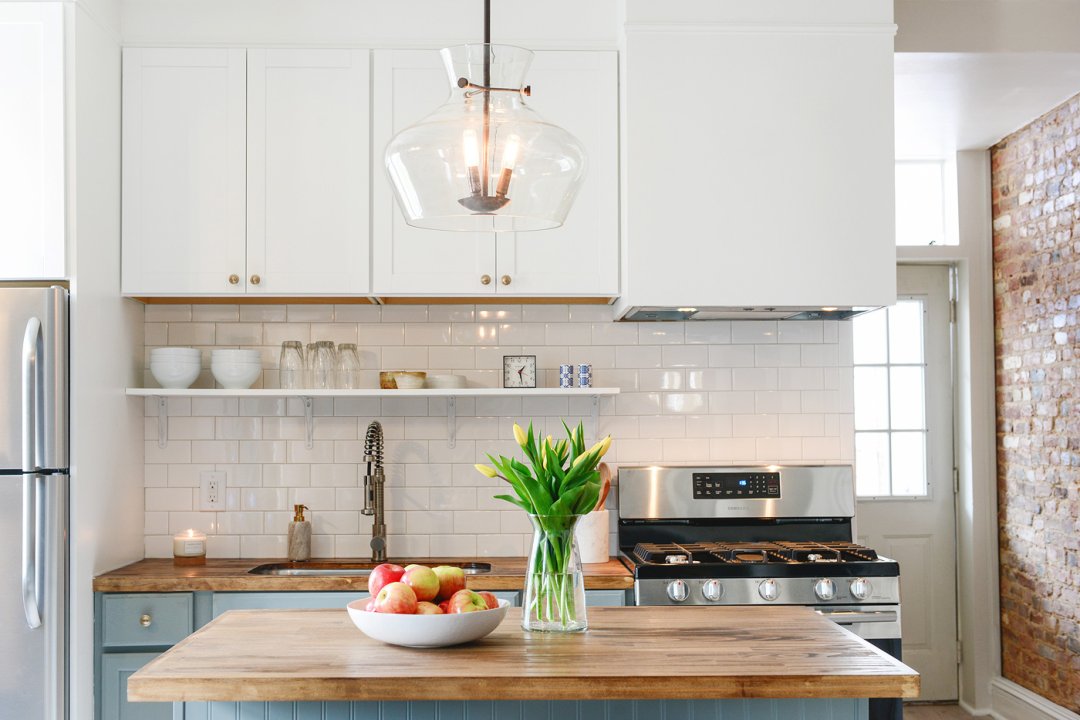
Can you believe that this entire kitchen came together in under $5k? (Yes, including appliances!) Paint was the real hero, which was used to update in-stock Lowe’s cabinetry, including this cute little coffee station made up of wall cabinets:
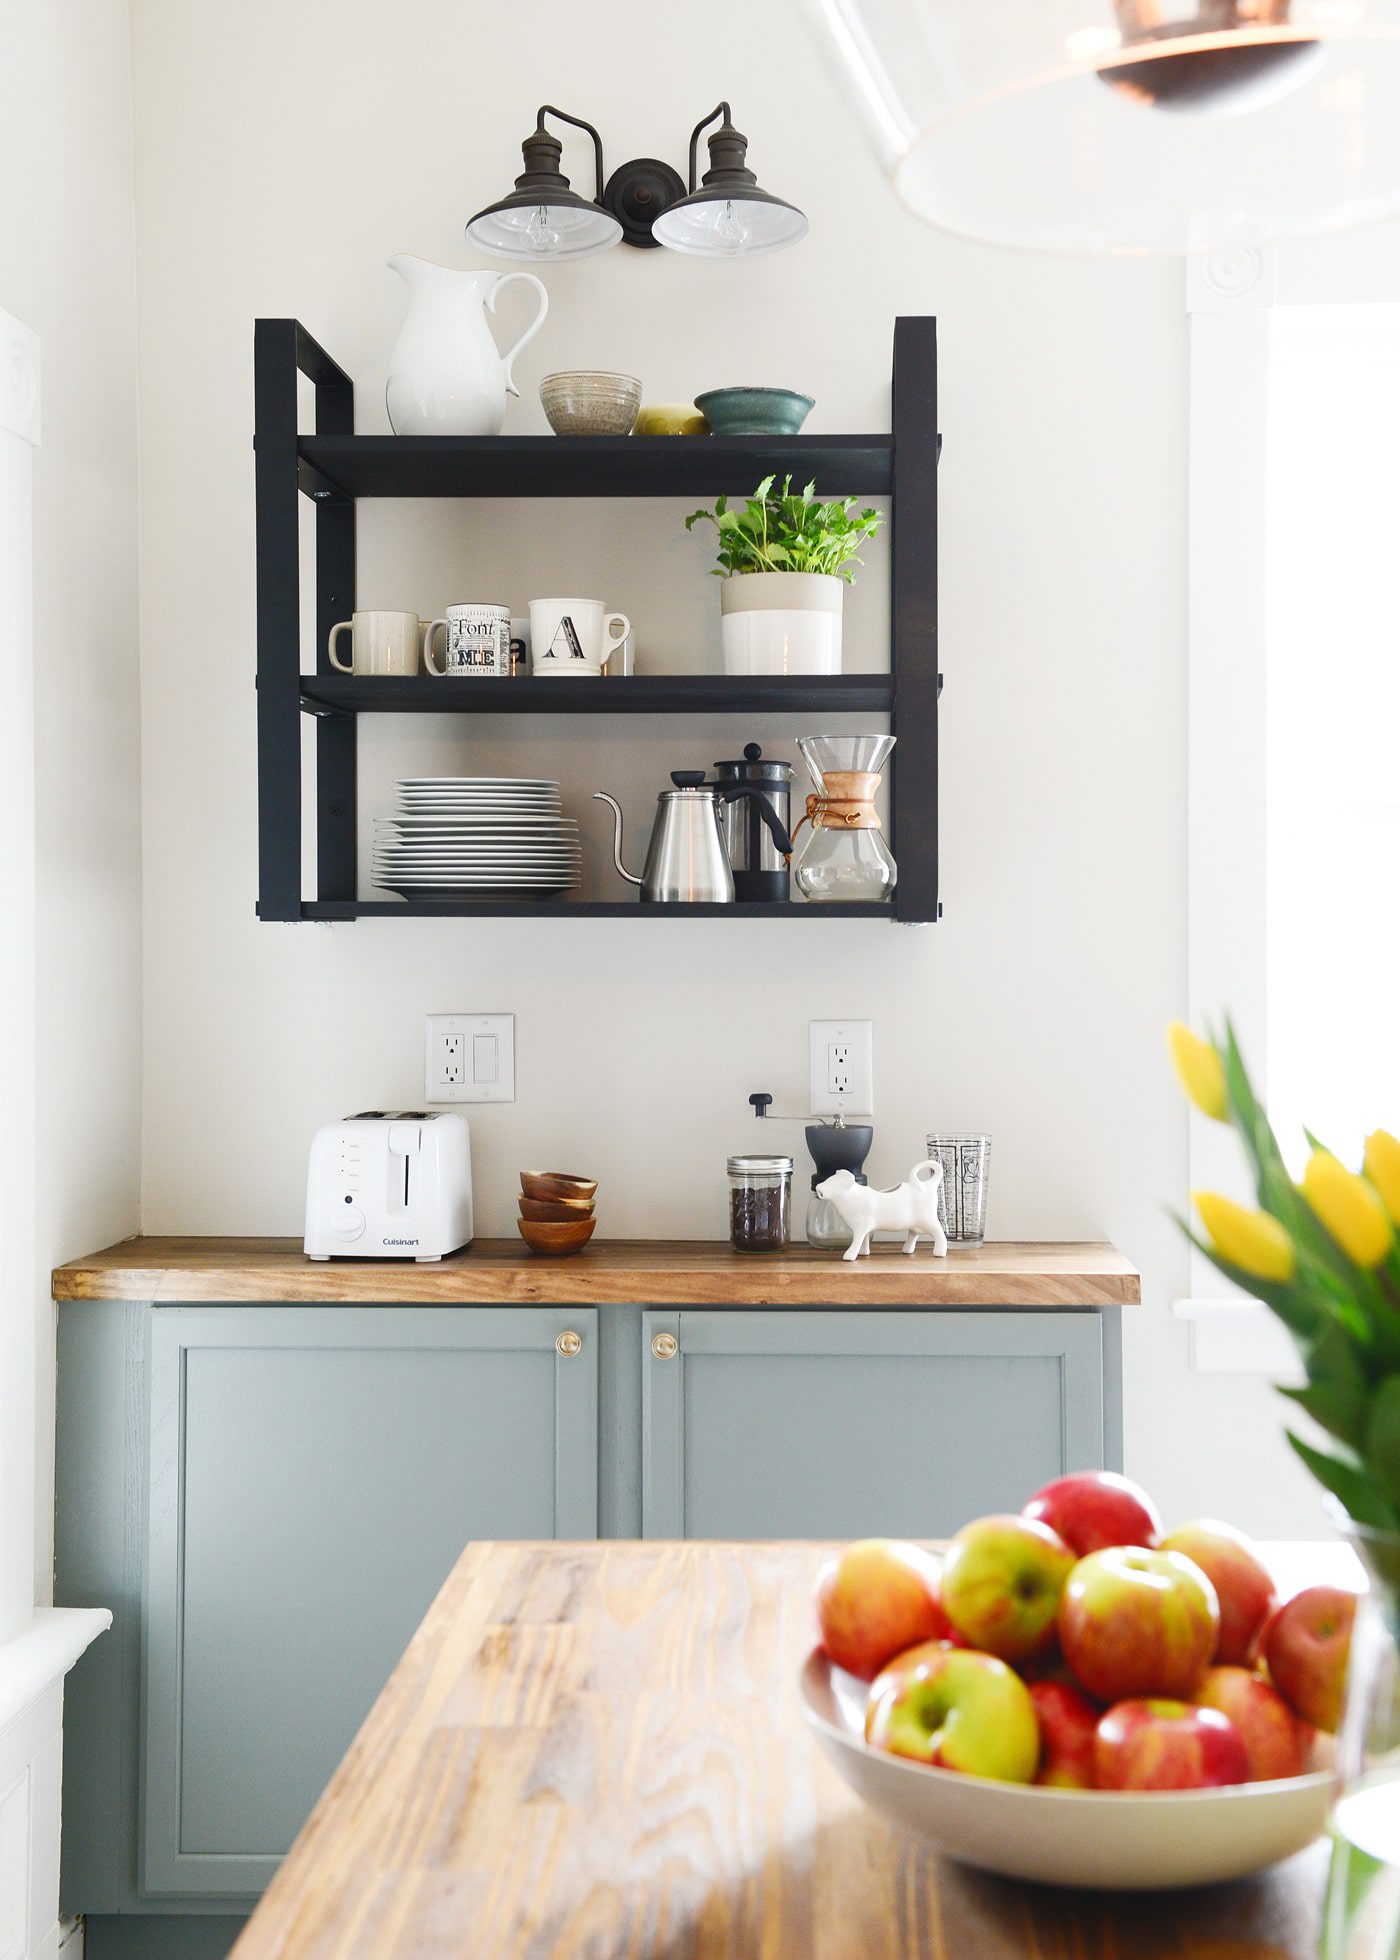
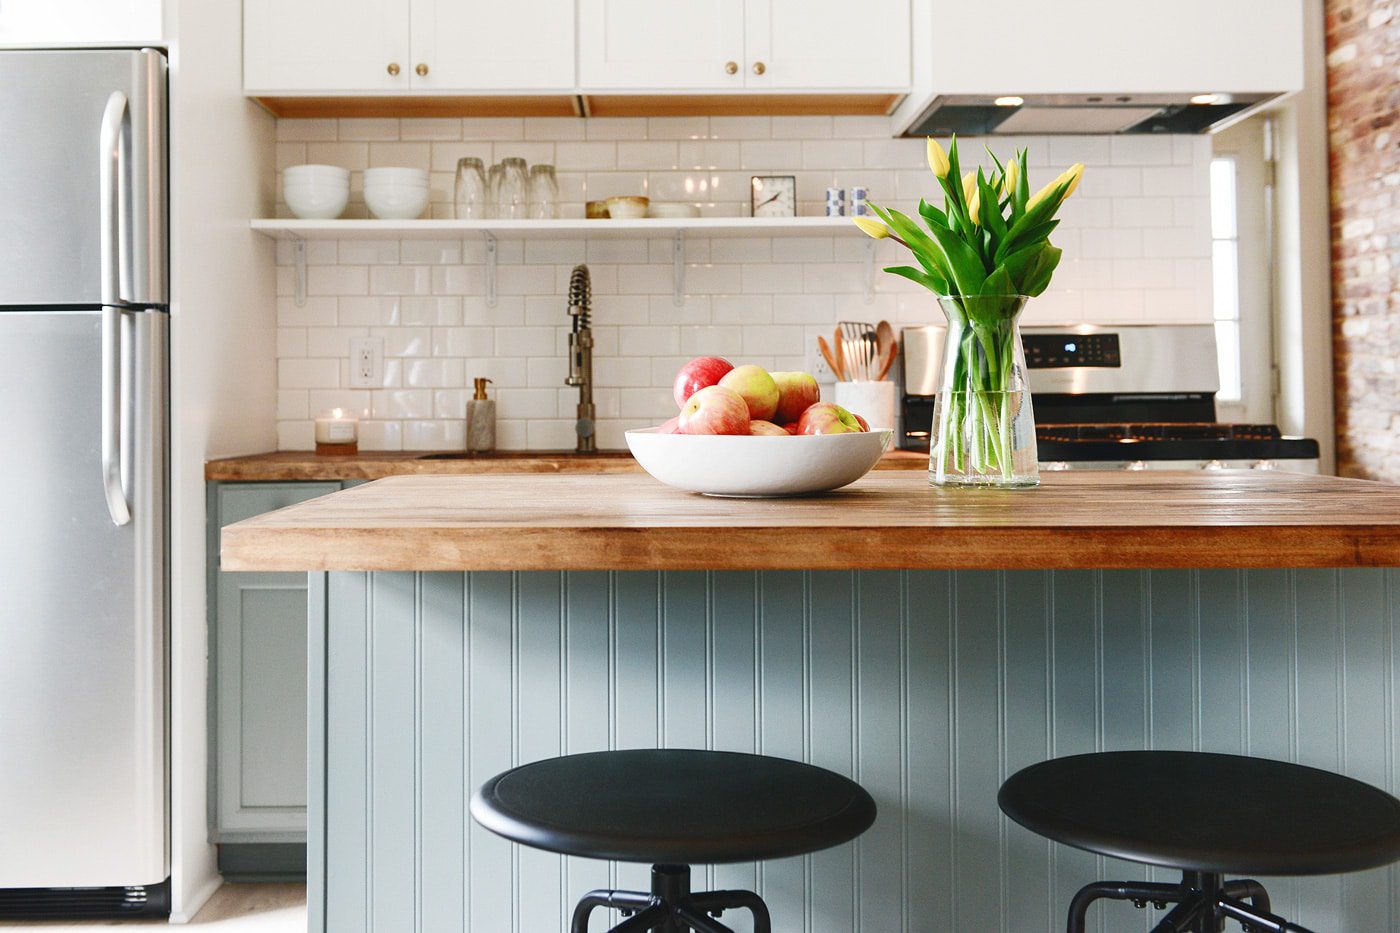
The white shaker style cabinets are also in-stock at Lowe’s, and we used these knobs on all the doors and drawers, adding a warm metallic finish. The upper cabinets were raised to make way for open shelving below, an endearing detail that adds so much personality!
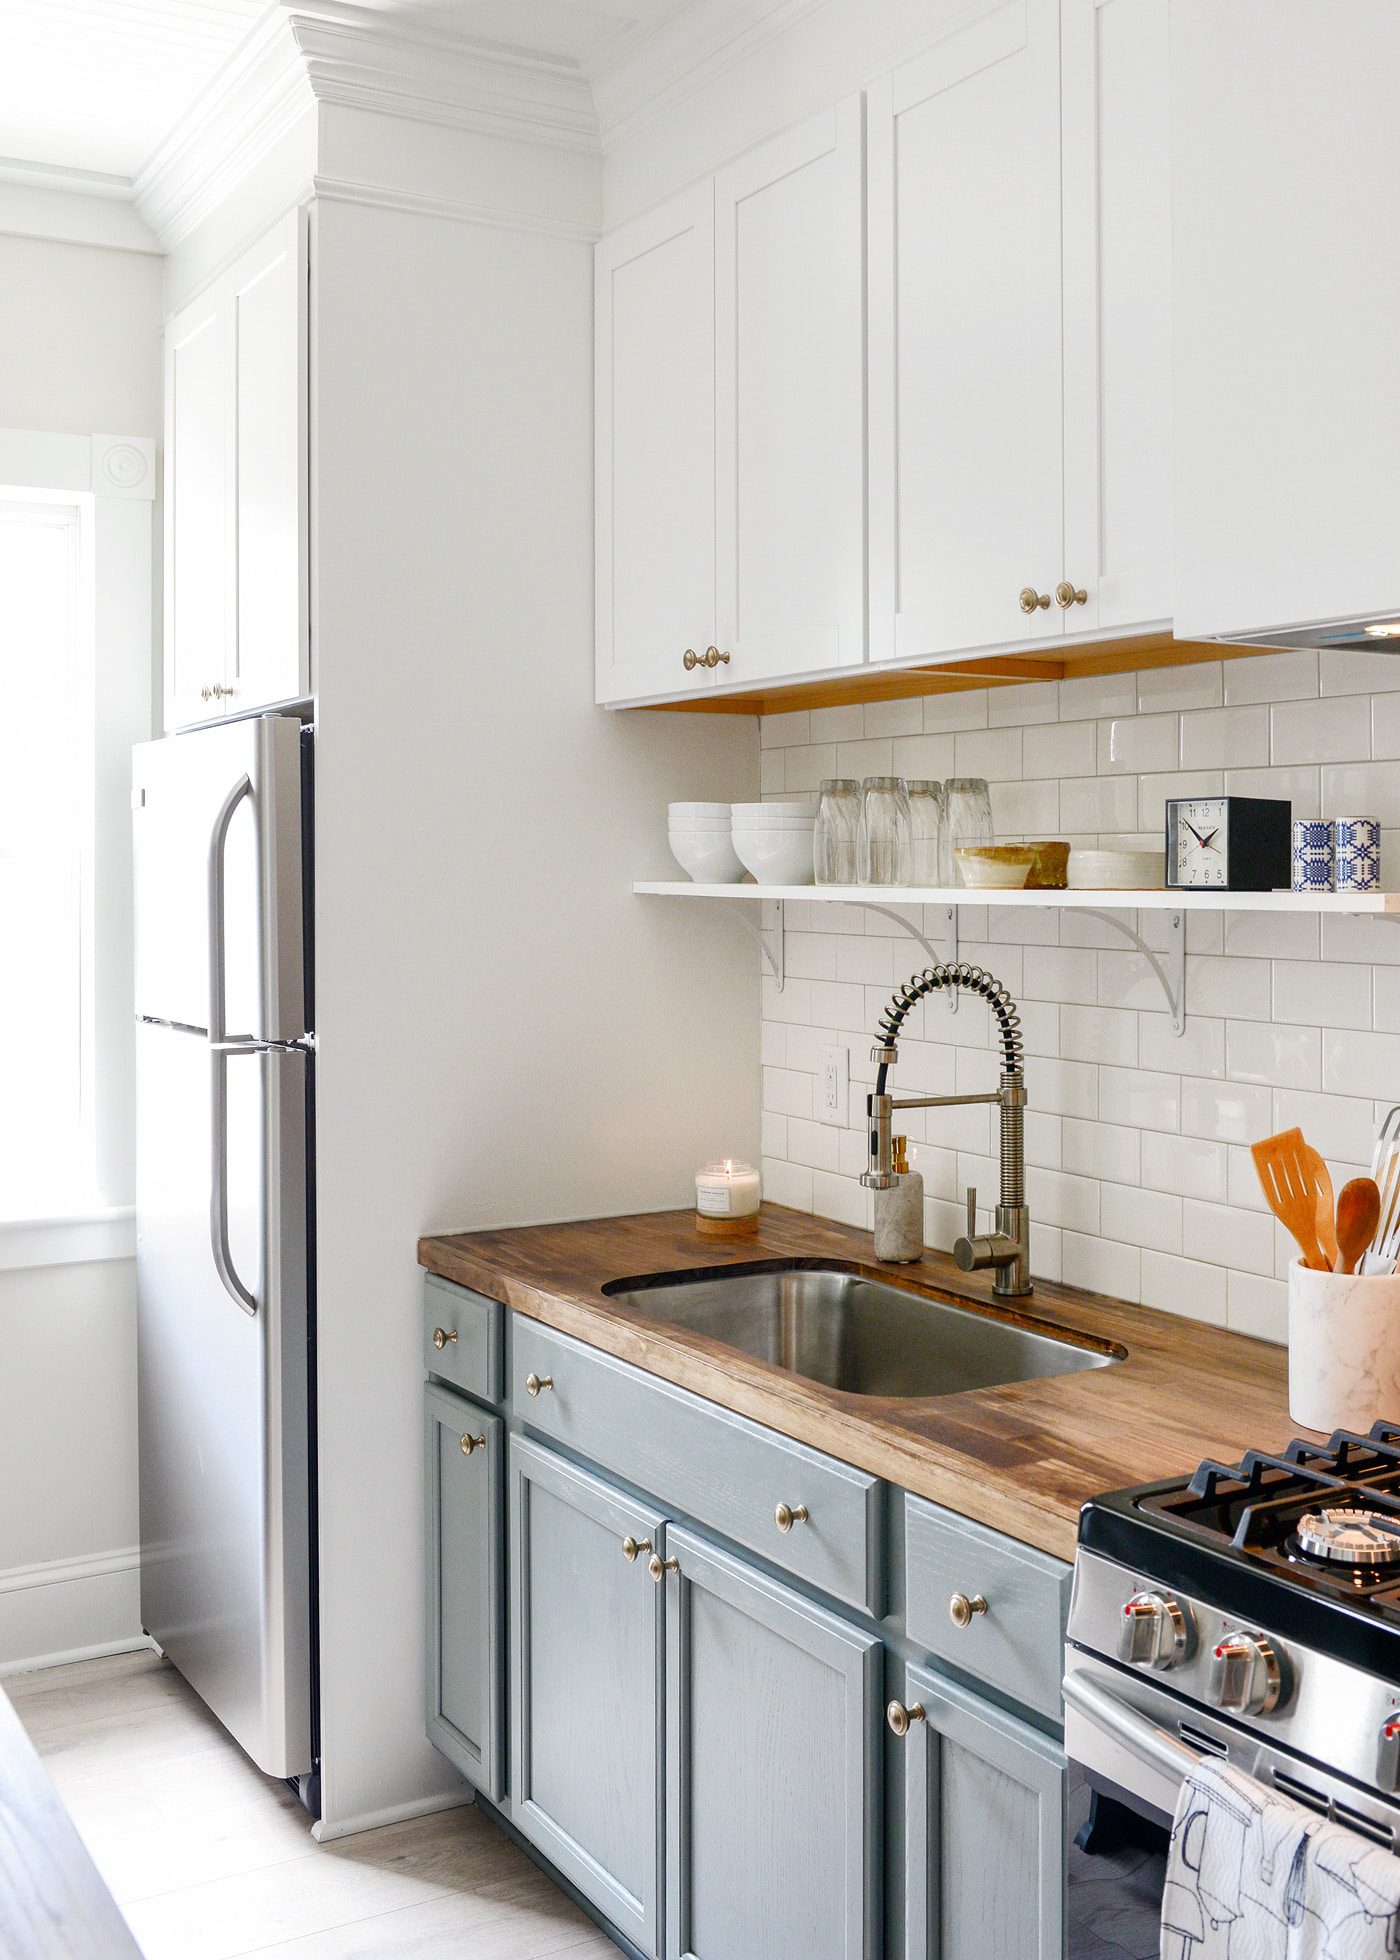
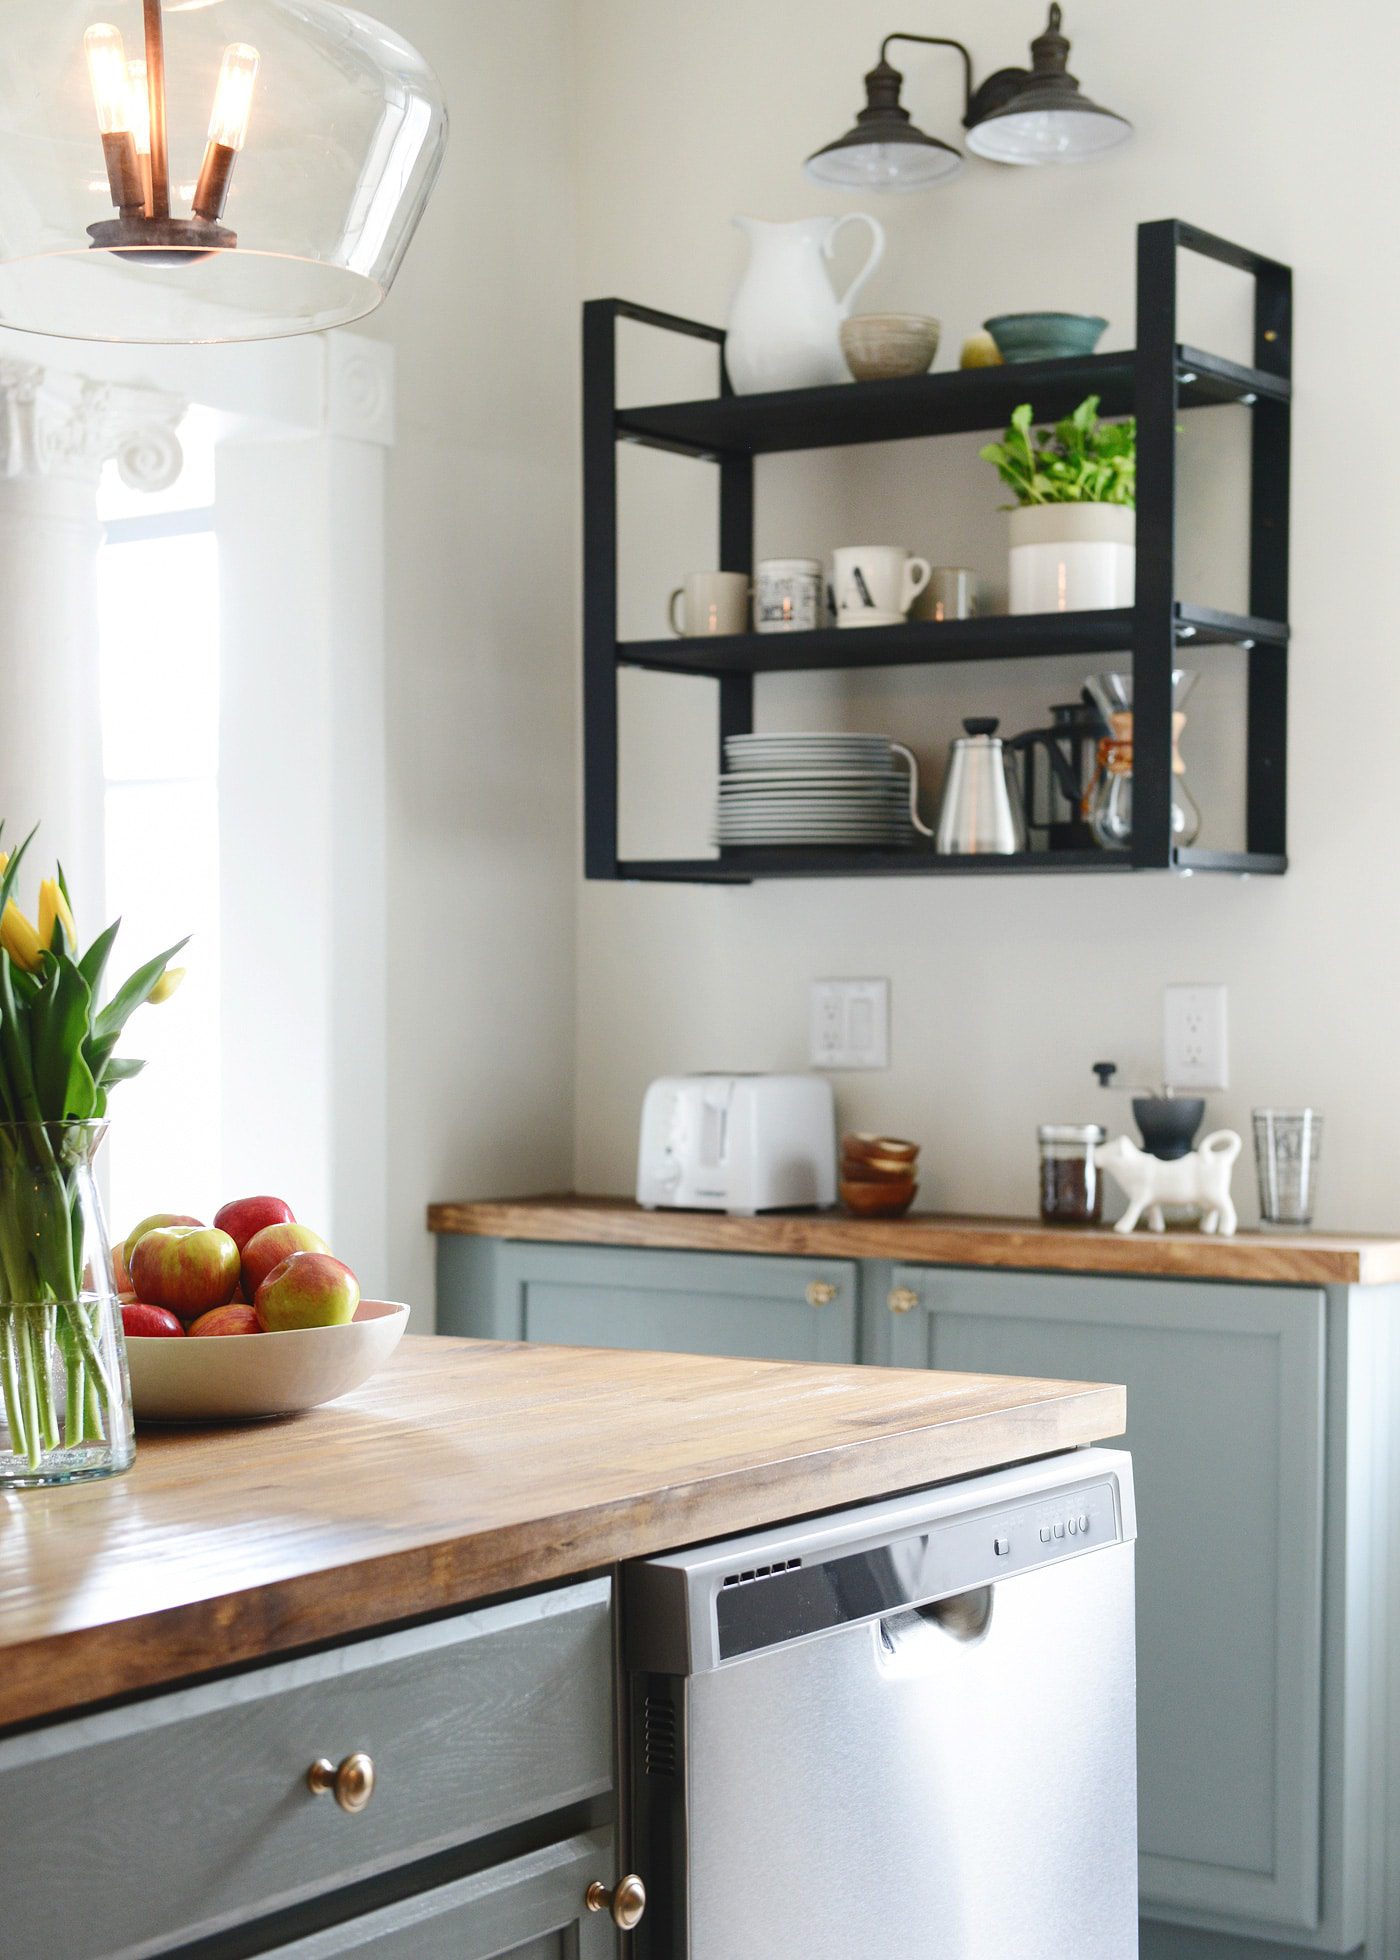
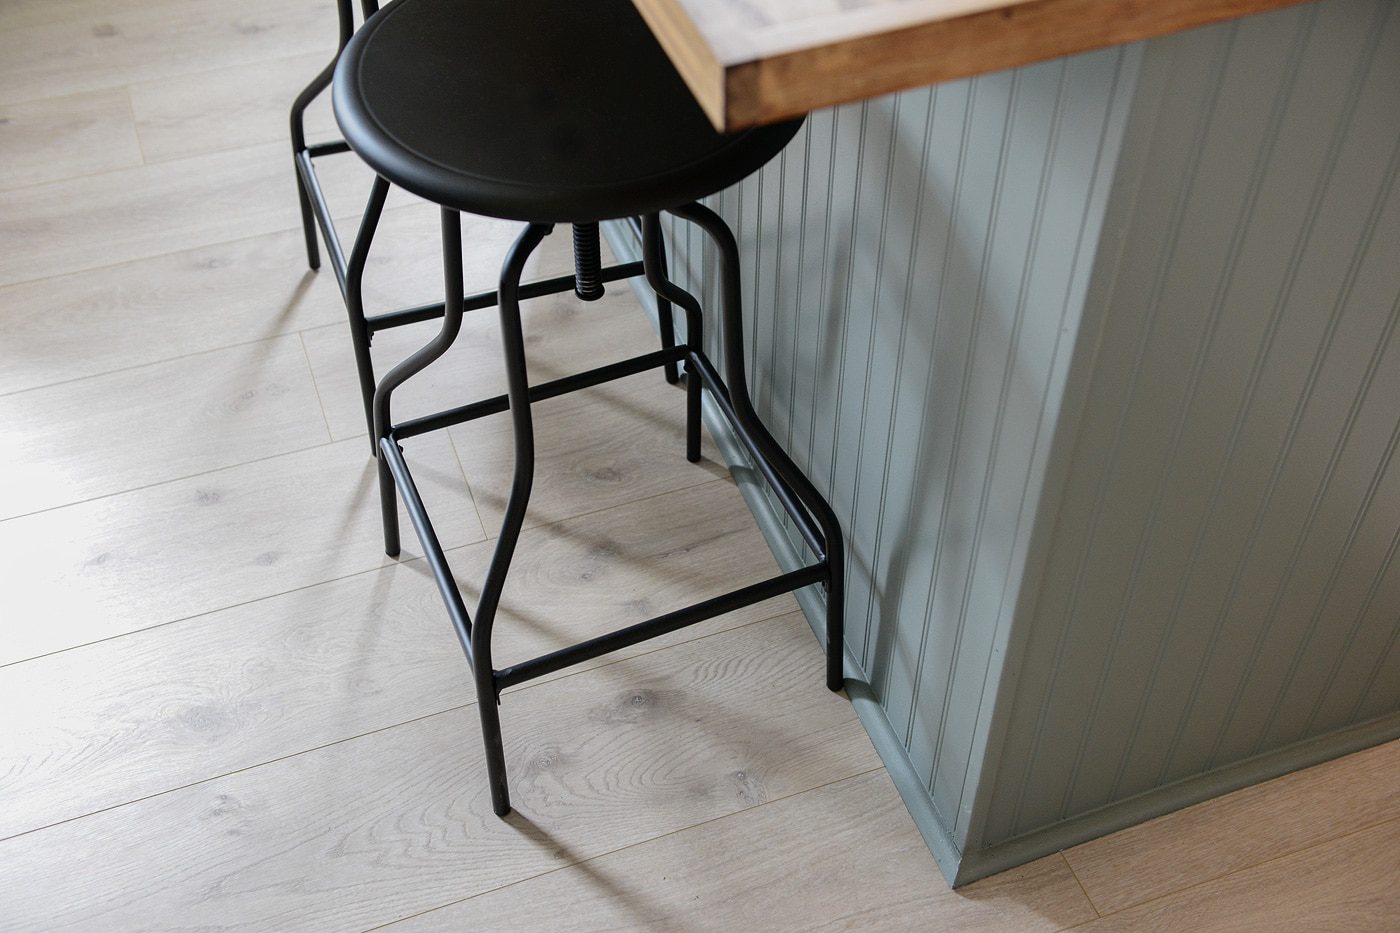
One of the biggest ‘saves’ in this renovation was the countertops. They were built from these panels and trimmed with 1x2s to give them a nice, hunky profile. They were treated with wood conditioner before applying one coat of Minwax Provincial stain and sealing them with three coats of Polycrylic in a satin finish:

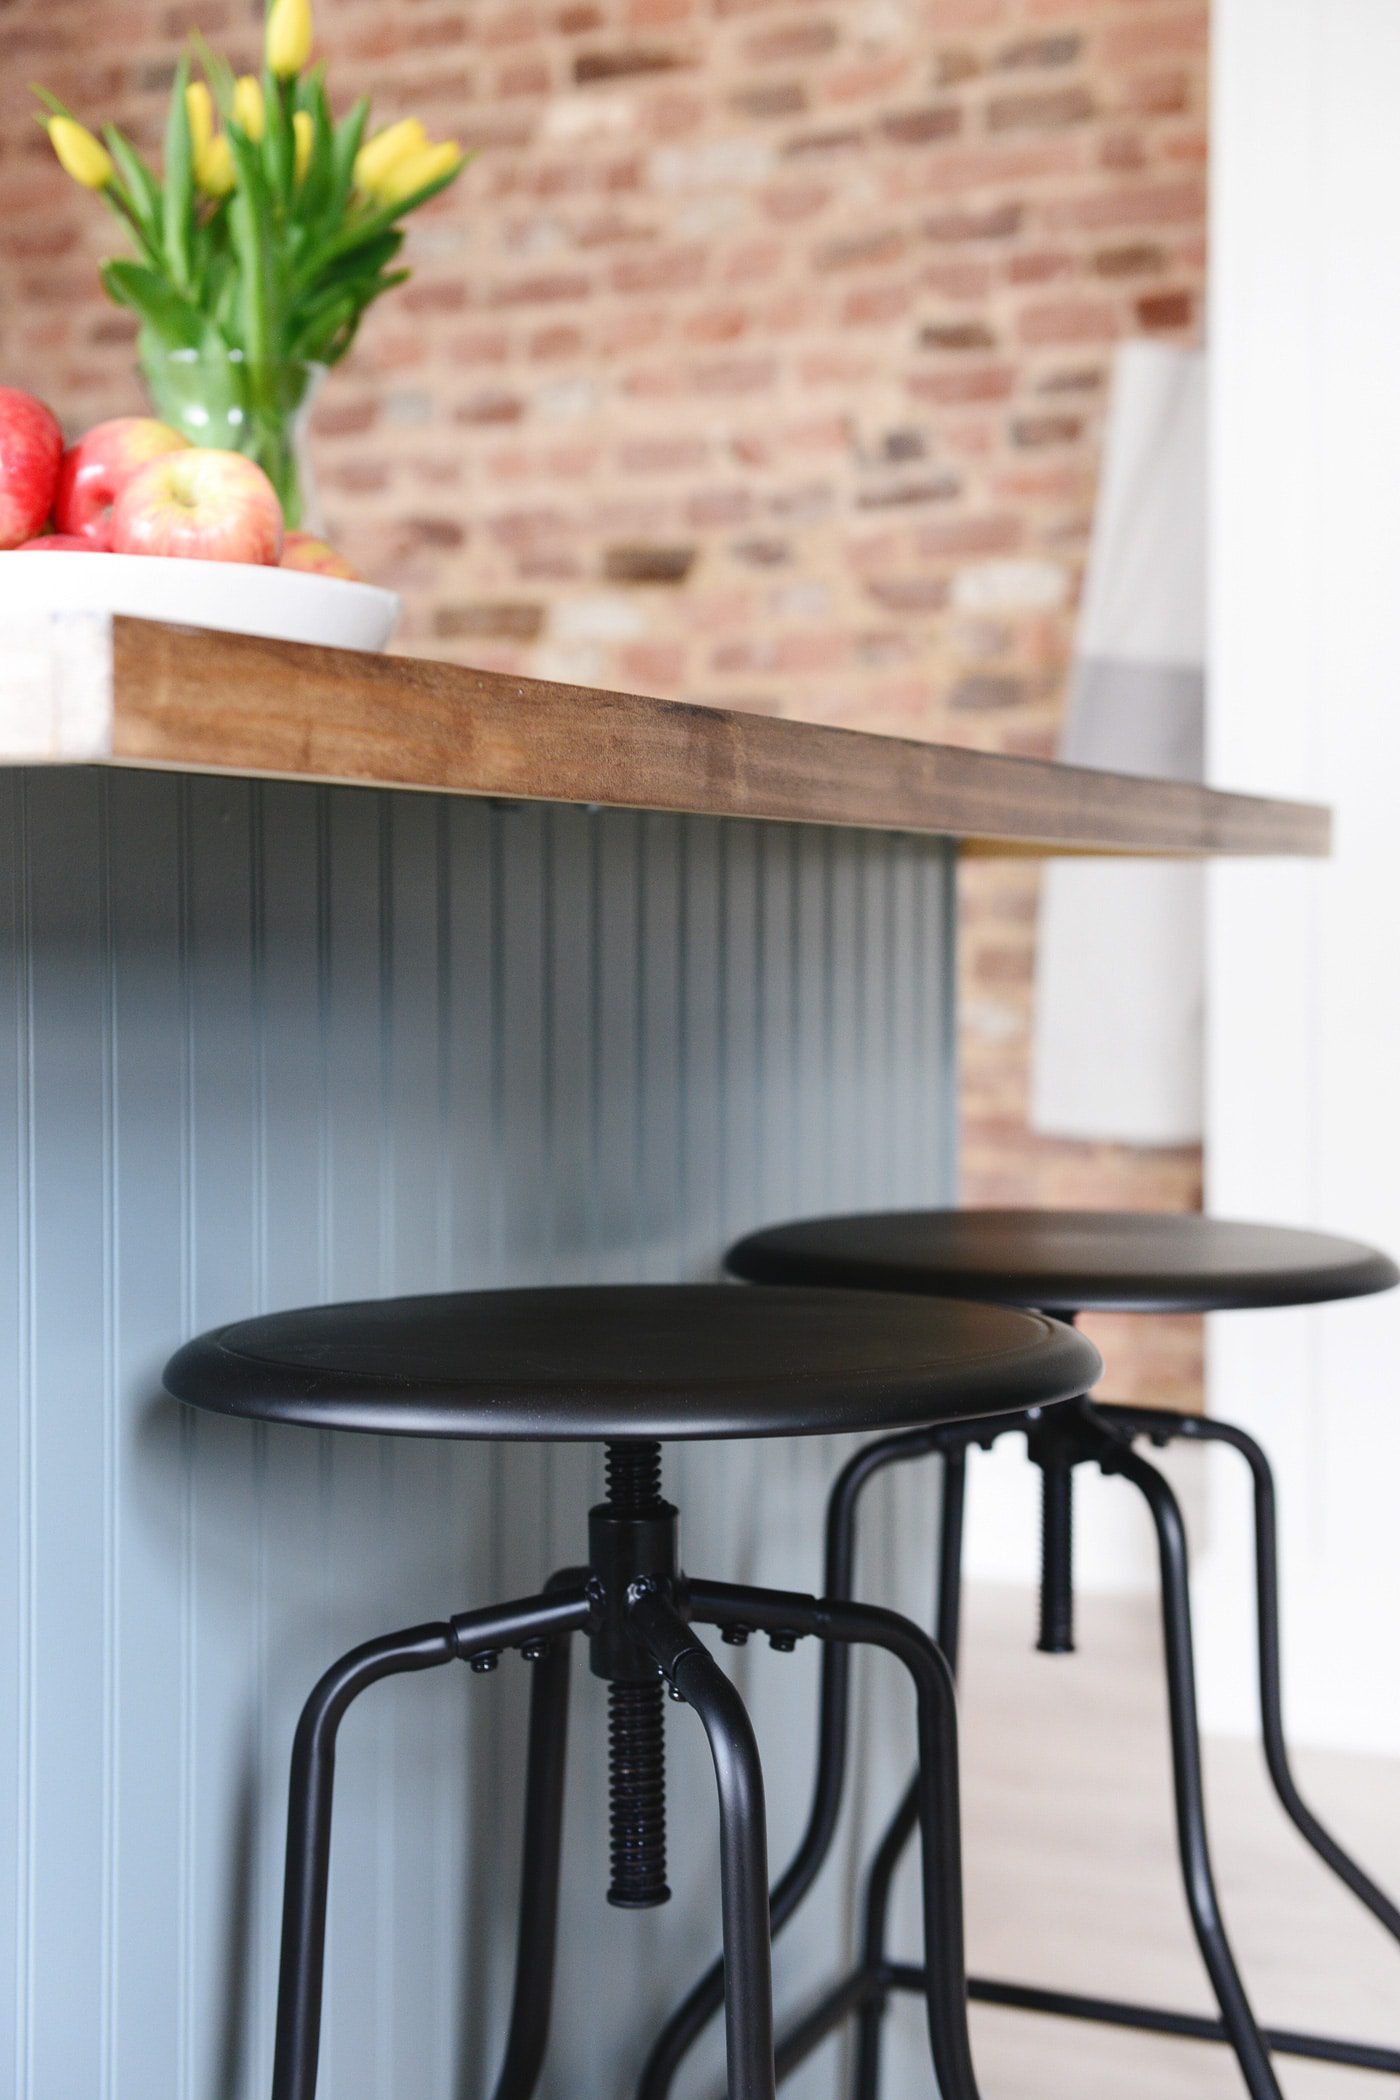
I’m sure we all have our favorite elements in the room, but for me? The beadboard panels that were used on the island (and the ceiling – hang tight!) are everything. Not only was it practical to cover the bare sides of the base cabinet and dishwasher used in the island, but my goodness, it’s so pretty! After the flooring was installed, quarter round was added at the base to give the island the most seamless finish. It’s like it was always there!
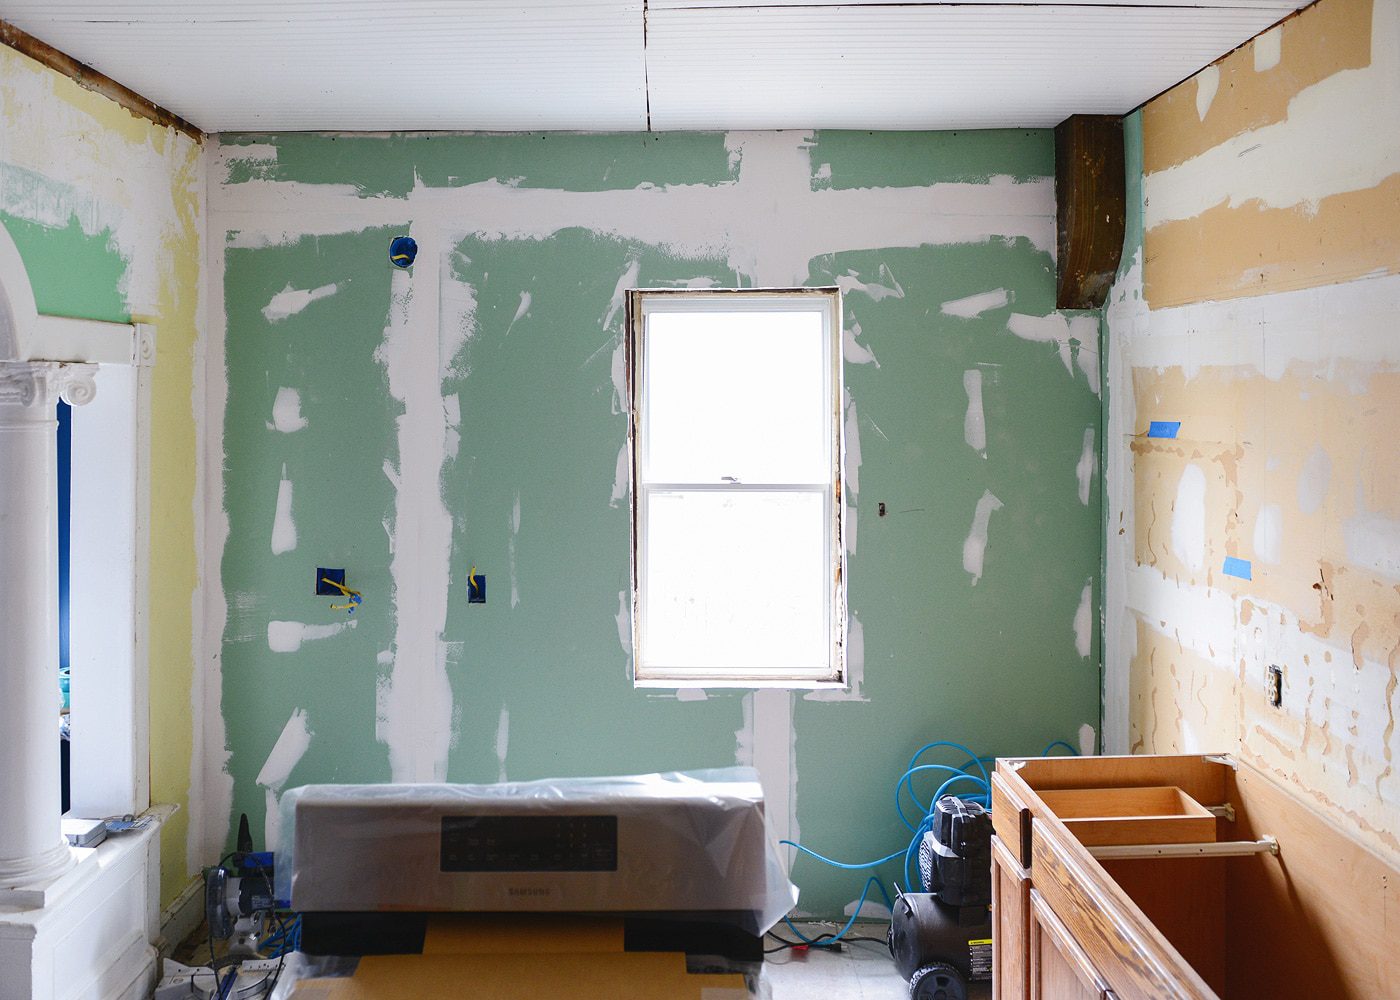
As I mentioned earlier, the beadboard ceiling and molding details were a result of realizing we had an extra foot of room height to play with, and as each element was layered upon the next, our team oohed and aahed without fail. The seams from the beadboard were hidden with 1x4s, and after being caulked, spackled and painted, the look feels incredibly high-end, while still maintaining the coziest, casual vibe. The moldings are made up of two parts: 1) Around the entire perimeter of the room, 1x4s lay flat against the ceiling, and 2) with the exception of the cabinets, an additional 1×4 was used as a trim detail on the vertical wall surface. The cabinets, on the other hand, had true crown molding installed, with a smaller rail molding running right above the cabinets themselves and around the vent hood:


There are countless elements from this makeover that Scott and I are looking to incorporate into our own home. But without a doubt, somehow, somewhere, we need a little beadboard in our lives!
One more before and after, if you will? We made sure to grab a team photo on the first day (oh, how bright eyed and bushy tailed we look!), and I think the first photo below perfectly embodies our team. Motivated. Silly. Excited. Having followed along with Chris and Julia‘s and Daniel‘s renovations over the years, you have this idea that you’re all in it together, despite being so stretched out across the country. It was the best feeling to work as a team toward this one common goal; my heart swells for each and every one of these guys! (Scott had an earlier flight home than the rest of us, so he’s sadly not in the after photo, boo.)


A huge thank you to Lowe’s for allowing us all to make this happen for Nate and Aura, and to Nate and Aura for jumping in alongside us, welcoming the team into their home and keeping their chins up through it all!
All sources below, and be sure to check out the other recaps on Chris Loves Julia and Daniel’s hilariously accurate behind-the-scenes peek at Manhattan Nest!
Source List:
Wall color: Valspar Promenade in eggshell | Lower cabinet color: Valspar Beguile in satin | GE stainless steel Energy Star refrigerator | Samsung 5-burner self-cleaning range | Broan undercabinet range hood | Whirlpool stainless steel Energy Star dishwasher | Superior Sinks undermount sink | VIGO 1-handle pre-rinse faucet | Countertops | Brainerd champagne bronze round cabinet knobs | Backsplash | Silverado grout for backsplash | Beadboard | Pergo Portfolio Modern Oak Embossed Wood Laminate Flooring | Diamon NOW Arcadia white shaker wall cabinets | Project Source base cabinets | Federal Brace universal shelf system | Project panels | allen + roth aged bronze vintage pendant light | allen + roth Hainsbrook 2-Light aged bronze cone wall sconce | Crown molding | Rail molding


Perfection.
Thanks, lady!
You guys! It looks AMAZING!!!!!!!!
Thank you :D
I completely agree, I love the breadboard detail and the rail molding at the top of the cabinets. It looks like it has always been there. Great job!
I absolutely love this! You all did such an amazing job! I love the exposed brick wall – it was such a lucky find!! How did the home owners know it was there?
My favourite details are the lights you choose, the crown moulding & the base paint colours. I need to incorporate that colour somewhere in my home too!
The homeowners had seen the exposed brick in a neighbor’s home, and so they decided to do a little investigating of their own. They knocked down all the plaster before we arrived!
The transformation is completely unbelievable. Wow! The color scheme is so pretty and plays well with the exposed brick wall. One question- Did you guys think about painting the underside of the wall cabinets since the raw wood is pretty noticeable in the photos?
Oh, Heather! If only we had an extra 30 minutes. I wish we did, but the good news is that we left a half gallon of leftover cabinet paint (from the surrounding trim) for Nate and Aura to tackle if they wish. :)
This kitchen is so pretty!
Paige
http://thehappyflammily.com
This space came out so well. Finding a brick wall, what a wonderful surprise! My favorite part of this kitchen is the cabinet color. It really adds a fun flair while still sticking to a more neutral theme.
Gorgeous! Can’t believe you did all that in 4 days. I love everything about the new kitchen and how it ties in with the age of the house and the beautiful columns.
One trick we’ve used at home is finishing our baseboards with doorstop moulding instead of quarter-round. It gives a sleeker profile.
Ooh, I like that idea.
This kitchen is absolutely gorgeous. I’ll be showing this to my boyfriend for some inspiration of our own. A job very well done!
Thanks, Josh!
The beadboard and 1x4s look amazing on the ceiling! How did you attach the beadboard? I too removed a dropped ceiling to gain height–but it’s plaster underneath, and in poor condition.
This would be a perfect solution for you! We used a finish nailer and had to adjust the power so that the nails wouldn’t go all the way through the boards. Then we trimmed out the seams with 1x4s and used a finish nailer here, too. It required caulking every seam and spackling every single hole before painting, but the results were SO worth it!
Wow, what an amazing job you guys did!
It is just so good, Kim. Way to go! I can only imagine the laughter and fun that accompanied this reno, even during the exhaustion. :)
Ah! This is STUNNING. I am obsessed with the light hanging over the island.
you guys are rock stars!
I loved following along and it came out so amazingly!
my favorite part of the coffee station shelving, I am going to have to incorporate that somewhere in the apartment and those countertops look awesome!
Those shelving brackets can also be used as desk legs!
I absolutely love what you guys did here! So so so amazing and classy. I had a question: the original kitchen did not have an island with a dishwasher. Was the plumbing and electrical added in the crawl space etc before you guys arrived? This seems like a big and messy part of the job!
Again, such beautiful results!!!
The plumbing and electrical took place over the course of the weekend, and thank goodness it wasn’t TOO messy or TOO big of a job! :D
Wow, fantastic! I’m dying to know, how did you attach the project brackets for the coffee bar shelving to the wall? It looks like there are only holes on the rungs to attach the shelving part, but no way to get it on the wall? How did you do it!!?
Oh, great question! We used a drill bit that can go into metal, and we simply added the holes we needed! :)
It looks amazing, so much inspiration! That gray-green paint color is just stunning.
I cannot BELIEVE you guys were able to accomplish this in just 3 days! Actually, I can believe it because you’re all awesome. Imagine what you could accomplish in a week!
Amazing! Where did you guys get the stools for the island? I can’t seem to find the source in this entry or Julia’s!
It’s this one from Target!
Beautiful job! Can you give some info about the range hood cover? Did you guys make it and if so what were the materials and steps you used? Also, how did you build in the upper cabinets to go up to the ceiling? Thank you! And congrats on a job very well done!
It’s just a standard range hood, and we built it up using plywood, trim, caulk and paint! To help the cabinets go up to the ceiling, I think we also used plywood, and then trim helped to hide the seam where it met up with the cabinet.
Wow! Did you assembly it and then hang it or hang it bit by bit? Did you attach the pieces with a nail gun? Thanks so much for this very helpful info!
The boys built the hood before it was installed, and for the life of me, I’m not sure how they attached it, but I’m sure a nail gun was involved. I hesitate to give you too much information, as this particular project wasn’t one that I personally tackled! I can say that it was a very simple frame, and then the hood was installed inside it once it was in place.
That was an amazing transformation! I love every detail and it came together so well! What kind of floor is that? Looks really good. Is it the wood-look porcelain tile?
It’s laminate! Hard to believe, right?! Direct link in the source list!
Balty!
I still can’t get over how good this is! I just de-popcorned & planked my hallway ceiling and am examining all these pics to figure out how I want to trim it out. I think I’m gonna steal that 1×4 idea because crown is just too fancy. :D
I am not exaggerating when I say you have created my <a href=”https://www.nhance.com/beachside/cabinet-refinishing-jacksonville/”>dream kitchen</a>. The countertops, brick wall, tile, hardware, THE BLUE! Love, love, love.
p.p1 {margin: 0.0px 0.0px 0.0px 0.0px; font: 12.0px ‘Helvetica Neue’; color: #454545}
I am not exaggerating when I say you have created my dream kitchen. The countertops, brick wall, tile, hardware, THE BLUE! Love, love, love.
I love the look of the refrigerator surrounded by panel with a 24 inch depth cabinet on top! How did you achieve this look? What size of cabinet is above the fridge? Do you remember what paint color matched the Diamond Now Arcadia cabinets? This kitchen looks phenomenal and is my inspiration for our kitchen remodel! Thanks for posting!
I was wondering the same regarding the paint color to match the Diamond Now Arcadia Cabinets. Did you ever figure this out?
What paint color matched the diamond now arcadia white upper cabinets?