

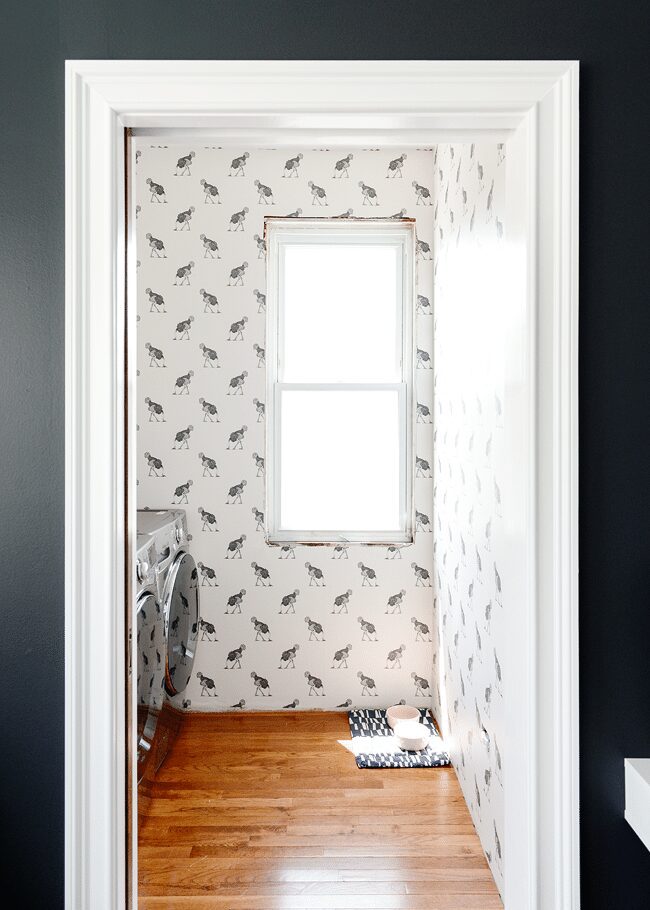
Our bed and laundry rooms are slowly making their way, with our bedroom at the point where everything is cozy and functions well. I’m still anxiously awaiting the arrival of a pretty sconce for a lonely corner (this one!), and we’re (read: I’m) debating on a few more framed photos or artwork. The laundry room, on the other hand, still has a ways to go, but we’ve made huge strides in the last couple of weeks! Here’s another little progress report, long overdue.

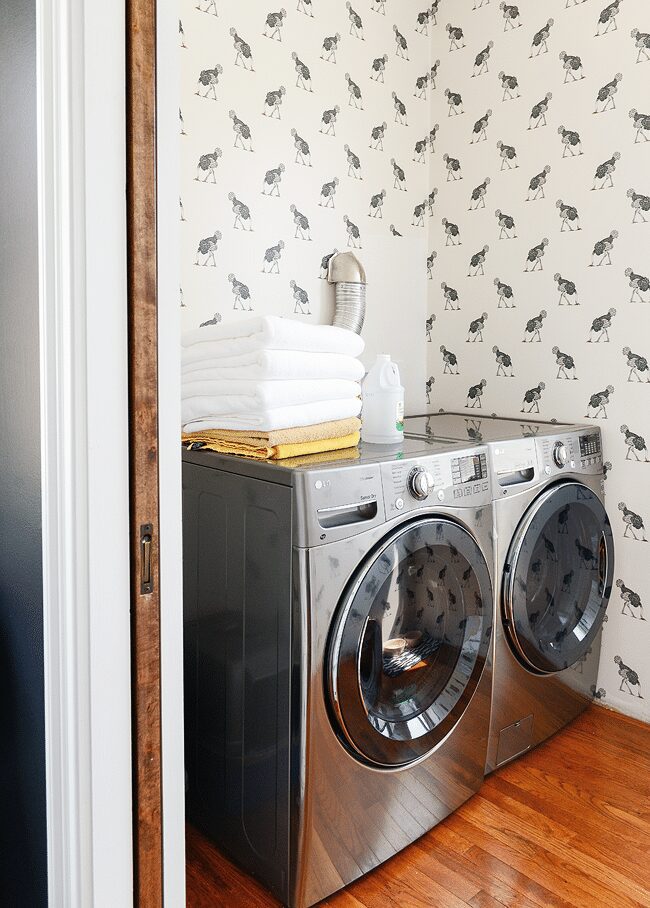
First, we got a new washer and dryer! We. Are. In. Love. We chose this washer and this dryer by LG, both picked up during an appliance sale. They play a cute melody when initially turned on (to which we sing, I-am-a-washing-machine! to the tune), they’re pretty, and most importantly, our clothes are, well, clean and dry. We sold our old set on Craigslist, making back almost enough money to cover one of the new machines.
Second – and the main reason for this update – we finally have cabinets picked out! You might remember when we first shared our laundry room plans, but the ultimate goal for our cabinetry is to hide soaps and stain sticks, towels, bed linens and odds and ends (like cat stuff, old yearbooks and photo albums). As much as we love the look of open shelving, we have come to terms with the fact that we all can’t be open shelving people. We need a hiding spot for the kitty litter, you know?
After initially thinking we’d go with IKEA cabinetry, we eventually had to nix the idea due to a lack of range in cabinetry height. Our goal has always been to take the cabinets all the way to the ceiling, but the math wasn’t checking out in their standard 20-inch, 30-inch or 40-inch options. A few months ago, however, I stumbled across TheRTAStore.com, which specializes in ready-to-assemble cabinetry with all the bells whistles you could hope for – soft close hinges, a wide selection of sizes and finishes and, the best part, one-on-one customer service! Scott and I devoured this review from House Updated, and after checking out their selection online, we were relieved to see that we would be able to create, essentially, a floor-to-ceiling wall of cabinetry. Super organized laundry room, here we come!
To this point, TheRTAStore.com has been awesome to work with, and they’ve since come on board to partner with us on our laundry room renovation! We’ll be sharing our experience with their ready-to-assemble cabinetry from the user side of things, which’ll hopefully provide you with more options when it comes to renovating your own laundry room – or kitchen or bath. (Stay tuned for the results, because we’ll also be spreading the love to you, too!) To start, we chose a variety of sample doors. Below, from left to right: Dakota White, Aspen White Shaker, Newport White, Brilliant White Shaker and Grey Shaker.
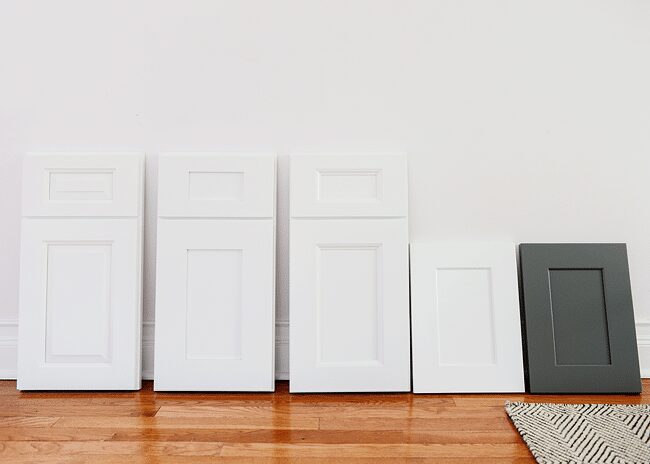
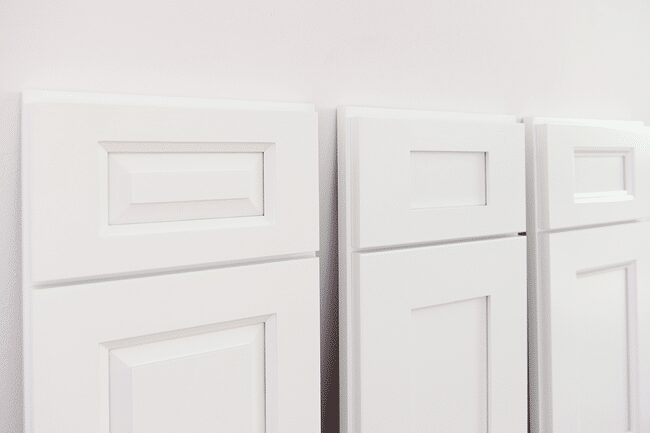
You can see right away that we were leaning towards the shaker style (just like our kitchen), but seeing the doors in person helped us to eliminate a few styles right off the bat. Our two favorites were the most simple in design, Aspen White Shaker (left) and Brilliant White Shaker (right):
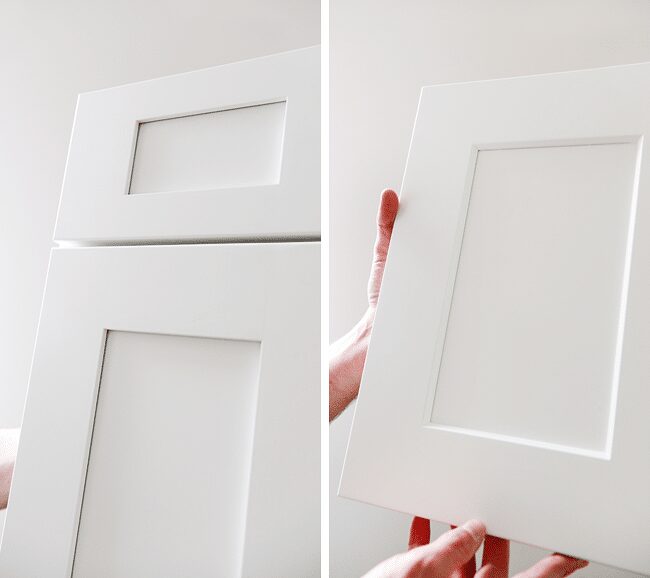
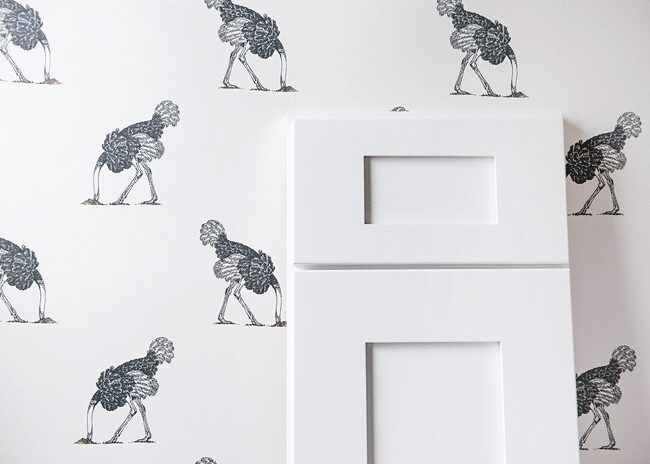
I’ll fast forward and quickly say that we landed on the Aspen White Shaker, due to the size options available; that said, the styles offer a variety of sizes and options across the board. Here’s a specific example: While considering the Brilliant White, we found that it wasn’t available in a 24″ deep x 30″ wide cabinet for above our washer and dryer (this will make more sense in a minute). In our case, the Aspen White Shaker did offer a deep cabinet, and because we liked both styles similarly, it was what made our decision.
Okay, so on to the plans! The cabinets will go wall-to-wall, floor-to-ceiling in our laundry room. Eventually, our washer and dryer will be stacked to allow for lower cabinet space.
The lower cabinet space is very, very important for a very, very important girl. We’ll be installing a kitty door into the cabinet so that Libby will have a private space to eat and potty in peace. Let’s just say that the pups don’t always make this easy on her, so we wanted to keep things behind closed doors!
Let’s talk about how everything will shake out! I signed up for a ‘free kitchen design‘, which basically put me in touch with one of their in house designers to work with one-on-one. After filling out the form, I was emailed by Chrissy the same day(!), and I sent her dimensions of the room, my ideas, and a quick sketch I made in Photoshop to give her an idea of where we were headed. Below are the plans from point A to point B, and the thought process along the way:
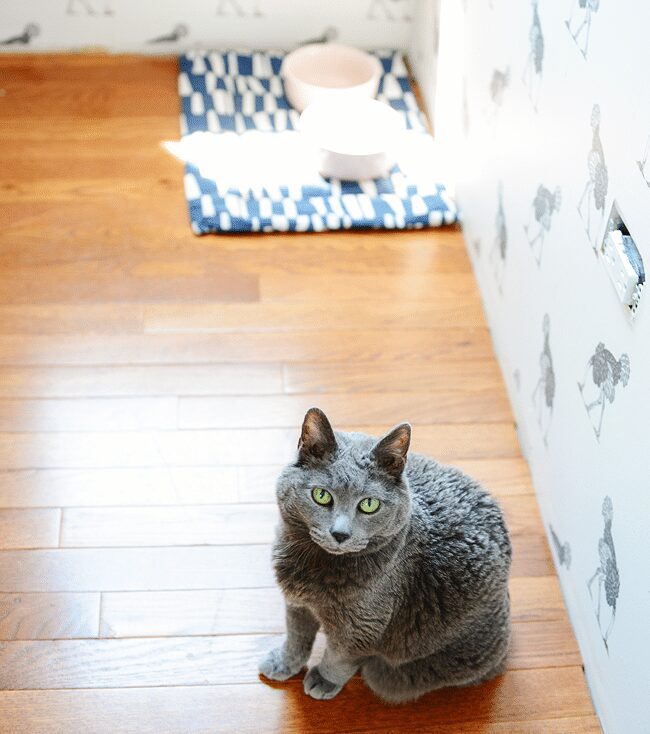
ONE. I told Chrissy that we were toying with the idea of dark lowers and white uppers, but how would that look with a white side panel along the washer/dryer? As it turns out, we weren’t fans. Wanting our wallpaper to be the star of the show, Scott and I both agreed that the tuxedo look was too busy for this small room.
TWO. For the second round, I asked if she could bring the cabinets all the way to the ceiling. You’ll notice a slim drawer below the upper cabinets. The idea for that was a DIY drying rack, like this!
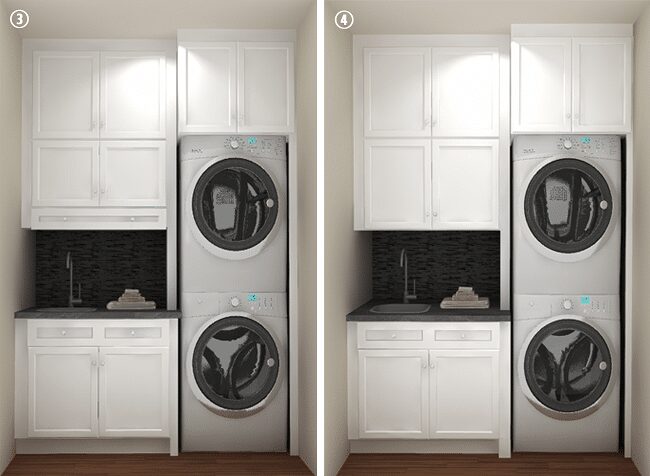
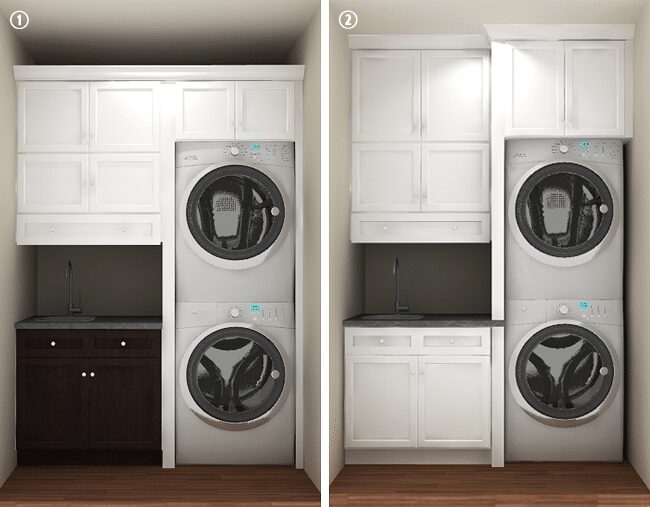
THREE. We liked the direction we were headed, but we asked her to eliminate the decorative crown in favor for something more streamlined. Also, could you even out the trim along both sides of the washer /dryer so that the side panel isn’t so thick? Regarding the side panel, this turned out to be our only pain point. Because our ceilings are 9′ tall in this room – and because side panels are typically only 8′ tall – you can see that we broke up the panel with the countertop. Once all of our pieces arrive, we will have to see how this plays out!
FOUR. In our final rendition, we did decide to take out the drying rack ‘drawer,’ and in its place, we added a taller upper cabinet. This makes all of the upper cabinets 24″ high, which we felt looked more pleasing (less cluttered!) overall. In the meantime, I ordered one of these retractable clotheslines!
Although our laundry room is a cute little thing, we did make the bold decision to have all 24″ deep uppers. Our lower sink cabinet will be pulled flush with the appliances (roughly 32″ deep), which will still give us the allowance we need to keep our heads bump-free. The extra deep uppers – typically reserved for above-the-fridge – will give us extra storage for larger blankets and linens, but it shouldn’t look out of place since you’ll never, ever see them from the side!
With everything finalized, Chrissy added all of the items to our cart for checkout (including an extra filler piece and touch up paint), and she sent along detailed dimensional drawings so that we knew how to trim all of our filler pieces once everything arrives. We haven’t yet received a shipping confirmation (it could take up to 2 weeks), but we can’t wait to cross this massive to-do off the list!
Has anyone else opted for extra-deep cabinets in unique situations? In our minds, it will work out, but we’re also crossing all our fingers and toes.
A huge thank you to TheRTAStore.com for sponsoring our laundry room, and all the same to you for supporting the brands that support us. xo


Ok dumb question.
Do you guys worry at all having the clothesline to hang items and the occasional drippy item dripping onto the wood floor? I know generally items are not THAT wet, but occasionally I find hand wash items are not “wrung out” enough and they drip as they hang.
Just wondering, when I saw the clothes line I had to go back to see what floor you had and seeing the wood brought up that question.
Totally valid! Right now, we use a folding drying rack (that’s old and wobbly and we can’t wait to get rid of it!), and we set it on our hardwood floors. We’ve never had an issue with dripping, but our clothes are never THAT wet once they come out of the washer. Just damp, I guess? Also, we’re not big into hand washing items, haha. If something is too delicate, I usually don’t buy it in the first place! :)
Pro tip: after you hand wash a piece of clothing, put it in JUST the spin cycle in your washer. It’ll air dry much faster! (Reading this tip on some blog somewhere pretty much changed my life. :) )
Please please please don’t make your kitty eat and poop in the same cabinet…
The cabinet is quite large. We always have her best interest in mind. :)
I came here to say the same thing. The plan looks gorgeous and your hearts are in the right place. But it rubs me the wrong way that you insist that a 32″ deep enclosed cabinet is “quite large” for eating and excreting. I’m not sure that this is the best solution, either, but what about two separate cabinets so that at least the spaces are separated?
Hi Kristy, we did consider 2 cabinets, but we quickly tossed that idea aside. With 2 cabinets, we would then need to put another cat door on the inside, and we feared that our elder kitty might get confused. The thought of her feeling trapped just breaks our hearts. (She’s a very small cat!) I see where you’re going with this though, so we may consider a little divider at the very least. I actually really like that idea! And for what it’s worth, our girl wouldn’t be hanging out in the cabinet all day long… She’s not one to lounge with her food. This idea is simply to keep her business away from the dogs so she can eat in peace.
Thanks for the reply, Kim, I do appreciate it! I also appreciate that you’re trying to give the cat some peace in this new design, but you lose me when you indicate that eating and excreting in one small, enclosed space is peaceful. In addition to it being gross, you run the risk of creating litterbox issues with even the most flexible cat, and it sounds like you’re really going to stress Libby out. I like Ariella’s suggestion of closing the laundry room door and installing a cat door, but I know your laundry room door may present a challenge there. Putting the food on the counter also presents challenges if she can’t jump up there. I hate to imply that we readers have any say in the design of your home, but you ordinarily strike me as people who love and respect your animals and I feel like you’re really off track here.
(Sorry if this posts twice, I’m not sure what I did!)
I came here to say the same thing. That’s not cool. Cats don’t instinctively like to eat where they sh*t (nor would you) and you risk either having eating issues or litter box issues, neither of which are pleasant. Why can’t you keep the laundry room door closed and put a kitty door in there? Or keep the food on top of the counters (if she can jump up there)? There has got to be a better way to deal with this issue, and I can’t help but feel that you’re doing this for your own ease rather than your cat’s well-being. Normally I like your blog, but this really turned me off.
The only place I’ve ever seen a retractable clothes line was in Colombia at a resort we visited in January – so funny to see one again so soon. They work great!
Love the design – looks great! Thanks for sharing!
We used the Aspen White Shaker from TheRTAStore in our kitchen and laundry room and have been pleased with them thus far. Great choice! On a different note, like Kitty Person, Kristy, and Ariella, I am gravely concerned for your sweet Libby. Even if she is small and meticulous, even if you use the ‘dustless’ litter, even if she doesn’t seem to mind, this is not a time in her life when you want her to feel that she is being punished when you are actually trying to provide her a peaceful place away from the pups. Such a change could contribute to a number of health issues, the worst of which being an early demise. Older cats are even less able to deal with changes and stress, so I encourage you to use your super creative energies to find an alternative solution that is appealing both to you and to Libby. I’m sure you can figure something out! :)
Pretty plans. Does “sponsoring” mean the cabinets are free? Can you share what the cost would be for others?
Hi Meredith, they are providing the cabinets, and we’ll be sharing the experience. They came to right under 1,200, but they tend to run sales frequently. Right now, our cabinet finish is 20% off, so the final price would be $950(ish). For us, that price also included an extra cabinet door, a side panel and a few extra filler pieces as well! Thank you for asking!
Thanks!
It looks great! I have mine stacked and love them. No doubt you guys gave this tons of thought and compassion for your kitty Love. It will be interesting to see if she tolerates it. It’s a good idea! But as you know esp older kitties can refuse change. I’m assuming her litter box is in that room now, which hopefully will help. Mine hate the washer/dryer, would not poop in the litter box there. I resorted to one of those walk-through baby gates that has a built in kitty door. Dogs out, mama and kitty in. We love it, but yeah, I hear ya, I’d definitely prefer to hide it in a cabinet. Good Luck, can’t wait to see more!
Thanks, Kathy – yup, the litter box is in that room now, pretty much in the same spot it will go once the cabinets are in (it’s currently just to the left of the washer/dryer). Both Maddie and Libby have been champions during the construction in this room. At one point, we had to move their box and food to the workshop downstairs while this space was down to the studs. We showed them where everything was, and they took right to it! When we moved it all back up here, it was business as usual!
Great!
I just wanted to alert you to using a liquid fabric softener in your new washing machine. I have the same LG & using Downey gunked up the drawer that holds the little cups. Then it caused mold & leaking on my floor.
If you need to use a fabric softener, I would suggest you use dryer sheets.
Also you need to leave the washing machine door open when you’re not using it.
Otherwise you get mold in the rubber gasket that seals the door.
Thanks for the tip, good to know! So far, we’ve been leaving the door almost closed after laundry, and then I’ll close it before bed.
Looks like things are coming along nicely! Will you have to nix the gorgeous salvage sink, or does it still fit with these plans?
Thanks, Cait. :) We had to nix it to make enough room for Libs. We have a different sink/faucet in waiting!
Aww, that’s sad since it’s such a nice find, but totally understandable. Looking forward to seeing your new plan come together. :) (And if you still have the other sink, maybe you could put it to use in the backyard as a potting area for plants or something?)
I’m with the others about the poor kitty, eating and excreting in the same box, even with a divider.
Id put the food in the cabinet so they can access it, but keep the litter box separate. Couldn’t you build a “Plant Stand” or “extra storage” that can encase the litter box in the corner now where you have the food and water?
While it may not be ideal for the food and litter to be in the same space, it really is kitty preference. If your kitty isn’t used to that setup, watch for signs of dislike such as soiling outside the litter box. I have the same situation with pups so my kitty has had her food and litter in the same space (a storage bench) since she was a kitten and she hasn’t had any issue. Just try to physically separate them as much as possible (opposite sides of the cabinet). Good luck and I just love your laundry room!
Thanks, Kristin! As long as we’ve had our girl(s), their food and litter have never been more than 3′ apart. They’ve always been very comfortable, which is our goal.
I love where you’re going with this. If I can offer one piece of advice to bear in mind it would be that laundries are typically damp, humid environments! You would need to consider ventilation both inside and outside your cabinets to maintain airflow. When I lived in the colder clime of England, I noticed that most linen storage cabinets were built around the old-fashioned padded type of water heater, so I’m assuming this was to combat mildew build-up problems. This may not typically be a problem in your situation (we’re talking older type properties in the UK!), but one very handy piece of information I stored for future reference is shelving! The Brits tend to go with the slatted-type shelves instead of solid ones – again to stimulate airflow. This makes a lot of sense to me. It will be interesting to hear which route you decide to take.
I’ve just read some of the tips above. Most front loader manufacturers will tell you not to use any form of fabric conditioner. Not only is it unnecessary (because it makes very little difference at the end of the day), but it’s not good for your washing or your machine + it’s an added expense! That said, always VENTILATE your machines!! When your wash is done, open up (and empty excess water from) the panel where your detergent goes; it’s a good idea to leave the panel open until it’s fully dry before closing it. I agree with Mary above – keep both washer and dryer doors open after washing and drying. I leave mine open practically all the time. The rubber seals will turn moldy after a time. Some machines, like my Asko, don’t go moldy, but most other brands tend to. It’s something to do with the sealing. It’s okay to air it during the day and then leave it open about 1-2″ at night, as this will prevent it from smelling. When not in use (and totally dry), I shut the doors completely. Don’t forget to always remove the lint from the dryer door! Very important. I tend to very seldom use my dryer – maybe because I have access to a great big backyard and an awesome washing line and sun! I do sometimes throw the towels in after they’ve been on the line, simply to soften them up a bit (but I like mine to be ‘scratchy’, lol). Same goes for my raw linen sheets. I prefer them softer, rather than sun-baked hard!
***Here’s a good reason why not to use fabric softeners and dryer sheets: “Fabric softeners contain toxic ingredients that are bad for your health and the environment.”
For more info on why not to use these products, pop over here to check it out folks:
http://www.ewg.org/enviroblog/2011/11/dont-get-slimed-skip-fabric-softener
Cheers from Oz ~ heather x
Heather, thank you SO much for all this awesome feedback. Luckily, the fabric softener is a non issue for us – we’ve never used it for the same reasons you’ve mentioned above. We actually picked up these dryer balls, and we’re excited to give them a go! (Haven’t tried them just yet.) We’ve also left the door slightly open with our old front loads, so that process has stuck with us for these machines as well. Can’t thank you enough for weighing in – I’ll be reading it again later as we start set-up with the cabinets!
We also have front loading machines, and have found a pretty great solution to the leaving them open issue. We have a fairly heavy duty magnet on the side with a cord attached to it, and then the other end of that cord is attached to a hefty metal s-hook. We hook the cord onto the inside of the washer door so that it stays open, but we don’t have to worry about it swinging too far. We can also adjust the length of the cord or placement of the magnet to change up how far we allow it to open.
It’s been really helpful since ours is in a high traffic area, so it minimizes it swinging around or getting bumped shut.
Great idea!
Very, very jealous of this laundry room and what it’s going to become. Ours is horrible with no light at the end of the tunnel. Yours is going to look amazing — I can’t wait to see the reveal!
Good choice on the final! Can’t wait to see the finished product :D
I love the pocket door! It’s so unique to see one that’s solid wood with that hardware. And that wallpaper? Sooo envious. <3
I replaced the toe kick on the bottom of the cabinet with a food station drawer which hold two bowls for my dog Paco
Cute! We saw that in some of our research. Do you have a photo of yours?
Seems like a gorgeous plan to me! Hope that you’re able to work out any problems and make something that works perfect and gives you a gorgeous, functional laundry room.
Your laundry room is looking really great, and I’m in love with the kitty!
I can’t wait to see the end result! Coincidentally, I have a big box of sample doors from The RTA Store that I’ve been meaning to ship back for, ohhhh, about two months now… (!) I’ve been going back and forth about whether to go with The RTA Store or with Cabinets.com, so I’m anxious to hear your thoughts about your experience!
Hello, thank you for the inspiration — we are now looking into RTA cabinets ourselves! What are your plans for the 30″ side panel fitting the 32″ needed for the stacked machines? Will you just have the machines extend 2″ beyond the panel? Thanks!
Hi Carly! Our laundry room poses a few challenges – a 9′ height and a 32″ depth. We talked at length with our RTA designer about all the ways we could make their side panels work, but in the end, I think we might have our kitchen cabinet maker make one for us. Our situation is super unique though, as most people wouldn’t have a 32″ counter depth! Definitely talk through the options with your RTA designer. She was amazingly helpful with going over every option with us.
One final question: are you concerned about matching paint finish at all? We may need to do something similar but my hold-up is matching the finish on such a large piece. :) Thank you!
We read in a different review for TheRTAStore.com that Extra White by Sherwin Williams is a really close match to Aspen White shakers. We’re sort of cross our fingers on that one! We also got a few touch up paint pens for everyday wear and tear from RTA. If you’re super concerned, you can also bring in a cabinet door to a hardware store and have them color match to your cabinet. We have done that before!
I’m so glad I’m not the only one that makes up little songs to the washer/dryer tunes! When our dryer turns off all I hear is “I’m bored I’m turning off.” Thanks for making me feel (slightly) less crazy!
How are your cabinets holding up? Easy to clean? Do they have glass door options?
They’re holding up beautifully – still look brand new! I wipe them down every now and then, but in a relatively low traffic room, it’s simple to keep them looking clean and nice. I do believe they have glass door options, although not in this particular style. it’s definitely worth a look!
We are considering moving our washer and dryer up from the basement into the main floor and having them stackable but would we have to reinforce our flooring for the weight since we have a basement?
We didn’t do any special reinforcing to our floors to stack ours, and I don’t think that would be the case, BUT you may want to ask a contractor just to be sure. Your floor joists should be 16″ apart (regardless of whether you’re on the main level or second floor or third floor, etc), which is standard. :)