

We’re slowly chugging along on finishing up the bedroom, while also planning for laundry cabinets and drawing up ideas for the backyard this summer(!). Today, I wanted to share a super simple IKEA hack – with the term hack being used lightly – for a perfectly sized, slim floating vanity using the EKBY ALEX.
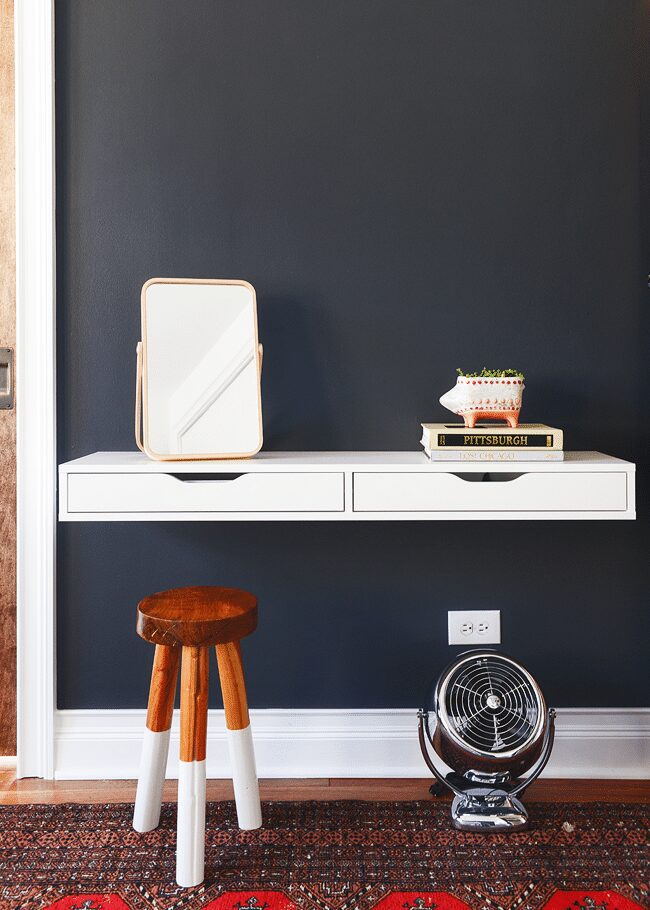
Stepping back quickly to our PAX wardrobes, our entire goal was to eliminate the need for a dresser (or two), as we wanted to keep the walls free of any heavy furniture. Instead, I knew I wanted to have a small landing spot for a vanity to hold my equally small stash of makeup and jewelry, and we both agreed it’d be nice if it was long enough to display a few favorite items, too. After debating between countless skinny consoles or DIY, we ultimately landed on the inexpensive EKBY ALEX – with just a few modifications, of course!
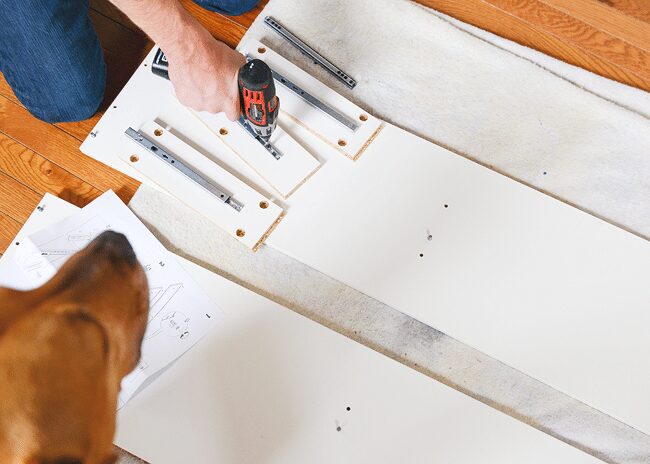
The EKBY is meant to be installed using a minimum of two brackets (like this), although three is recommended. We both loved the simple shape and the slim depth, but against our dark walls, we weren’t loving the idea of adding brackets – even if we did go with black. Endless Googling showed variations with legs, wrapped in wood or wallpapered, and although we toyed with the idea of using hunky industrial L-brackets and painting them the same color as the wall, we were determined to keep it looking light. Could we make it float?
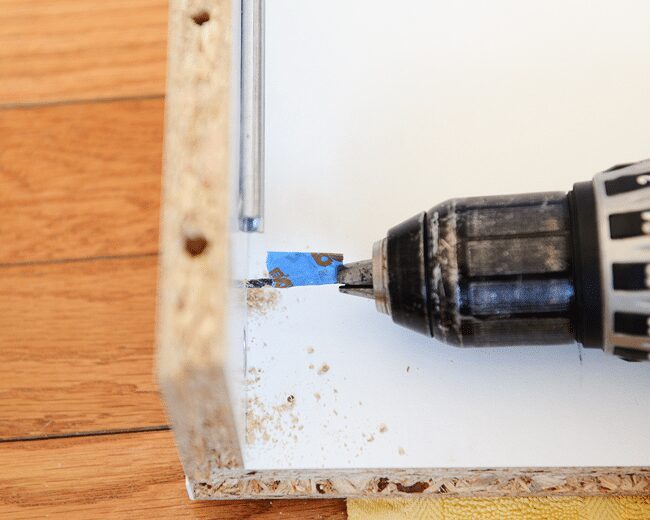
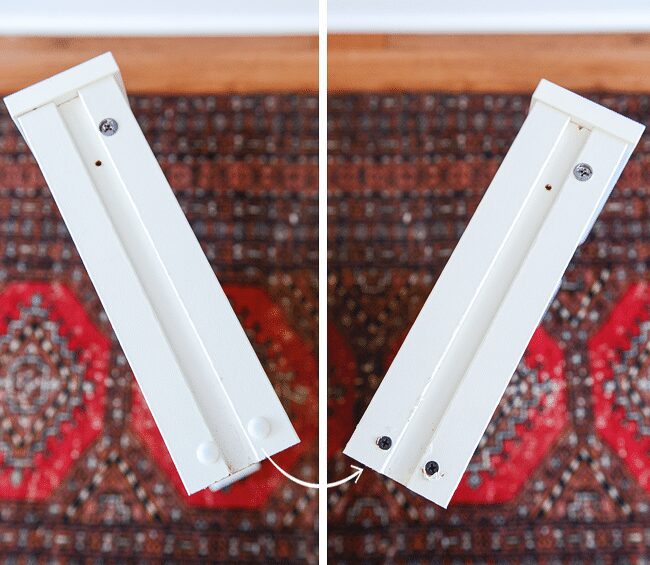
Eventually, I turned up this BESTA hack using heavy duty corner braces. If it seems obvious, it’s because it is! Unlike L brackets, corner braces can be completely hidden from the inside and attach on three sides. I bought two packs of these 3″ heavy duty braces, and we were golden. Tip: Always drill a pilot hole before screwing anything into IKEA furniture (or anything, really)! To prevent us from accidentally going through the other side, we flag our drill bit with a piece of blue tape, which tells us when to ‘stop.’

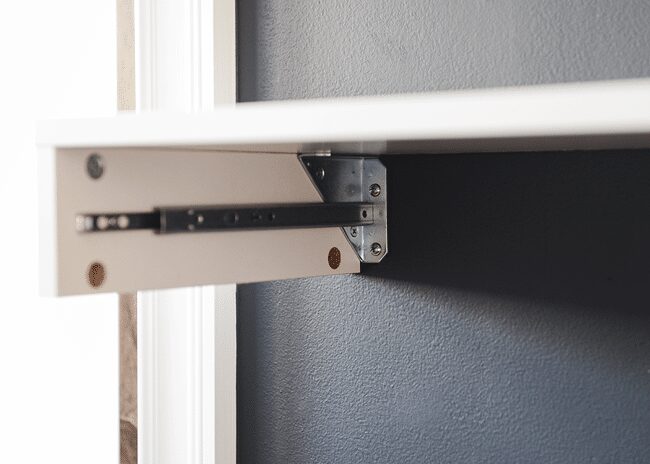
We discarded the back of the unit (which was a thin piece of cardboard, more or less), which allowed us to attach the braces to the wall. In order to gain access, we had to stop short of installing the bottom piece and sliding in the drawers. We were able to hit a stud on one of the braces, and for the other two (we installed three total), we used toggle bolts. This was surely overkill as nothing in this vanity is more than a few ounces on its own, but it’s also nice to know that this thing is strong. Float, float!
With the unit on the wall and the bottom in place, we went to slide in the drawers and hit one small obstacle: IKEA includes thick plastic bolts to attach the sides of the drawer to the back, but the slightly rounded head hits the edge of the corner brace! We removed the bolts and (carefully!) used wood screws instead.
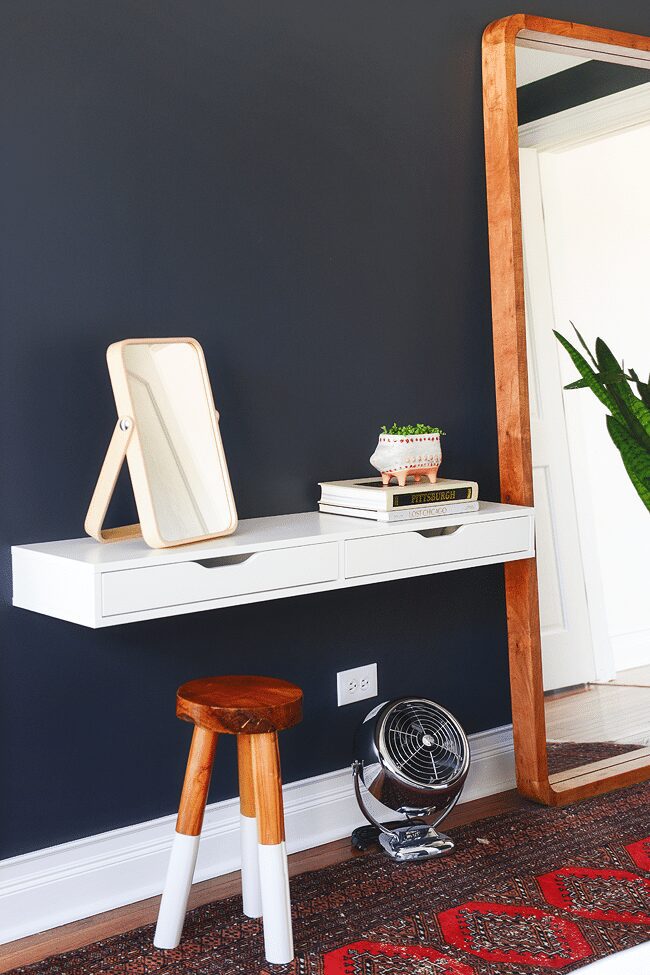
As it turns out, it will float! The vanity is installed along the wall that leads into the bedroom, right next to the laundry room door. The 12″ depth makes it a non-issue, allowing for easy flow between both rooms and back out into the studio.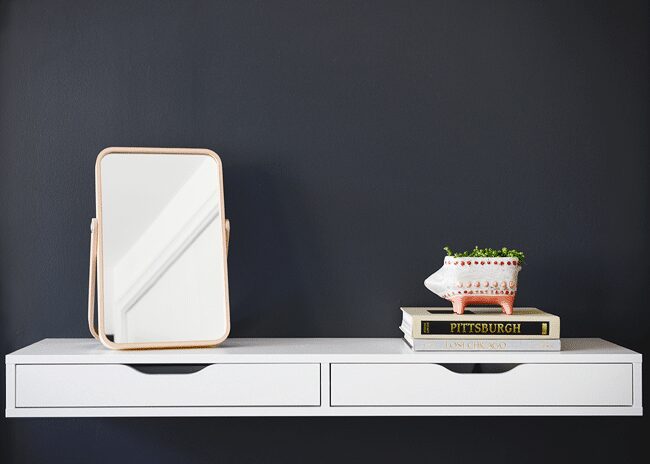
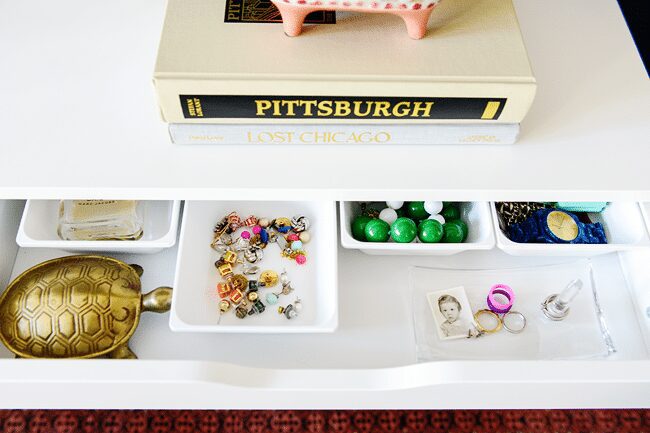
Inside the drawers, I used a flatware organizer for makeup and small bowls for containing my fancy (ha!) jewelry:
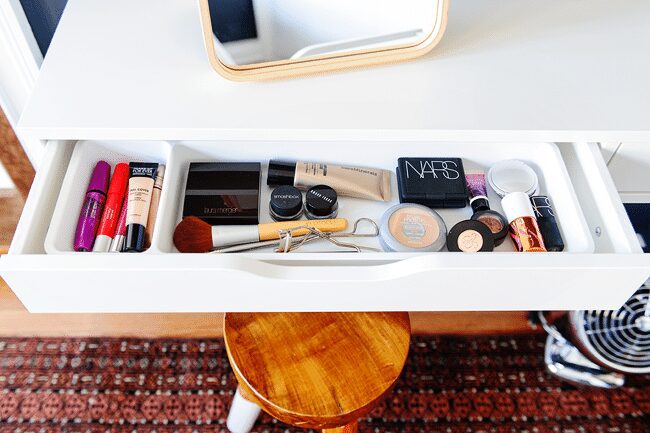
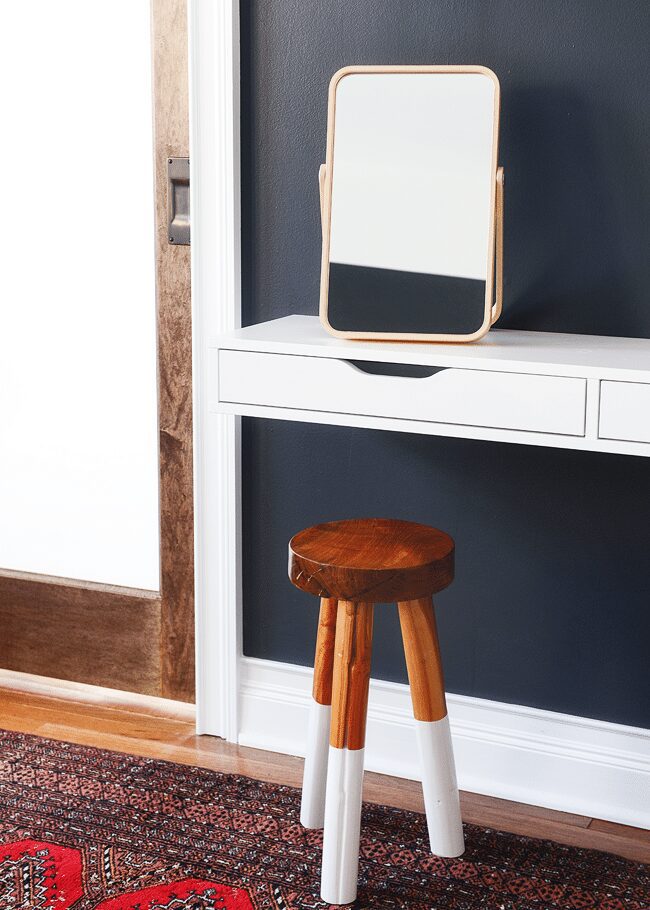
The drawers don’t pull out all the way due to built-in stops (the photos above show the extent of their range if you’re curious), which I thought might be a problem in the beginning but having used the floating vanity for several weeks now, it’s a non issue. The notched out pull is decently sized, so I push my trays to the back of the drawer when they’re not in use, and you can barely (like, baaarely) see them with the drawers closed, which makes me happy.

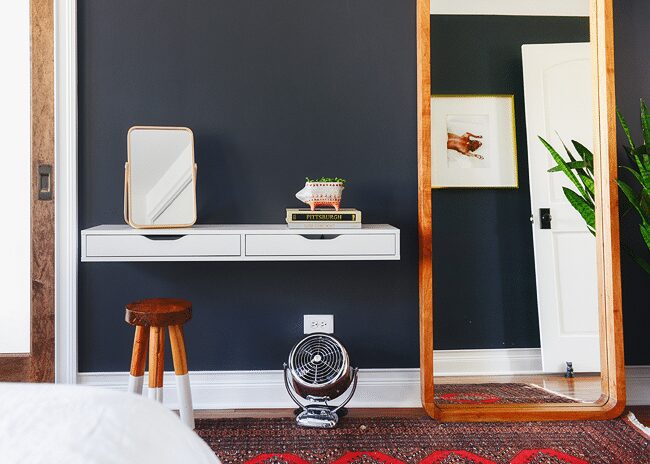

We also picked up the IKORNNES mirror after seeing how cute it is in Anna’s bedroom, which is such an IKEA gem! We wanted a small-ish mirror that would sit on top since we’ll be hanging art above the vanity. Speaking of which, we’re waiting on a few photo prints, frames and one more sconce to arrive, and soon enough, we’ll be calling this room done!


I’ve never known a sweeter vanity. This is all turning out so amazing. I’m not surprised, just really inspired.
I listened to the Marie Kondo audiobook while driving from Cleveland to Pittsburgh with my best friend last November. I tell you this because a) I’ve been reading your blog for many years, and you were clearly living like Marie Kondo long before Marie Kondo’s method became a thing, and b) I saw your Pittsburgh book and was immediately taken back to the city which blew.my.mind. I won’t get into my opinion of the book (except to say that it could have been more, umm, succinct), but I wanted to say that I admire your ability to keep things in your home EDITED. It takes mad skills, which I don’t have!
Amy, so funny, thank you, but where do I begin?! First, yes, Pittsburgh is awesome (the entire side of my dad’s family still lives there), and GO PENS. Second, I love how polarizing Marie Kondo’s book can be! We got the most helpful information out of the clothes organization and getting rid of BOXES – like, boxes for our old smart phones, boxes for my billion year old laptop, etc. And third, I’ve never been a fan of clutter, but don’t be fooled – we have an entire room that we lovingly call ‘The Scary Room,’ which has a constant rotation of items we need to sell, frames and miscellany from our last home (still) and boxes for donation. Once a year, our block has a big yard sale where we toss it all out there, and every year the room gets better. One day, it will be completely free of ‘stuff’, and we will weep with happiness.
yay pittsburgh! i’ve lived here for 7 years now, and i’m getting to be quite fond of the ol’ girl. i’ve lived in lots of other places, and my husband and i are glad we’ve chosen the ‘burgh. it’s got character.
Rachel, yeah! We always joke that it feels like we’re in a spaghetti bowl when we head back home – so windy and twisty, especially coming from flat grid-like Chicago! But we love it so much, as long as we don’t take the wrong bridge and get stuck going 10 miles in the opposite direction we intended…
Okay this is SO good to hear! One of the things I’m so impressed by is how your home is so pared down! It’s very aspirational to me. Can you do a post on the scary room? Where even is that in the floor plan?!
The Scary Room has a long way to go, but we hope to start on it towards the end of this year! I may just have to do a post about it though since we get a lot of questions about all of our “things.” If you look on the floor plan post, it’s labeled “guest room #2” on the second floor: https://yellowbrickhome.com/2013/08/02/the-floor-plans/
You guys are magic!
What a great idea to float it. I need to do this in my room! Your bedroom is looking mighty fine!
Hi Kim! Can you source the fan? (Weird, right, but hard to find a good looking one!! And you’ve done it, of course.) Thanks!
Yes!! It’s the Vornado from Rejuvenation! It comes in a few sizes (and colors), although we have the mid-size one. It is so quiet but really powerful, and I can already tell we’ll be using it a lot this summer.
Looks great!! Where is the giant standup mirror from? It’s gorgeous!!!
It’s from CB2!
Awkward comment for an awkward photo, but is it possible to get a shot of what it looks like from the bottom after it’s been attached to the wall? I think I can visualize it in my head, but I want to be sure “I’m sure.” I can see myself using this hack and I want it to work! LOL
Hi Miranda! The bottom looks exactly like the top! Once it’s been attached to the wall, we attach the bottom (identical to the top piece) and slide in the drawers. Does that help?
Just an FYI – over the years I’ve made a few floating/wall vanities with various products – many being IKEA. The main issue is this – if you at ALL lean on/rest your elbows on said surface, in time, it will pull from the wall – no matter your anchors. Forewarned is forearmed. Good luck!
Ahhh I absolutely LOVE your house. Your design aesthetic is so simple but still visually interesting. Makes me more excited to move back to the States and buy a house. ^^
So nice, thank you!
What a great idea! I rent in Boston so I can’t have something like this but as soon as I move I’m doing this.
Love this! And paired with the navy wall elevates further. http://www.decoraid.com
Love this! And pairing with the navy wall elevates further. http://www.decoraid.com
That’s a very good job done by you Kim! Inspired from your works. Even I’ll start doing such DIY stuffs in my home :)
After having installed it for a few months now, how has it held up, structurally? Have you had any problems with it coming off after using it? I’m plannine to do the exact same (already bought the ekby alex) but am torn whether I should get the brackets (safety, but not too keen on look) or to do this one… let me know!! It’s really beautiful btw! :)
After having installed it for a few months now, how has it held up, structurally? Have you had any problems with it coming off after using it? I’m planning to do the exact same (already bought the ekby alex) but am torn whether I should get the brackets (safety, but not too keen on look) or to do this one… let me know!! It’s really beautiful btw! :)
Thanks, Nile! We’ve had no issues whatsoever, and it’s firmly in place. Make sure you’re able to hit a couple of studs in the wall – that’s the most secure you can get!
Ah, that’s really good (and reassuring) to know especially now that we went ahead and bought those corner bracket plates! Working on it as we speak! Wish us luck! :) Thanks again for this DIY post! :D
Hooray!
I purchased and installed this exact same shelf and use it daily as my vanity. I was wondering if there is any possible way to make these drawers open more than they do to be able to gain more usable space? If anyone knows please let me know. It would be greatly appreciated! Thank you and have a great day!
That is a little frustrating about this unit! I think it’s a safety measure since the drawer is so shallow, but potentially purchasing all new drawer glides and fitting them into the IKEA unit would solve the problem.
Could you share your large mirror source, please.
Hi, Emily! It’s from CB2, and you can find a detailed source list for our home here: https://yellowbrickhome.com/shop-our-house/
How many of the corner braces did you end up using? Just two in the end corners, or did you use all four? If so, where did you place the other two? Against the middle divider between the two drawers? Please let me know! I am going to do this same thing for my vanity and LOVE the clean lines!
Hey I know this post is old but I just wanted to thank you for it! It helped me build a streamlined vanity and soon a coffee bar in my new salon studio and I could hug you for it! ❤️❤️❤️
Thanks,
Hagan
Aw, I’m so happy to hear it!
I know it’s been several years but this has come in handy for my current search for this exact solution!
I have two questions – how did you this hold up over time and did you put these in place at studs or add anchors?
It has held up beautifully! Would do it again in a heartbeat. We hit a stud or two, but where we didn’t, we used toggle bolts. Good luck on your project!
I tried to do this same thing, with a French closet running the length of the shelf and advertise to support 300 pounds. It did not work well. I am going to try this though my shelf is already assembled and I will have to disassemble it a bit. Hope it works!
Hi! I am looking at buying this exact shelf to use as a desk, but I want to be able to store my MacBook Air in it. I can’t find interior dimensions for the drawers anywhere. Would you mind posting when you have a chance? Thanks!!
Hi Michelle! The interior of the drawers is approximately 9 1/2″ x 21″. I just tested my 13″ macbook pro and it fits with lots of room to spare. Hope this helps!
Hi! could you tell me if you used 4 braces? 2 at each end and two in the middle? I’ll attempt to install one for the kids room as a Desk, your hack is brilliant and looks fantastic! Thank you!
I believe we did use 4, yes! When in doubt, more bracing is better!
Hello…I know this post was from a while back but I was curious if you would tell me the depth from front view?
It’s about a foot deep!
Hi Kim, Great job on the hack, I am building my wife a set of two side by side against the window as we speak. Just wondering what size and length wood screws you used in place of the plastic bolts. Also did you have any issues with the drawer glides rubbing against the corner braces when pushed in? I bought my braces from Home Depot, maybe they are thicker than the ones you have?
Hey Eric! Unfortunately, we’ve moved on from this piece in favor of a full on dresser, so can’t confirm wood screw size. We didn’t have any issues with the bracket rubbing against the corner braces and I think ours were also purchased from Home Depot. Hope this helps and good luck with your project!
How much weight do you think it will hold floating?
I wouldn’t put anything too heavy on it! It works great as a vanity and felt very solid.