

We’re still talking about the laundry room, but we’re in the home stretch! After installing our cabinets, we could move on to the countertop, which we actually started working on over the summer. But in Chicago, with nice weather comes outdoor projects, and so the countertop took a back burner while we laid pavers, built a picnic table and planted greenery.
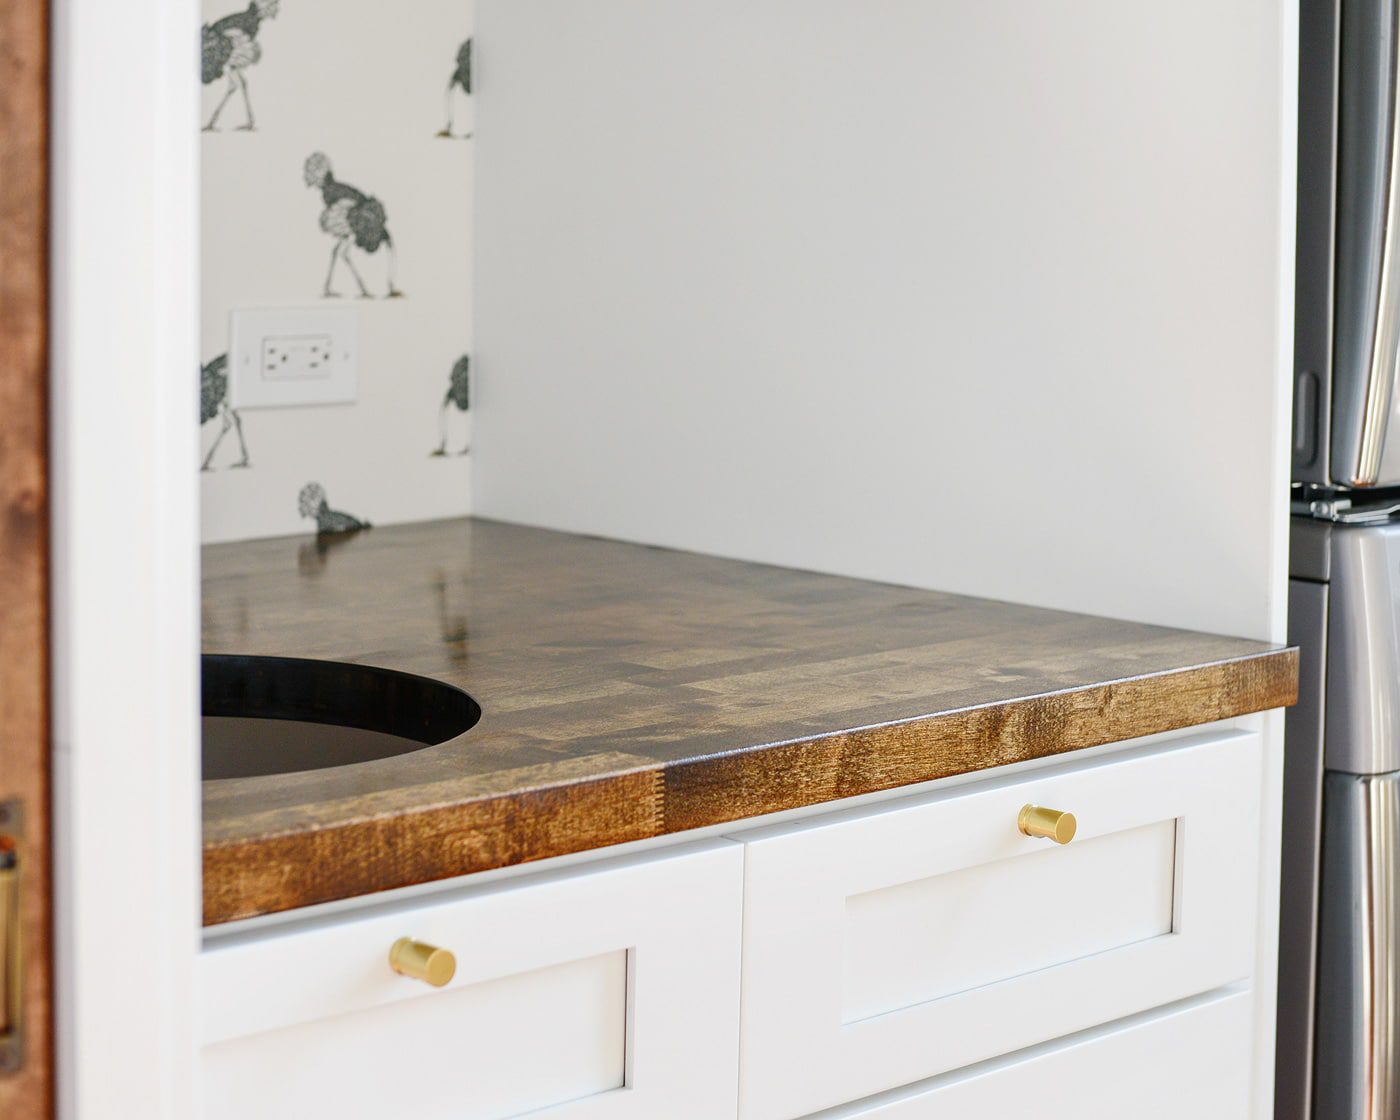
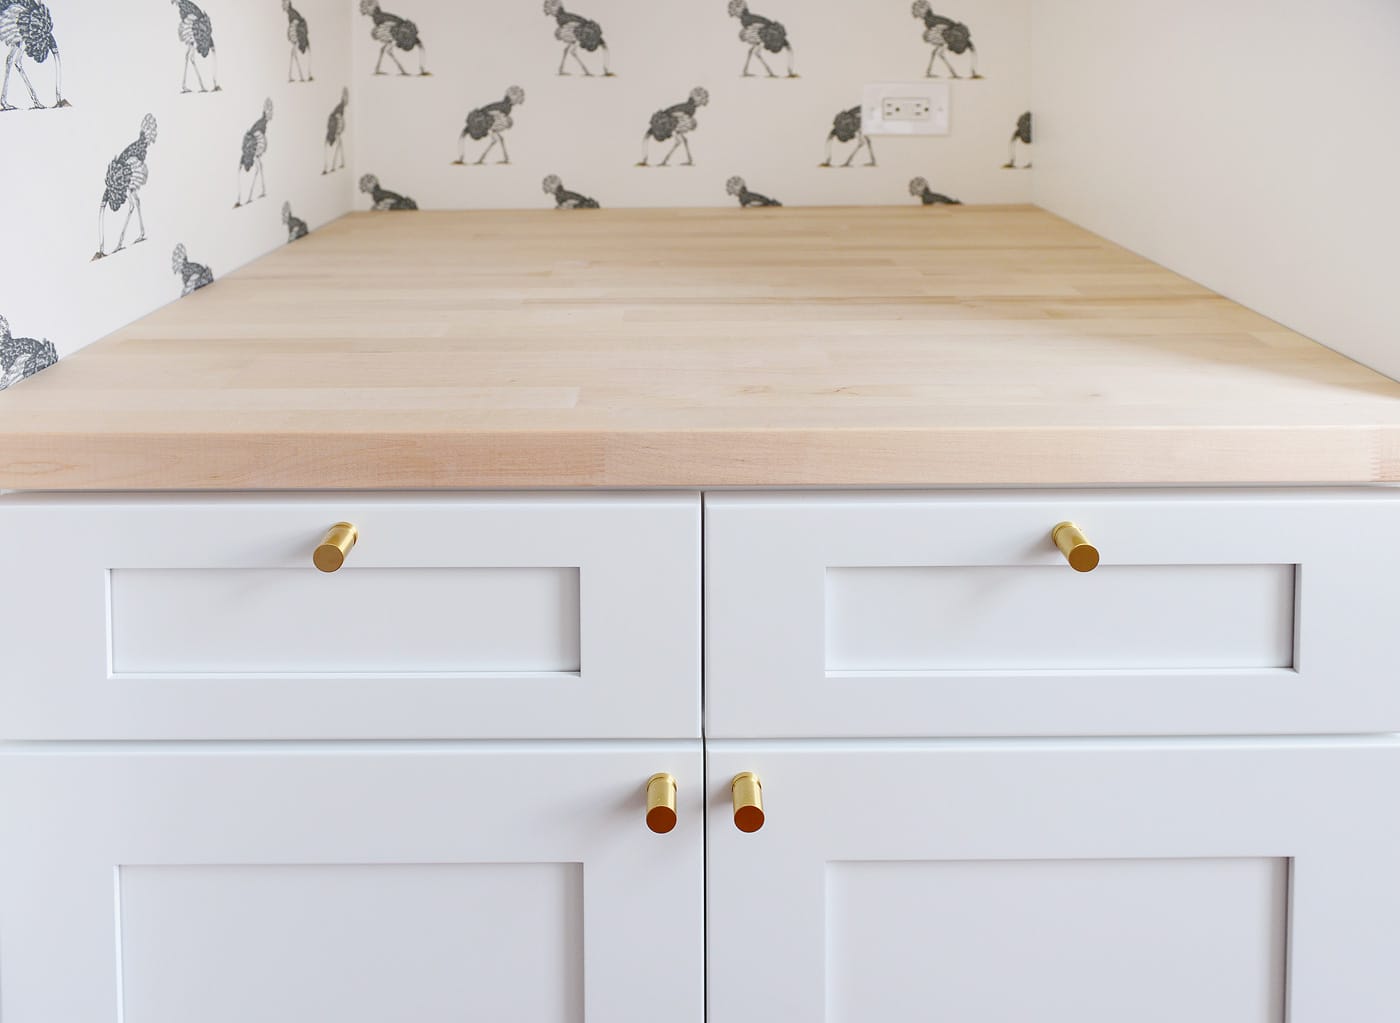
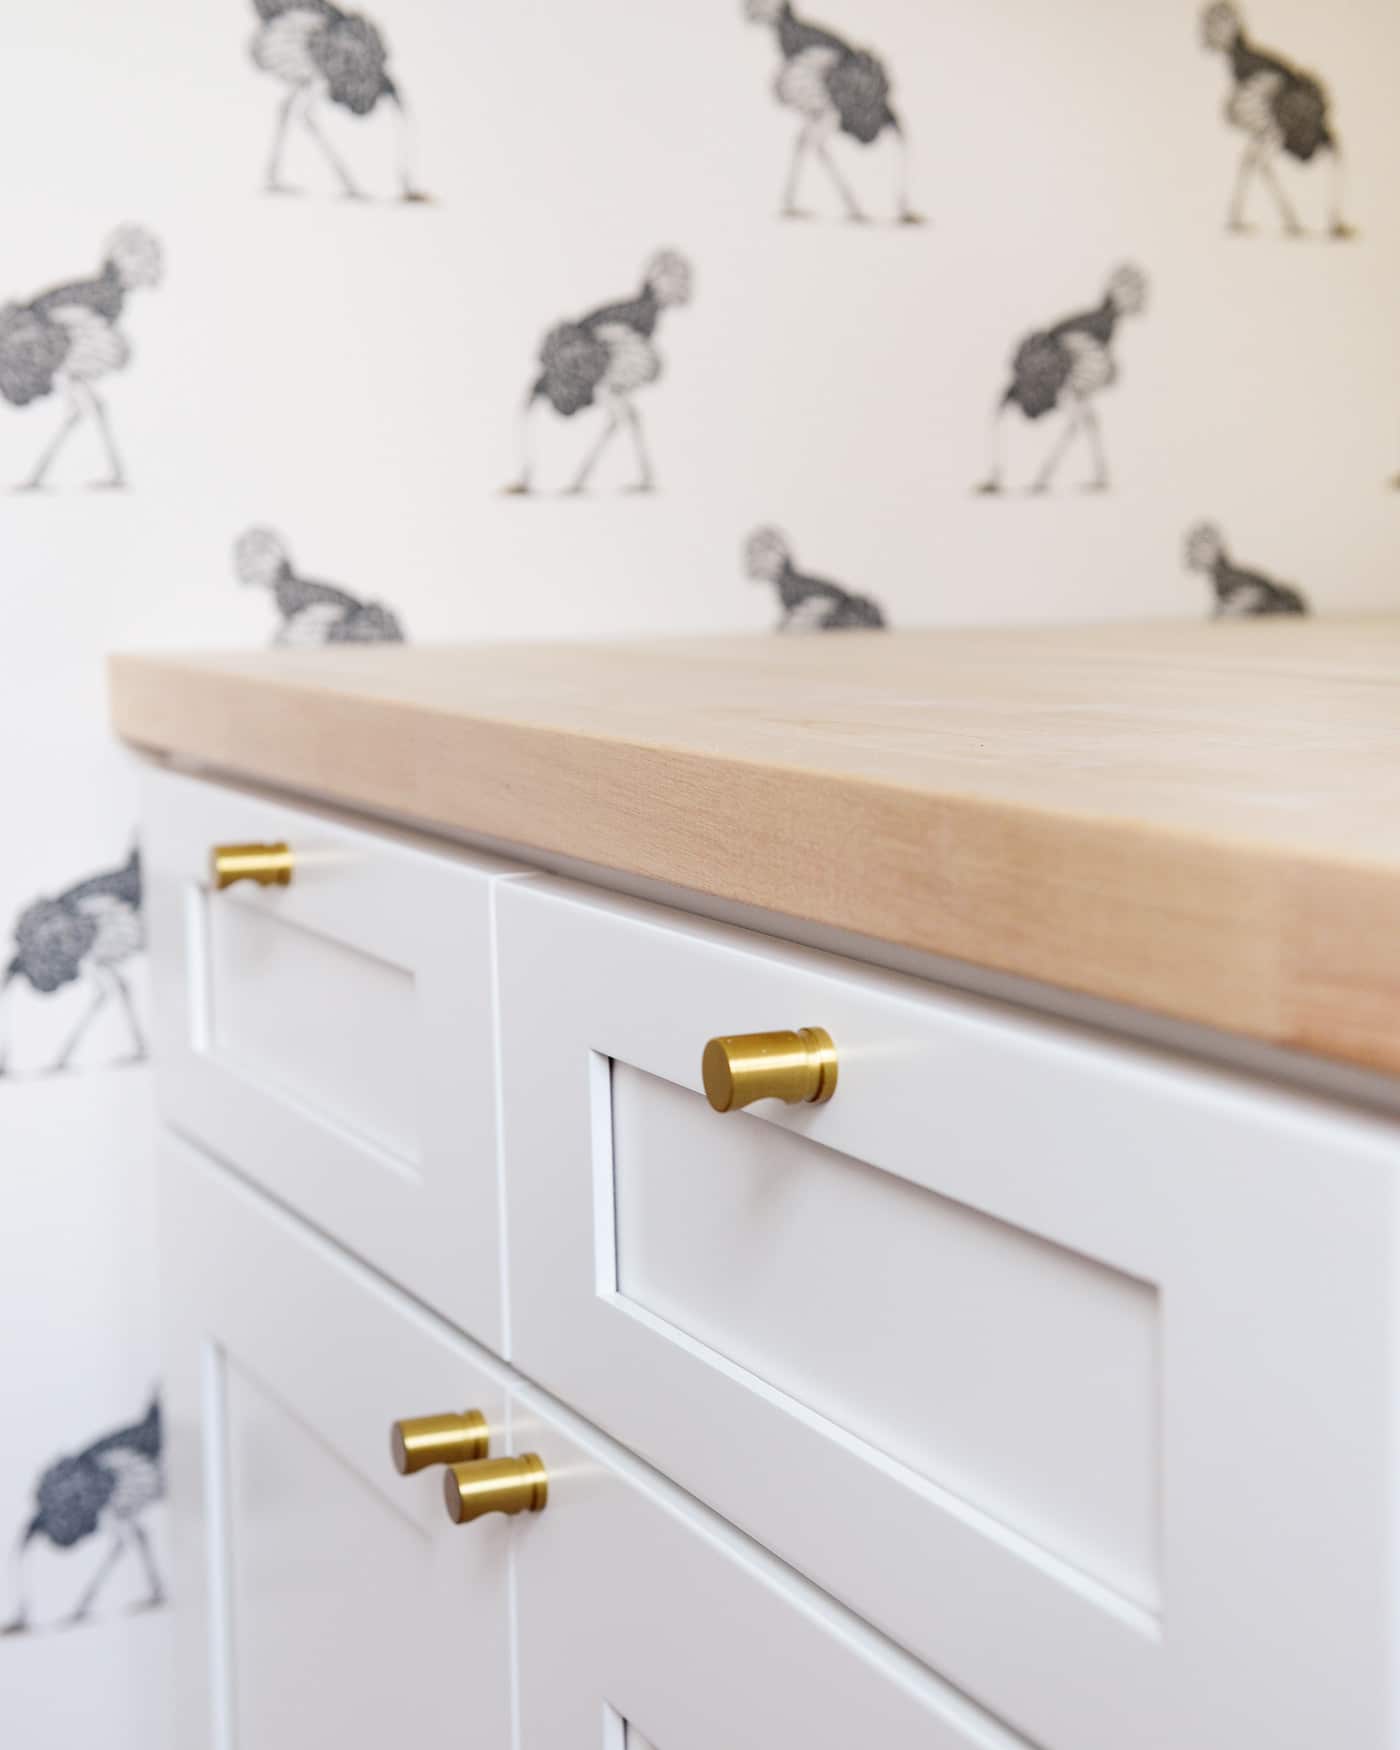
Only a few weekends ago did we turn our attention back towards the laundry room, and months after starting Project Butcher Block, we were finally able to call this countertop done! We chose butcher block for its affordability (a 3′ x 6′ slab cost us less than $150 at the hardware store), and with all the white cabinetry, we wanted to bring in some warmth. Despite the amount of time we spent dragging our heels, the majority of this project can be completed in a weekend – if you just set aside the time for it.
WHAT WE DID:
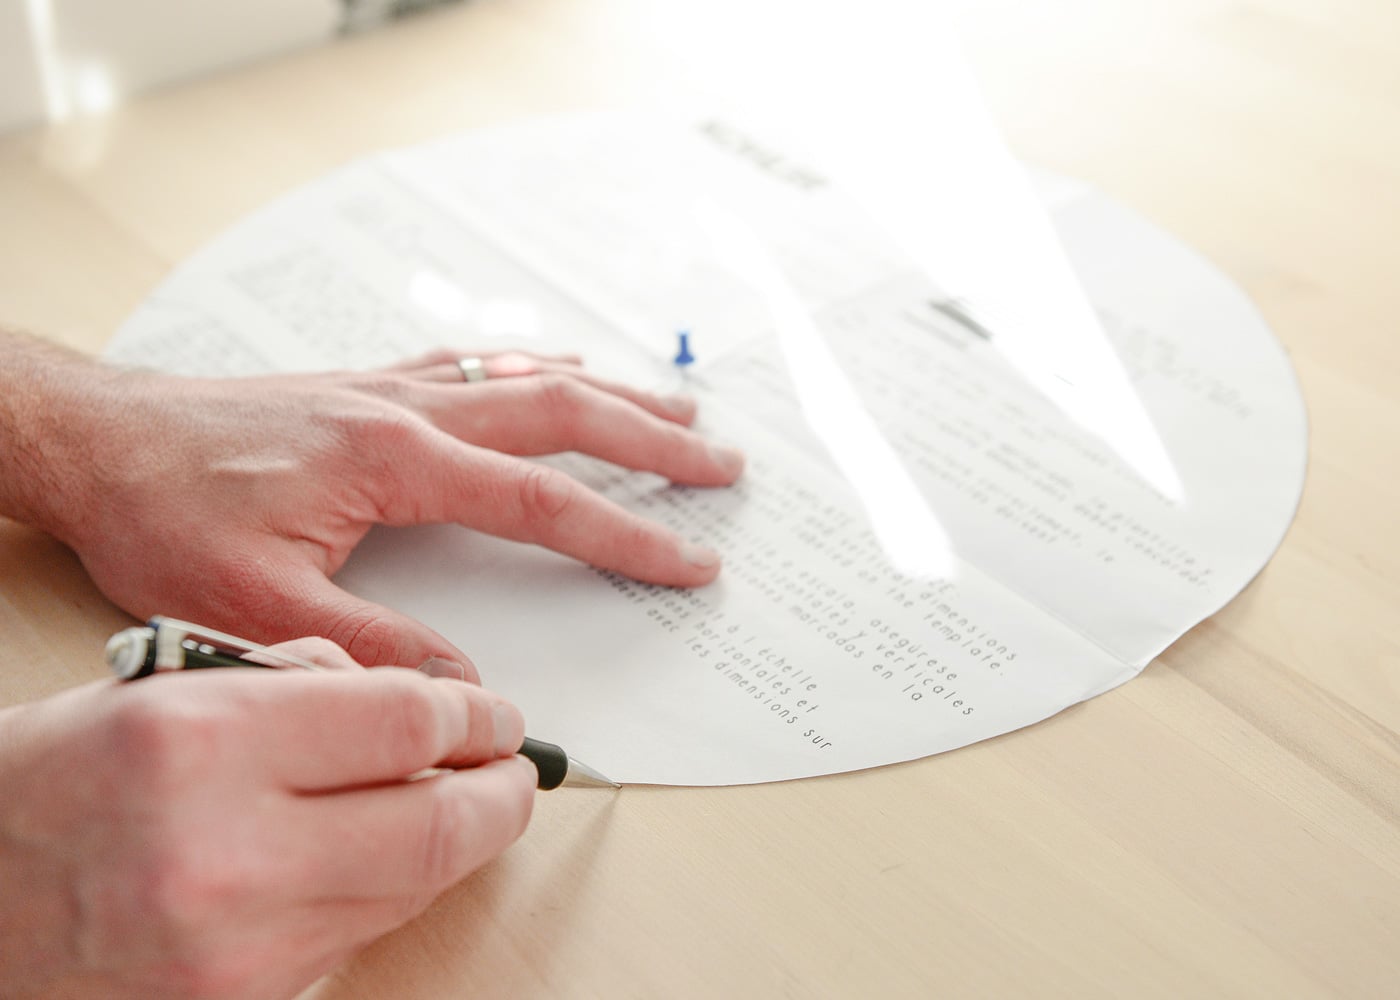
You might remember that the base cabinet is kicked off the back wall by about 8″ so that the front face of the cabinets would align with our stacked washer and dryer. With this cabinet secured to our small 2″ x 4″ box frame, we could take our measurements. That said, drywall is rarely square, so although this room received almost four walls of new drywall, we were still at the mercy of the shared walls (one being an exterior wall, the other to our bedroom). Scott measured from side to side and front to back in 3 places, and I made note of each of these measurements. We also added an extra inch to the depth of the cabinet for a small overhang. As an example, our front to back measurements were 32 7/8″ (left), 32 15/16″ (middle) and 33″ (right). Our side to side measurements were 38″ (back), 38 5/16″ (middle) and 38 1/2″ (front). You can see that the side wall was a good 1/2″ off-square overall!
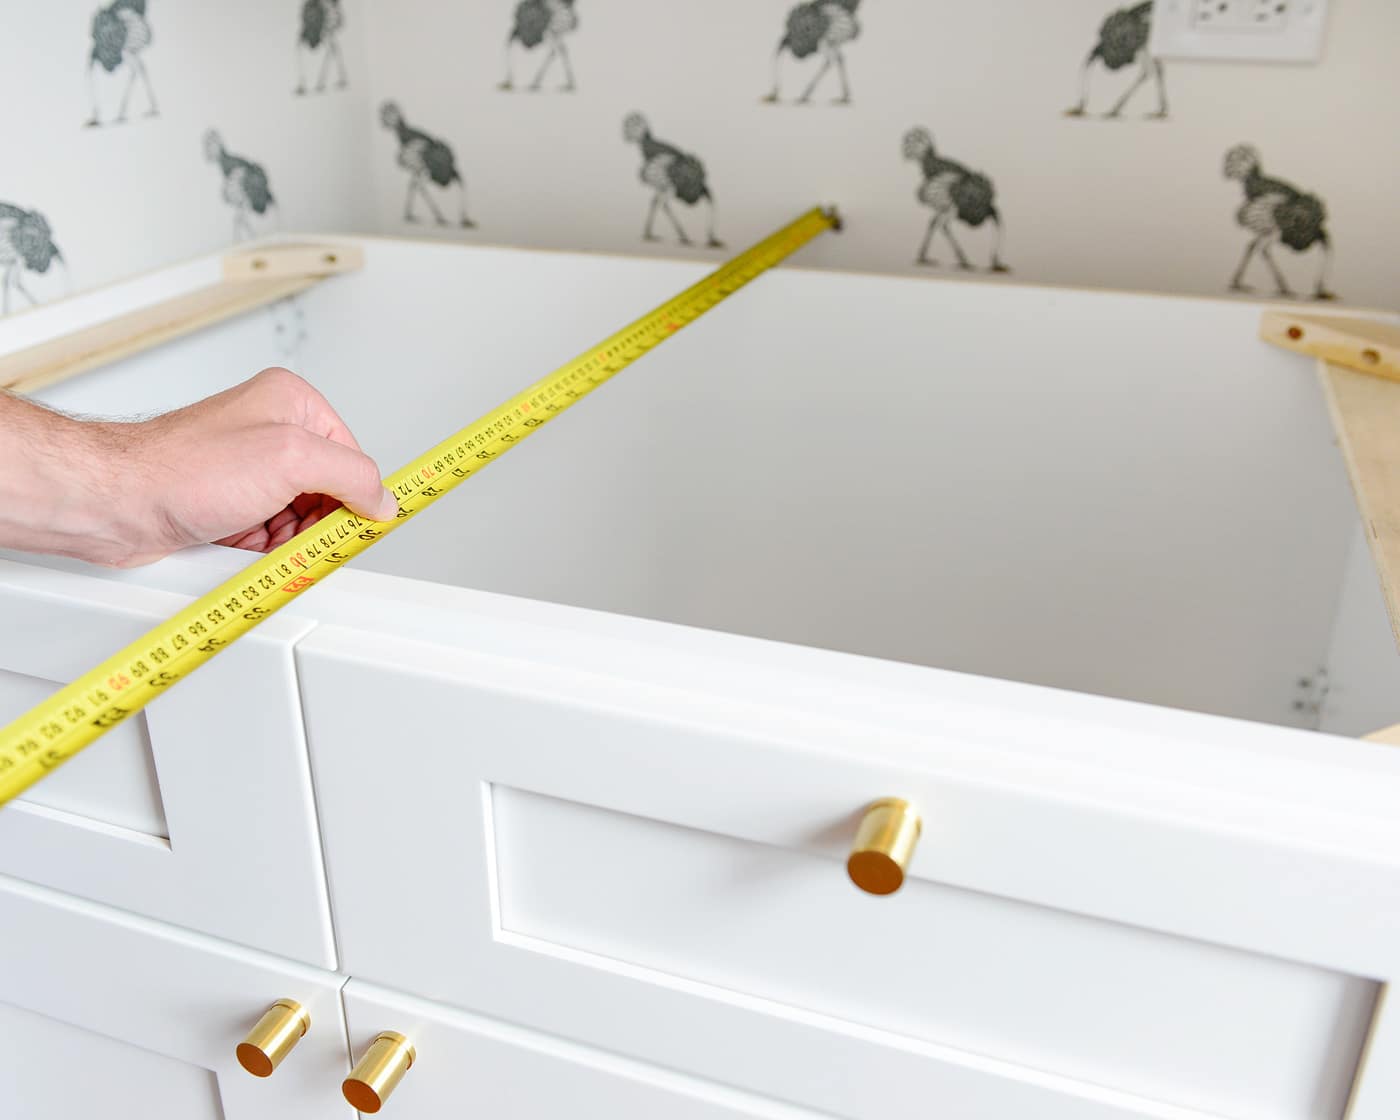
On a large sheet of 1/4″ thick foam board, we used these measurements to make our template. In our case, we assumed that the right side and front of our countertop would be a 90-degree angle, based off of the careful install of both the base cabinet and washer/dryer side panel. We made a mark at each of our measurements – measuring over and up from two of the ‘perfect’ sides of foam board – and we used a long, spare piece of trim to connect our dots. (Optional, but an extra pair of helping paws can speed up this step.)
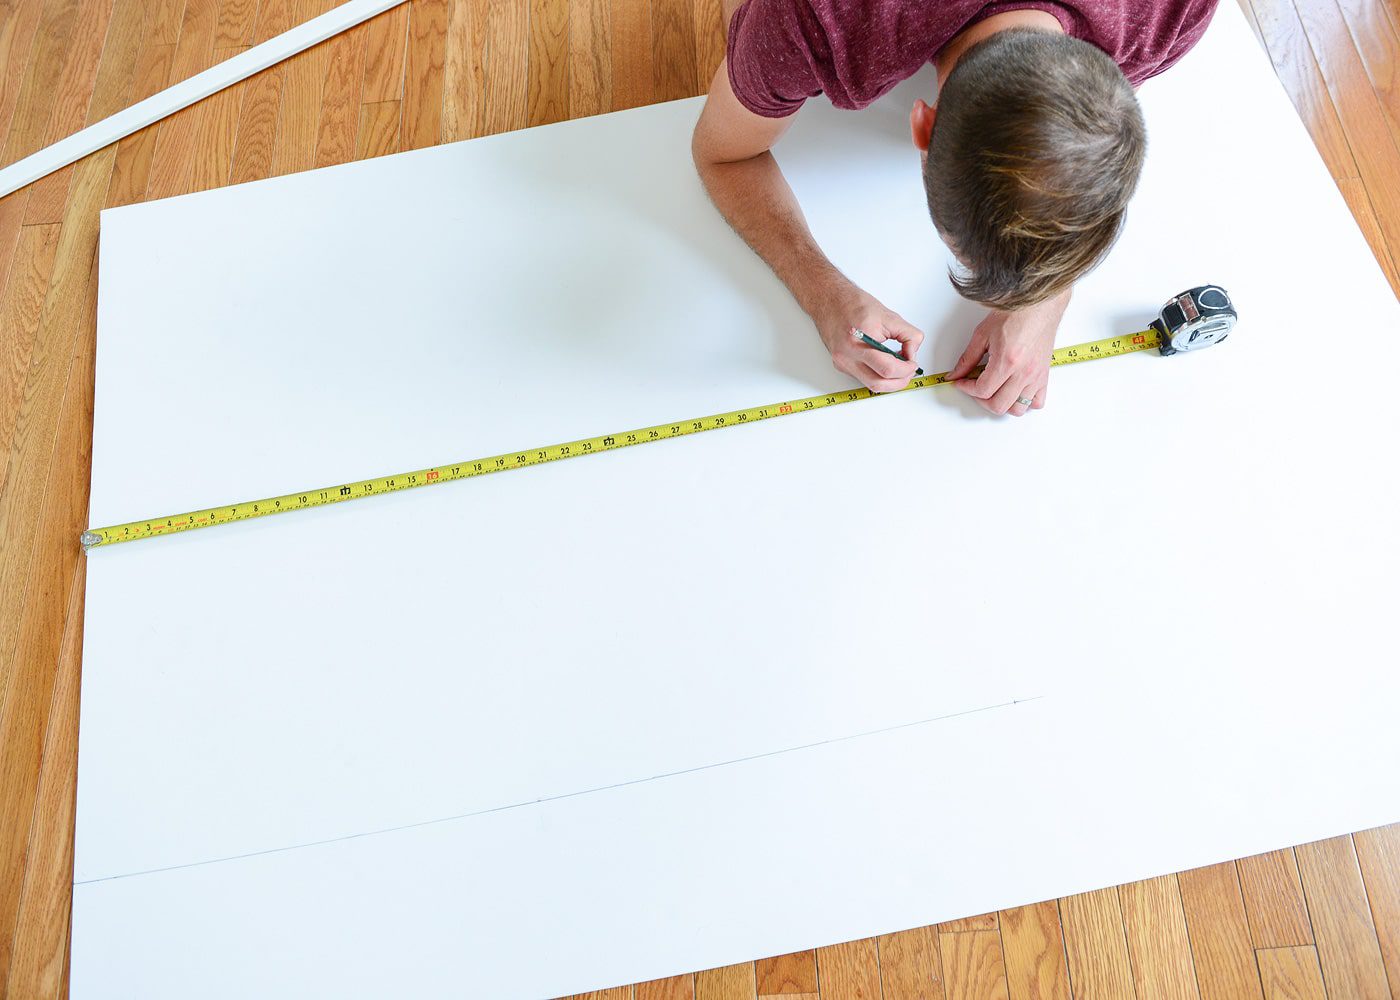

I used a utility knife and a straight edge to cut along our lines, and then we placed our perfectly-imperfect template into place. The fit was just right! We made a note to reference the front/top, and then it was time to make our cut.
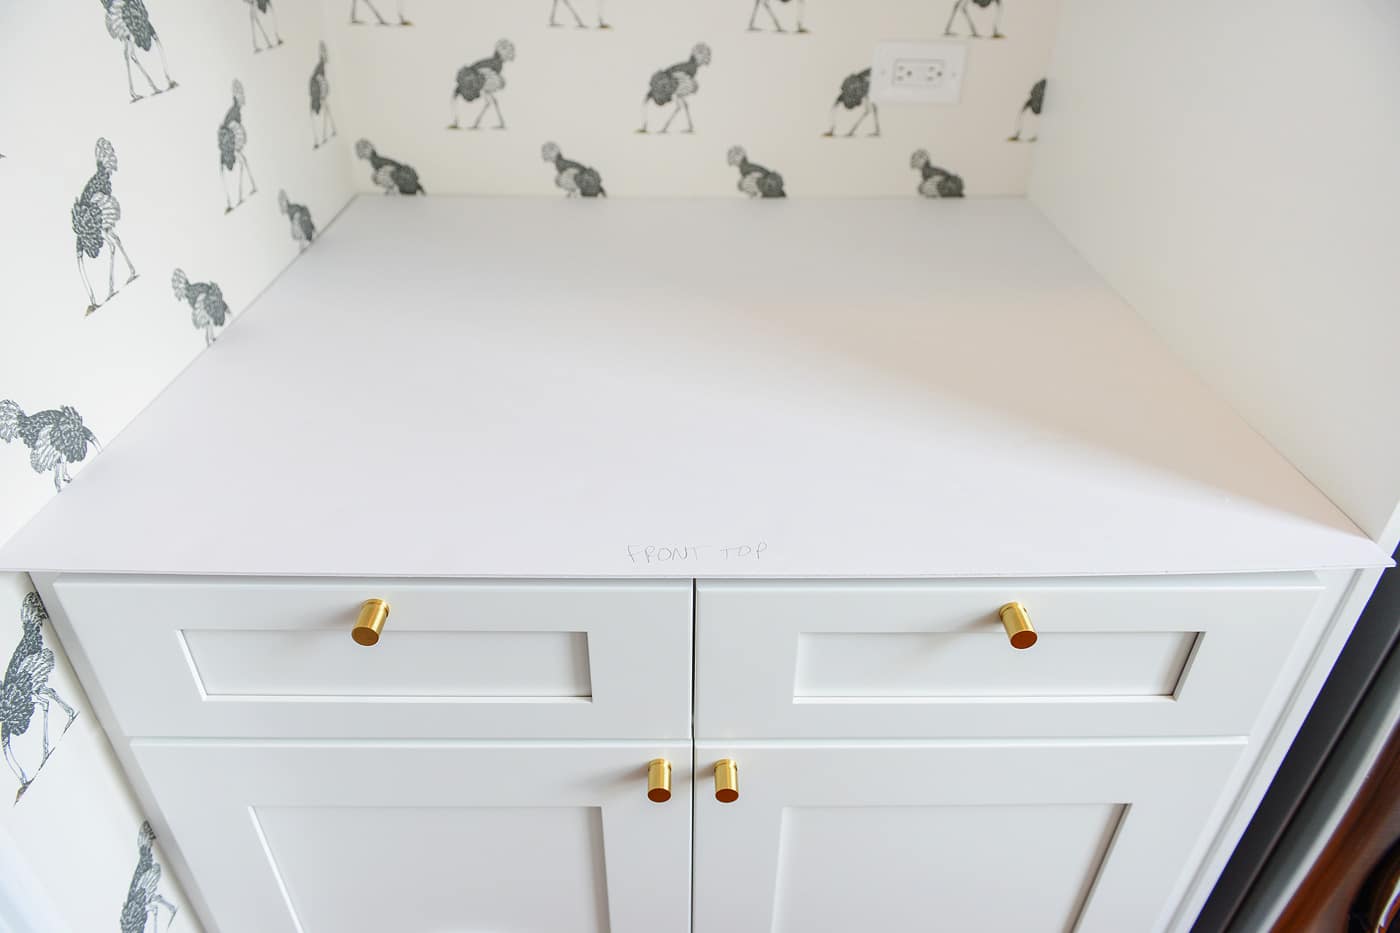
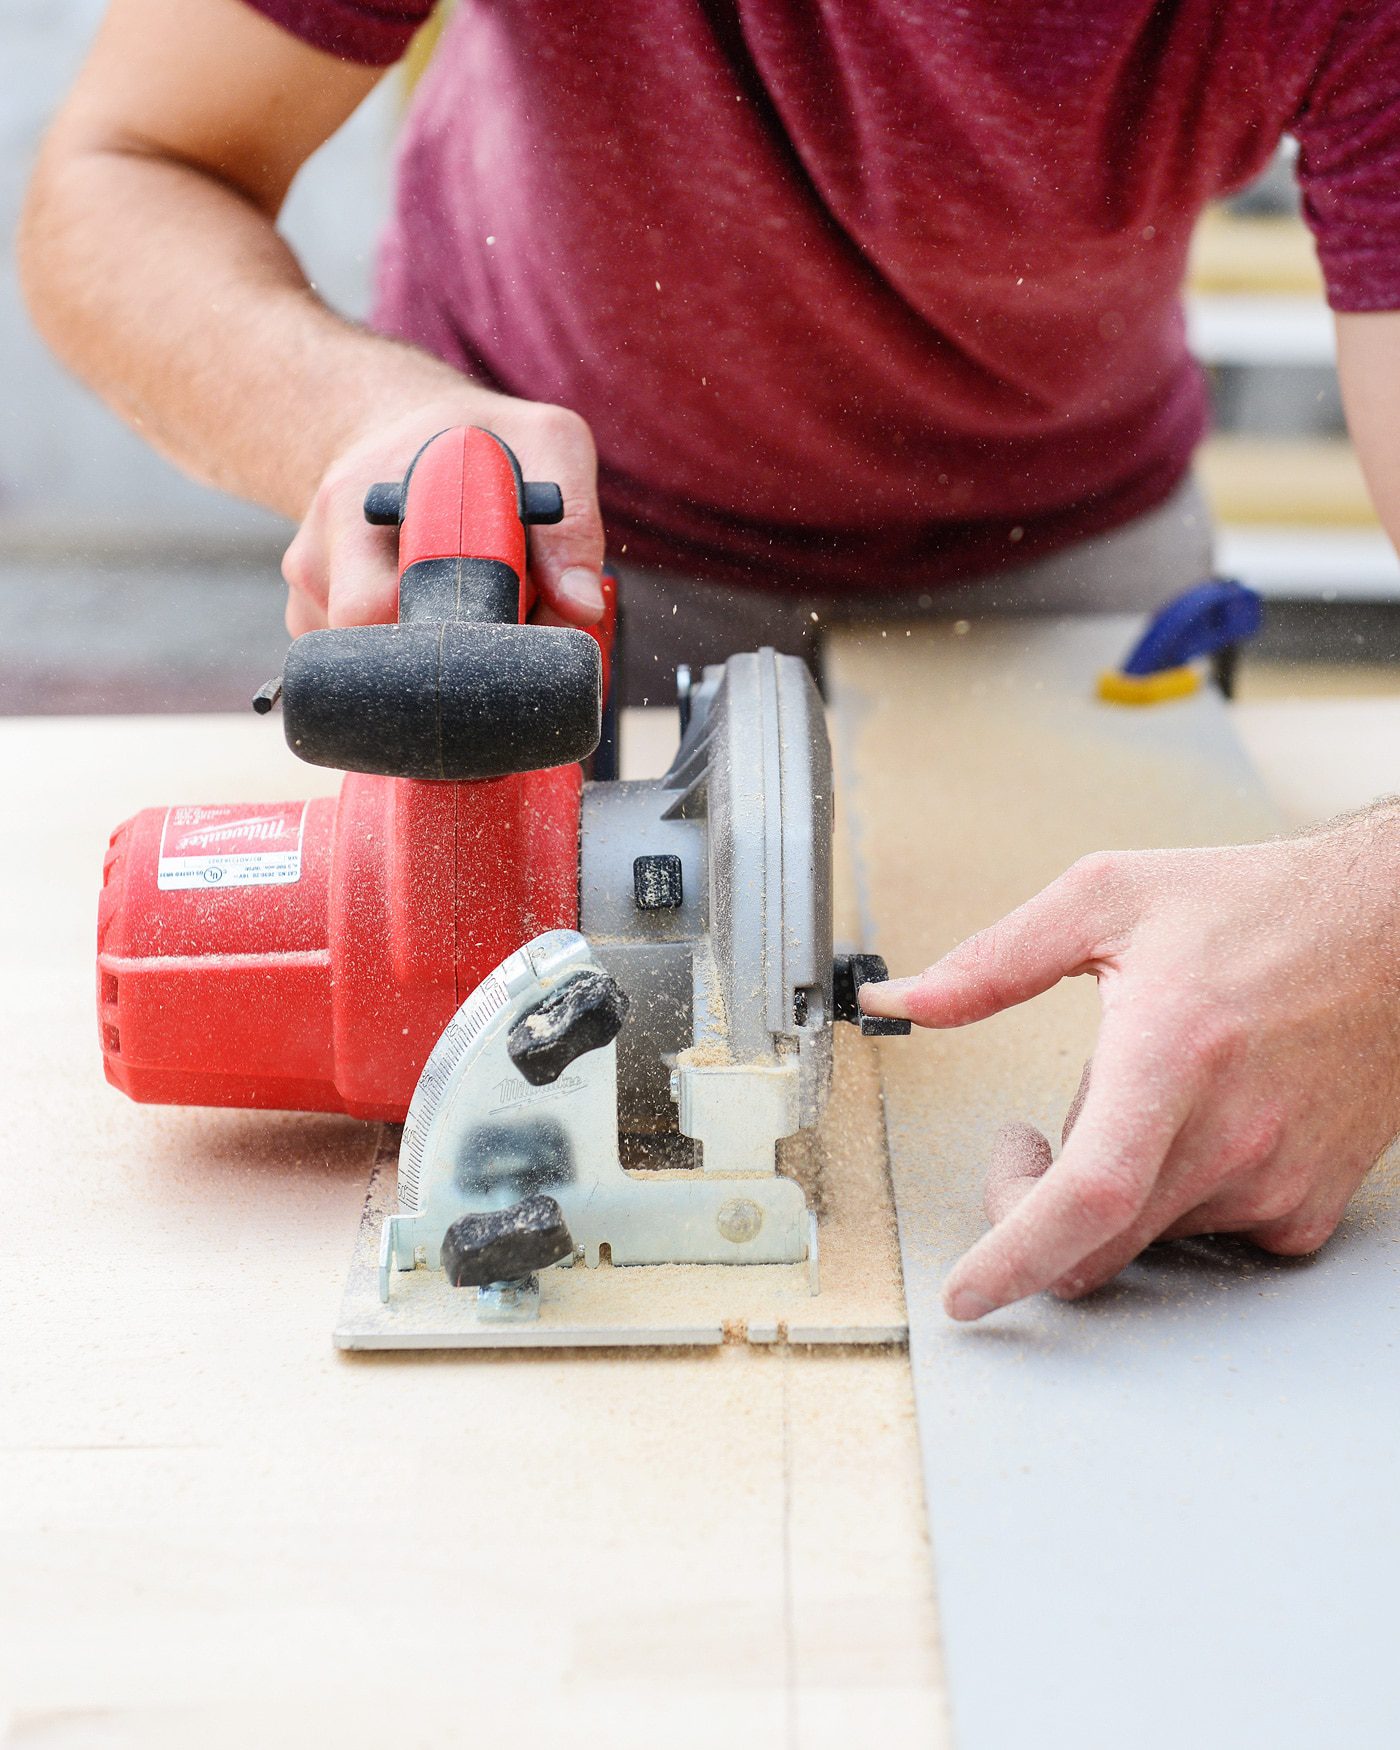
We traced around our foam board template directly onto the butcher block, and Scott used our circular saw with a makeshift straight edge to make his cuts. Afterwards, I used a fine sanding sponge to clean up any burrs along the edges.
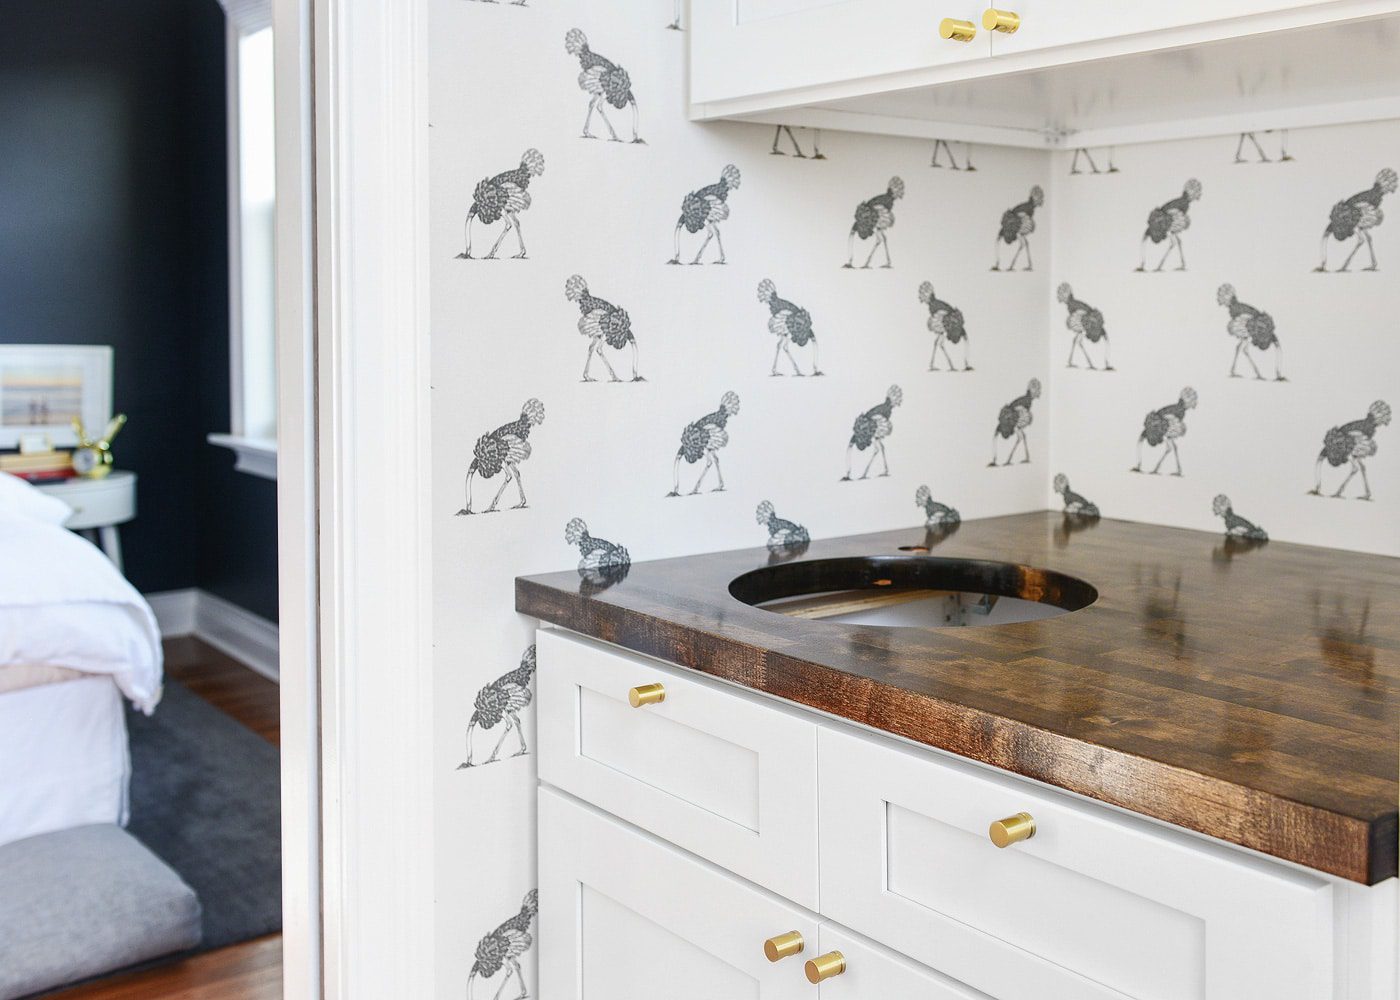
We brought our countertop back inside to check our fit, held our breath, and… like a glove, I tell you! The extra inch for overhang was a nice match for the base cabinet, and the nominal gap around the other three sides of our butcher block would eventually be sealed with caulk.
Next, we were able to make the openings for our sink and faucet – easily the most nerve-wracking part of this process! We’d been hoarding this adorable Kohler bar sink for almost a year, and the day had finally come to unbox it. We traced our undermount line using the paper template provided with the sink, spacing it 4″ from the front and left of our counter.
We picked up these fresh new blades for our jigsaw, and Scott began cutting. Slow and steady wins this race. The circular design we chose for our sink meant that he had to freehand the whole thing, and to say we were both nervous is an understatement!
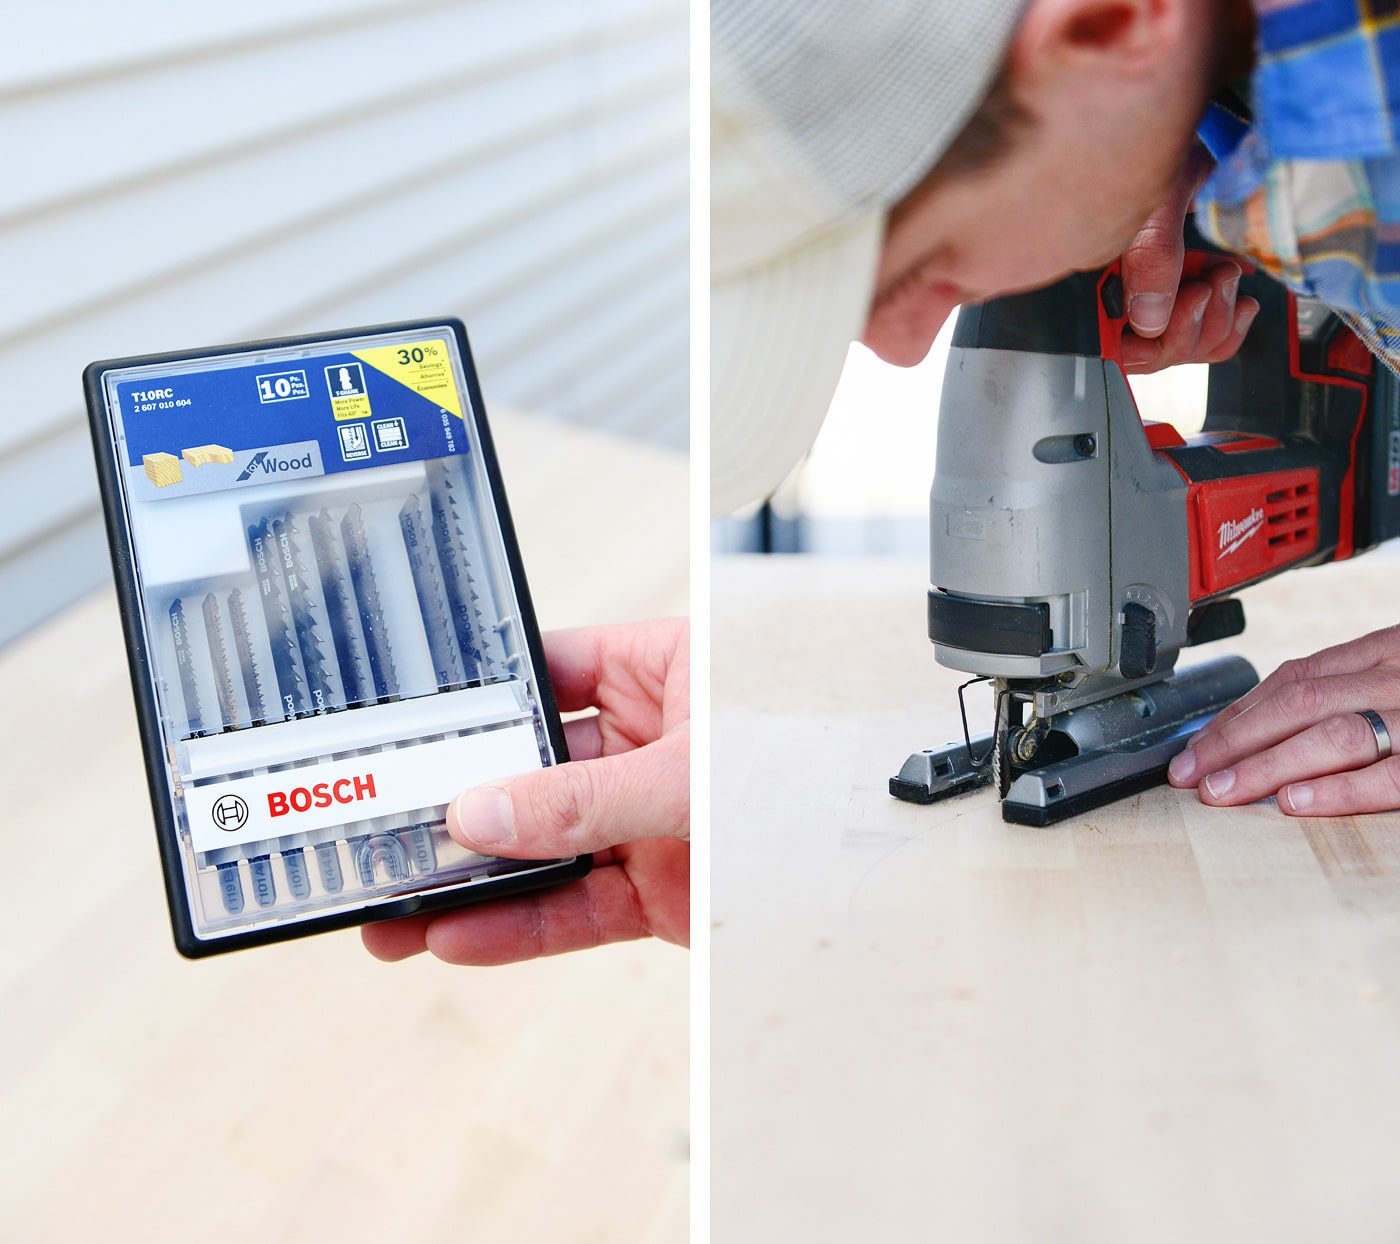
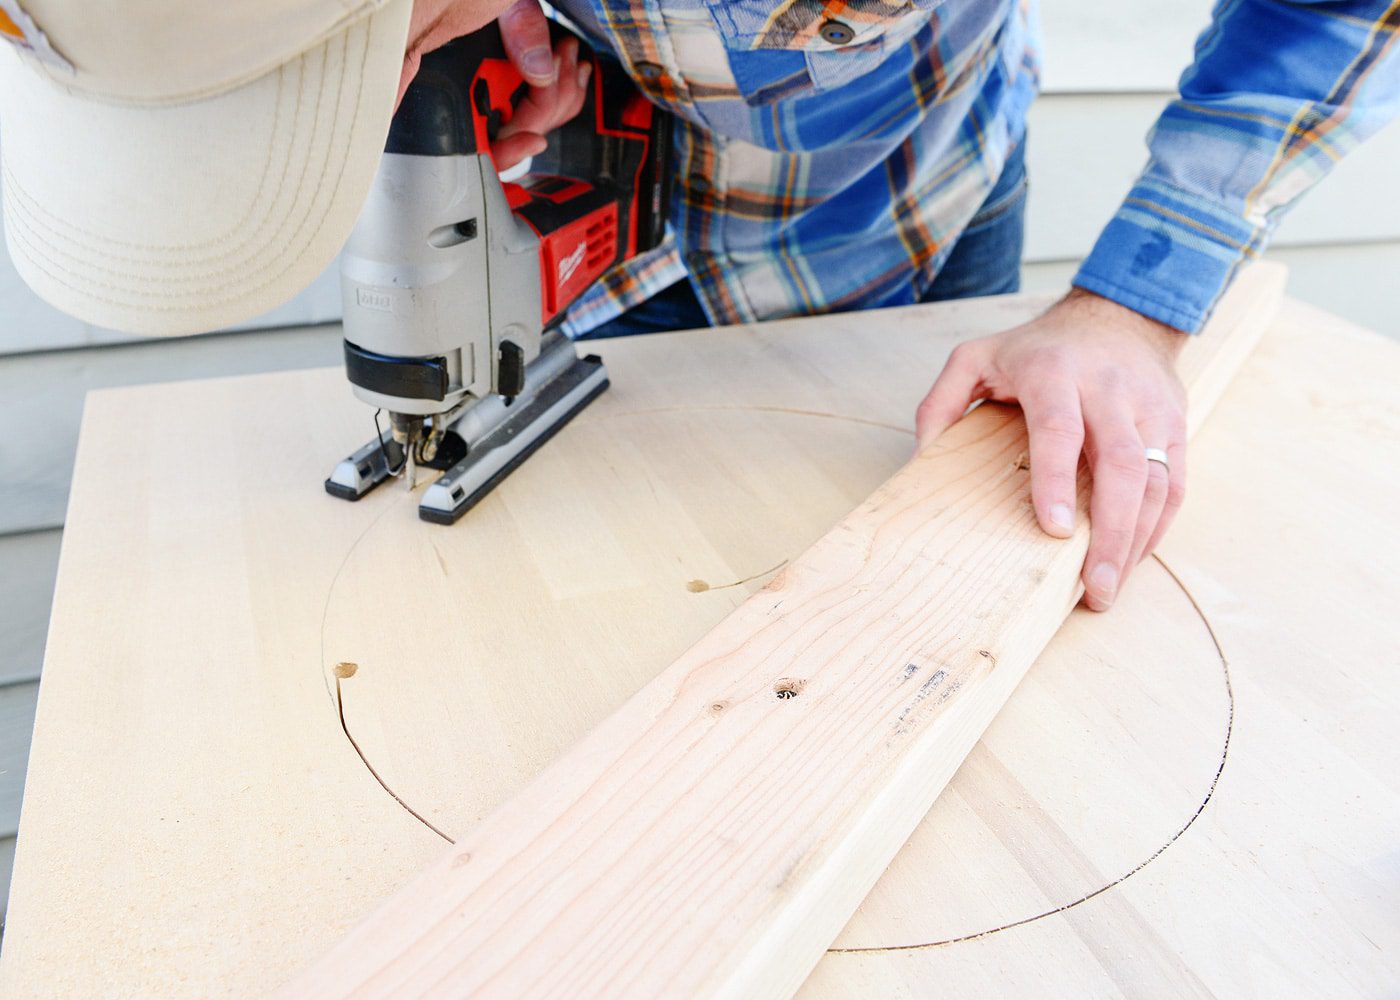
About halfway through the cut, he screwed a long scrap of 2″ x 4″ into the ‘hole’ of the sink. This would prevent the cut-out from starting to fall, which could in turn affect his cut. His precaution worked like a charm, and all said and done, his finished cut was nice and clean! With the sink cut-out complete, we then used our hole saw to cut a 1 1/4″ opening for the faucet. We measured the distance from our kitchen sink to the faucet, and basing it on that, we made the hole about 2″ away from the sink opening. This turned out to be a huge error, but luckily, it was one we were able to remedy! In a nutshell, the rim of our sink was so large that the faucet wasn’t able to fit through its opening; as a result, we had to modify the sink (more on that in another post!), so learn from us: measure thrice, cut once. #basicruleofDIY
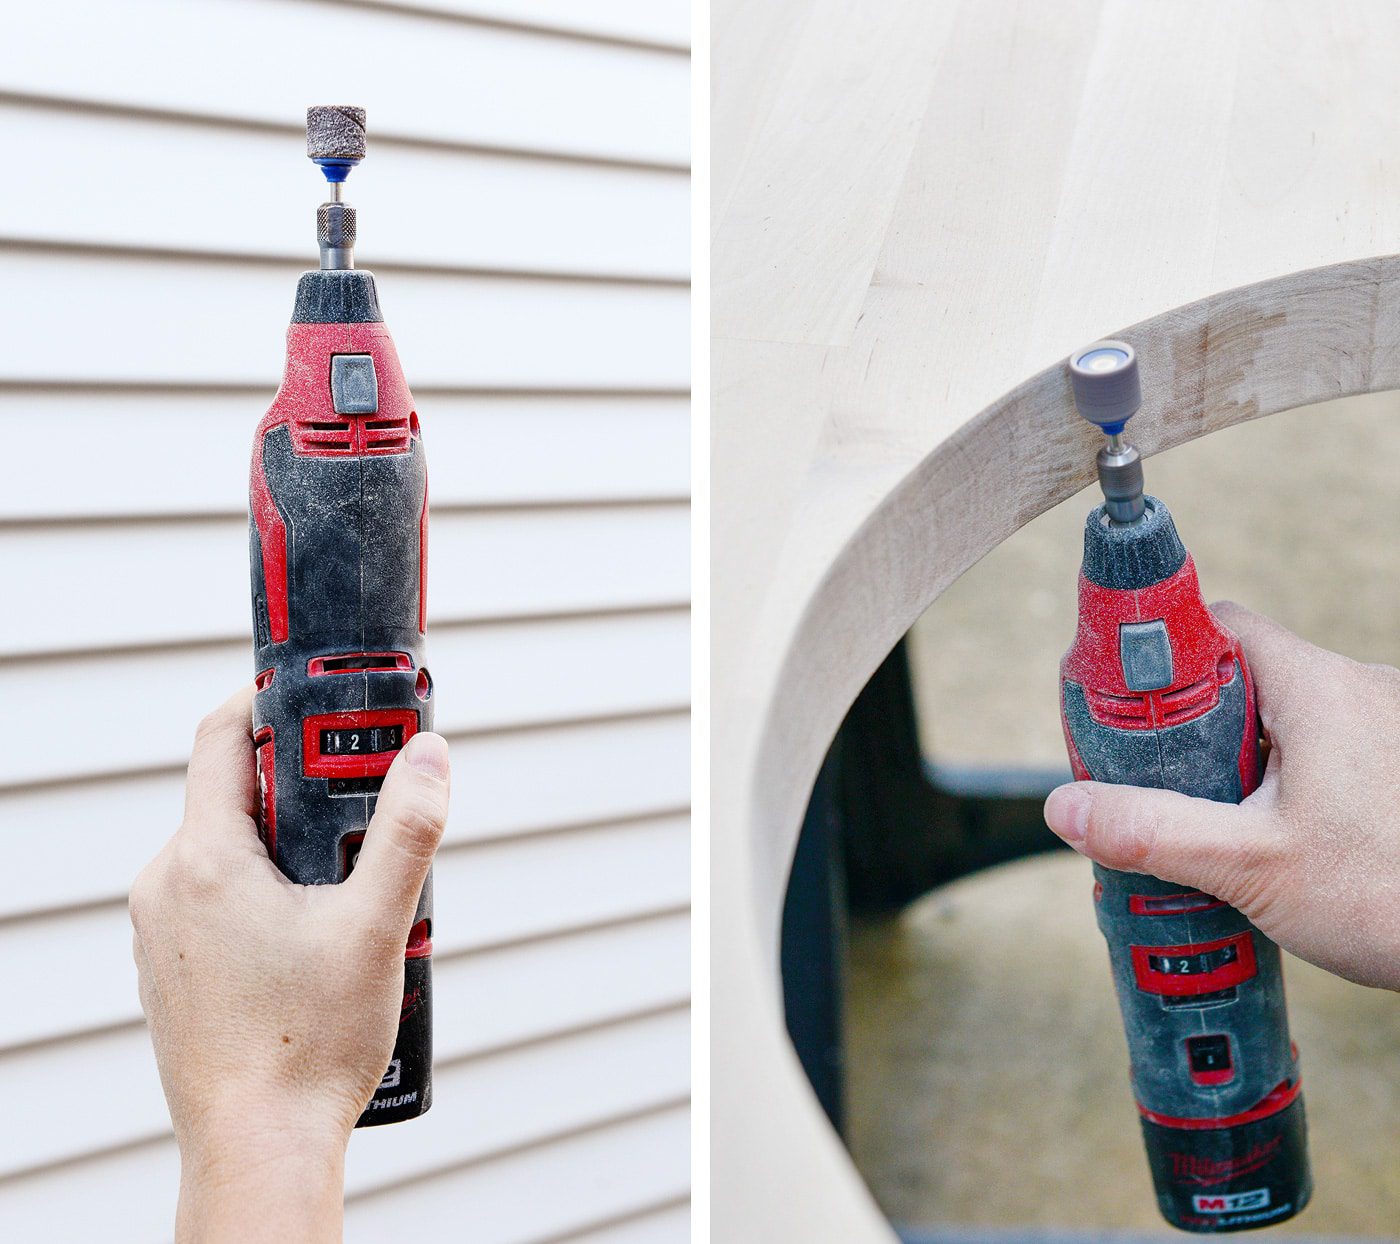
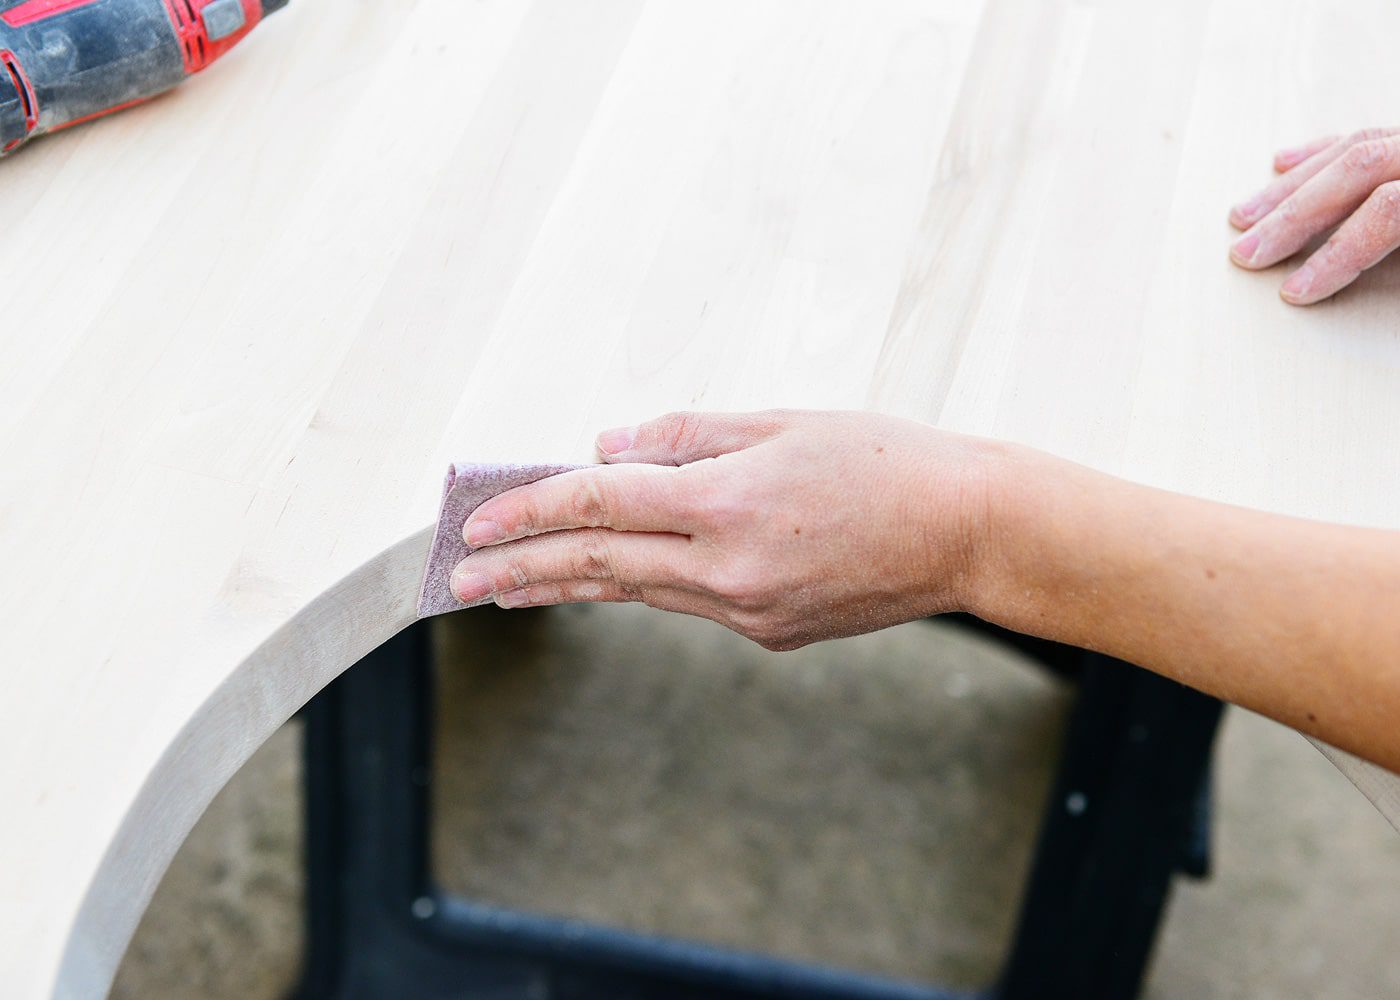
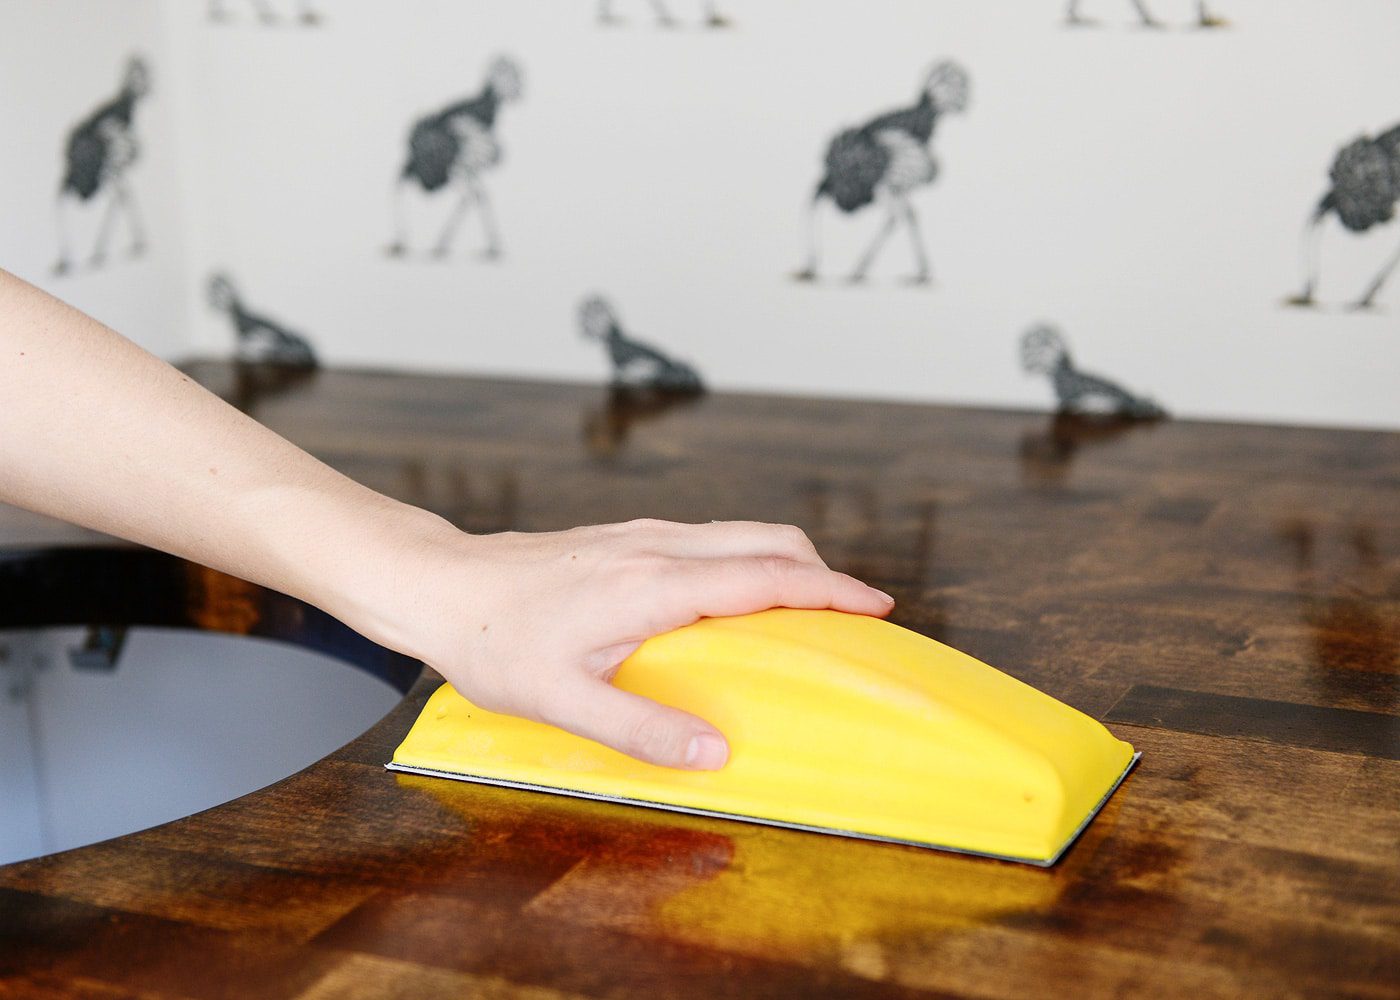
Back on a positive note (and before we had realized the error of our ways), I polished up Scott’s cut by sanding – lots and lots and lots of sanding. I started out using course sandpaper on our Dremel, which helped to take down any areas that weren’t as round as they could be. Although tricky to get the hang of at first, I found that by attacking these areas from below, I could get a better grip on the tool. Afterwards, I used sanding pads and worked my way around that circle – over and over and over again. I started with 80-grit, but by the end, I had worked my way down to a super fine 400-grit paper.
Finally, it was time to apply our finish! We went with our favorite fail-proof dark walnut stain, and we sealed it using Waterlox. The butcher block was pretty thirsty, and it drank up one coat of stain pretty quickly. We liked how dark it got, and not wanting to go any deeper, we left it alone at one coat. The next day, we began applying coats of Waterlox using a natural bristle brush.
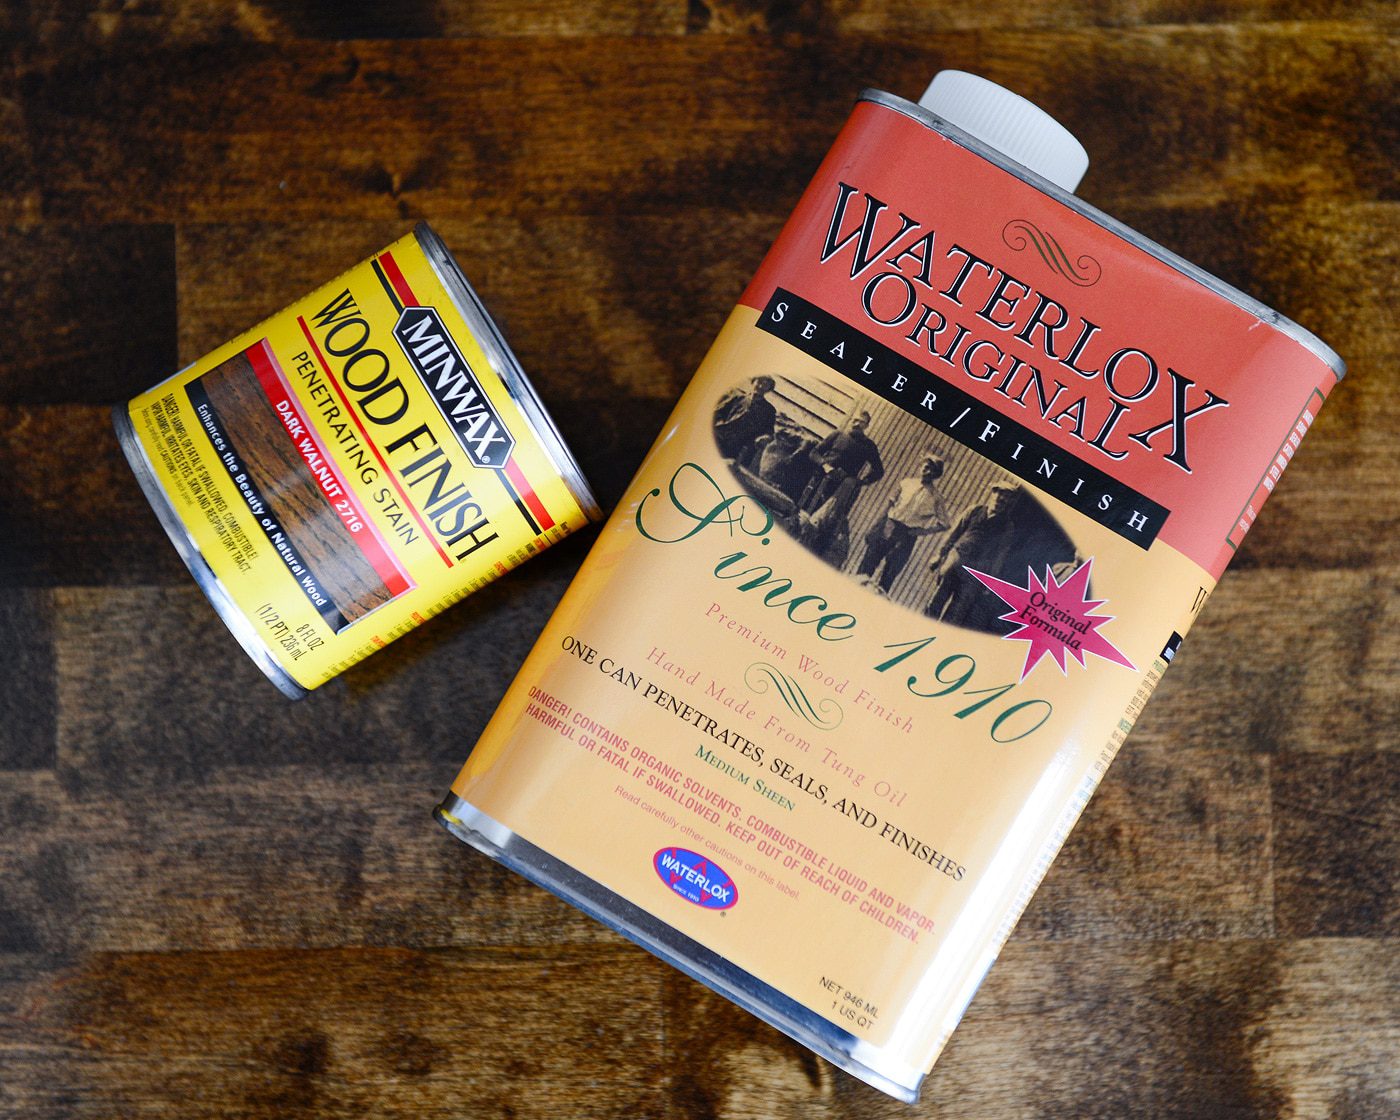
I applied four coats over the course of four evenings, and I used a super fine 1500-grit polishing sandpaper between coats. This was our first time using Waterlox, and the final results were a higher gloss than I was expecting, but it has mellowed over time. I’d liken the sheen to a step above satin, and although that alarmed us at first, it quickly grew on us. Now, we couldn’t imagine anything less than this soft shine!
If you follow along on our Insta-stories, you’ll know that we finished up plumbing (thank you to everyone who chimed in on our angled-faucet debate!), and despite the faucet trouble, we are thrilled with our cute little sink. Scott will be back to fill you in on how we plumbed our extra-deep counters, including our road bump and how we resolved it.
In the meantime, I’m awaiting a photo print to hang on the wall, and our DIY suds could use a re-fill. You’re so close, laundry room!


It looks great! Great tip about drilling the wood into the circle to keep it from sagging and changing the cut. Also, I still think that wallpaper is so cute too.
We used Waterlox on the wood top of the center island in our kitchen. It is quite shiny. I bought the Waterlox satin sheen product (https://www.waterlox.com/products-item/waterlox-original-satin-tung-oil-wood-floor-finish) to go over the original finish and reduce the shine. I got lazy, and I did not end up using it since our center island took five coats and the instructions said it would take weeks to cure fully. I may add it next summer, but I have gotten used to the shine, and like you, It has grown on me.
We have only been in our new kitchen for around four months, but with regular daily use, the island top still looks brand new. Waterlox is amazing.
Great tip about the satin finish! We also looked into the satin finish, but wished it was a 2-in-1 like the sealer we used. We may end up adding a satin coat down the road if it really bothers us, but as every day passes, we like it more and more.
I used butcher block counters in my kitchen remodel last year and I really struggled with finding a product that was durable but also looked natural. I really didn’t like the idea of a shinny finish.
I ended up using this product called Bona Nuturale and absolutely love how it turned out. Totally matte finish – it looks almost soft no shine at all. Over a year later the counters still look great even around the sink where there is a lot of water.
Here’s a link to what I did!
https://weboughtahouse.squarespace.com/theblog/2015/7/21/how-to-protect-your-butcher-block-counter-tops-and-still-get-a-natural-look
Sam – that countertop is stunning! LOVE, love, love that matte finish. Thank you for sharing that product!
I have used Waterlox twice and have been really happy with the durability and upkeep. It’s a very forgiving and sturdy product.
Like you, I wasn’t super happy with the shine and thought I would use the Satin finish on the second project. HUGE mistake. It is extremely unforgiving, the exact opposite of the original product. Even though we followed the directions exactly, we ended up with the worst brush marks we’ve ever produced. We ended up sanding down the entire countertop and starting over with the original. Customer service was very unsympathetic (although they did send us some free product…)
Unless you spray on the Satin finish, my advice is to stay away. Like you say, we can learn to love the shine.
WOW. So good to know! Thank you so much for that feedback, Cindy!
We just installed our Kitchen counter Butcher block and used waterlox as well. We sand our counters down to 220 grit then laid down 3 coats of waterlox with 24hrs of dry time in between. Instead of sanding between every coat we just sanded after the 3rd with 320 grit just to smooth the surface, then put down 2 more layers for 5 layers total. At first we were a bit worried by the shine but, even after a couple of weeks, we feel the shine is both growing on us as well as dulling a bit.
Aside from that we love how the waterlox has brought out the grain of the wood as well as the color it gave the wood. we’re still babying our counter since we’re still within the 30-90 day complete curing time, but we’re happy with choosing to go with wood and we’re loving the way it has turned out. now we can’t wait to get our backsplash up and have our kitchen nearly finished.
Hi, Cully!
Isn’t it funny how we all seem to let the shine ‘grow on us’? There’s just something about Waterlox, I guess. Did you stain your butcher block at all, or did you keep it natural? If it wasn’t for our all white cabinets, we would have considered the natural look.
That turned out really pretty. Is the sink going to be undermount? Do you think that butcher block would hold up well in a kitchen?
It will be undermount. And yes, I think if treated properly, butcher block is great for a kitchen! We have it on our island: https://yellowbrickhome.com/2015/09/02/kitchen-done/
I’m using a similar hard wax oil product to seal my wood counter tops in the kitchen and will have an undermount sink (hopefully we get it installed soon!).
I’ve read a lot about wood countertops and undermount sinks and most recommendations for the best result say to put a few extra coats of finish around the cutout and refresh as needed. The finish may wear more around the sink. Just like sealing a natural stone counter, wood counters require yearly or every-other year maintenance to keep them looking good. One the section we have installed already, I haven’t done any maintenance coats and you can tell. It’s our main prep area and the counter is dull where we wipe it down a lot. But I know that all i need to do is clean the counter and add another coat to make it look good again.
Such good advice, thank you, Ryan! We’ll have to keep that in mind as this little sink gets use over the years.
Love your extra helping paws and glad you were able to remedy the sink situation. It looks so good.
Thanks, Julia!
I saw the pic on FB and thought “oh cool! they came up with a built-in laundry hamper” lol. love the dogs supervising pic and terrific results as always.
Ha! Now that would be something! Perhaps if we had a TON of counter space, that would have been a pretty cool option though!
I love how this turned out! I was wondering what happened to the vintage sink with built-in shelf you had bought?
Oh, don’t remind me! We LOVED that sink, but we couldn’t make it work into the plans without sacrificing cabinet space, and we REALLY wanted the hidden storage. We ended up listing it on Craigslist for the same price we bought it, and it went to the sweetest couple who were renovating their old home. They were so thrilled, so we felt good about the decision in the end.
I’ve never heard of Waterlox, do you mind explaining why you chose this finish as opposed to the zillion other choices out there/ways you’ve finished wood previously? I always love standing on the shoulders of giants when it comes to picking new products :) Thank you!
Hi Becky! You probably know we’re the biggest fans of Polycrylic for a water-based poly that won’t yellow, but in this case, we needed something that would stand up to lots of water because of our sink. Waterlox penetrates the wood AND protects, and it can be reapplied year after year, if needed. There’s a little more info here: https://www.waterlox.com/what-is-waterlox
I first head of it from Julia (at Chris Loves Julia), and I also saw Dana (at House Tweaking) use it on the stand for her bathtub. Those two ladies know what they’re doing, so I took their advice and ran with it!
I see you stated that you bought butcher block at hardware store…do most hardware stores carry it?
We bought ours at Menard’s, but I think some Lowe’s stores might carry it, too! Also check out Floor & Decor if there’s one near you. Most stores have a scratch and dent section at steep discounts, so be sure to check that out.
I’ve been following your treehouse reno and started jumping around in your blog to find your butcher block install in the laundry room. After fitting it in place you mentioned filling the small gaps with caulk. We put walnut butcher block in our kitchen and also used Waterlox. Btw, we also had enormous fits with the satin finish but were determined to make it work. After hours and hours of research we found a YouTube vid from a man who recommended applying it with a small lint free cotton cloth. After trying natural bristle brush, foam roller and foam brush, we found this was the solution!! Howev, you must apply it liberally so the wipe marks can level which they did as we held our breath. Just wanted to get that info out there.
Now my question: we have our countertops next to Ikea gray cabinets. Would you use white caulk? Seems like it would be glaring. Is there tinted caulk and if so, should I go with dark brown or gray? Your opinion and expertise would be much appreciated.
Thank you for that tip!
To answer your question: Because we made a template to create the tightest fit possible, we only needed to use clear caulk to prevent any water or moisture from seeping down around the wallpaper edges. I’m trying to imagine what you mean by saying the counters are NEXT to gray cabinets. Are the counters on top of the gray cabinets? Or if they are next to them, are you able to get away with clear caulk if the fit is tight enough? Another option would be to use white paintable caulk and touch it up with paint that matches the cabinet color. Orrrr… yes, you could get a brown caulk. It won’t be a perfect match, but if the tolerances are pretty tight, I assume you wouldn’t even notice it over time.
Thank you for taking the time to give me such a thorough answer. I guess I wasn’t clear in that the counters are butted up against a gray IKEA pantry set into the middle of a run of cabinets on one side of the room and against a panel/built in fridge on the other.
I like your idea of clear caulk, as our countertops are also a slightly tight fit.
Also I just wanted to tell you how much I enjoy your blog. I also LOVE to rehab houses. The bug bit me late when i had to get our house ready in a hurry to sell and was madly researching refinishing a wood floor. lo and behold, there were BLOGS to help me with just about anything!! We downsized to a smaller home which badly needed updating. I was in love!
Anyway, thanks again. I’ll be following your progress. And congratulations on your baby girl. I’ll be praying all goes well. Merry Christmas!
A-ha! That makes a lot of sense. Yes, 100% go with clear caulk, especially if your tolerances are really tight. That will definitely look the best!
Thanks so much for the kind words. It’s amazing the community of help and resources out there, as well as friendships that can be made along the way from like-minded people. So happy you found us!
Did you use pre-stain before using the dark walnut? I’m about to start my kitchen makeover with butcher block counters and I’m wondering if you need to pre-stain it before I start?
Do you mean wood conditioner? I don’t think we did but it’s always a good idea!
[…] determine how much your butcher block weighs, you will need to take some measurements. Once you have the measurements, you can use a […]