

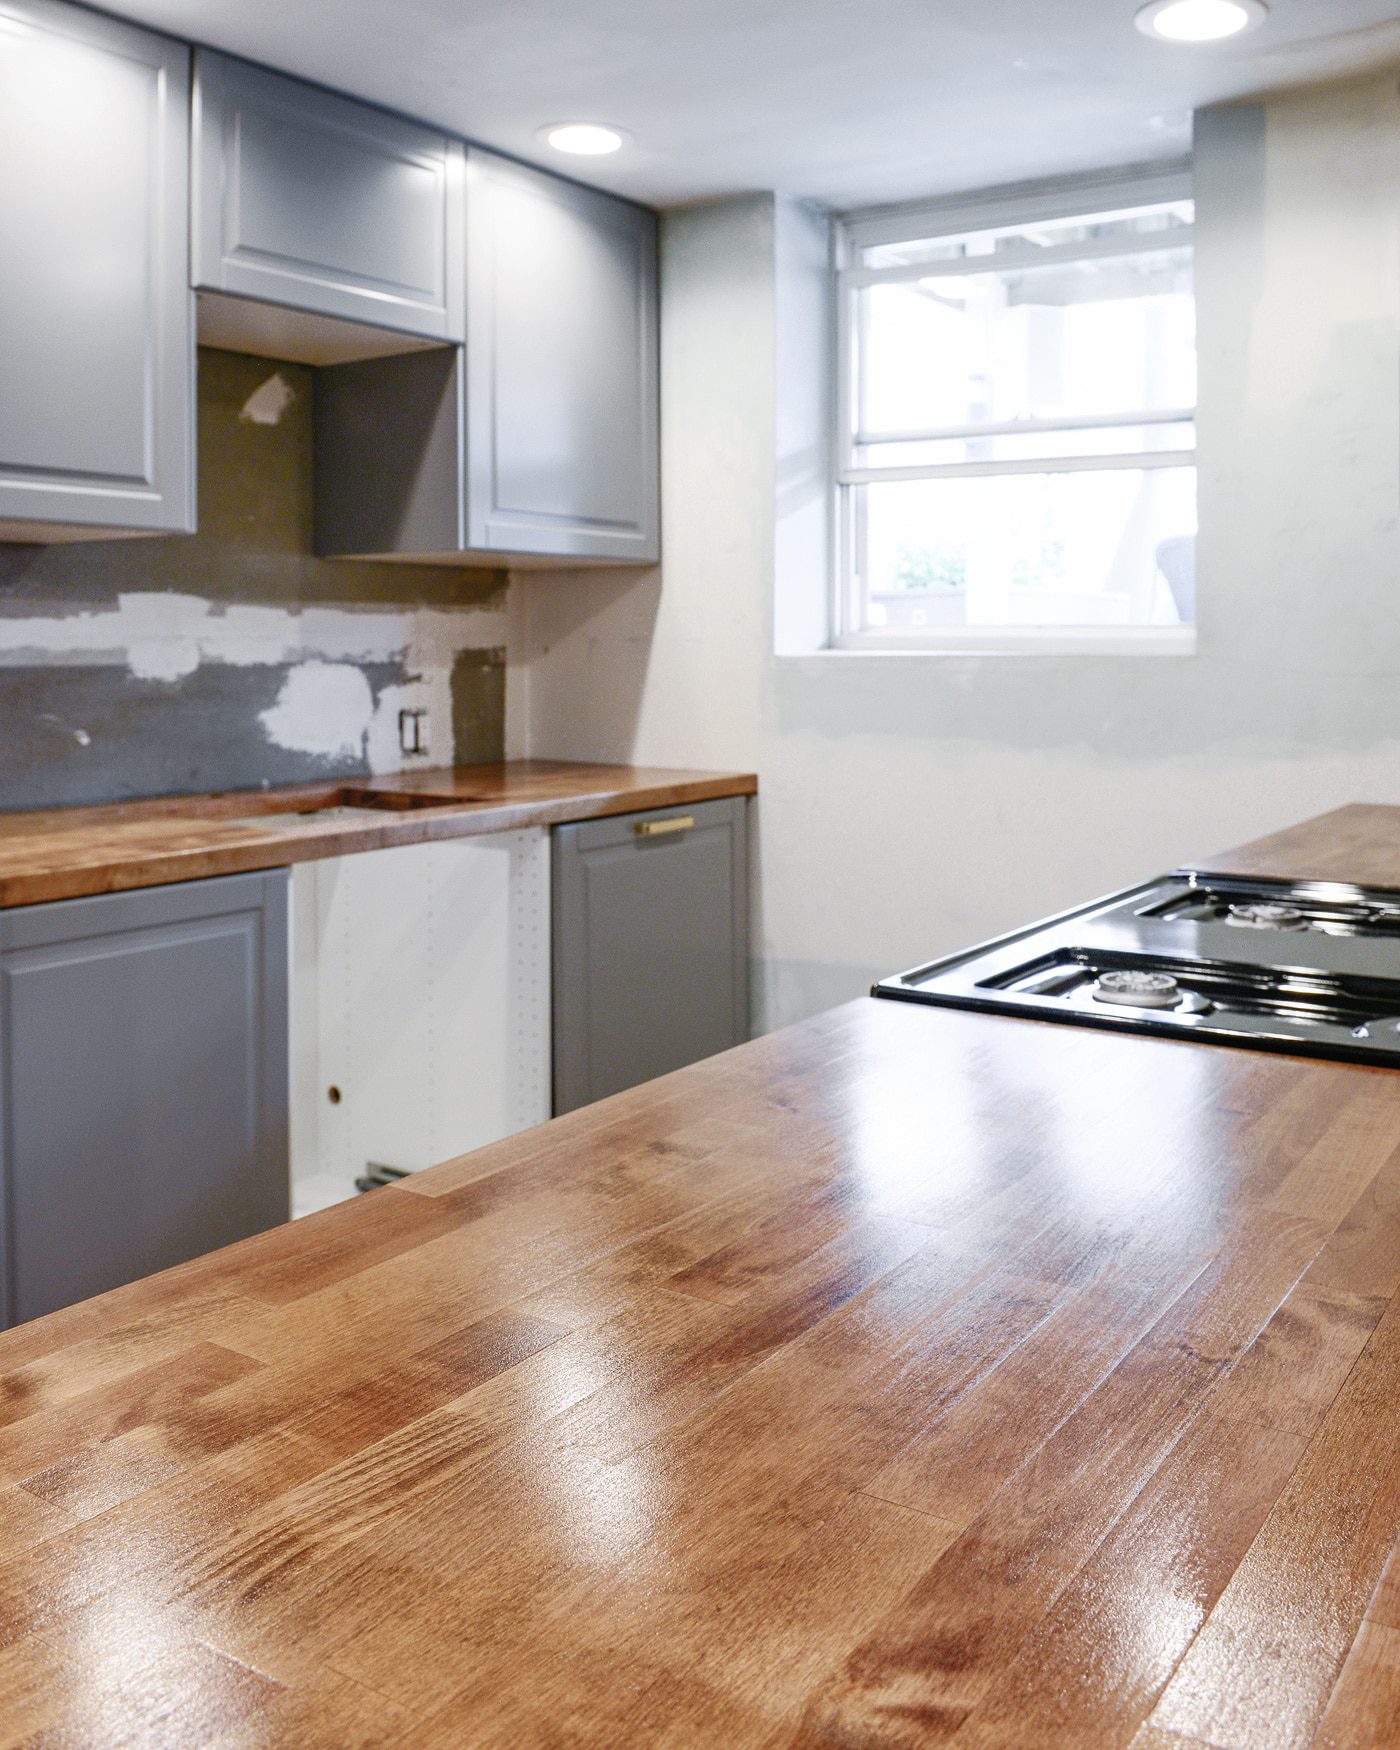
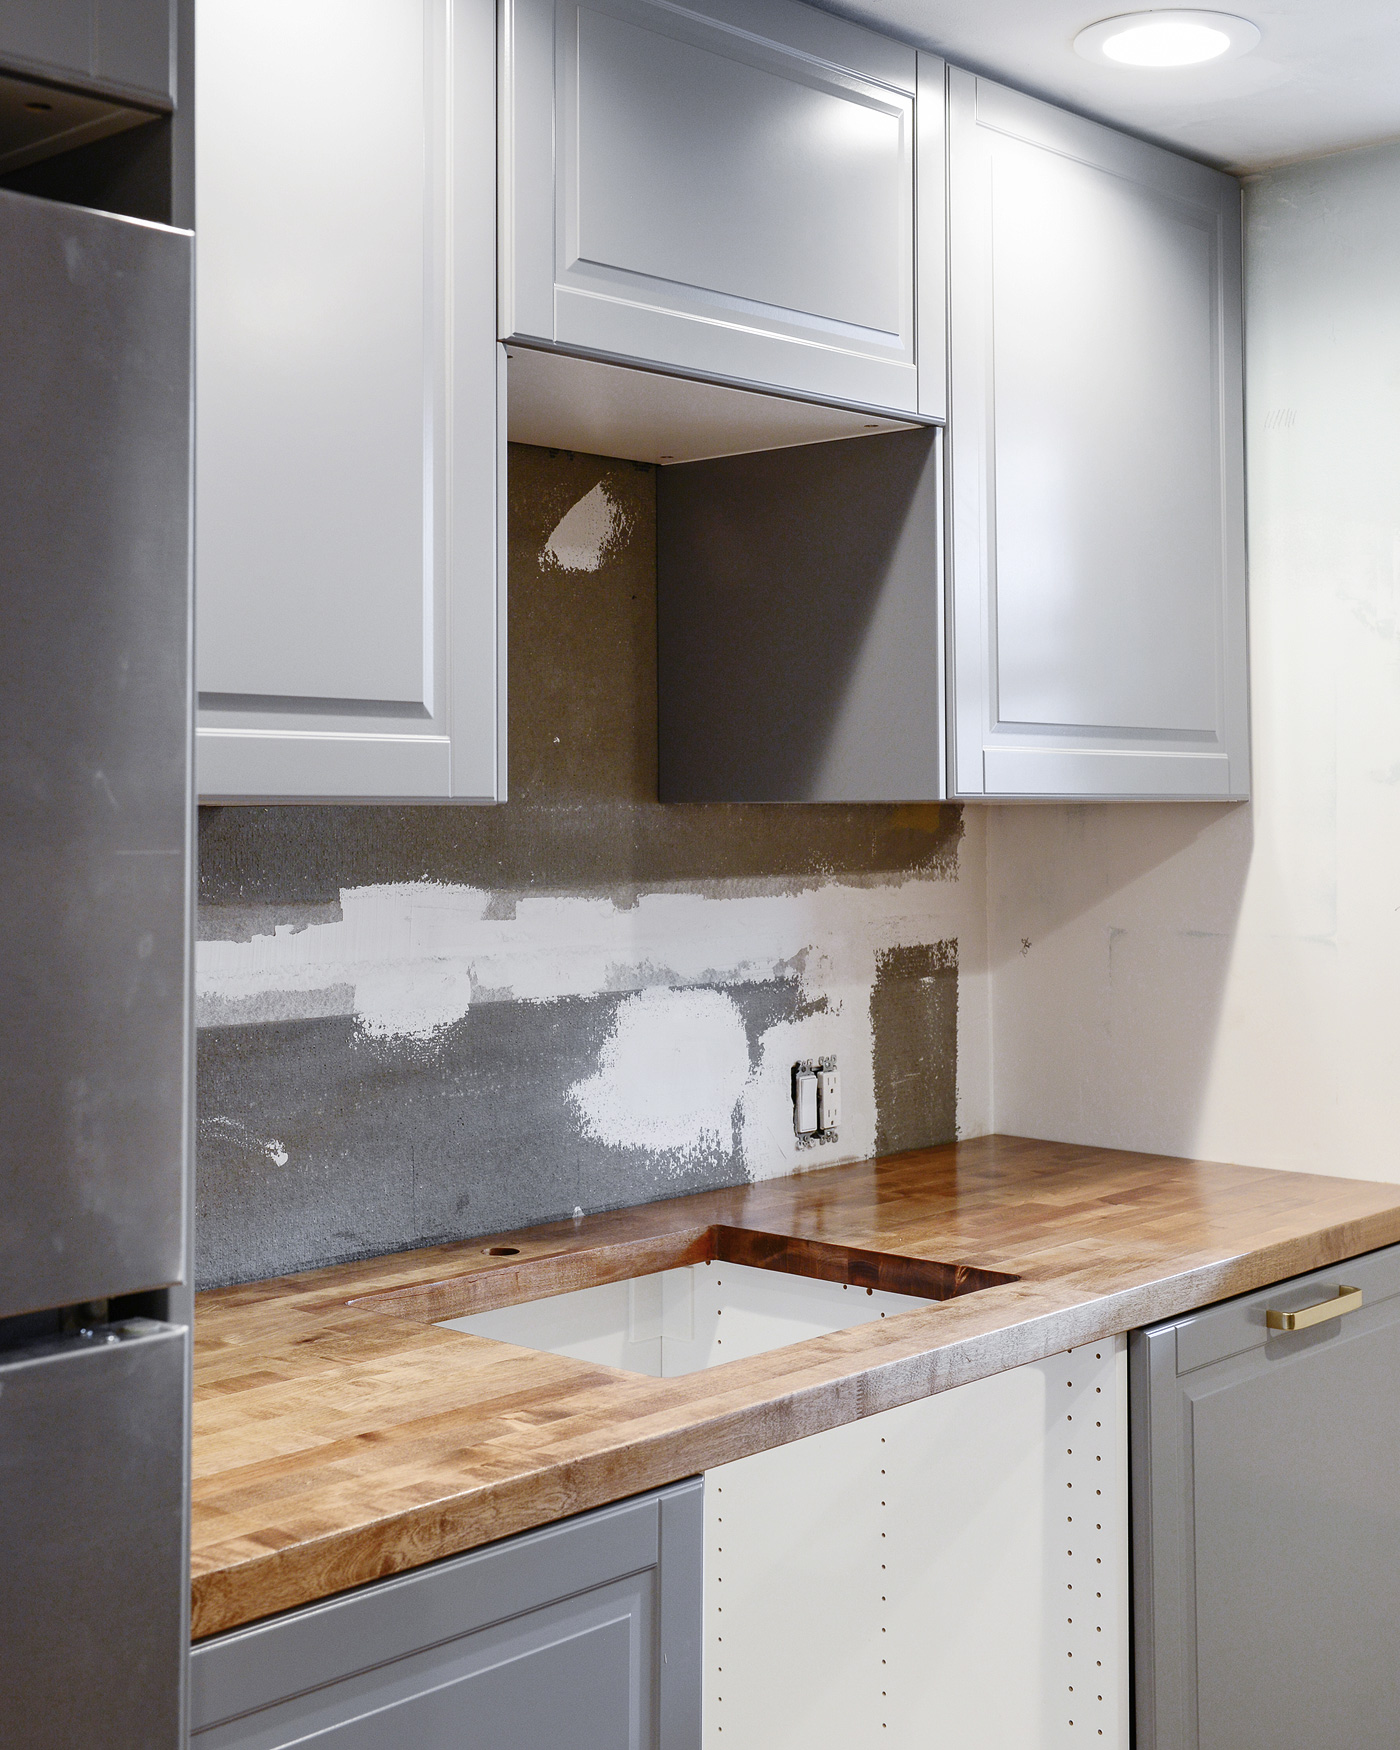
An exciting thing happened the day we went to buy our butcher block countertops – they were on sale! Marked down to $109 from $159, we hauled away two slabs (one for each side of our little galley kitchen) before they could tell us it was a mistake. And that – that price! – is one of the reasons why we decided to take a bit of a risk and go with butcher block in the garden apartment. To our Chicago friends, we picked ours up at the Menard’s on Clybourn Ave. They always have a full stock!
Even still, price was one of the least important factors on our list. We considered shopping for a stone slab, in the same way we did for our own kitchen counters. There were a few splurges that we’ve taken along the way (like hiring a team to demo and replace the tired, cracked tile), but there have certainly been some saves, too (like our IKEA vanity and tub reglazing). At one point, we tossed around the idea of butcher block, and the idea just … stuck. It’ll warm up the place!, we said. It gets better with age and wear, we agreed.
Is it a small gamble to put butcher block in a rental unit? Probably. But for the cool price of $225, it’s a risk we were willing to take. We don’t expect them to look pristine in 1 year, 2 years or even more, but just like our decision to use solid brass hardware, it’s a material that patinas well over time, and if push comes to shove, a good sanding can knock down problem areas in the future. We’ve always had a soft spot for a well-loved butcher block top, and the hope is that our future tenant will agree.
But! Perhaps the best part of a butcher block counter is the ability to DIY. We completed a much, much smaller version in our laundry room, and we still love how much character it brings to that tiny space. This job was larger, sure, but our process was similar, and the results are just as pretty, we think.
What we did:
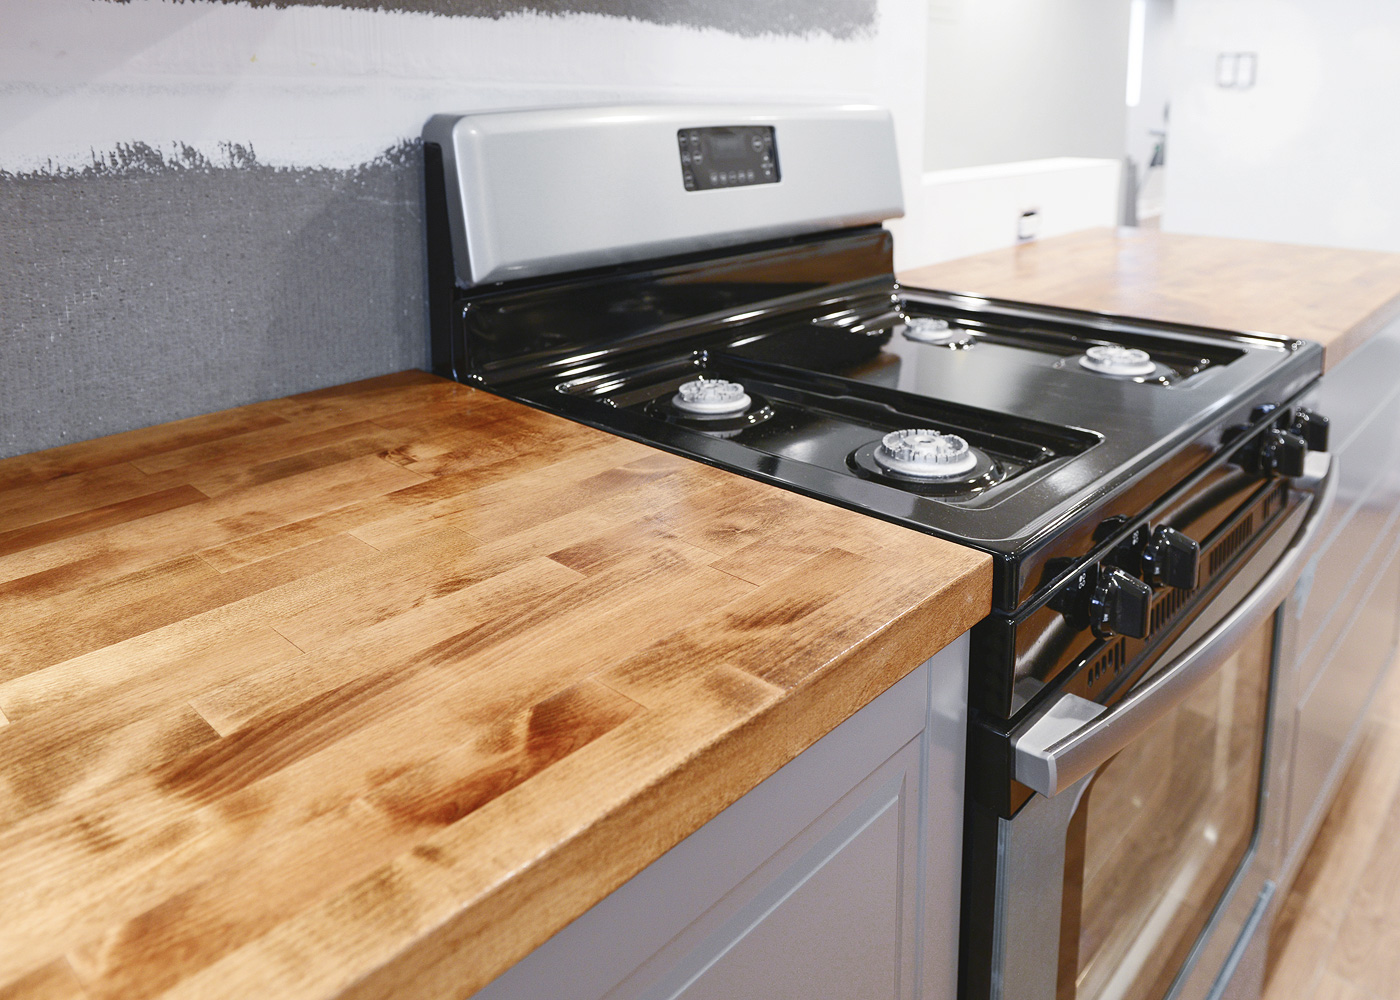
We started on the stove wall first, since it would essentially be two simple cuts – one for each side of the range. We always measure in three places – back, middle and front (even if it is just a cabinet base, because you never know!). Measurements were recorded on the sink wall as well, and then we got to work with cuts!
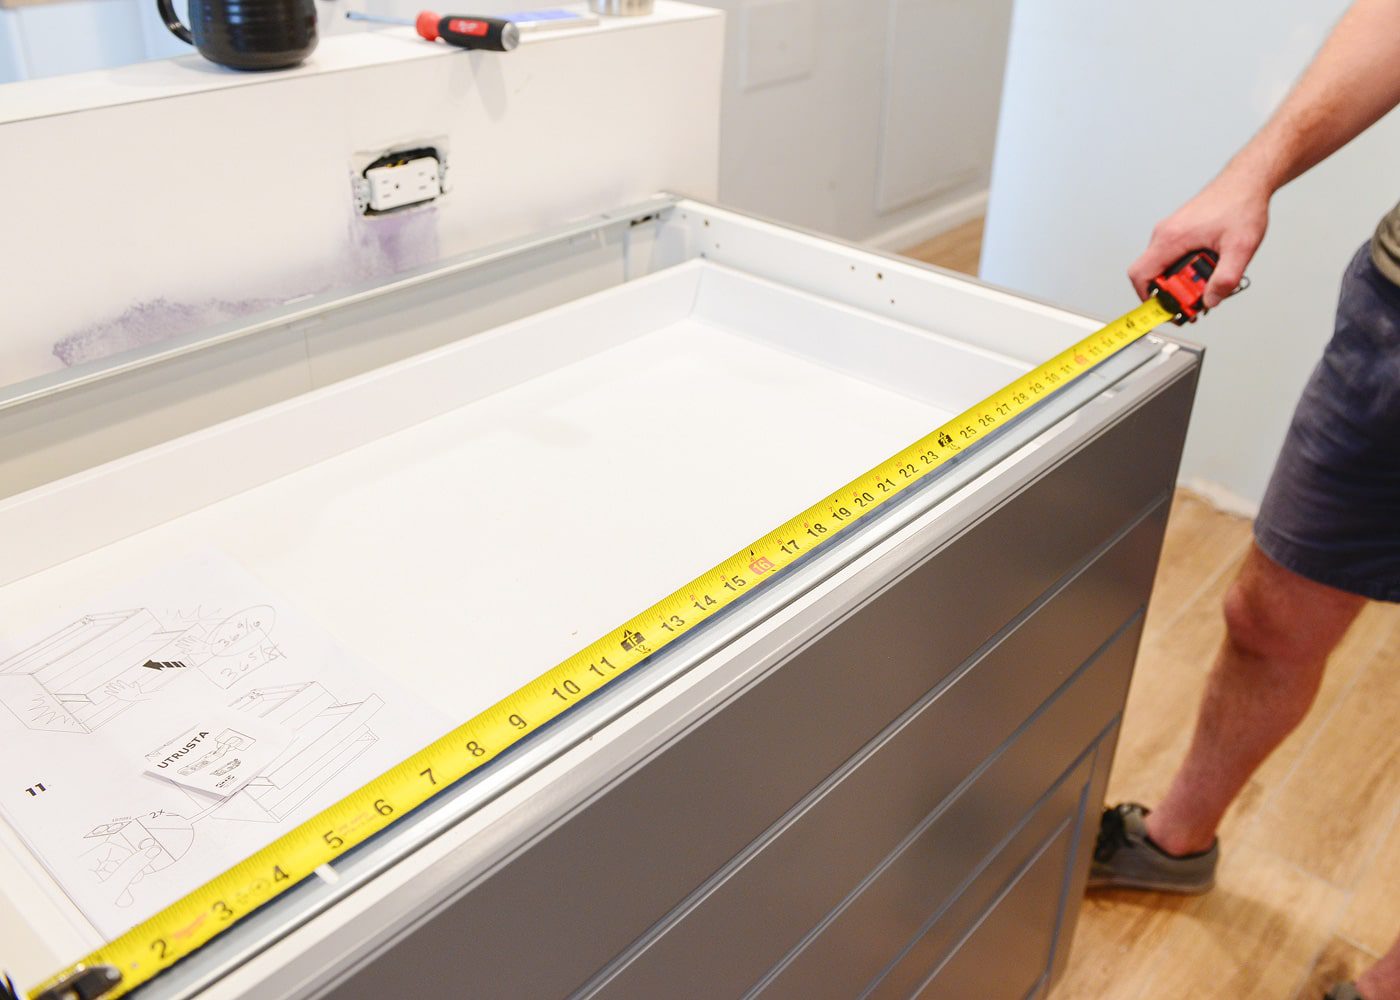
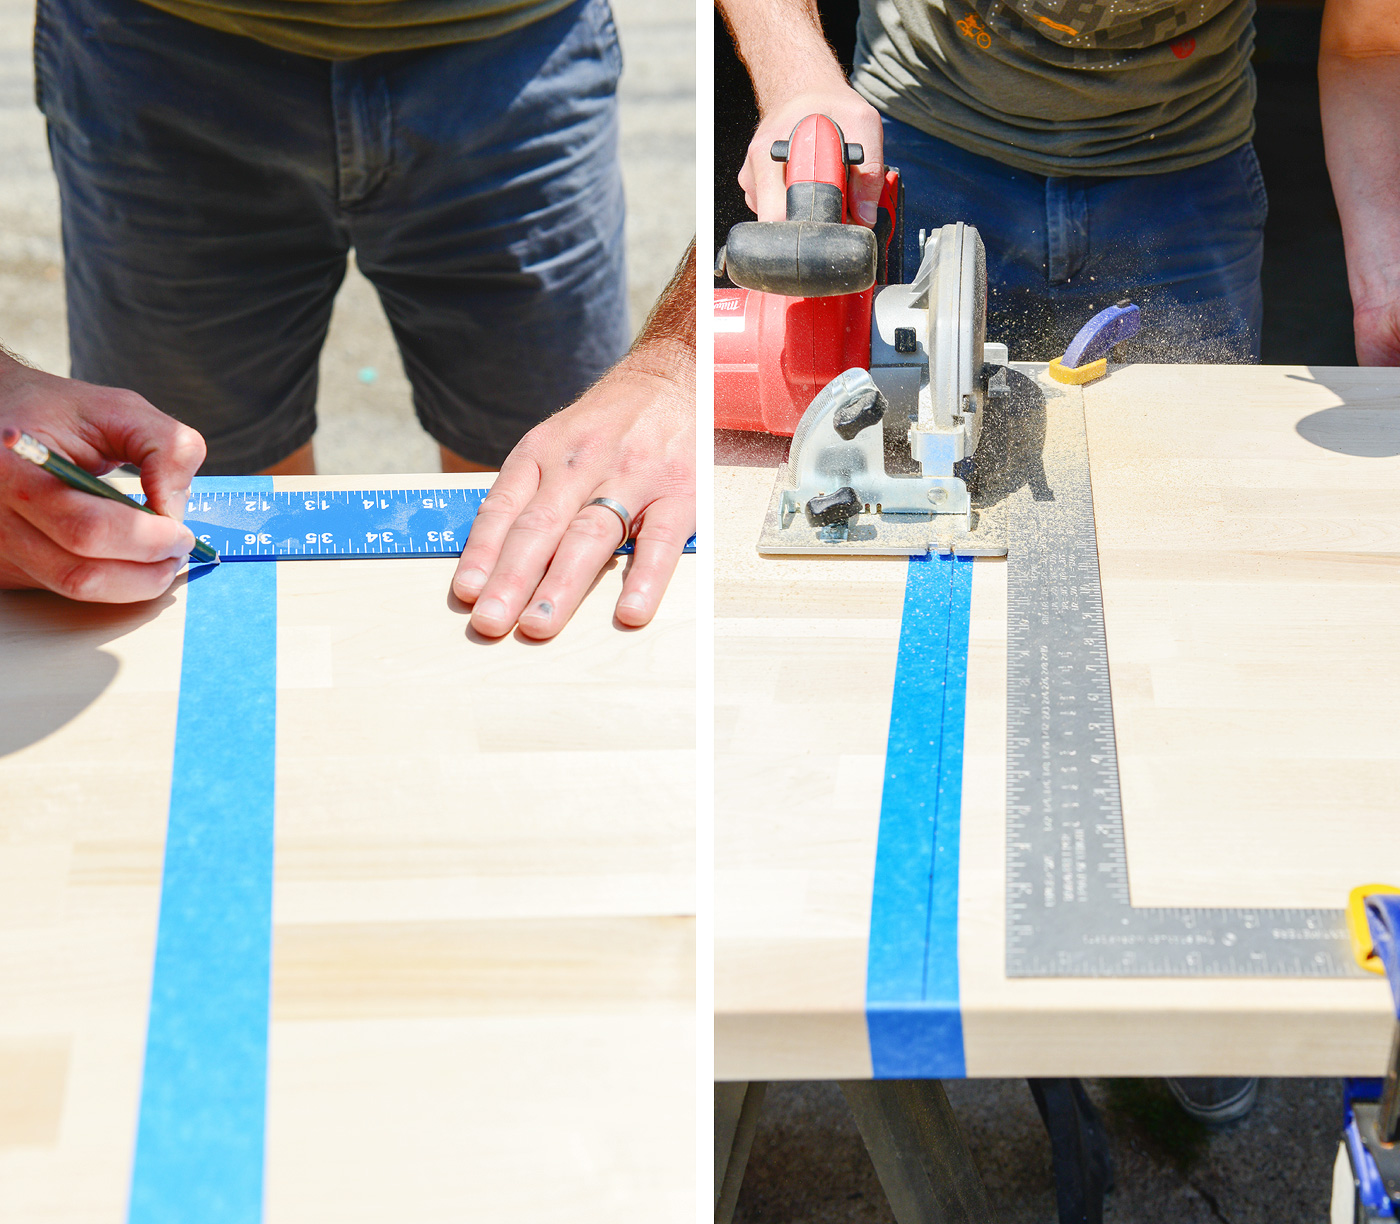
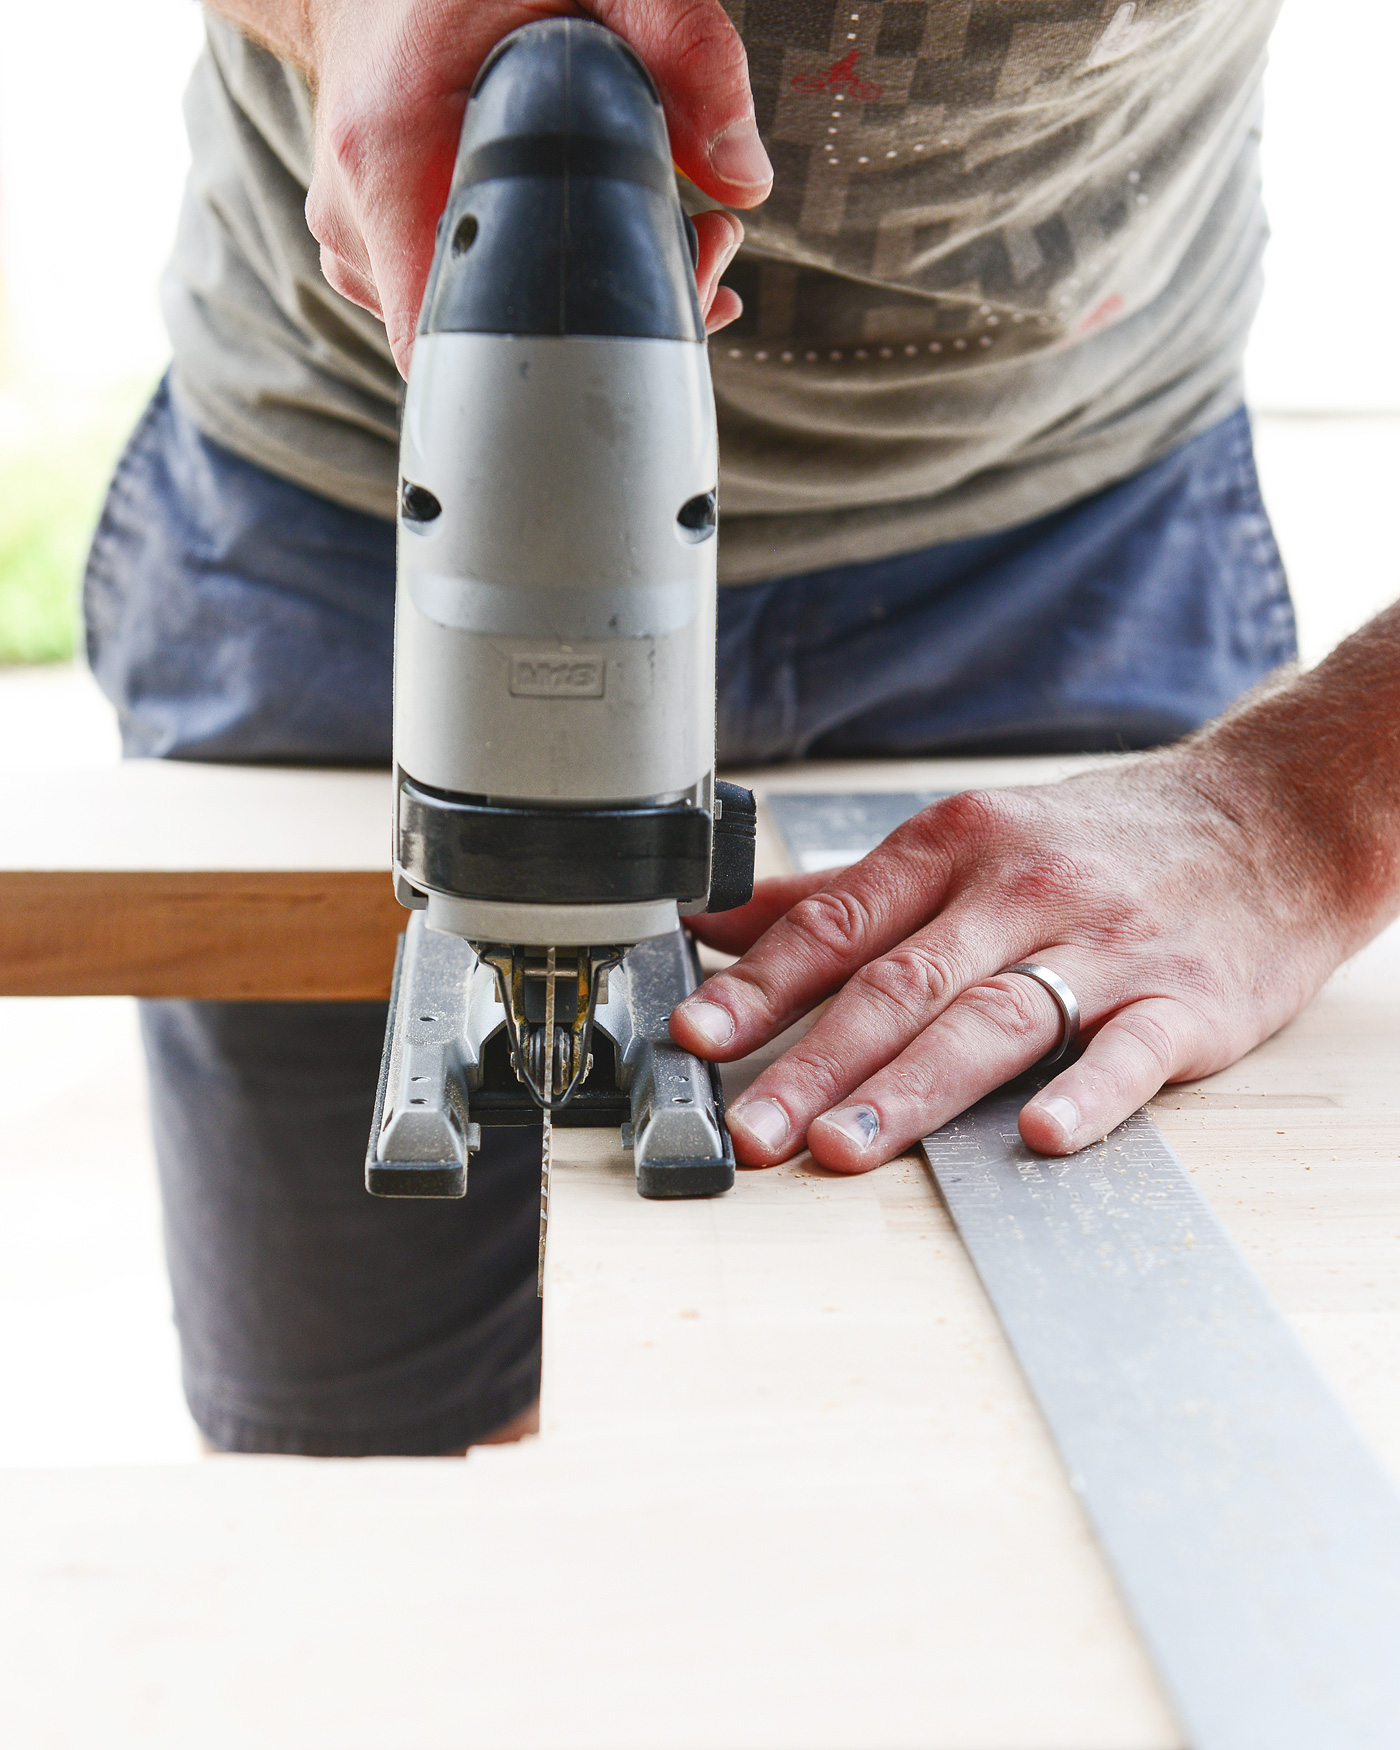
Even with a fresh blade, a circular saw can cause little chips along the surface of the wood, so we always wrap our cut with blue tape first, which helps to minimize any burrs on the top of the butcher block. Then, it’s time to cut:
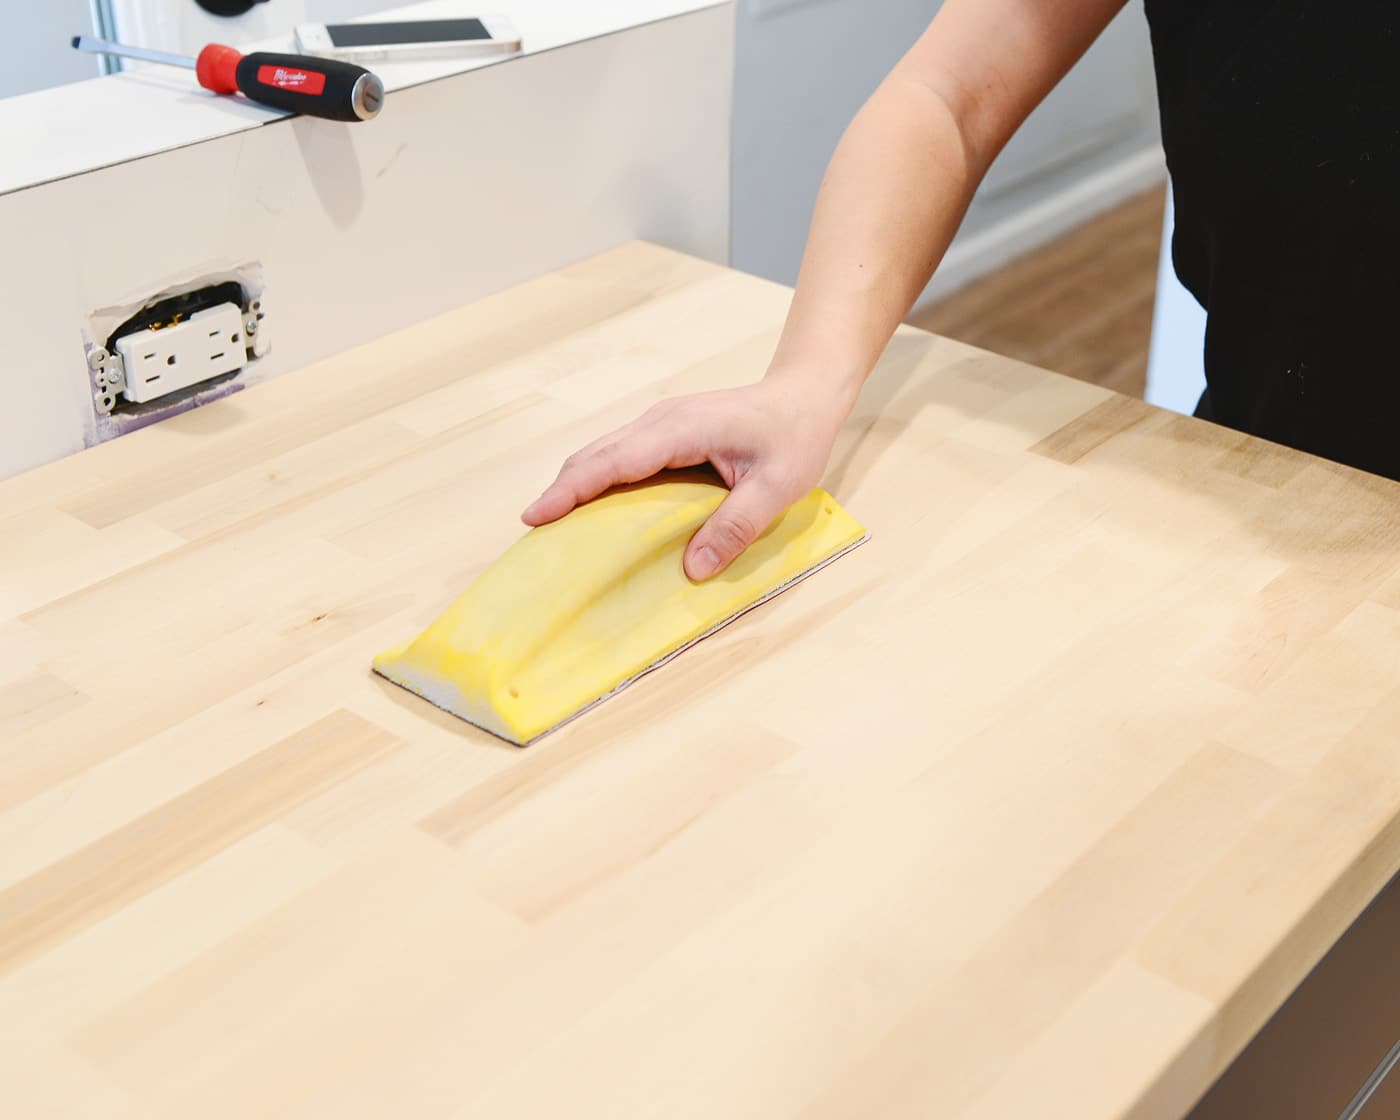
Our dry fit of all three sections was a success (hip, hip!), and I spent about 5 minutes per slab with 100 grit sandpaper, easing the rough edges and smoothing the cuts. I followed that up with 400 grit paper on the top, ensuring that the butcher block was smooth to the touch.
A quick side note along the sink wall: Our dishwasher will be placed up against the wall, so we whipped up a support for the countertop using scrap 2x4s at the top and bottom. The top 2×4 is a resting place for the counter (which was leveled to the same height as the cabinets), whereas the bottom scrap will give our future filler piece a place to adhere to.
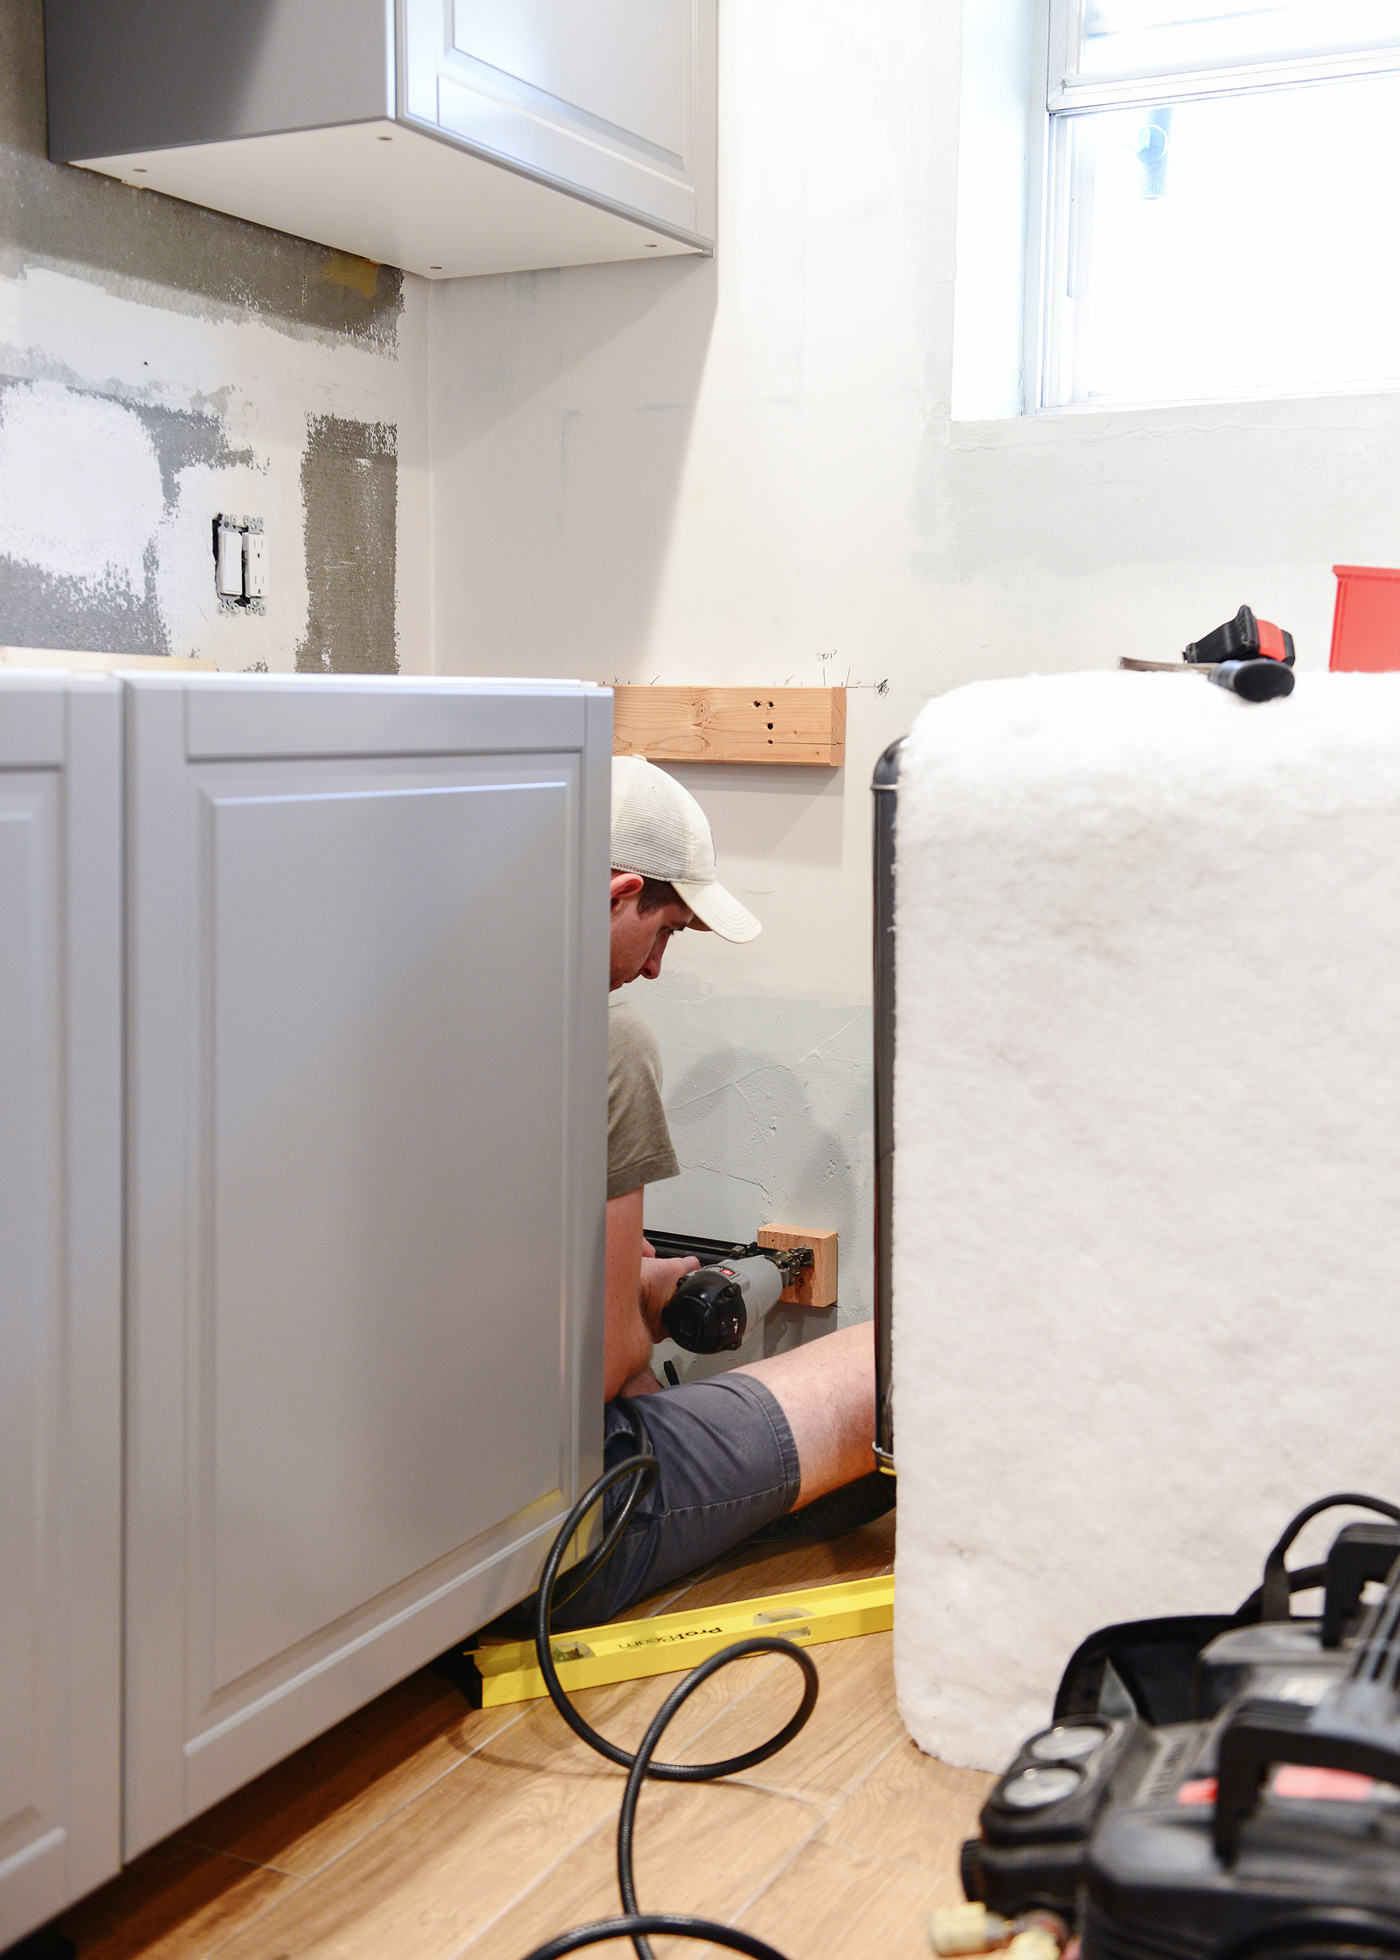
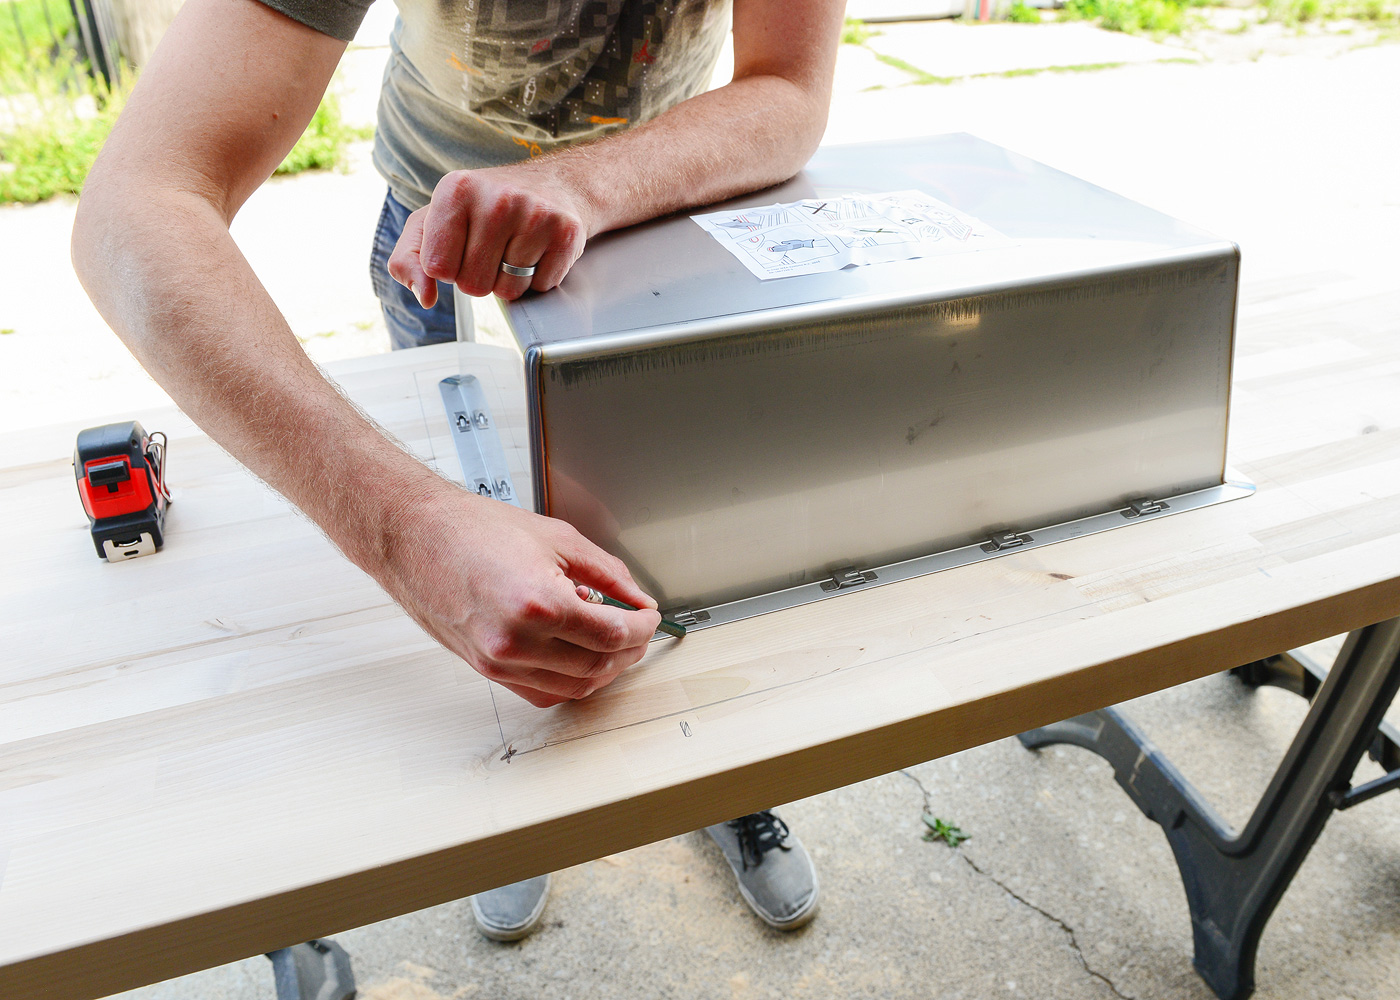
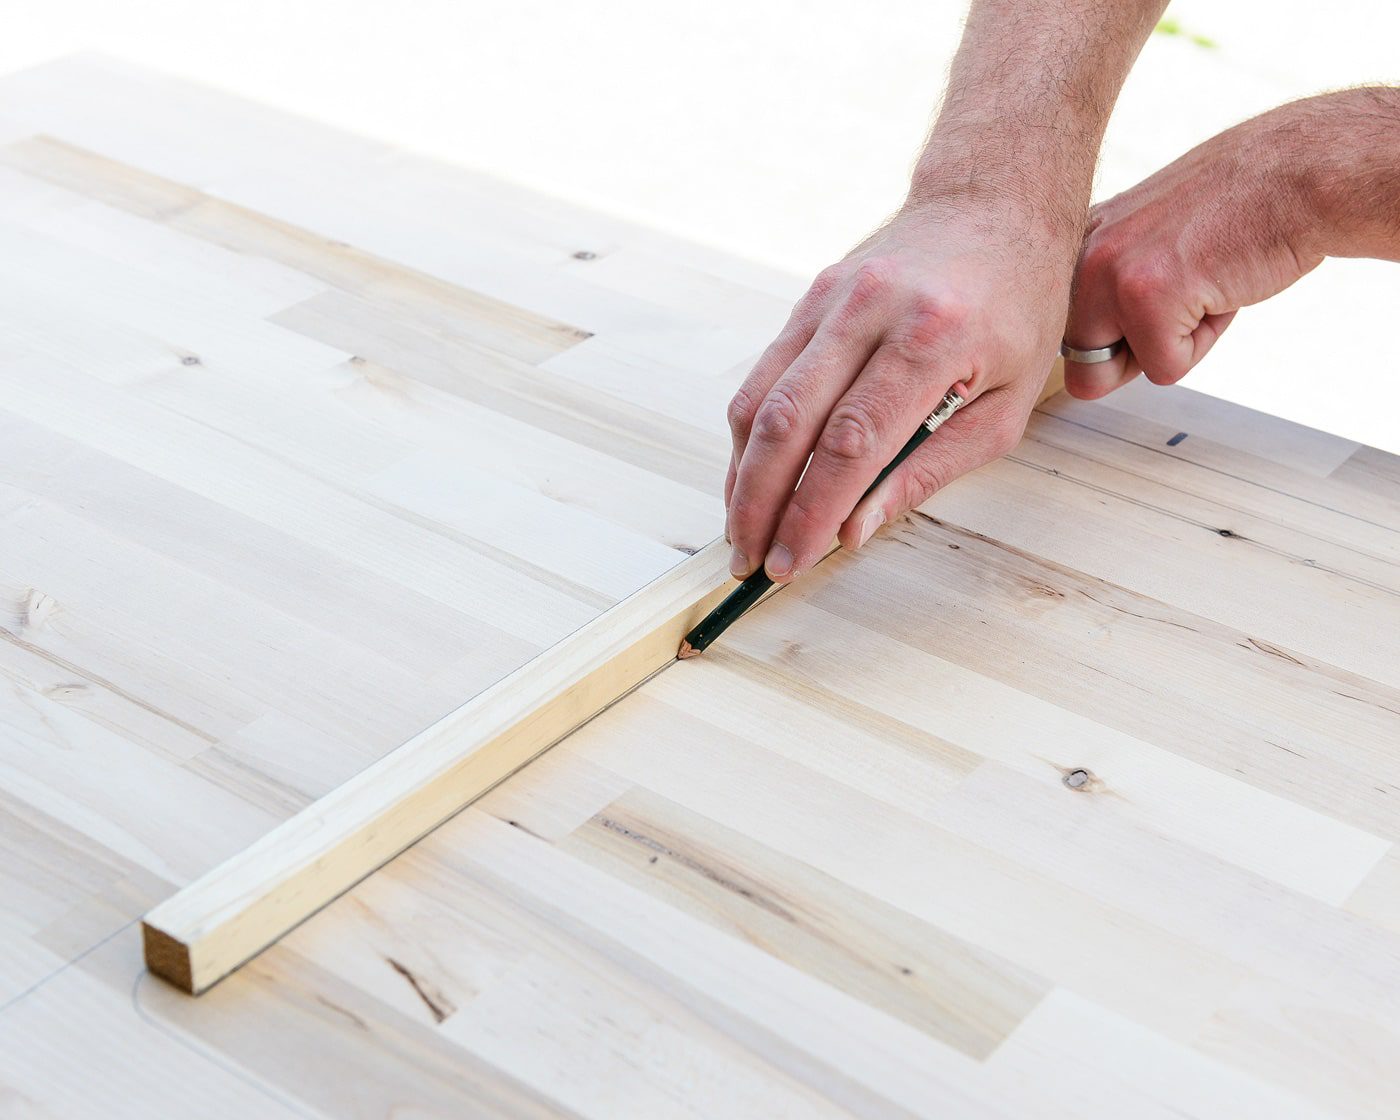
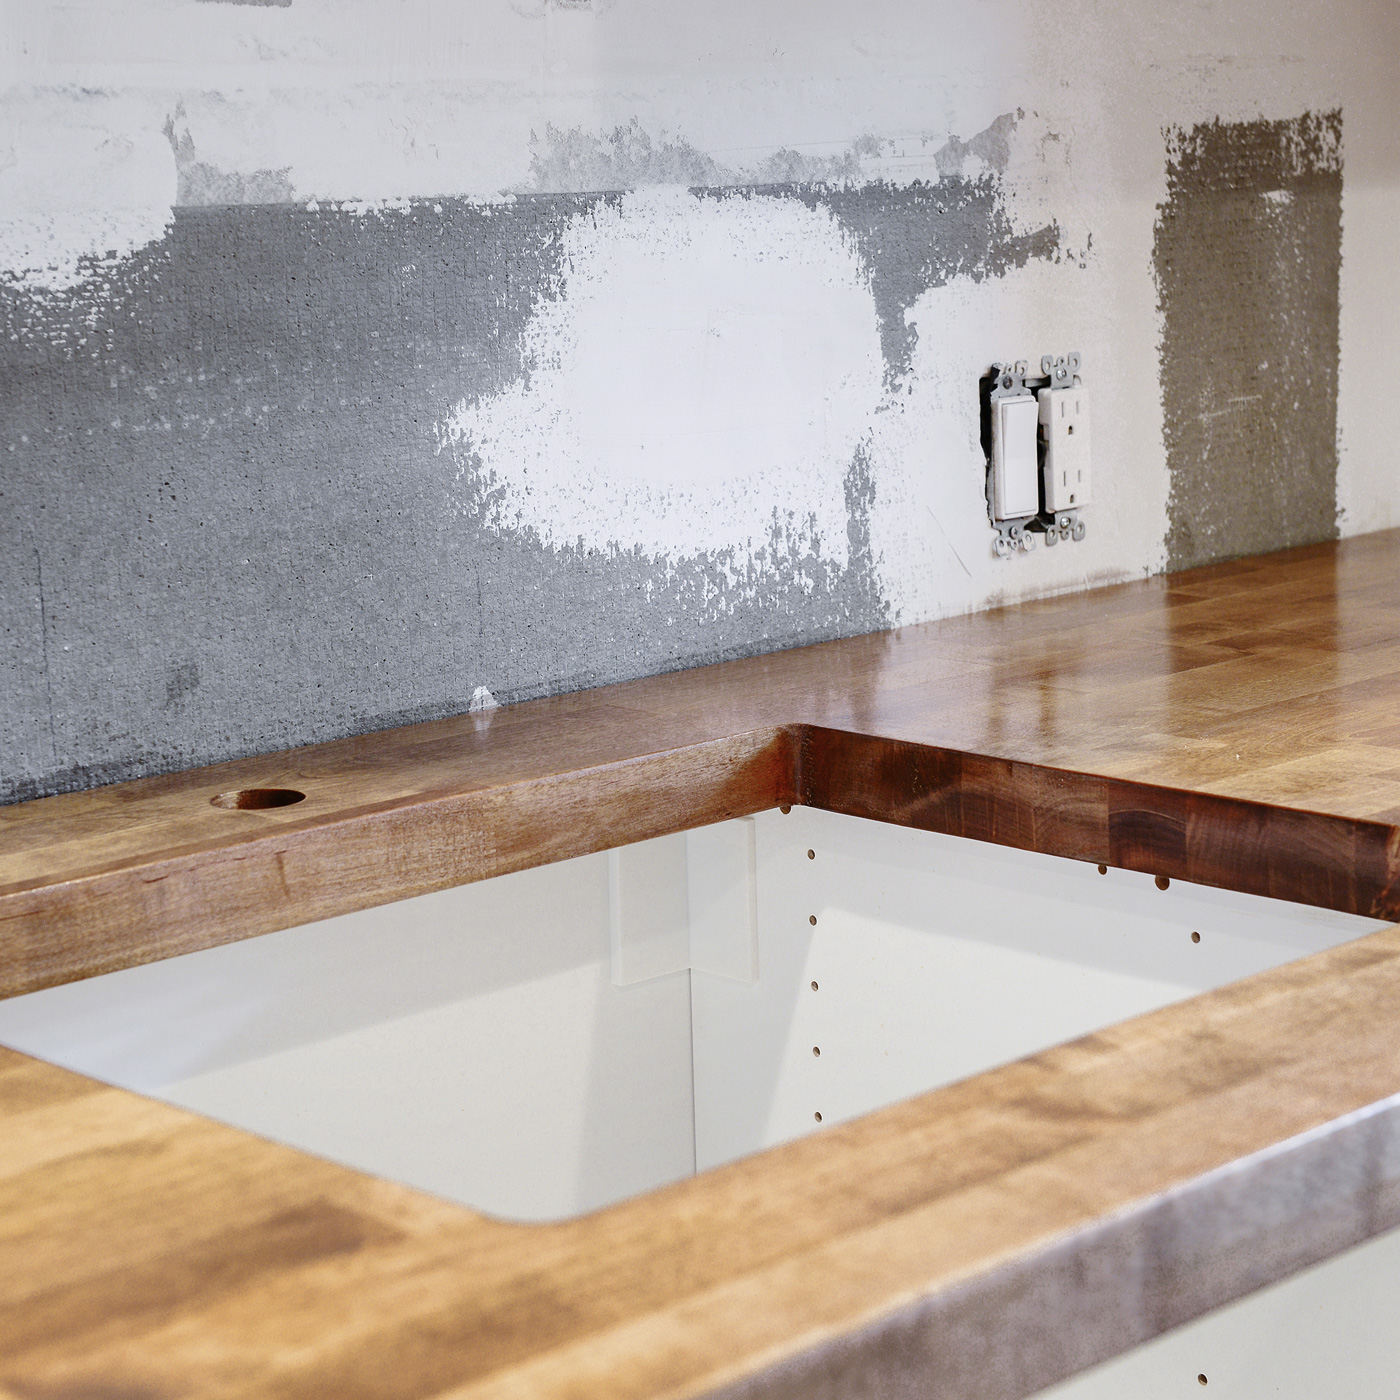
Prepping our butcher block for the sink was the larger task of the day, but a bit of patience, pushing aside our nerves and a lot of sanding did the trick! We’ll be installing the NORRSJÖN stainless steel sink from IKEA, which doesn’t come with a template. Instead, we were instructed to outline the cabinet box on the underside of our countertop, turn the countertop upside down, and finally, trace the sink to its proper location. Our sink is an undermount, so we then used a scrap piece of 3/4″ wood to trace an inside line, which would be the exact size of our cutout:
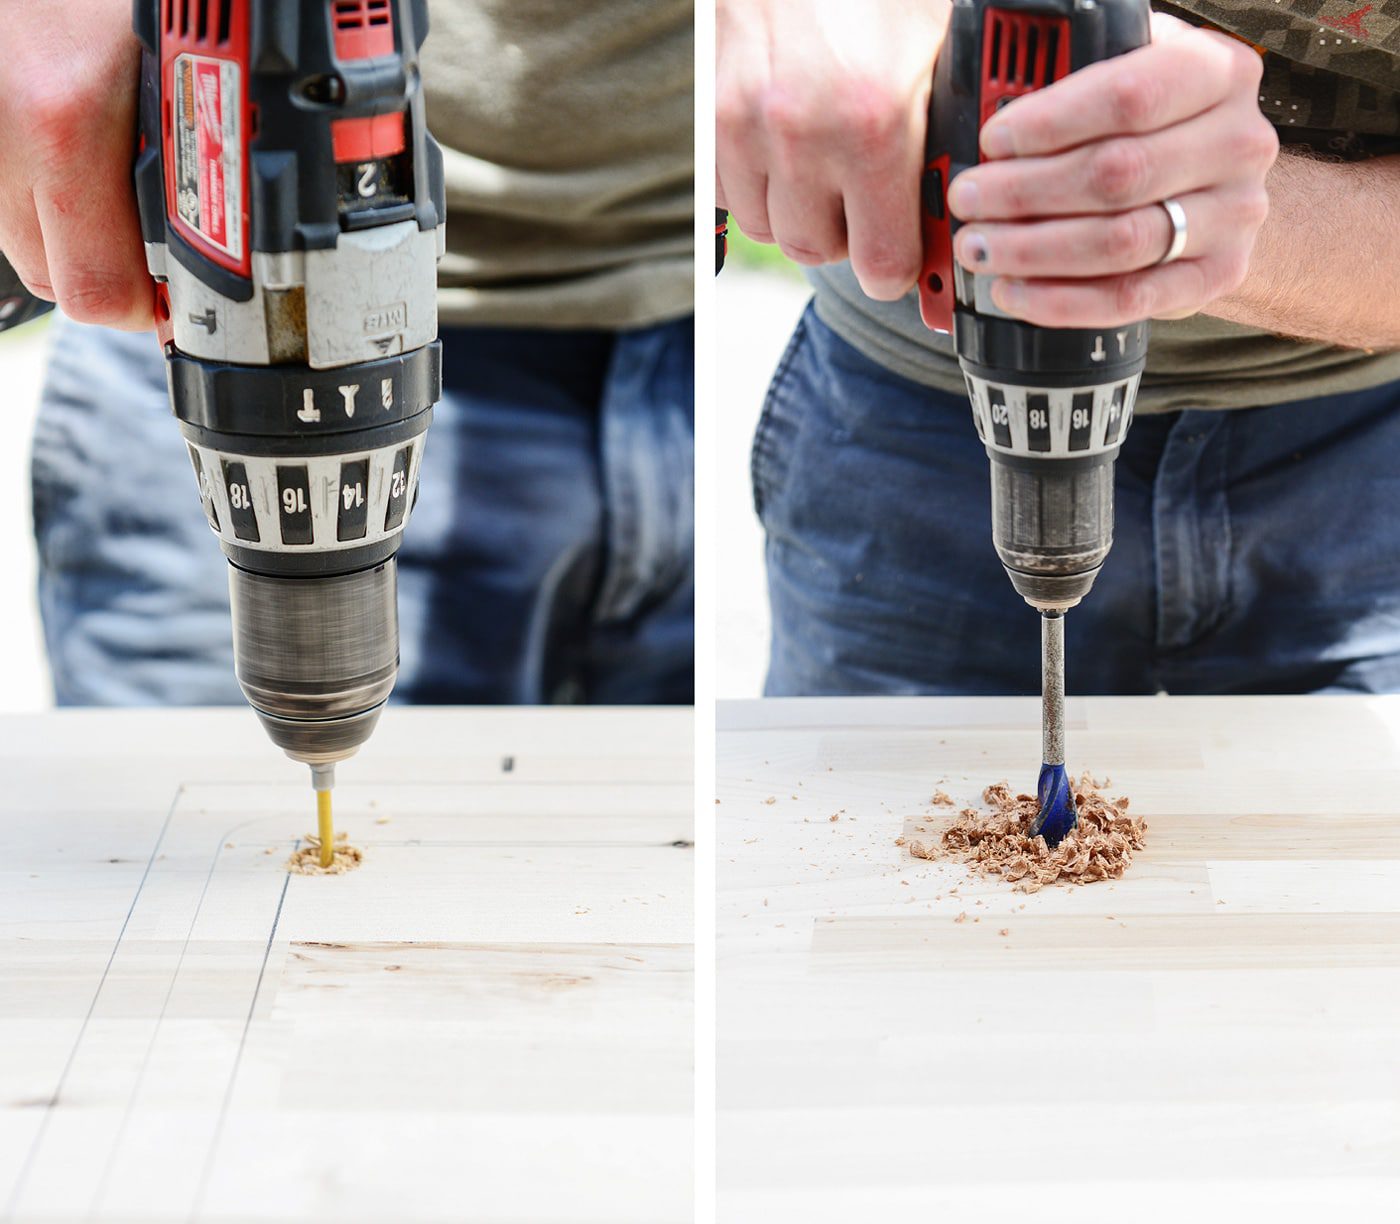
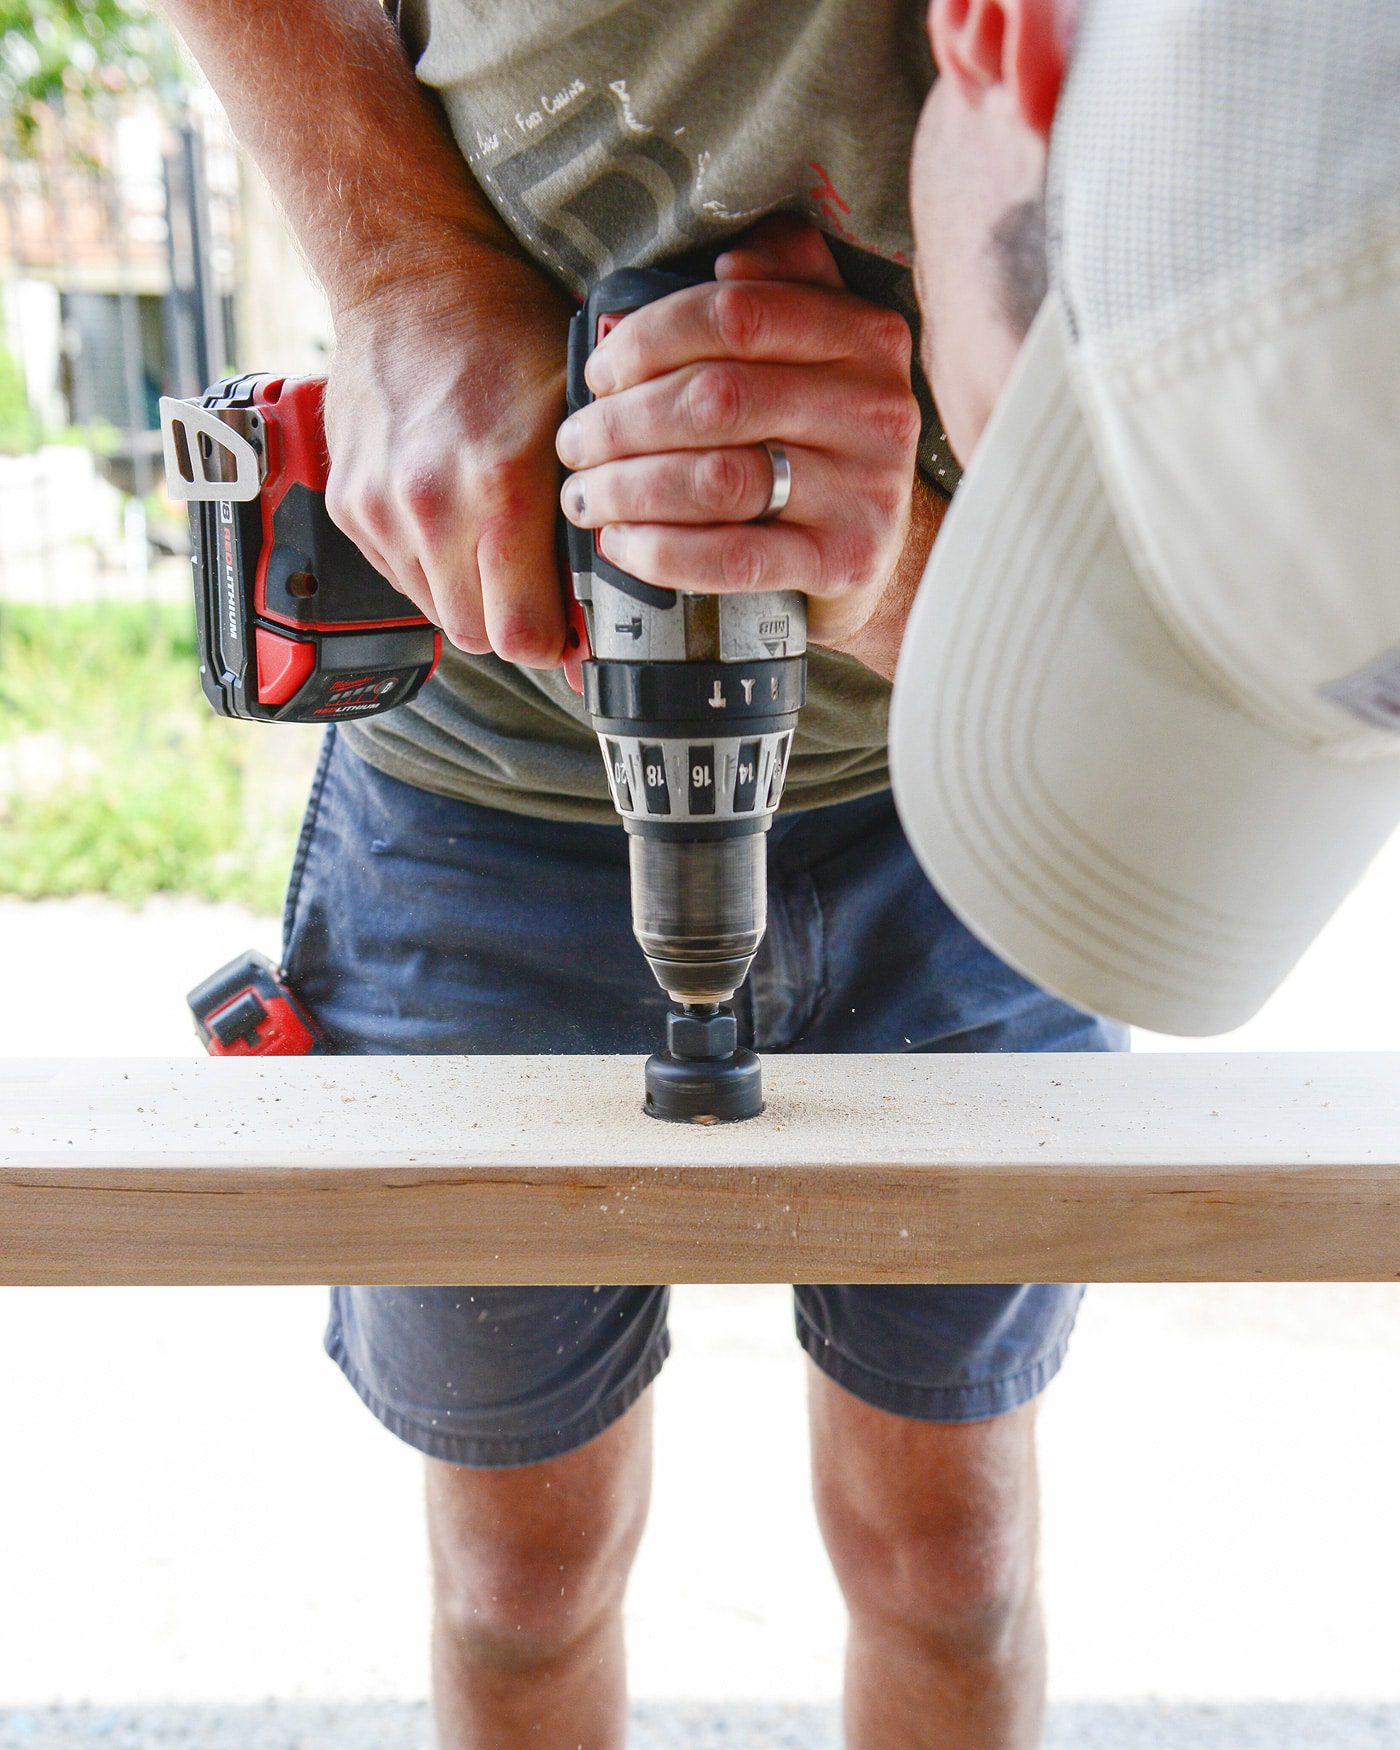
To prep for our cut, Scott drilled pilot holes, 3/8″ in from all four corners, making sure it went all the way through to the ‘top’ of the counter. We turned the butcher block over so that we were looking at the top of the countertop, and all we could see were the fresh pilot holes. Using those holes as a guide, we then used a 3/4″ bit to create a rounded edge, mimicking the corners of the sink. By drilling from the top-down, we were able to get the cleanest edge on the exposed side of the butcher block:
We turned the countertop over again, so that we were back to looking at our outlines of the sink. Scott used a jigsaw and a steady hand to connect the dots, so to speak, while I held my breath the entire time! Once all four sides were cut, we flipped the butcher block (are you sensing a theme?) so that we were once again looking at the top. I might have panicked. At this point, it still looked a little rough, but Scott worked his magic and fine tuned the edges with the jigsaw, and I followed that up with a good dose of sanding on the orbital, starting with 50 grit paper and working my way up to 220 grit. I hand sanded the corners, until they were perfect, rounded edges!

Once we were happy with the sink cutout, we measured for the faucet opening, and we used a hole saw bit to make the opening.
Finally, it was time to condition, stain and seal! Here’s my process in a nutshell:
- I applied a heavy dose of wood conditioner using a 3″ brush.
- After 5 minutes, the wood will probably be slightly damp, but this is what I’m looking for. The more cool/damp to the touch, the less the wood will take the stain. Because I didn’t want too dark of a color, I wanted this. (And if you want a darker color, wait until the conditioner has dried more thoroughly!)
- Using an old rag, I applied 1 coat of Minwax Special Walnut stain on the top, sides and cut outs, and I even swiped a coat on the bottom, about 2″ in from the front edge of the counter.
- The next day, I used a natural bristle brush to liberally apply my first coat of Waterlox. I did this every day for 5 days, waiting 24 hours between coats, so that I would have 5 coats total.
- Tip: I used 400 grit sandpaper to lightly smooth the surface of the Waterlox before applying my next coat. This isn’t absolutely necessary, but I find it creates the most beautiful finish!
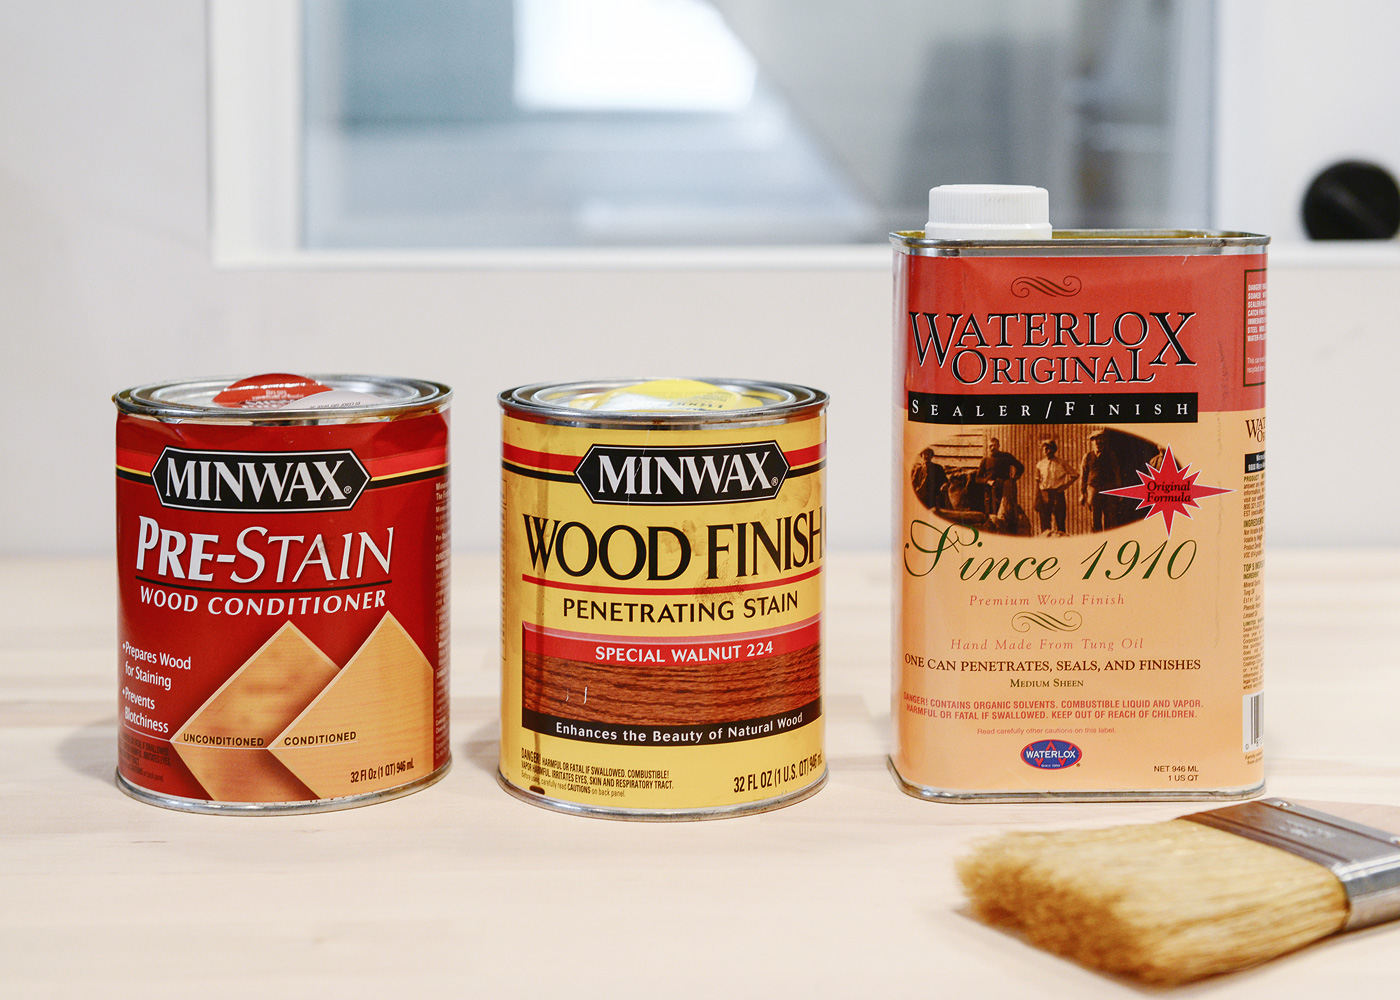
Waterlox actually absorbs into the wood, unlike a polyurethane or a shellac that sits on the surface. Because of this, the first two coats looked a little spotty as it began to drink up the liquid. By the third coat, the sheen began to even out, and by the fourth coat, I probably could have considered it ‘done.’ Even still, I added a fifth coat as my own personal insurance policy, ha!
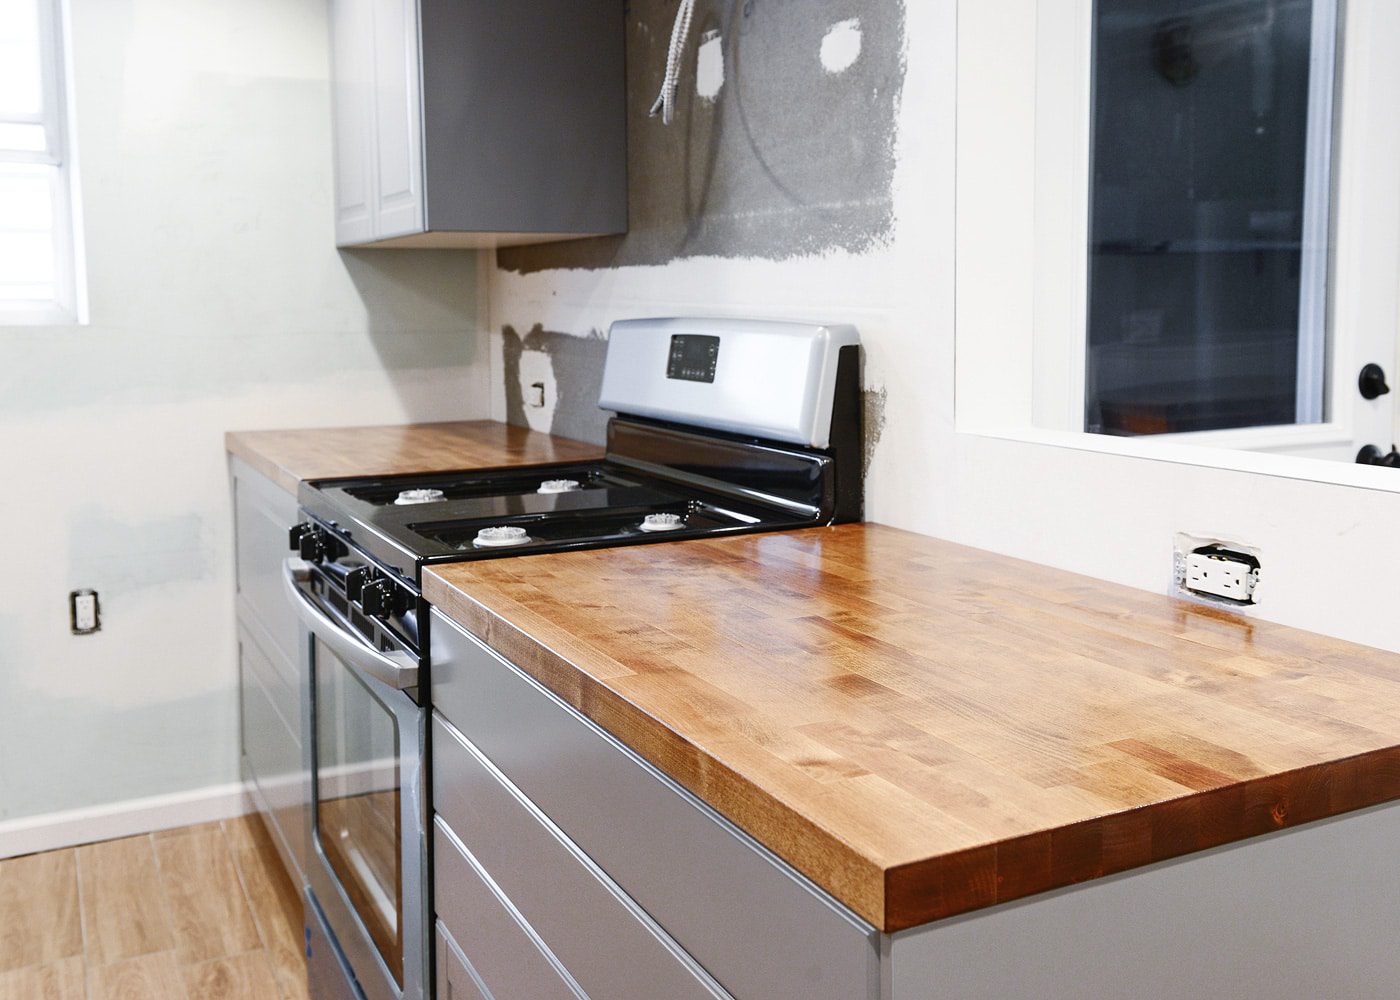
I would describe the finish as a semi-gloss, but having used Waterlox in our laundry room, I can say that the sheen does knock down a teeny bit as it cures over the weeks and months. Of course, regular use will beat it up as well, but again, that’s all part of the charm, don’t you think?
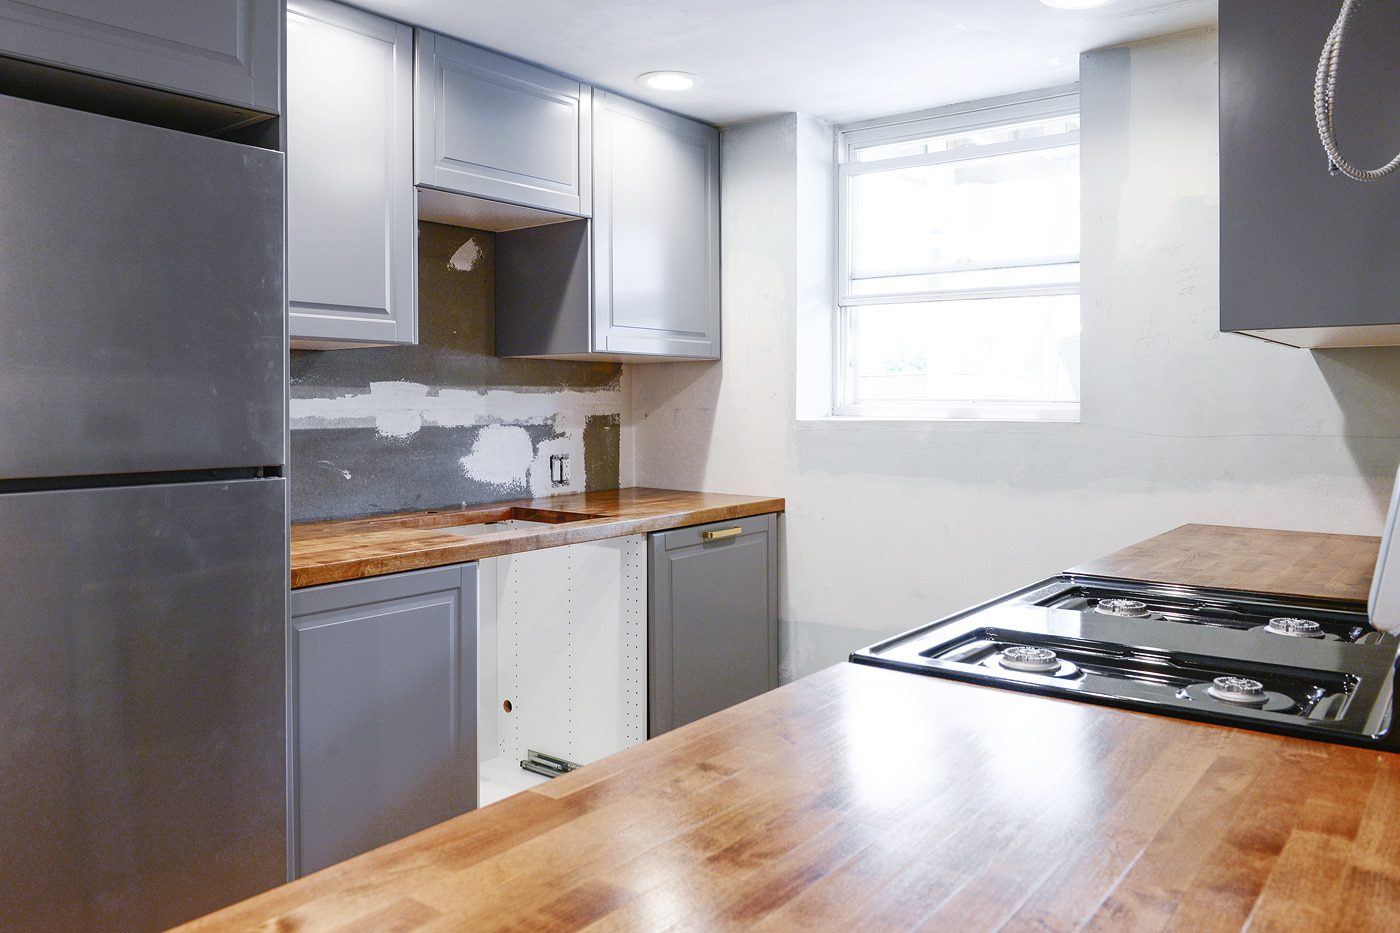
Scott has been a busy bee working on the trim work and quarter round throughout the unit, and I’ve been following behind with spackle, caulk and sandpaper. This weekend, we’re hoping to complete the backsplash, and then we can start installing the sink, range hood and dishwasher! (And then it’s on to prepping the walls for paint, cabinet hardware, new outlets and, and … !)


Love the butcher block countertops. This is going to look amazing. Your tenants are going to have a more stylish place than me!
IKR? I want to live there. :-)
Butcherblock is awesome and a great choice for a rental. I would never hesitate to use it. We installed it in our last kitchen and loved it. It’s so cheap, holds up well if you seal it properly and like you said, can be sanded down over and over and over again for decades if necessary. Which it probably won’t. But seriously it will be the countertop that won’t die. And for so cheap!
We couldn’t agree more!
Hi there! I absolutely love how the counter tops turned out.
Would you please share your process? Which product did you apply first, and how many coats?
Thank you!
There’s a bullet point list in the post of exactly my process, but it’s wood conditioner, stain, and 5 coats of Waterlox.
These are GORGEOUS!
This a little off the topic of the counters, but you mentioned that they might be seen as a risk in a rental… were there any of the same concerns with your wood tile floor? I had suggested wood look tile to a friend who is renovating a rental property and her contractor (who is a “tile guy”) was really discouraging of doing it throughout the living space. I did a fair amount of research and read mixed pros and cons. Thanks for any input!
Thanks, Gretchen!
I have NO idea why her contractor would discourage the use of tile, unless it’s simply because it’s a lot more work (because it is). Porcelain tile is going to be extremely durable, and we weighed a lot of pros and cons ourselves. We dive into it a lot more in this post: https://yellowbrickhome.com/
“Finally, it was time to condition, stain and steal!” I think you meant to say “seal”, although at that price, it was quite the steal :)
Love your work and I’m really enjoying watching the rental apartment come together!
Haha, you’re right on both counts! Updated.
I have butcherblock counters, that I seal on occasion with mineral oil. Love them. Love how these look too. Did you seal the underside where the dishwasher is? Steam pouring into unsealed wood sounds like a problem waiting to happen.
The dishwasher is sufficiently insulated, so we should be okay. We also saw that IKEA sells barriers, so we may add that as well: http://www.ikea.com/us/en/catalog/products/04375085/
Finish underside of counter-top under the dishwasher. It may get humid with the dishwasher running
I love the look of butcher block but don’t care for joints with L-shaped countertops or longer lengths. Do you have any tips for dealing with joints?
I don’t think there’s any big trick, other than butting them off against each other nice and flush (and probably some wood glue). I found this blog post that details a similar process to mine, and she has a seam: http://cherishedbliss.com/finish-install-butcher-block-countertop/
What is the name of the ikea butcher block you used? The website has several options but none that appear to be solid wood and stainable. We used the Karlby in a project at out house and it is just a particle board with a thin wood veneer.
Ok now I’m realizing it never says they are from Ikea??♀️. In that case where did you get yours from;)
Ha, that’s ok! In the first paragraph, we say we got them from Menard’s. :)
Those counters look great! I’m jealous of the future tenants :)
Three cheers for butcher block + Waterlox! Beautiful, sustainable, durable, affordable (look at all my rhyming words!).
I’ll be really interested to see how this holds up in a rental: will you come back in a year and give us an update? I’m curious because we have this combo in our kitchen and adore it, but we’re there to take care of it, wipe up standing water at the end of the day, etc.: not a huge amount of love, but some. We want to do the same thing in our boys’ bathroom but are not sure how it will do with zero love. Keep us posted?
We would love to keep you posted! Once our tenant(s) moves in, we do like to give them privacy (so no more photoshoots down here!), but assuming they move out after a year, we agree that it would be a great idea to discuss how things are holding up!
First of all, the garden apartment is looking great!
You may want to specifically ask that your tenants not cut directly on the countertops (i.e. use cutting boards) and take care to clean up spills immediately, particularly around the sink—give them pointers rather than just hoping they’ll treat the counters with respect. Some people are pretty clueless unfortunately.
I lived briefly in an apartment that had butcher block counters. When my now-husband and I moved in they were disgusting: stained, scratched. The area around the sink in particular was really, really bad. We sanded and sanded, then oiled, and with a lot of work most of the counters looked good again, except the area around the sink—the water damage was really deep there and we never could get out the black staining. I don’t know how long they were bad before we moved in (three young guys lived there before us and my only memory of touring the place was all the dried ketchup on the counters)…blah blah anyway…a few words of prevention might help you to avoid some work between tenants. :)
You’re so right! We’ll definitely say something and hope that they take our advice to heart. We do realize it’s a bit of a gamble.
Looking good! The butcher block countertops are beautiful!
Hey there! Quick question – did you cault between the countertops and walls? If so, what did you use?
Yes! We used clear silicone caulk since we have butcher block countertops.
Awesome – I thought as much, but wanted to check!
What type of wood is your butcher block ?
Thanks
Hi ! I know this is an old post – but did you seal and stain prior to installing? I’m reading about the sink and dishwasher areas, did you seal underneath to prevent damage?
Hi Courtney! We stained and finished the butcher block prior to installation in both our garden apartment kitchen and our Chicago laundry room. We’ve had great luck with waterlox and didn’t seal anything underneath. We do, however, apply a solid bead of clear silicone caulk around all of the seams to keep water out of cracks and crevices. Hope this helps!
[…] Are you planning to rent out your place? Do not rent it without working on this plan for a DIY wood countertop. This butcher countertop will increase the rent of your house and will add a character to your place. You can make it in half of the price on your own. yellowbrickhome […]
Just what I was wanting to do… thanks for the steps to get my diy butchers block island… complete…
I love the look of the gray cabinets and the honey colored butcher block counters. What color and brand of paint were used on the cabinets?
It’s a stock color of cabinetry from IKEA!
Thank you for this great tutorial! Just used it to stain the butcher block in my laundry room.
[…] Wood Countertop […]