

It’s a Monday Rewind! Yellow Brick Home has 12 years of archives, so from time to time, we’ll be sharing our favorites from posts past. This tutorial was originally published in May 2018. Current photos have been added throughout the post. Enjoy!
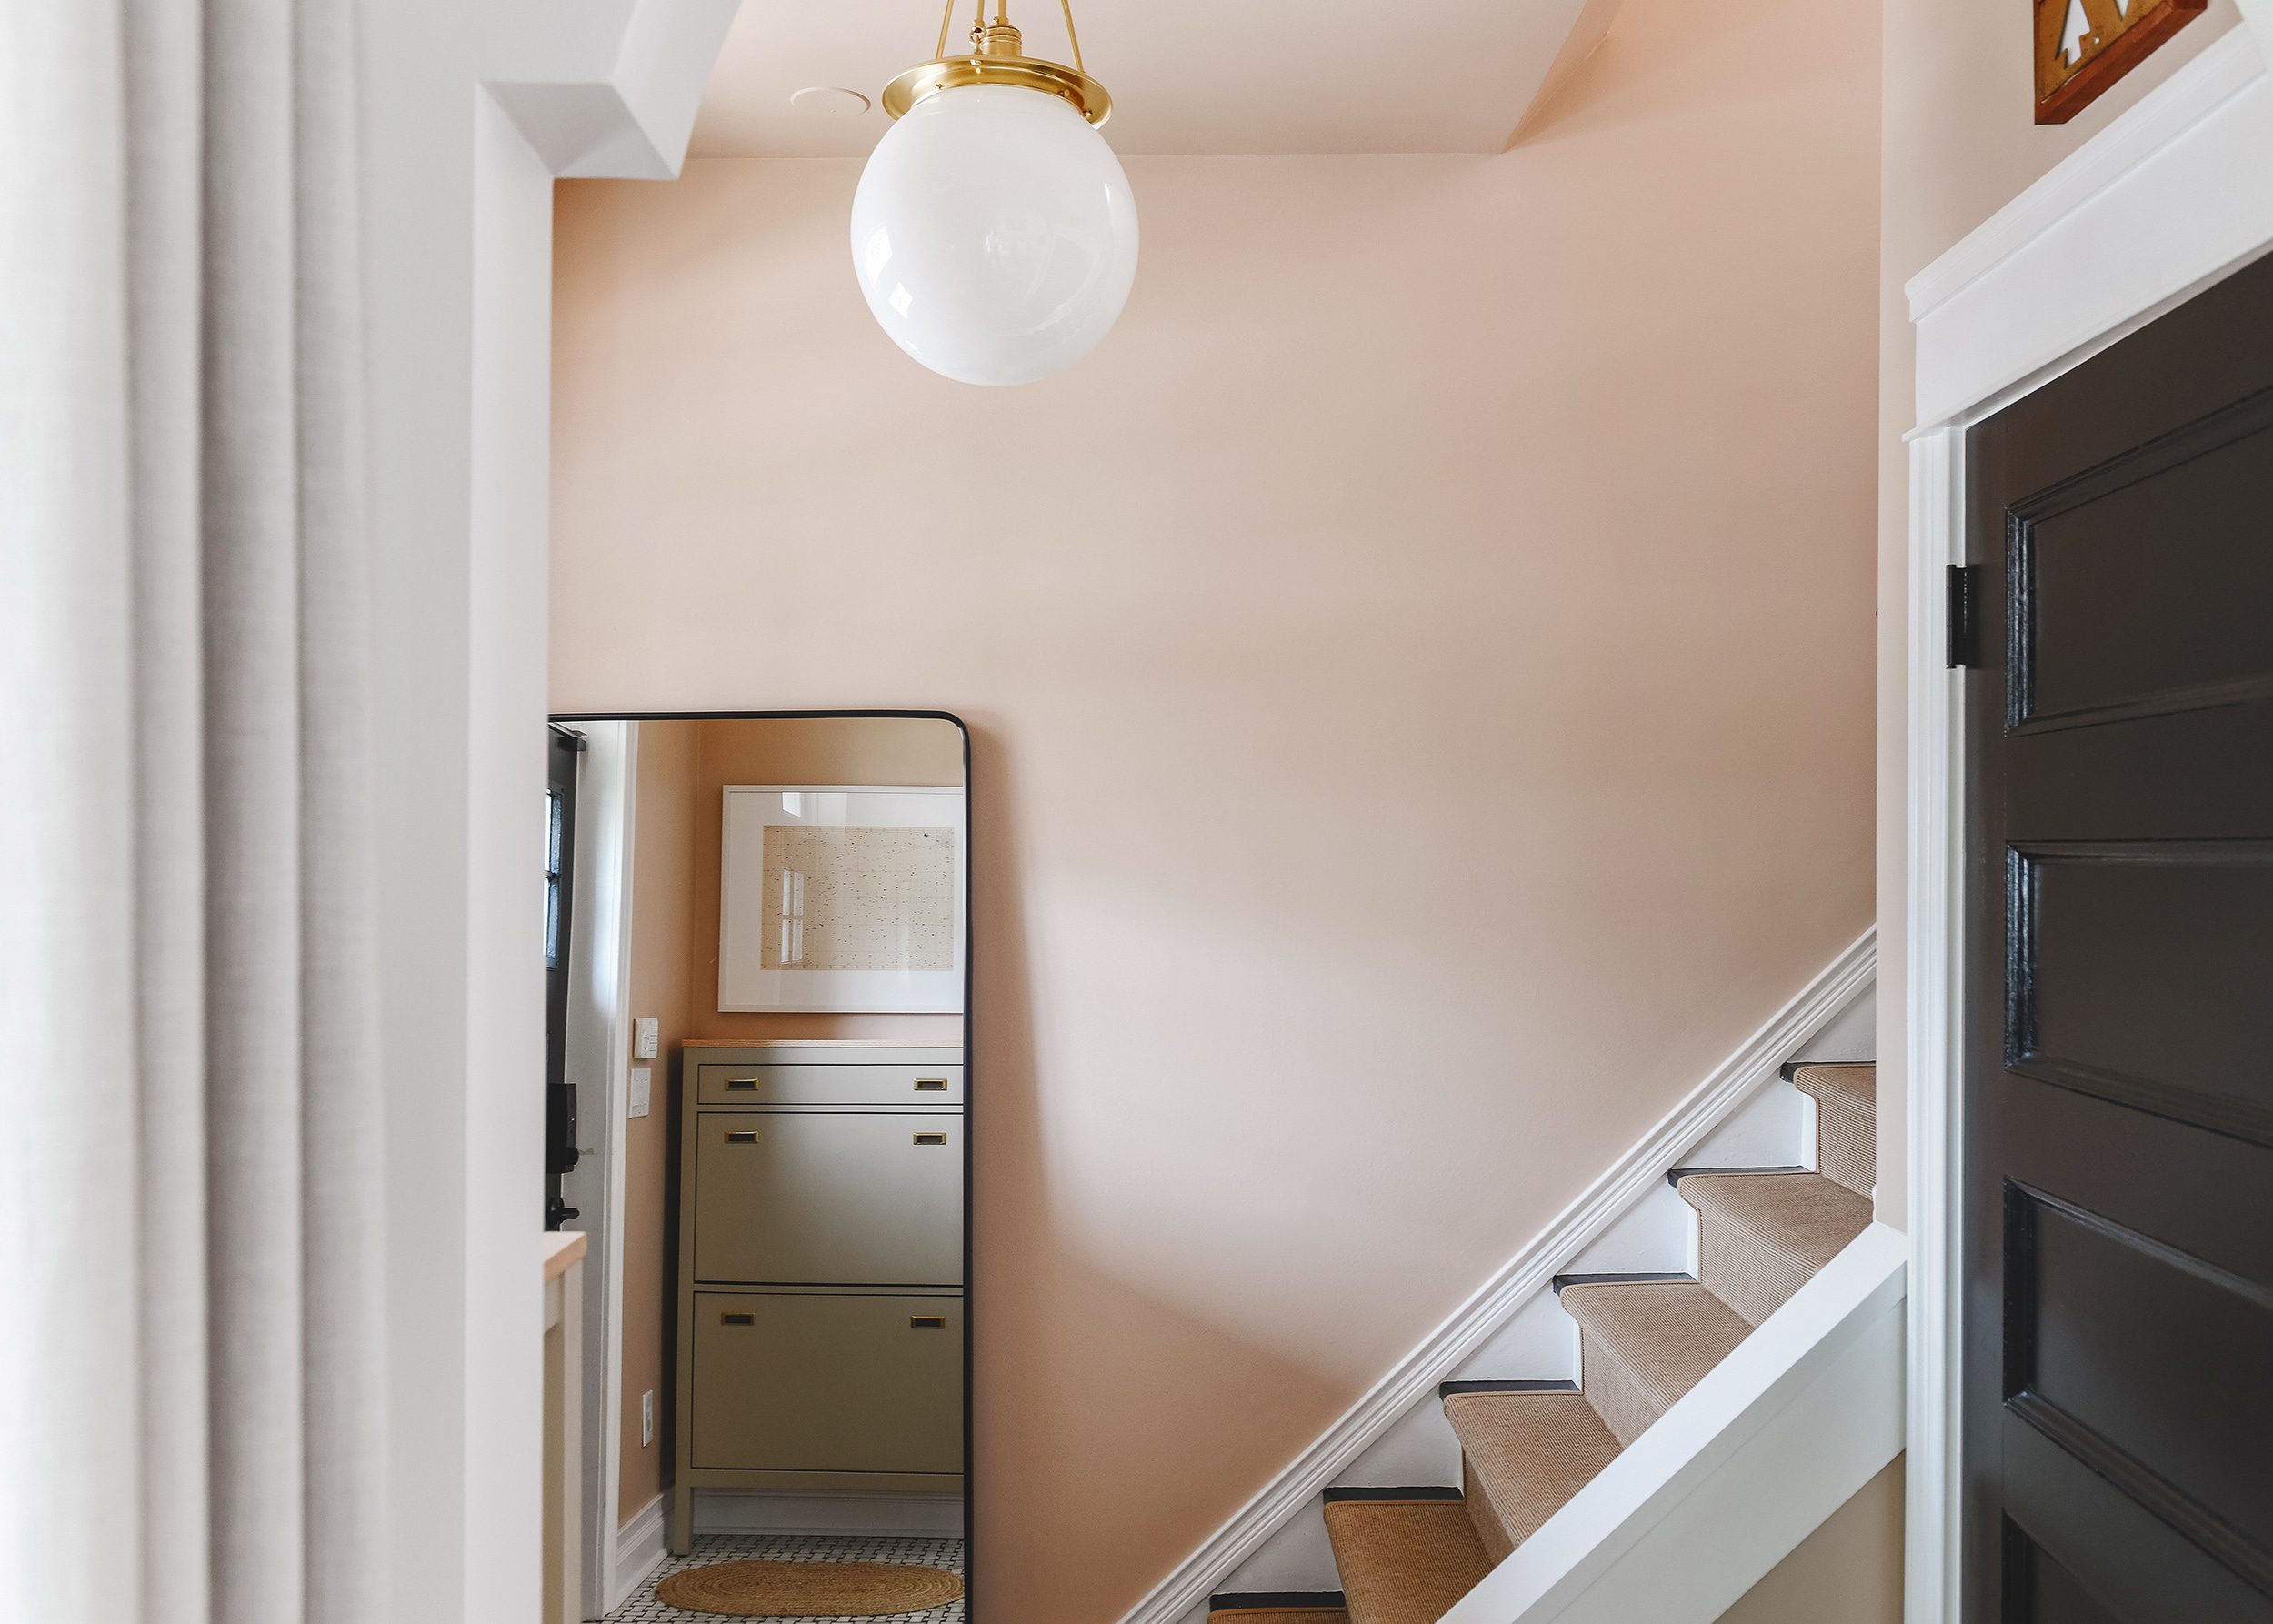
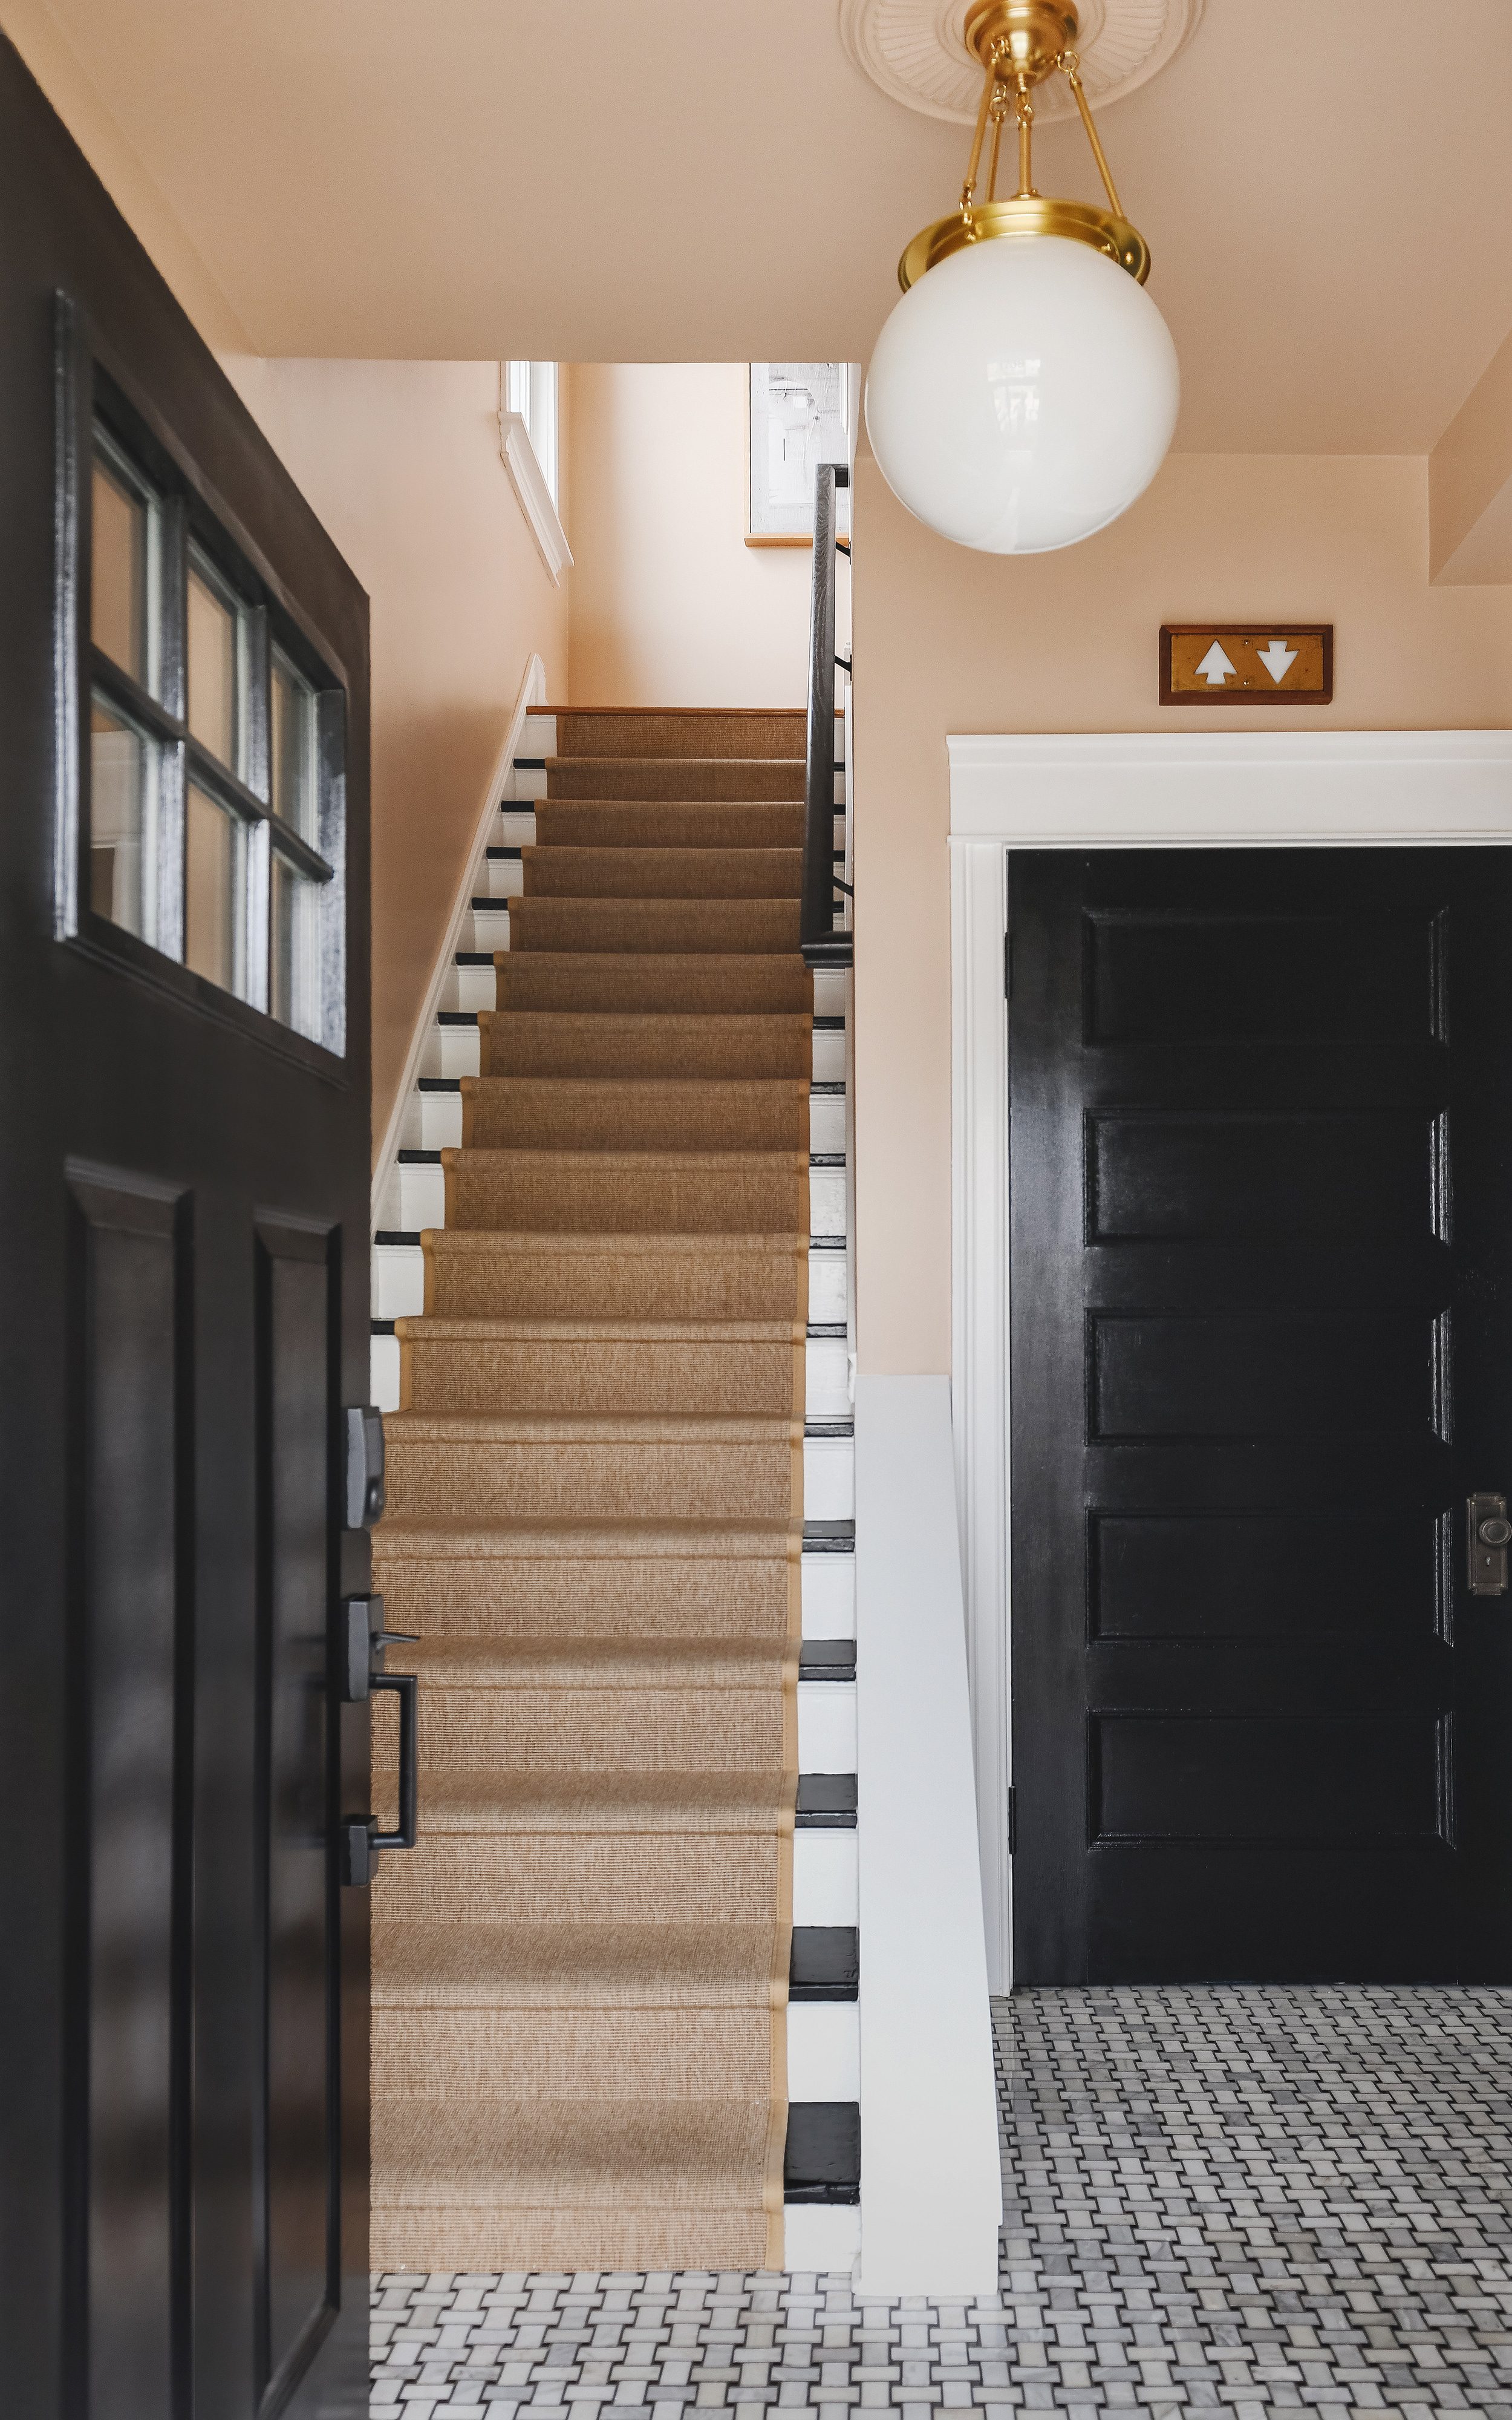
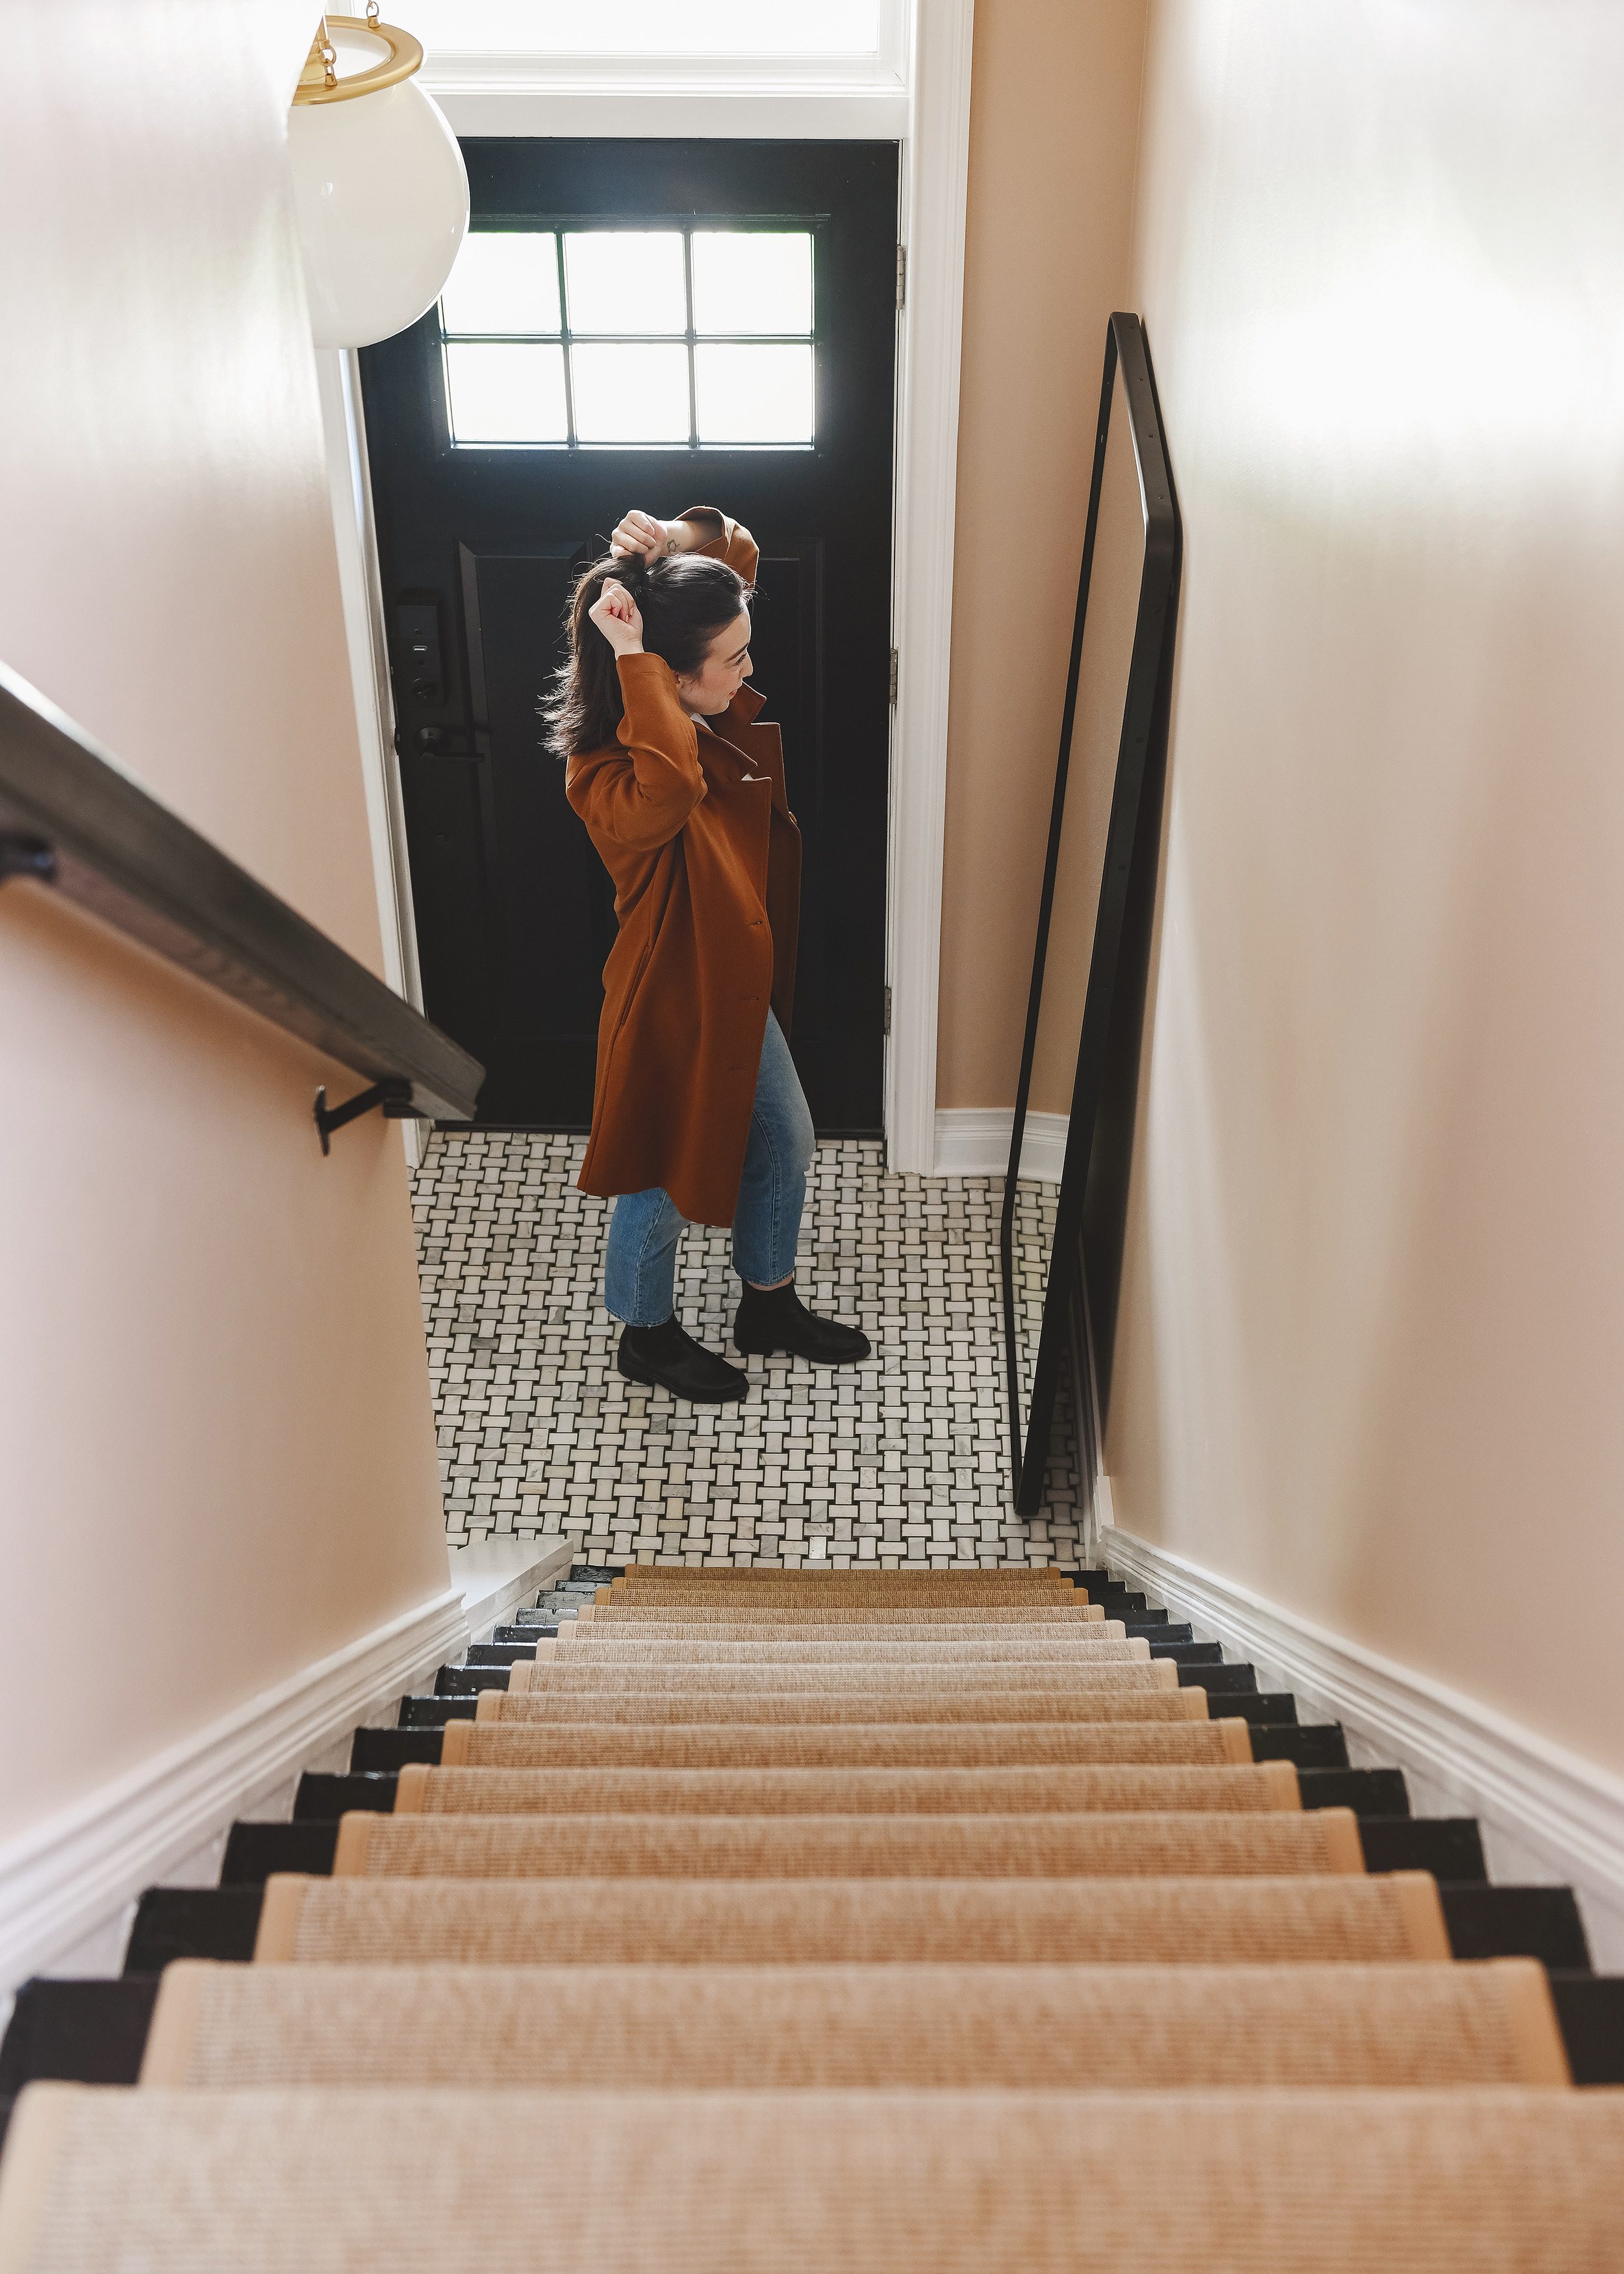
To say that the entryway has been a labor of love would be a huge understatement. Somewhere along our home’s history, our 130-year-old stairs had been painted brown and red, then covered in maroon carpet (the 70’s, right?). We stripped it all back and gave them a classic black and white finish using floor paint, and then, growing tired of the constant touch-up, we gave them several thin coats of polyurethane. The poly worked like a dream, and since completing that project, there have only been a few chips in the bull noses (a result of Jack and CC using our stairs like a race track!).
All of that brought us to here:
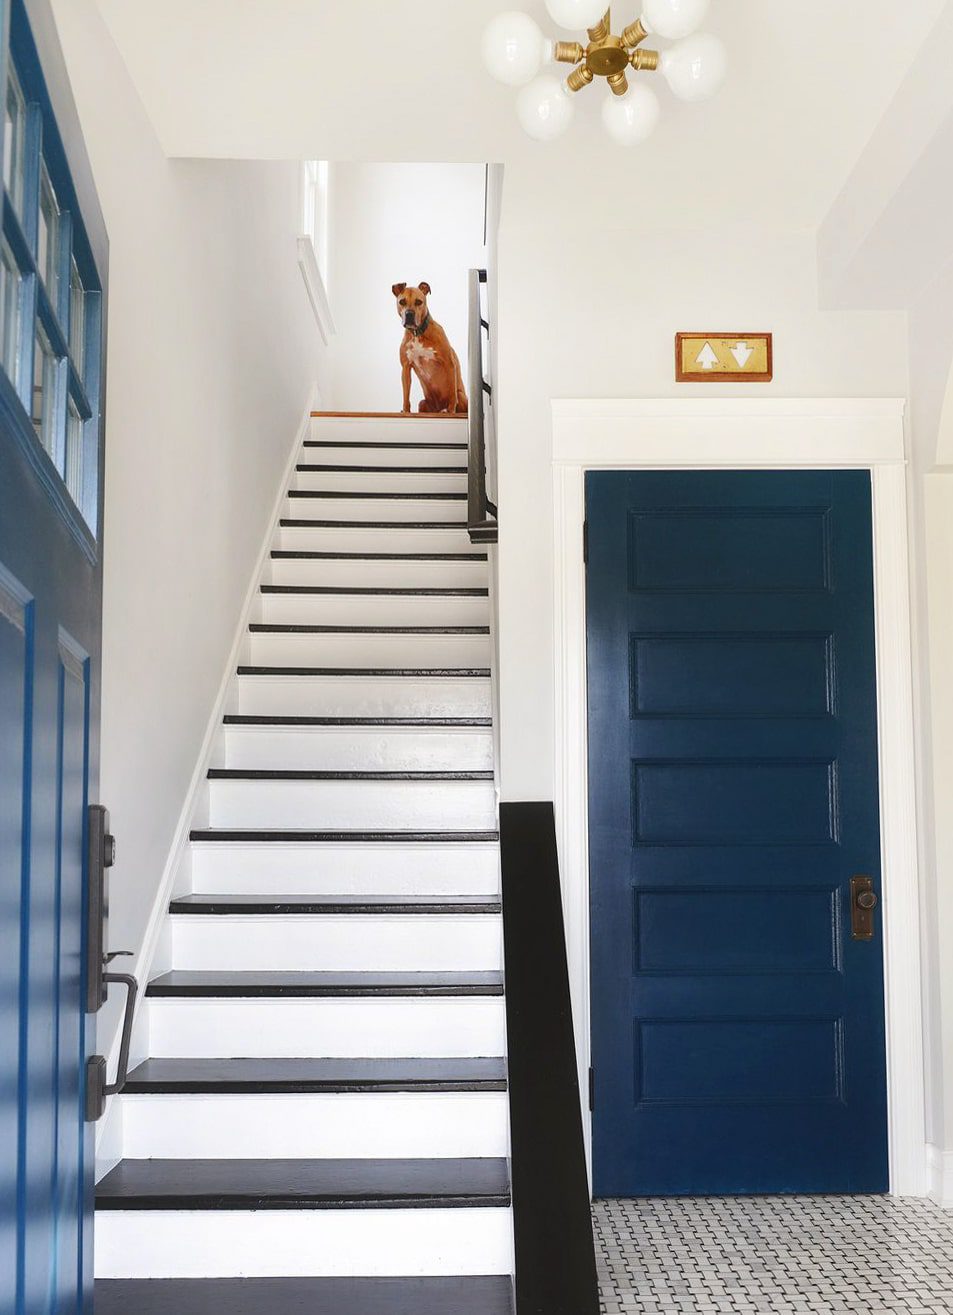
We love those black and white stairs. The treads are pocked and dented, a badge of honor from the last century of use. There’s a stubborn nail that pops out of that third riser when the weather changes; neither one of us have ever been able to successfully pull it out. And after all the changes it has seen, this clean look has always served as a reminder of how far it’s come.
With the addition of our newest family member, we prioritized installing a stair runner. Although we know to be careful when using our stairs, we were constantly telling our friends and family to hold onto the handrail. The stairs are narrow and not as deep as more modern staircases, and we were always the tiniest bit on edge when going up and down. Now that we’ve installed our runner, we are breathing a sigh of relief! The job took us two afternoons over the course of a weekend, and with a little patience, it’s a DIY that you can do, too. Keep reading for the step-by-step, from ordering swatches to celebrating!
In This Post
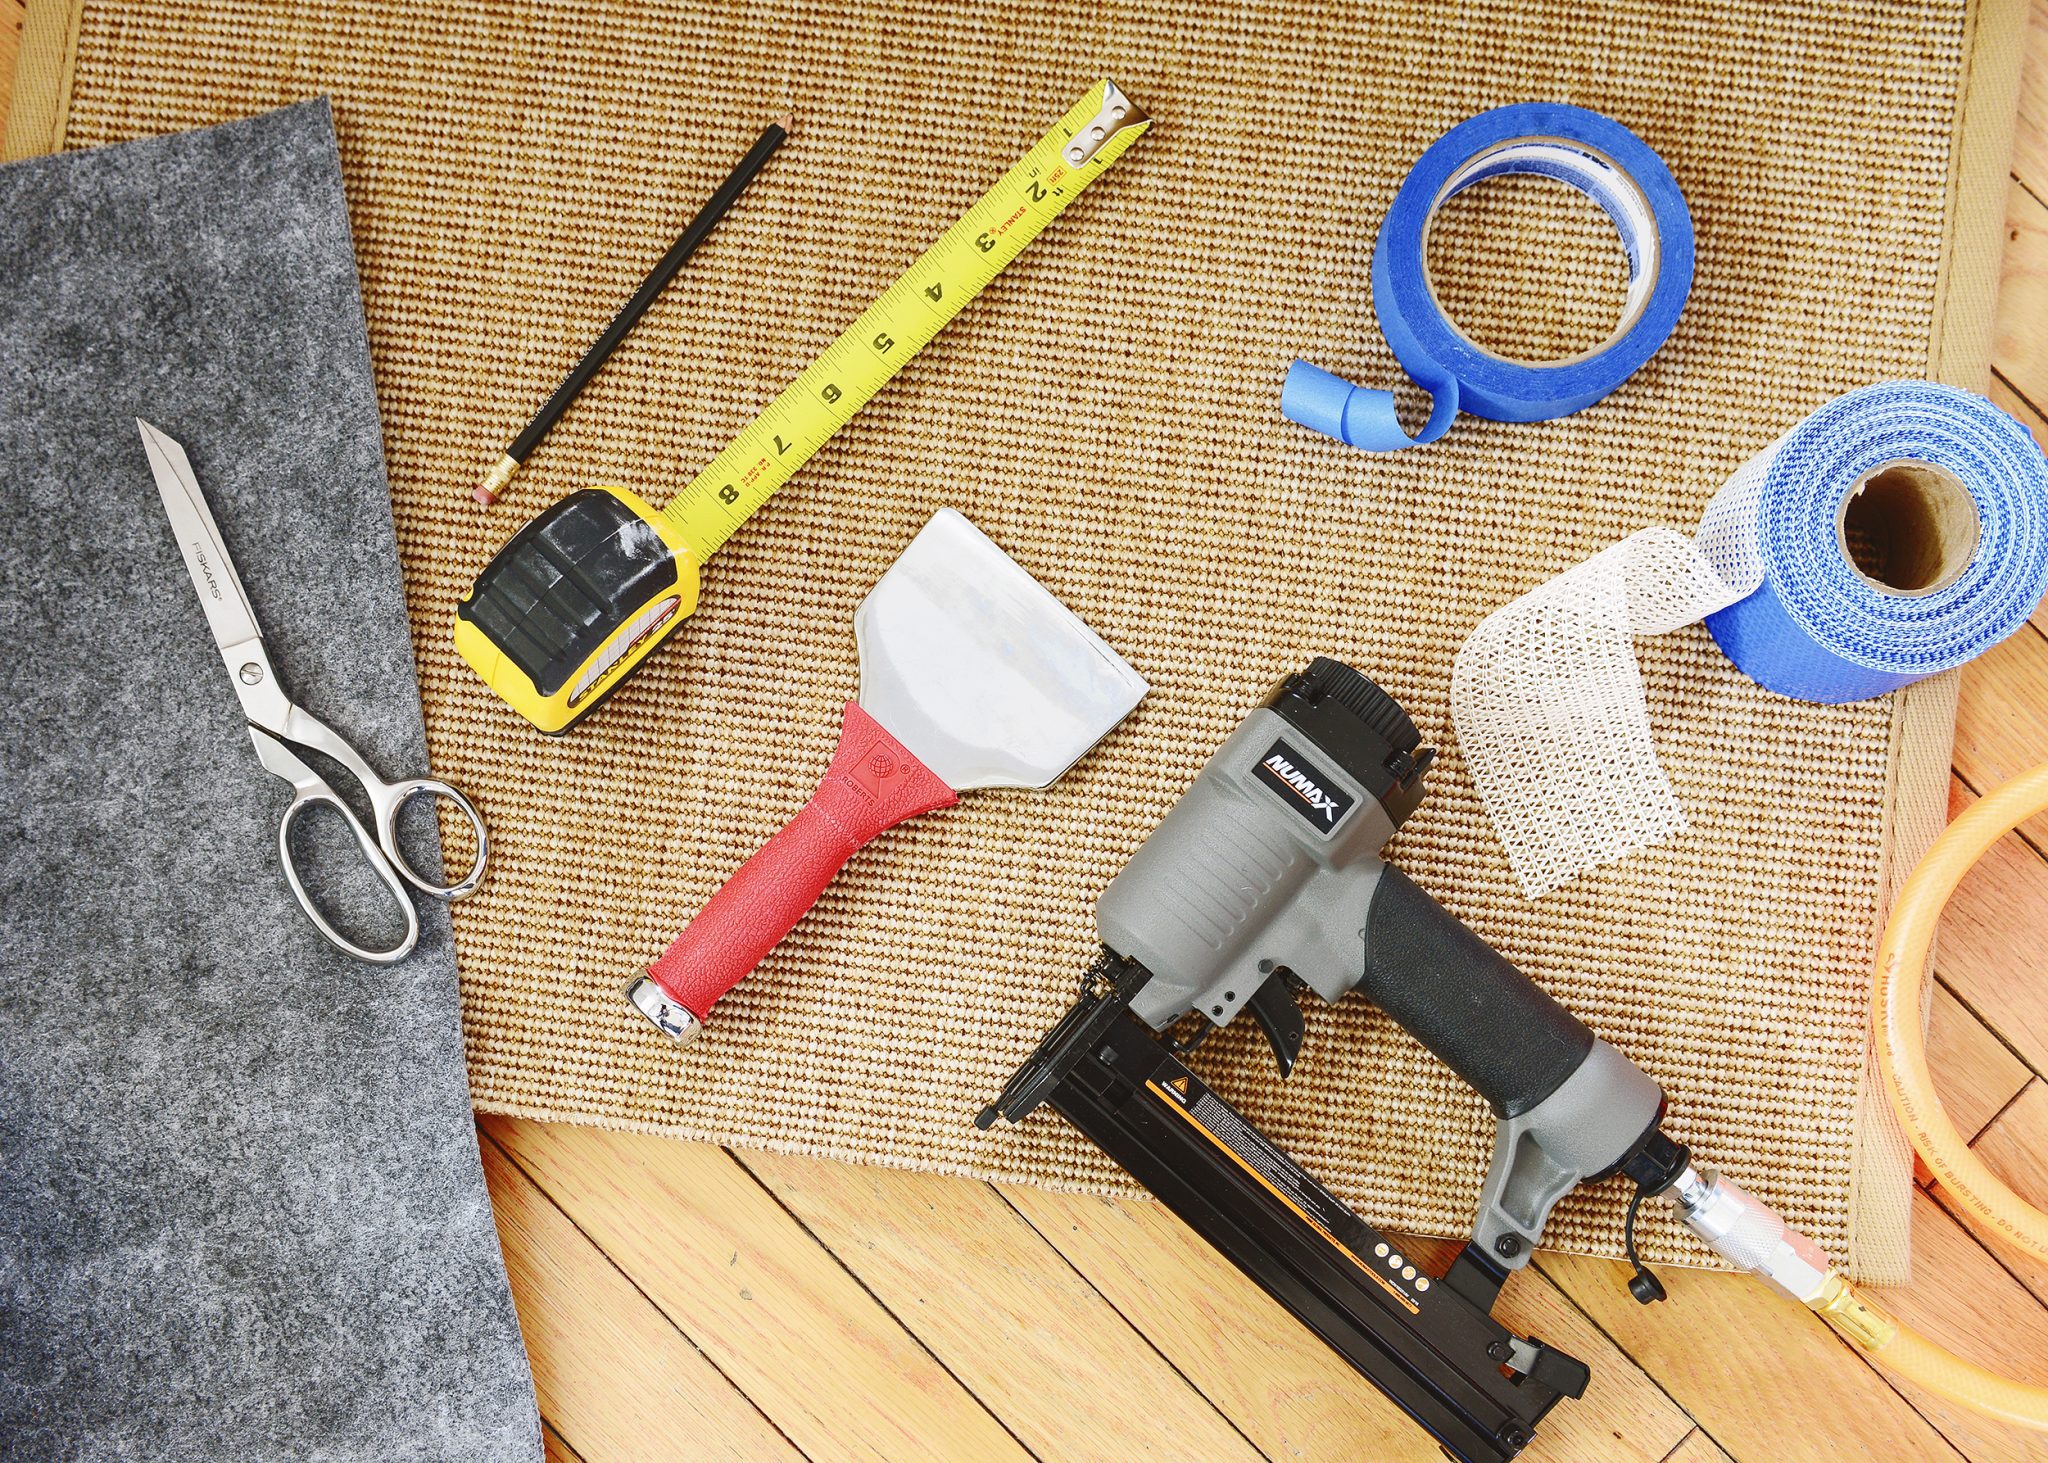
Tools + Supplies Used:
- Stair runner of choice
- Rug pad
- Staple gun + ½”-1″ staples
- Bolster chisel
- Sharp scissors
- Carpet tape
- Painter’s tape
- Tape measure
- Pencil
1| Order swatches
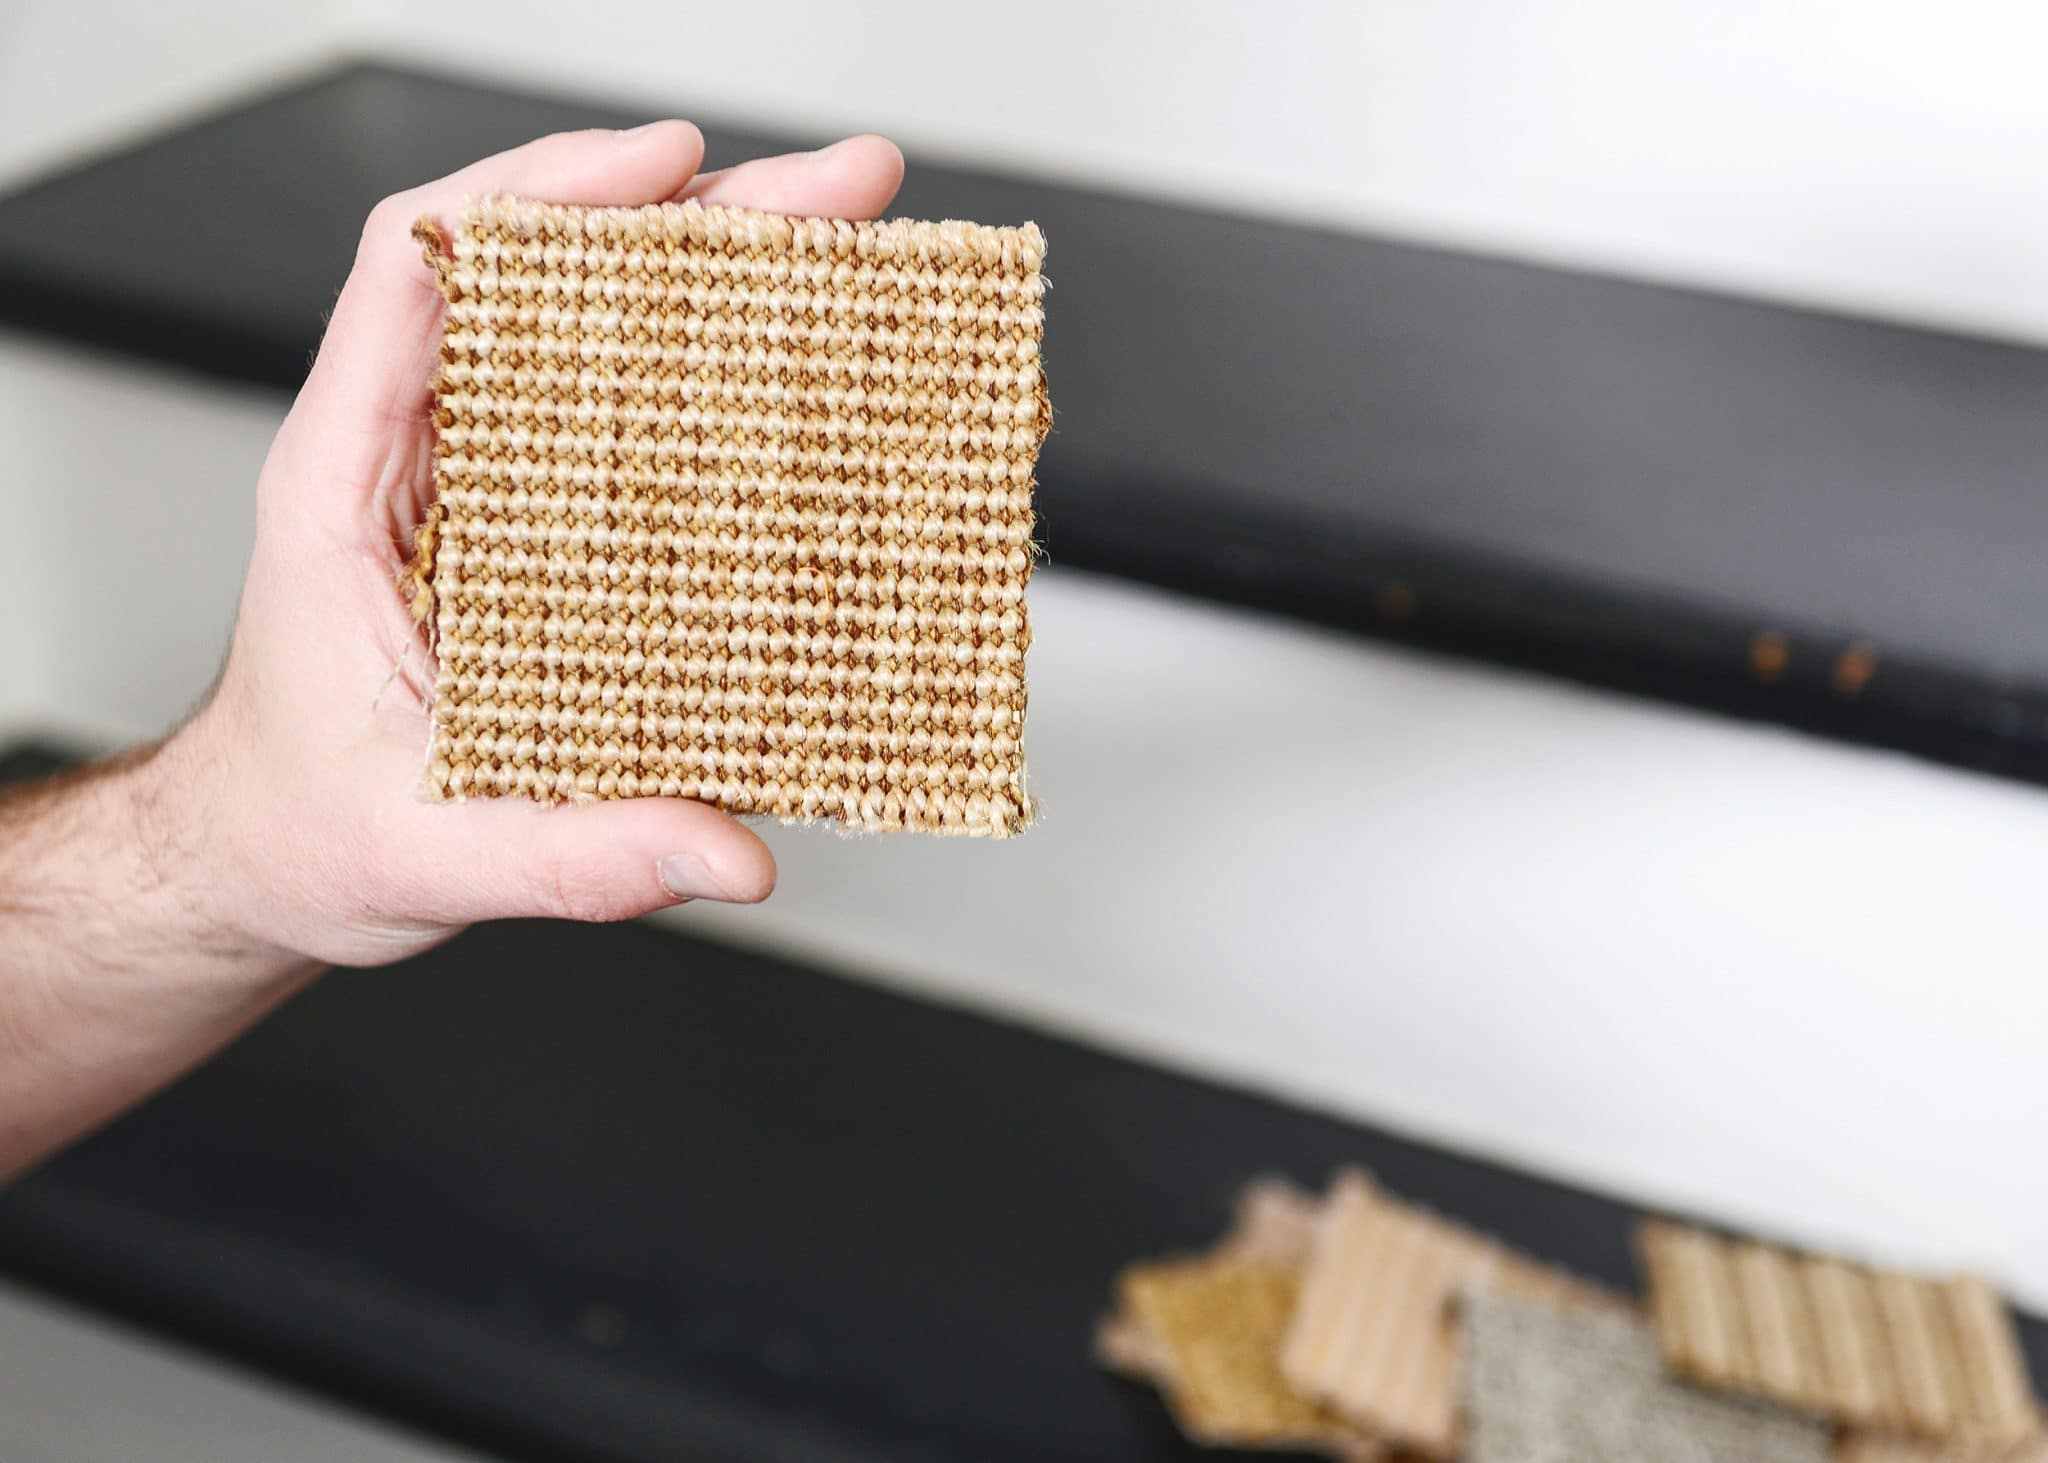
First things first, we ordered swatches. We wanted to keep a more traditional look, bearing in mind durability and upkeep. We’ve ordered rugs from Sisal Rugs Direct in the past, and we’ve had great luck, so we turned to them first. We gathered at least 10 sample swatches from their faux sisal indoor/outdoor line, and we landed on the color Belize Dune with a Granola cotton border. The faux sisal is durable enough for outdoor use, easy to clean and comfortable on bare feet, so we felt great with this material for the longevity of our stair runner! When placing our order, we decided on a 28″ width, which would leave a 3″+ exposure on each side.
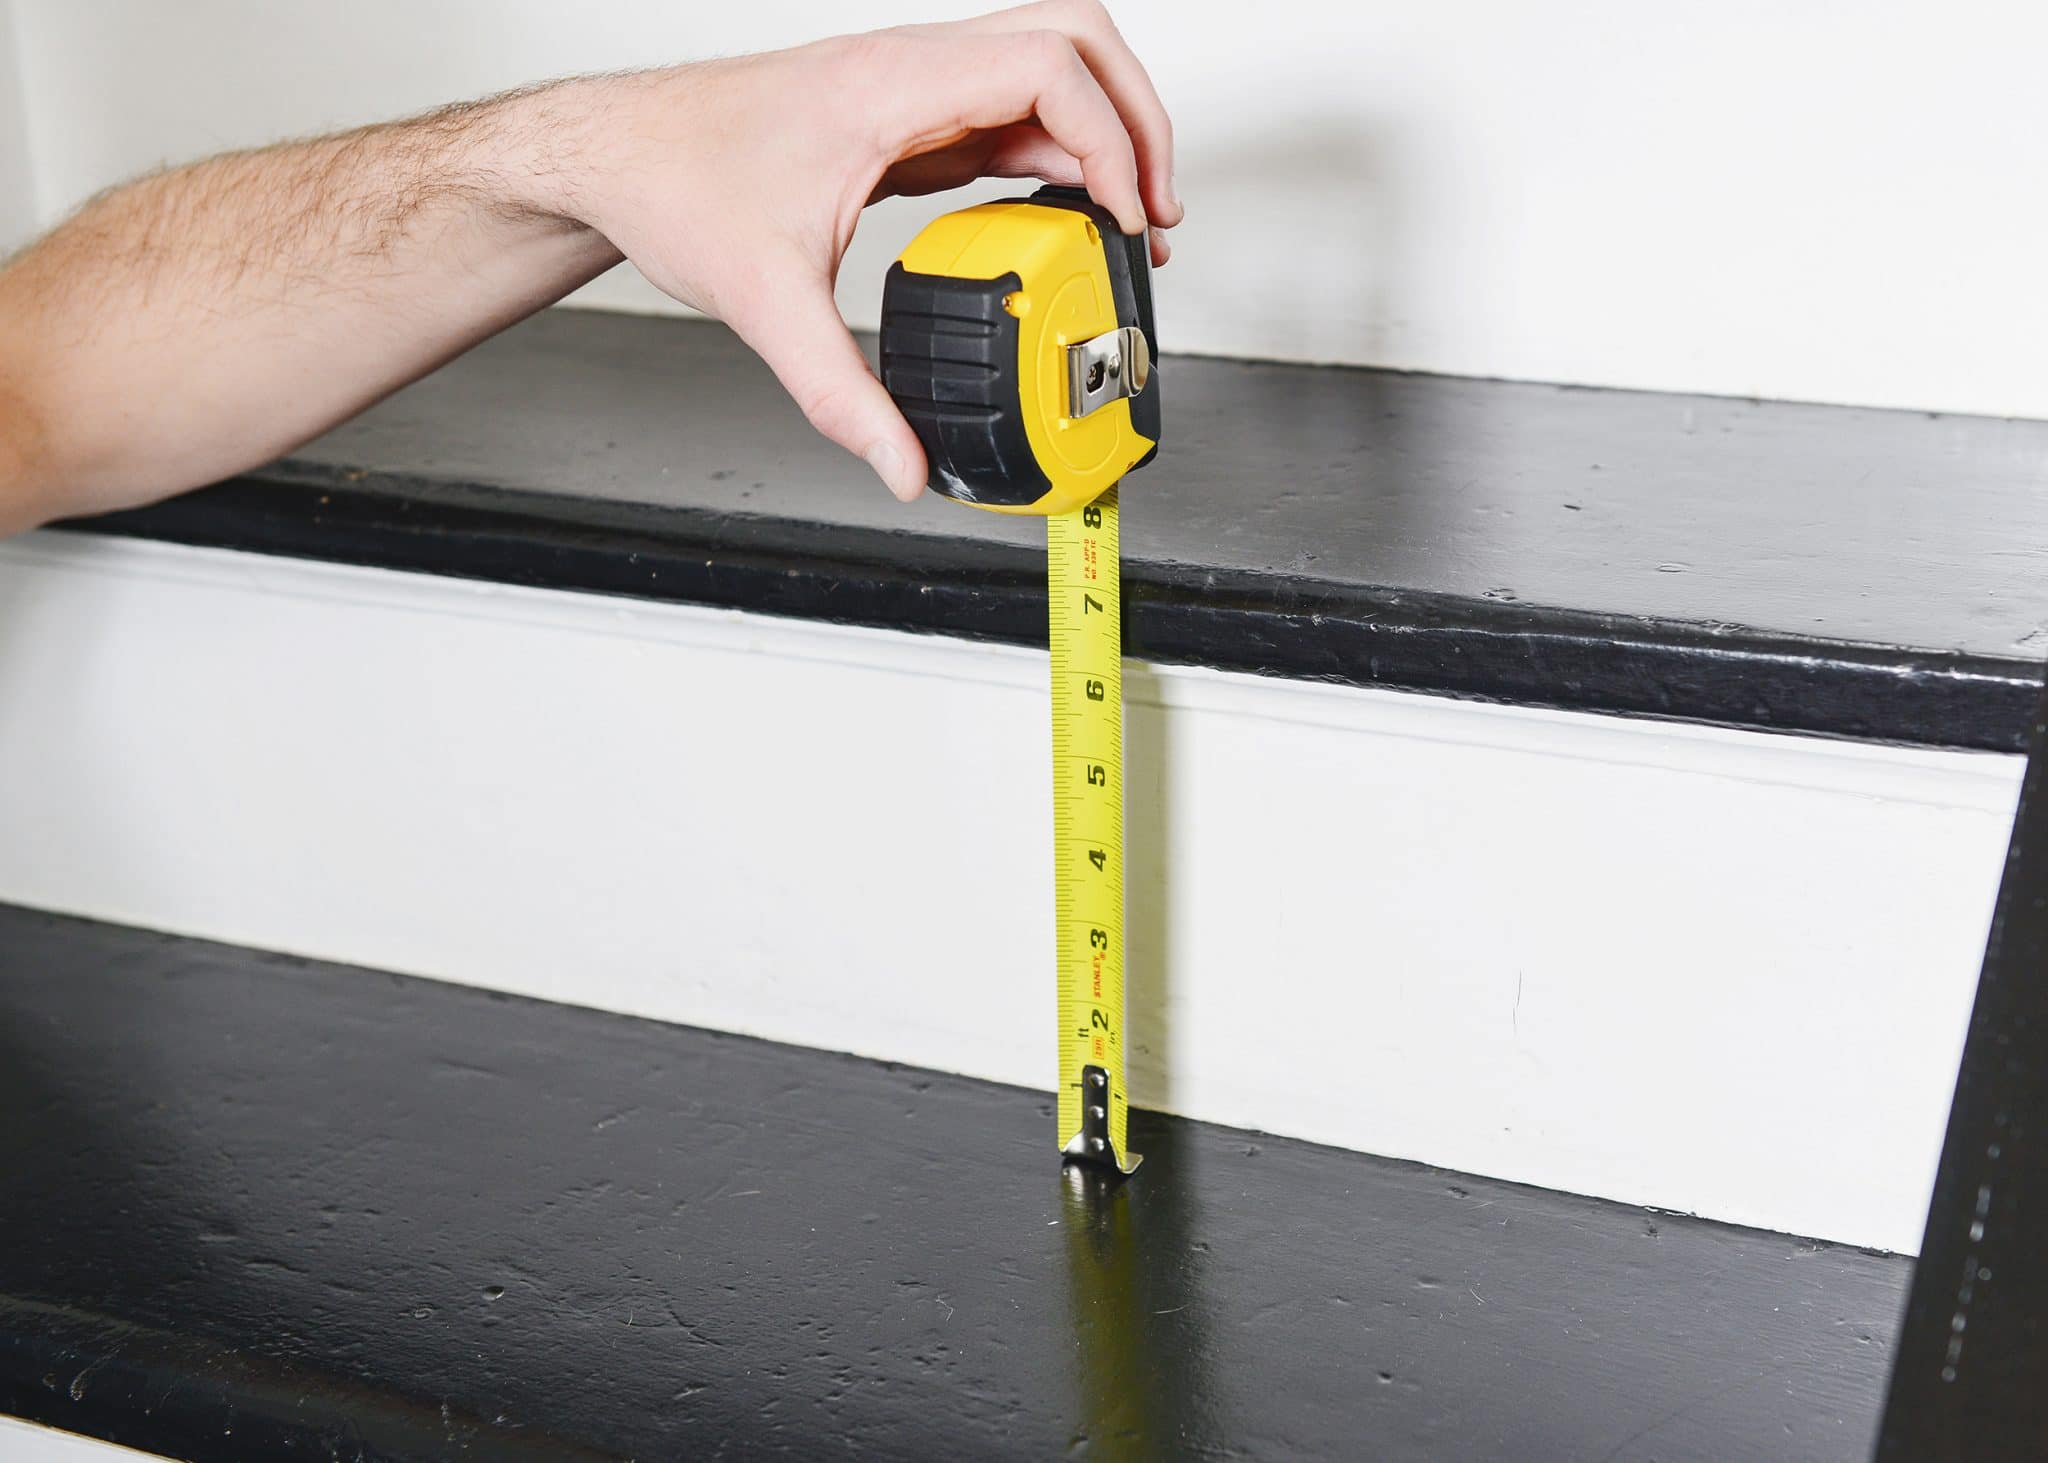
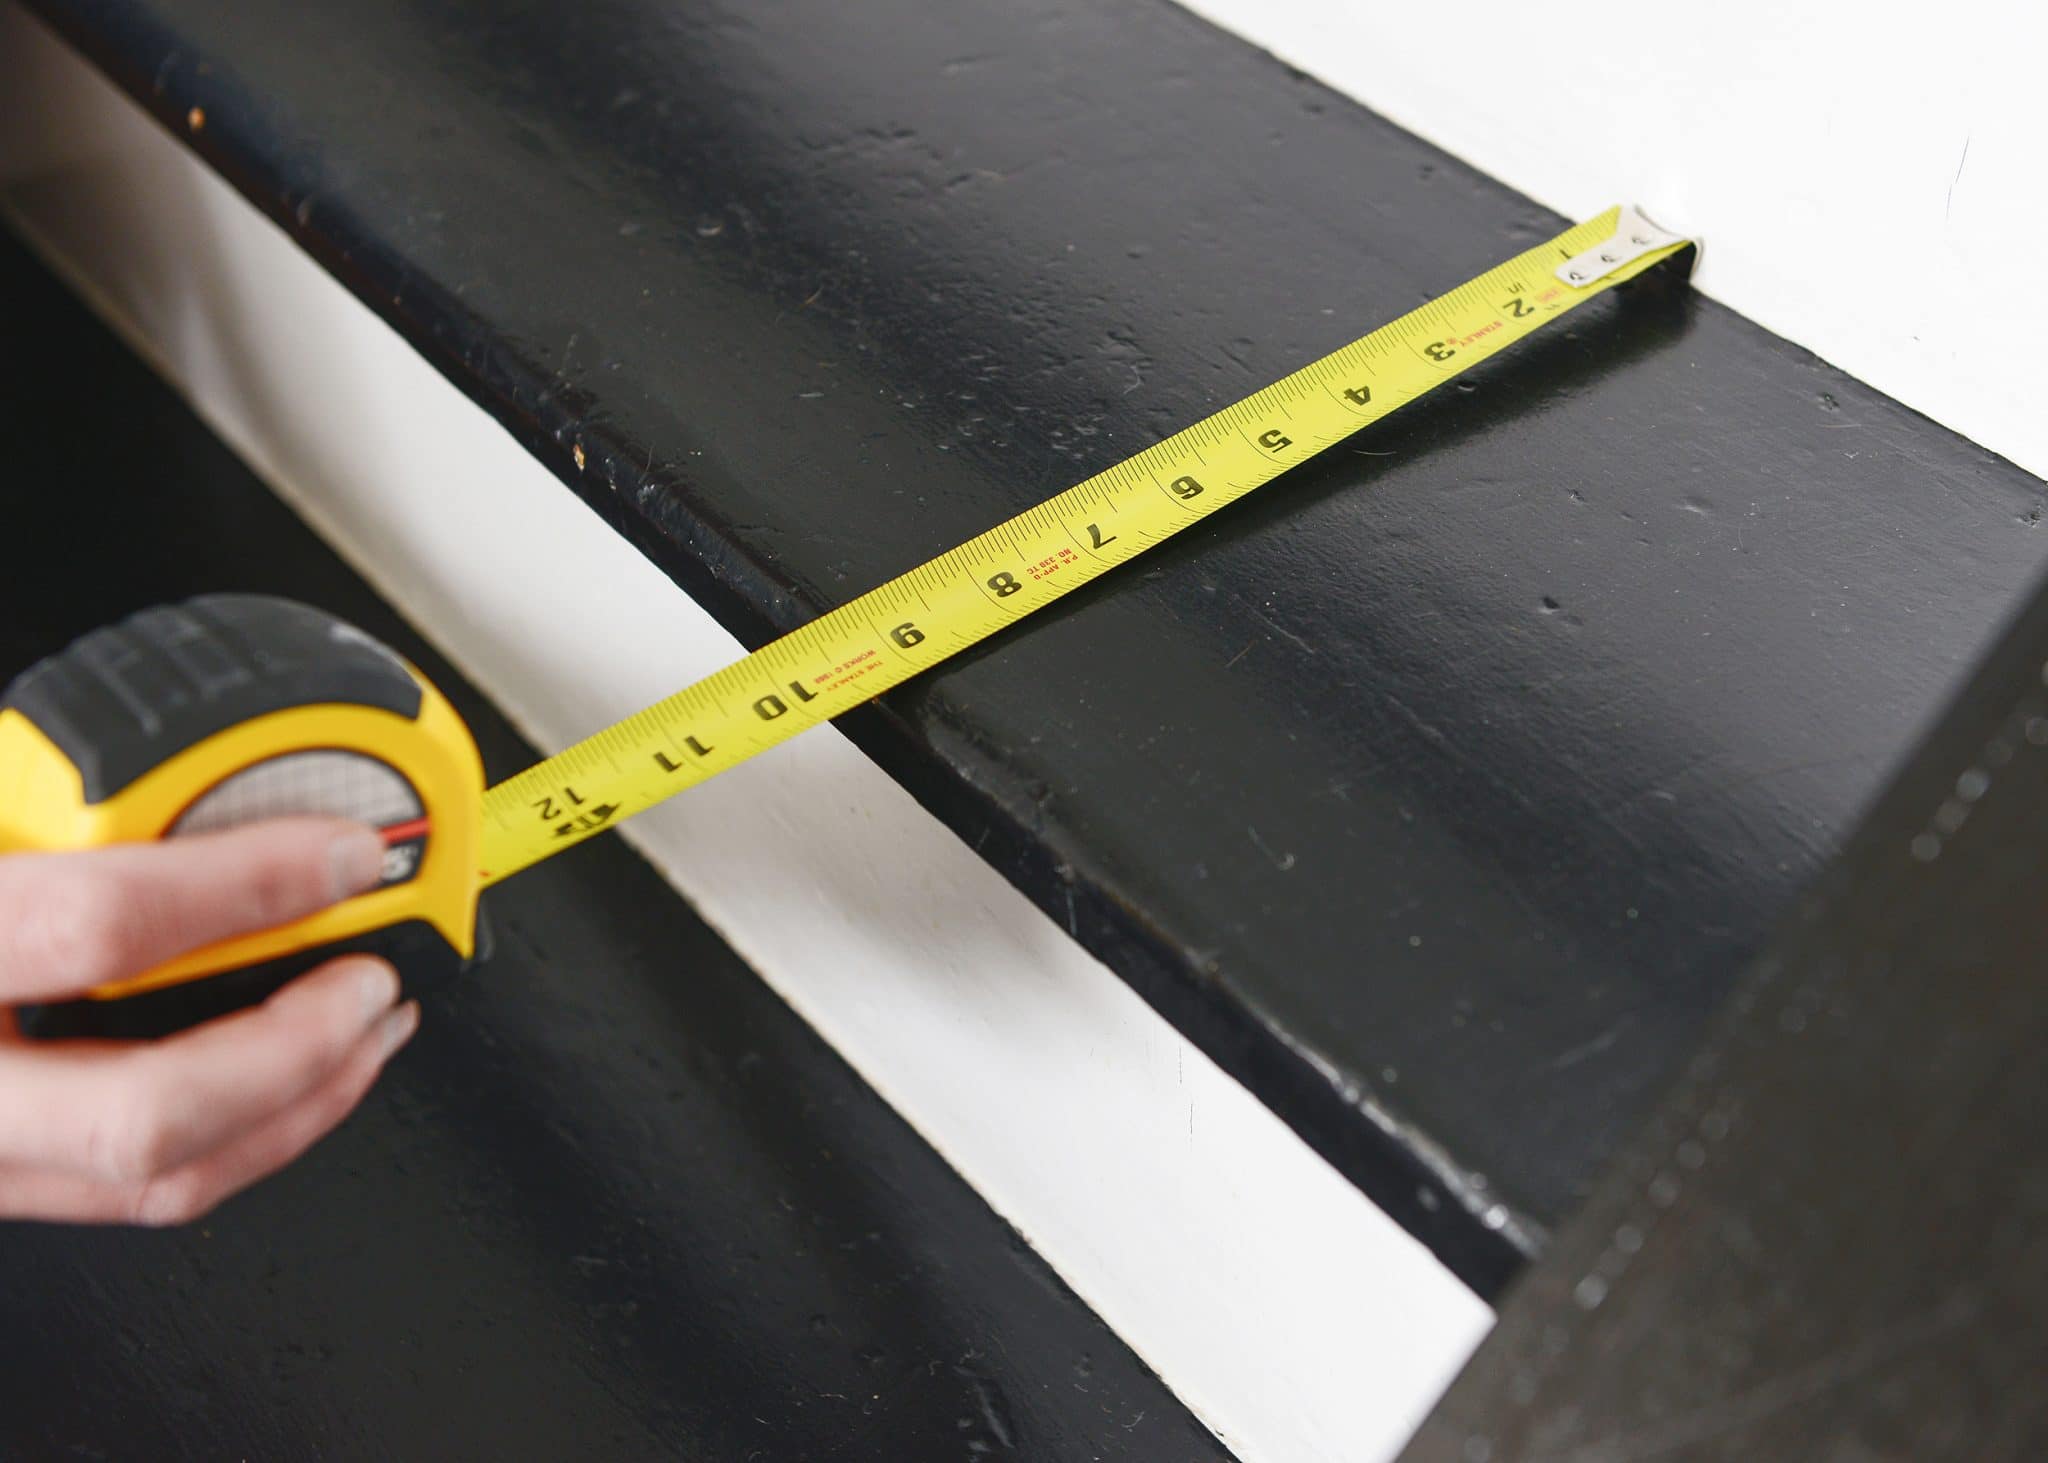
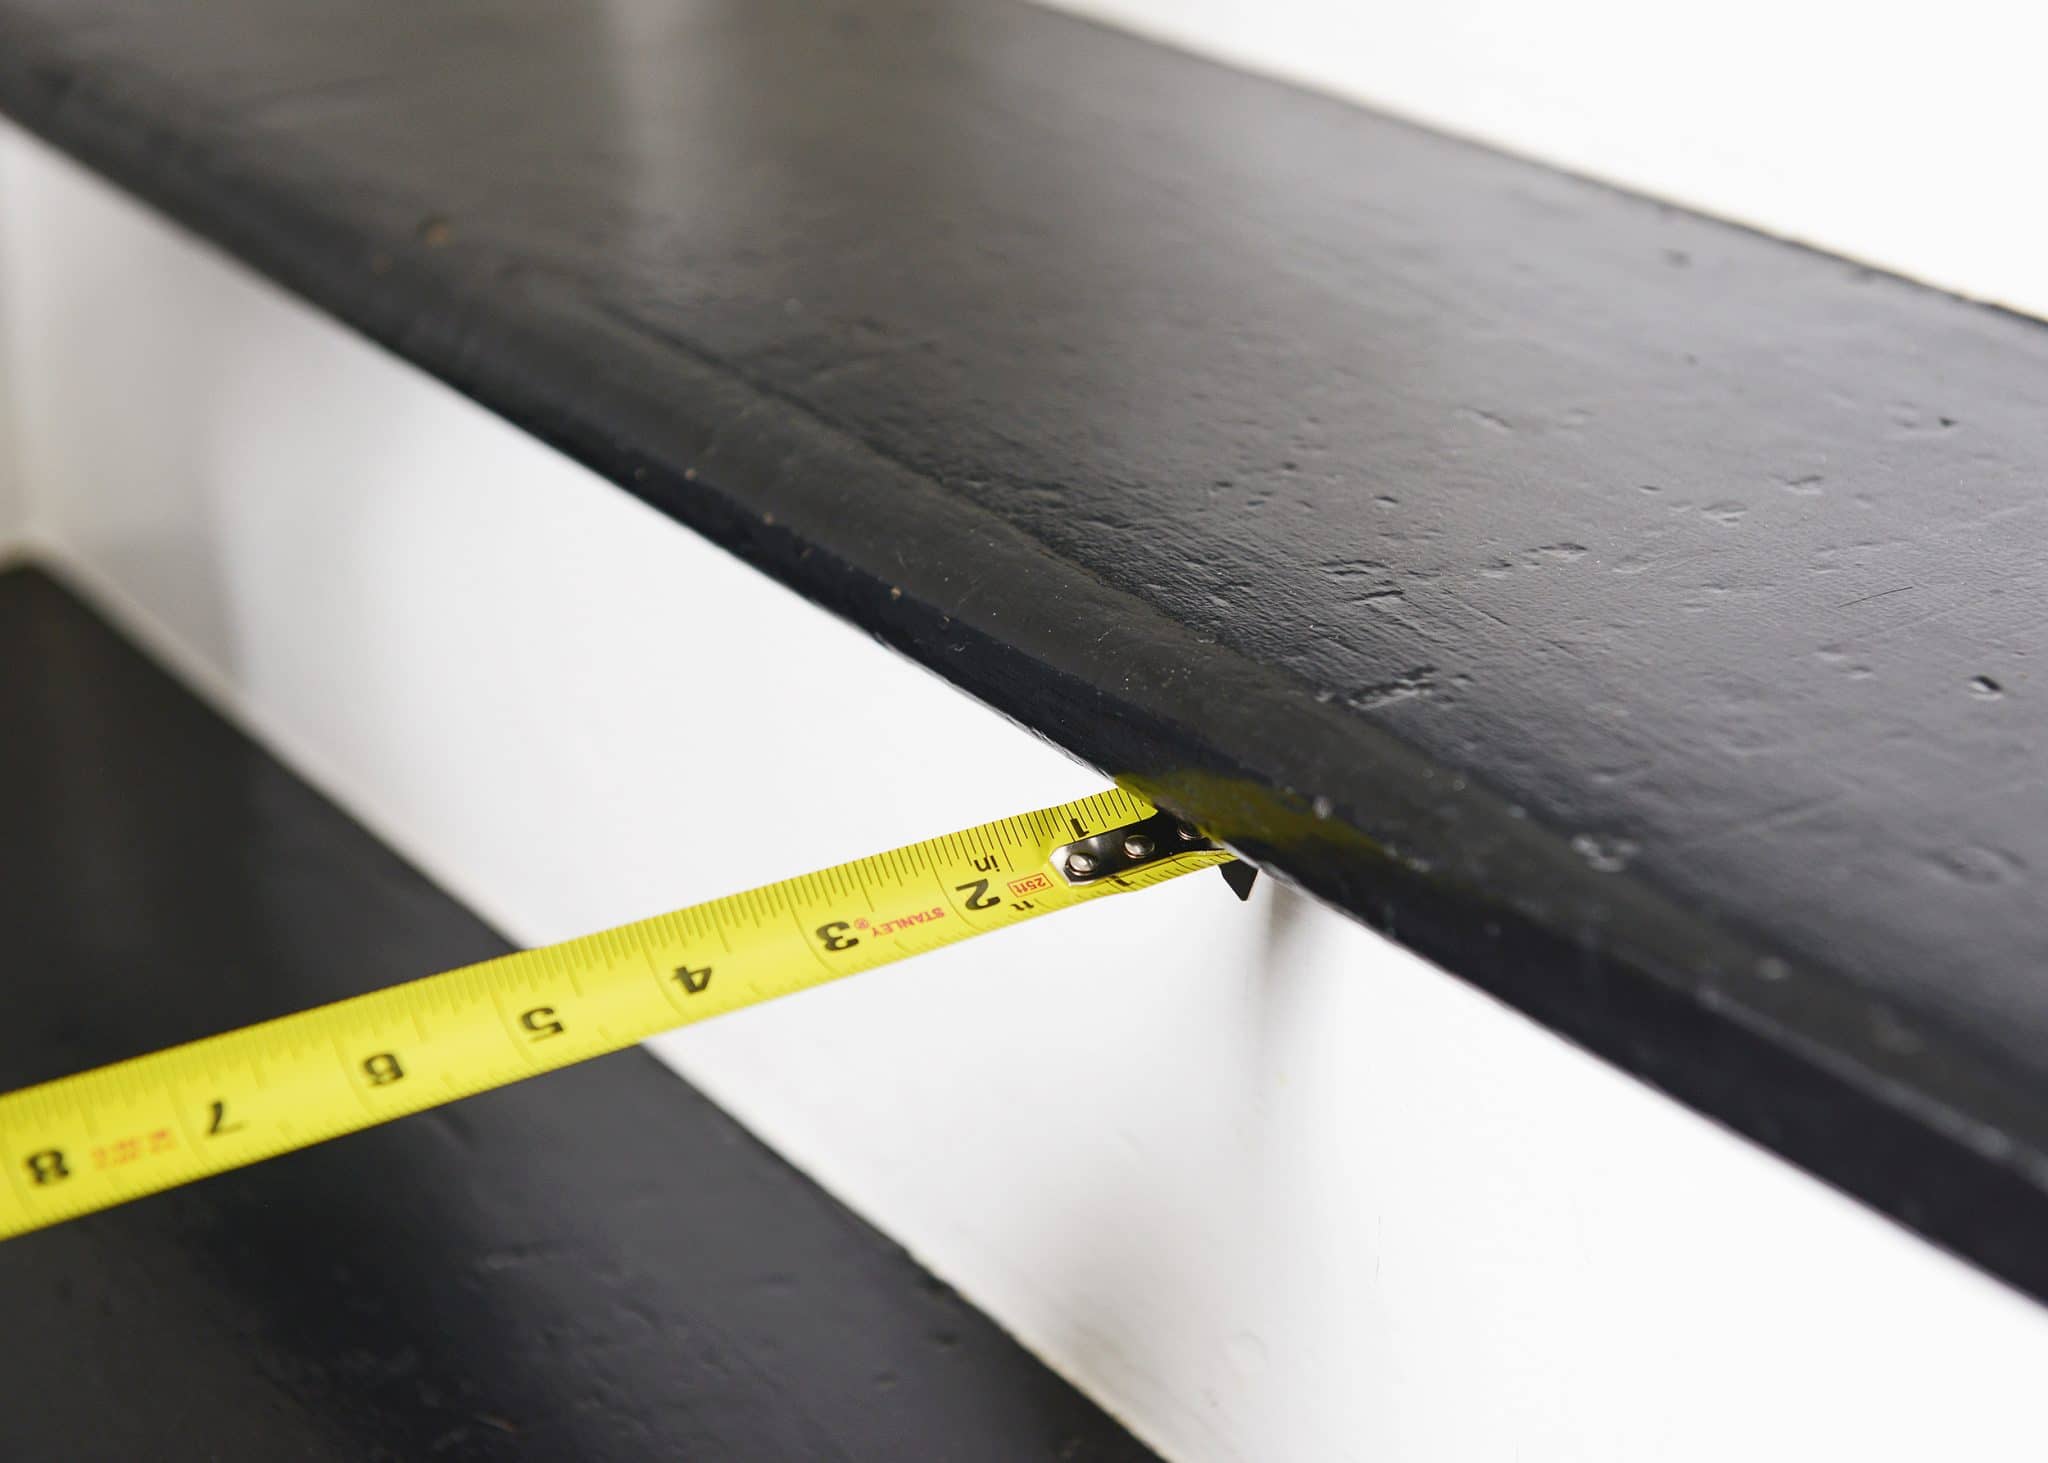
2| Measure for runner length
To determine the length of runner needed, we took 3 measurements: The depth of the treads (the run), the height of the riser (the rise) and the depth of the bull nose. We multiplied that by our number of stairs, and we added an additional foot as a precaution. We would be installing the runner so that the rug would hug each bull nose, and that extra foot of rug put our minds at ease. We were able to order the exact width and length of our choosing from Sisal Rugs, which is another reason we were happy to choose them! Our final measurement was 300″ long by 28″ wide.
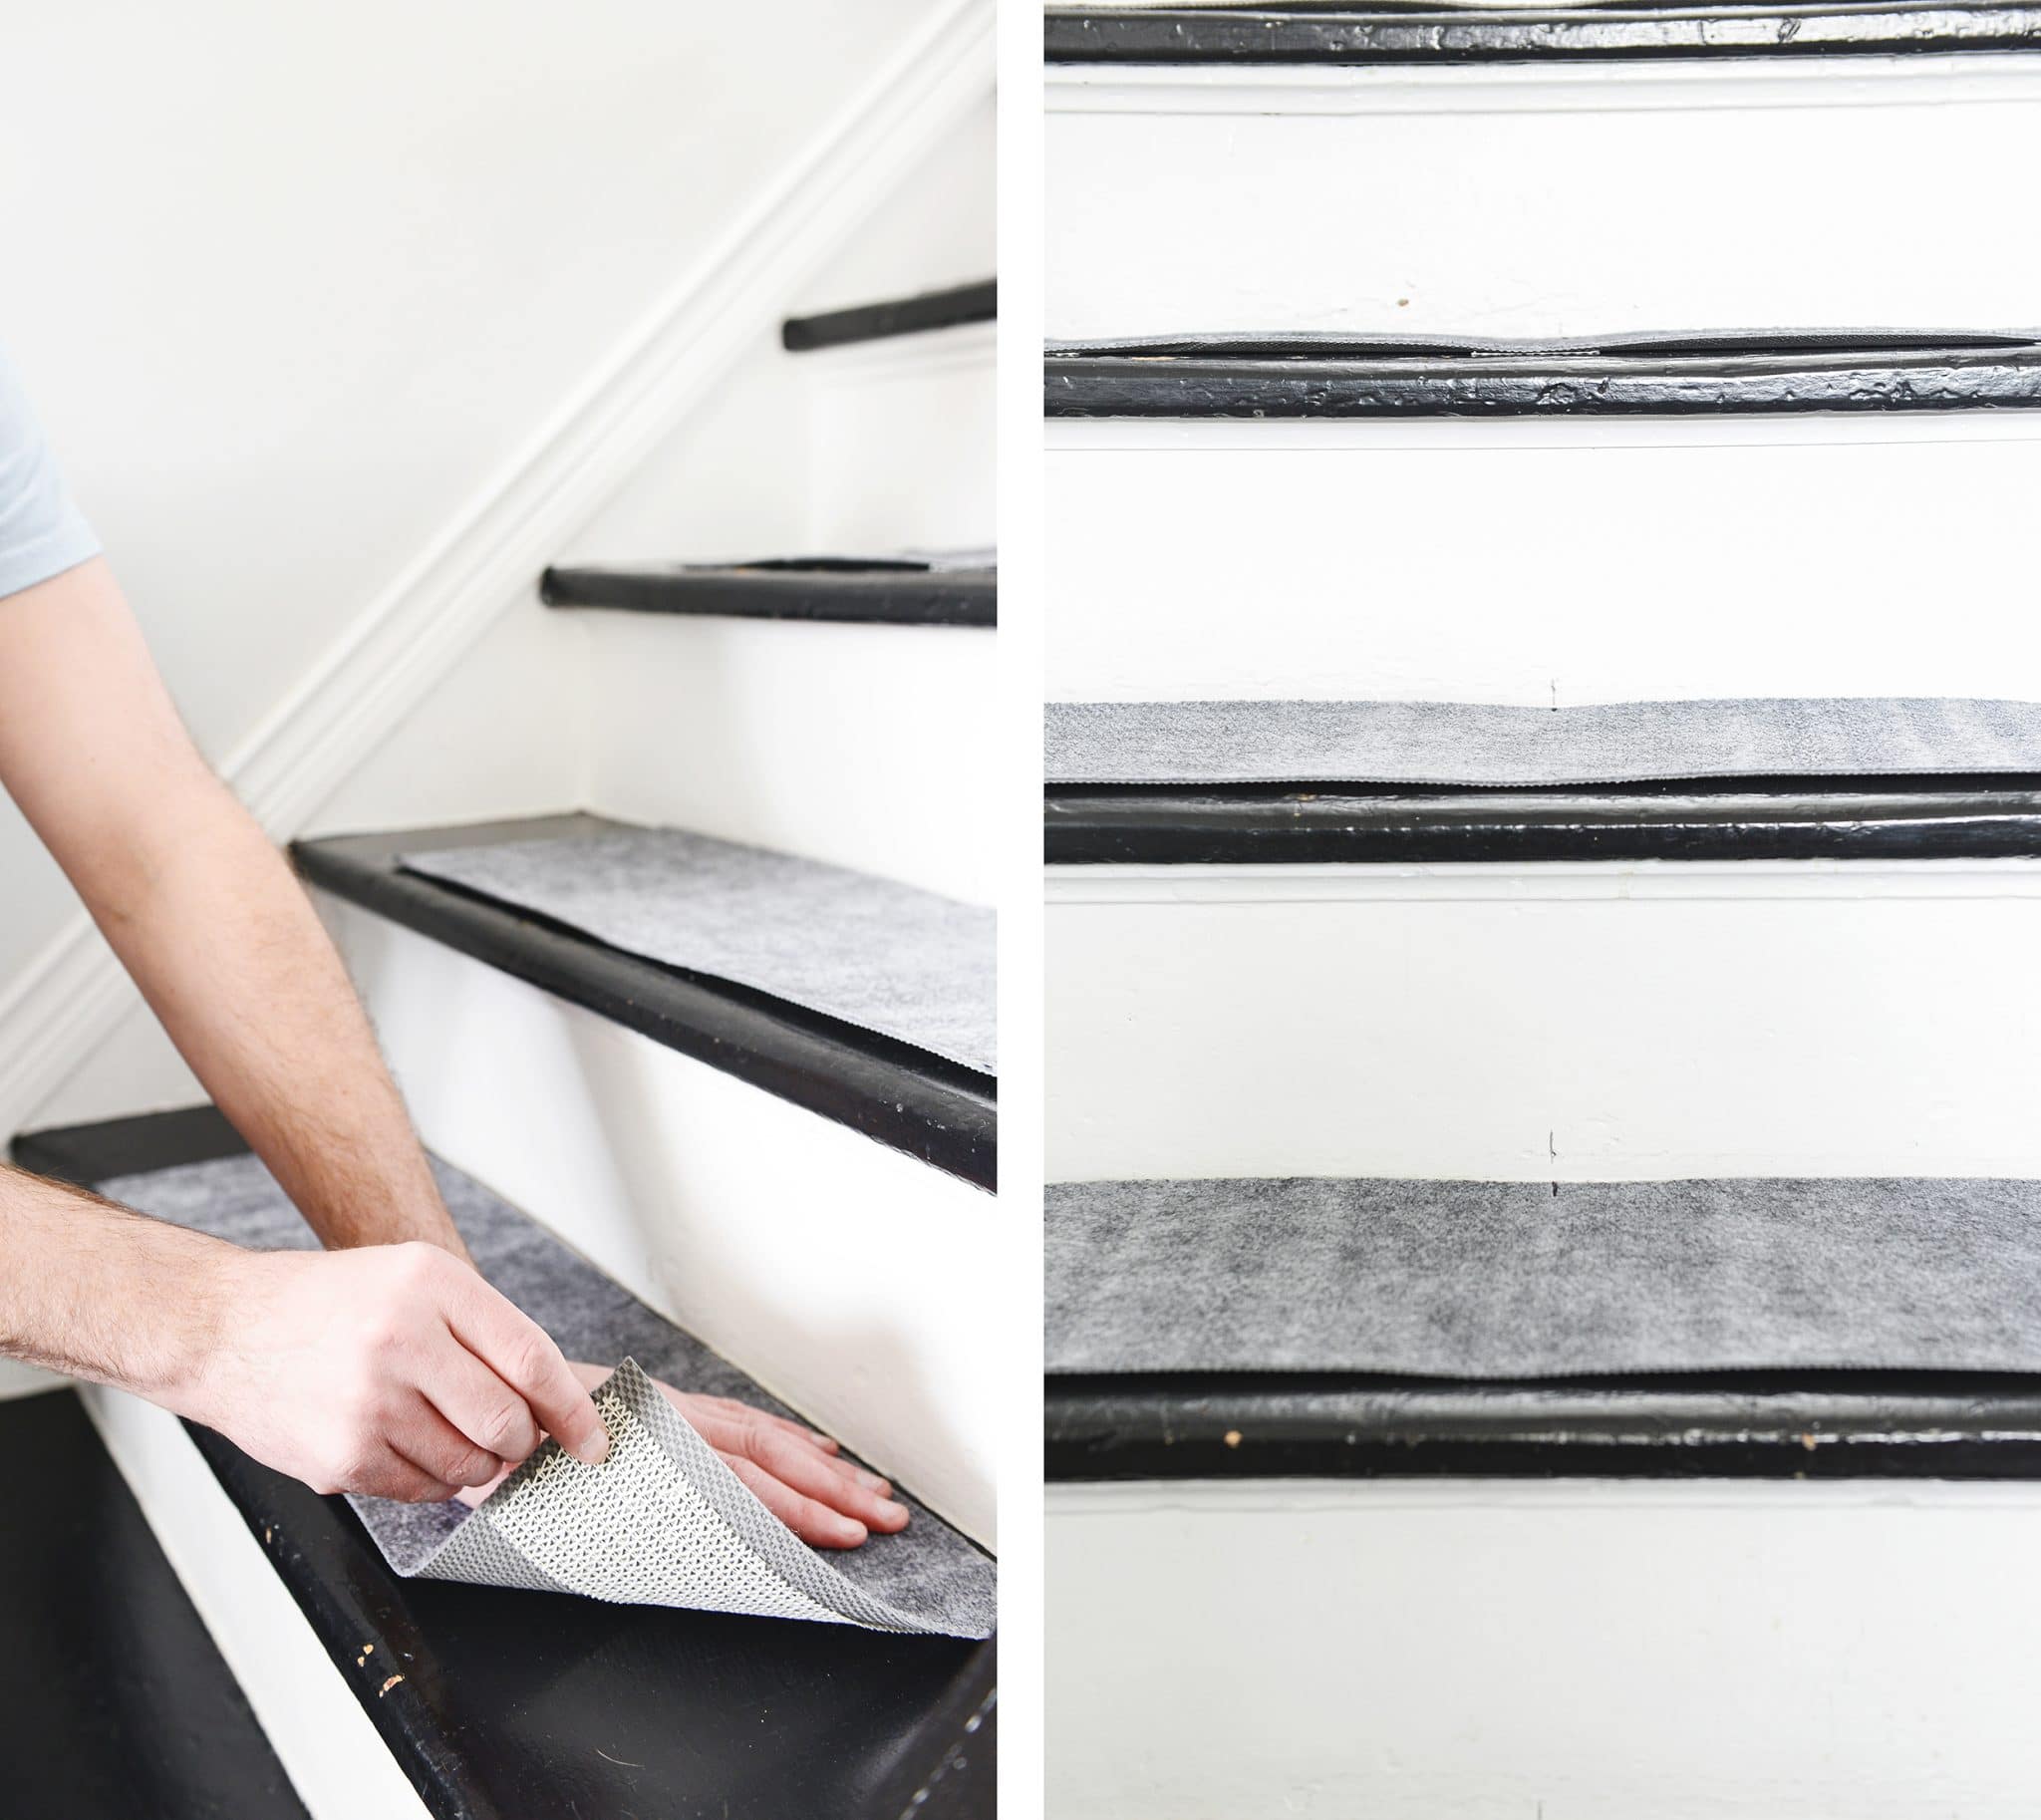
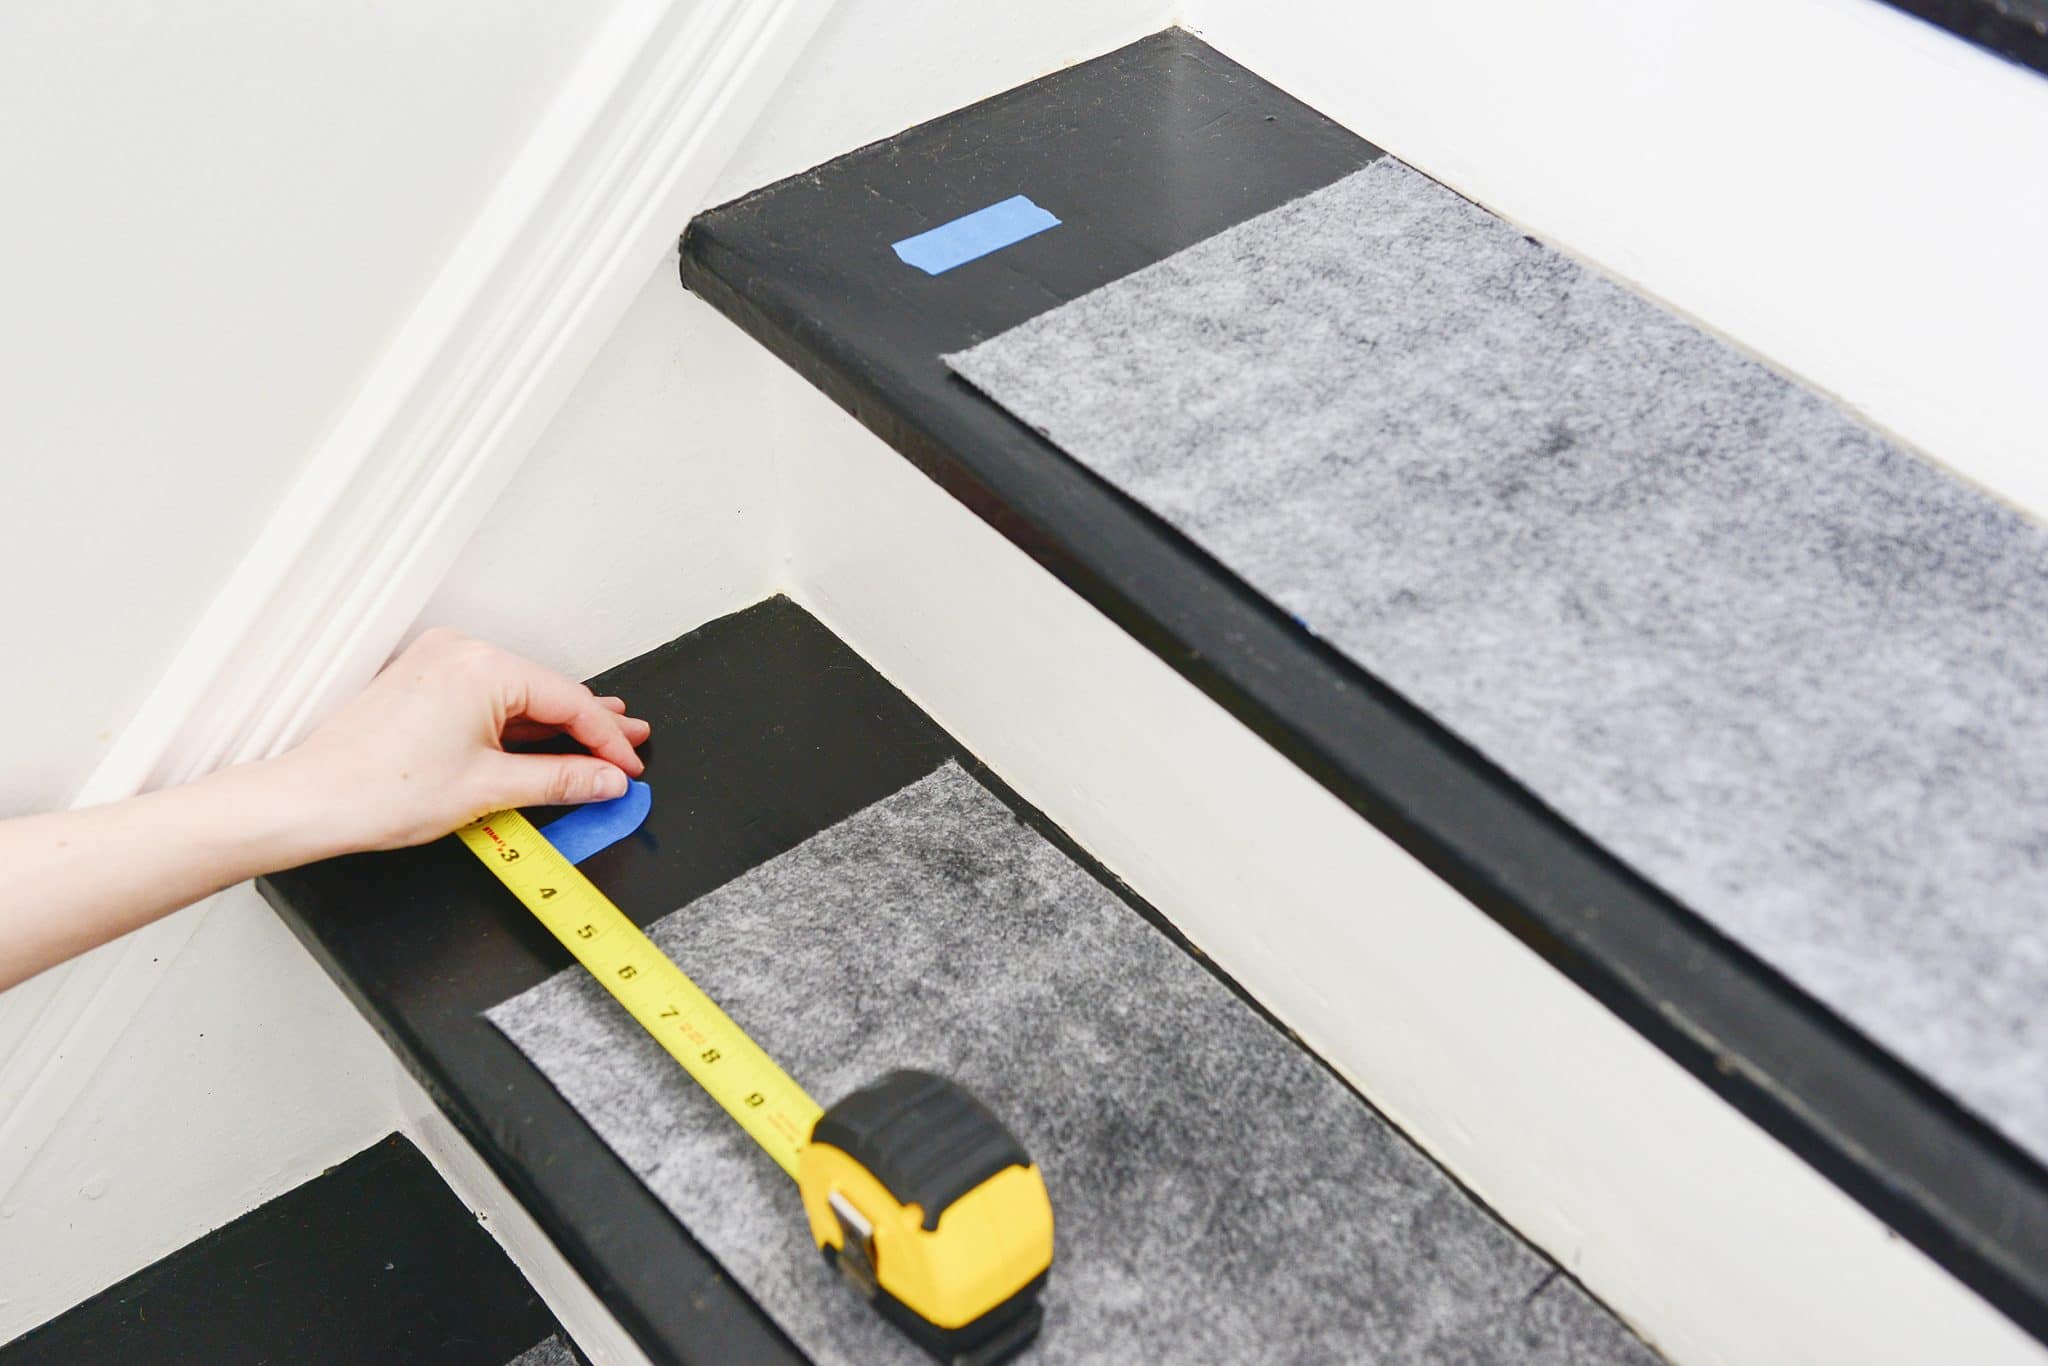
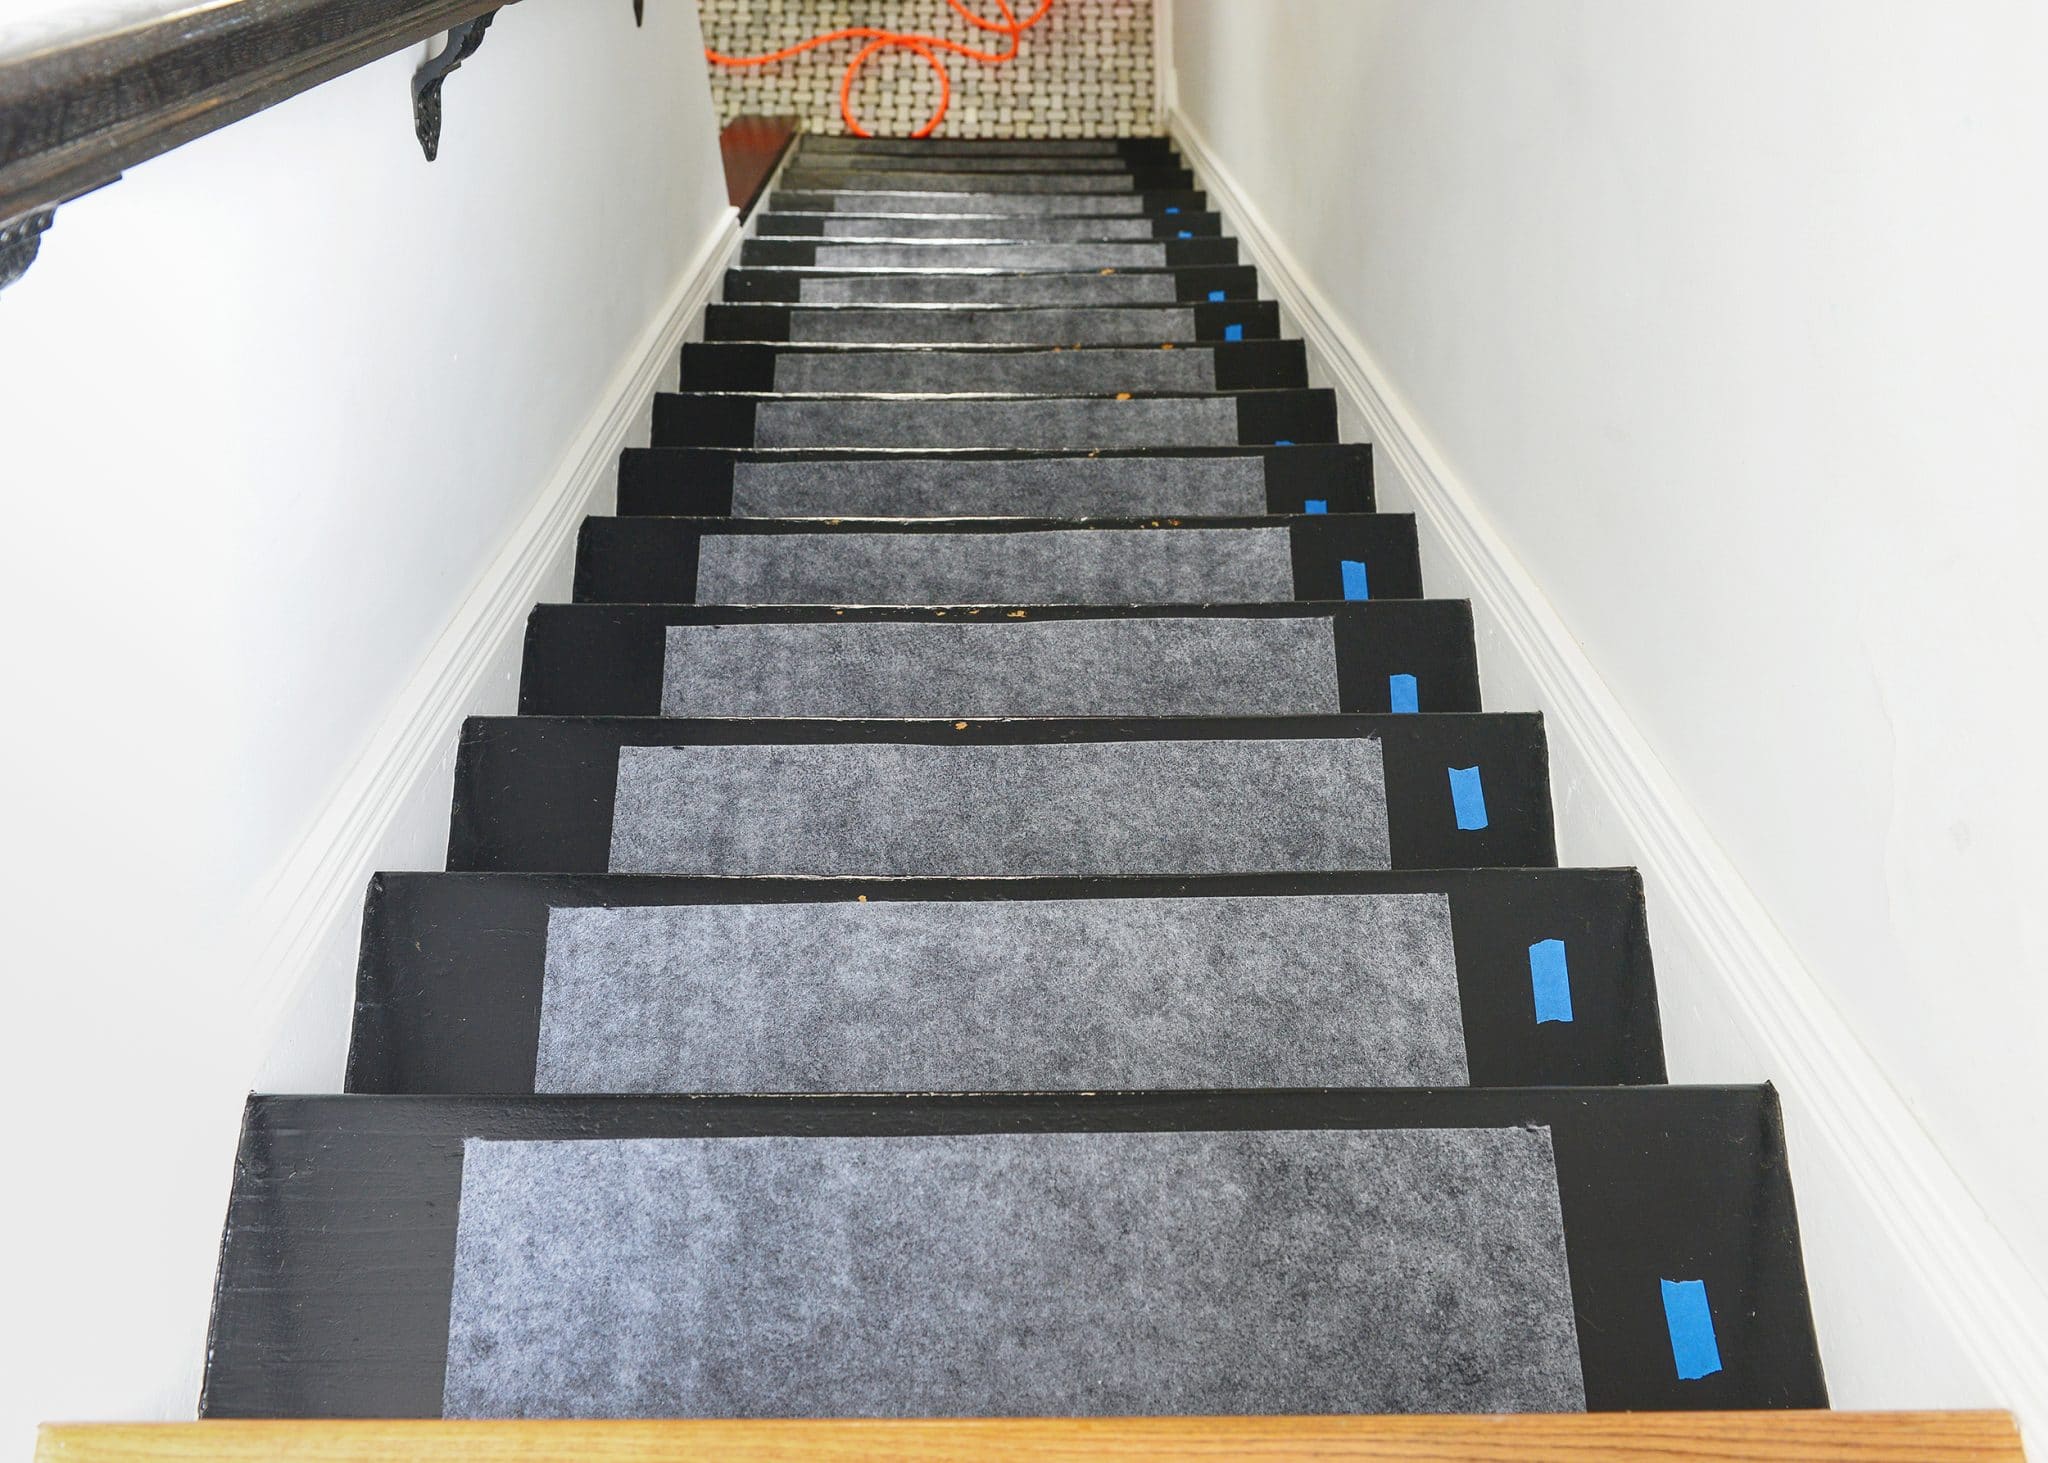
3| Add a rug pad to every tread
Once our custom runner arrived, it was time to install! Using a pencil, I marked the middle of every riser:

Then we could add our rug pad! Do not skip this step. We purchased this thin rug pad and using sharp fabric scissors, we cut strips of rug pad for every tread. Our treads are 9½” deep, so we cut the pads to 8″ deep. We then adhered them to every stair using this carpet tape, making sure to align the middle of every pad to our pencil marks on the risers.
Tip: Use tape in at least 3 places on the rug pad, such as the left, middle and right. Alternatively, you can tape across the entire top and bottom.
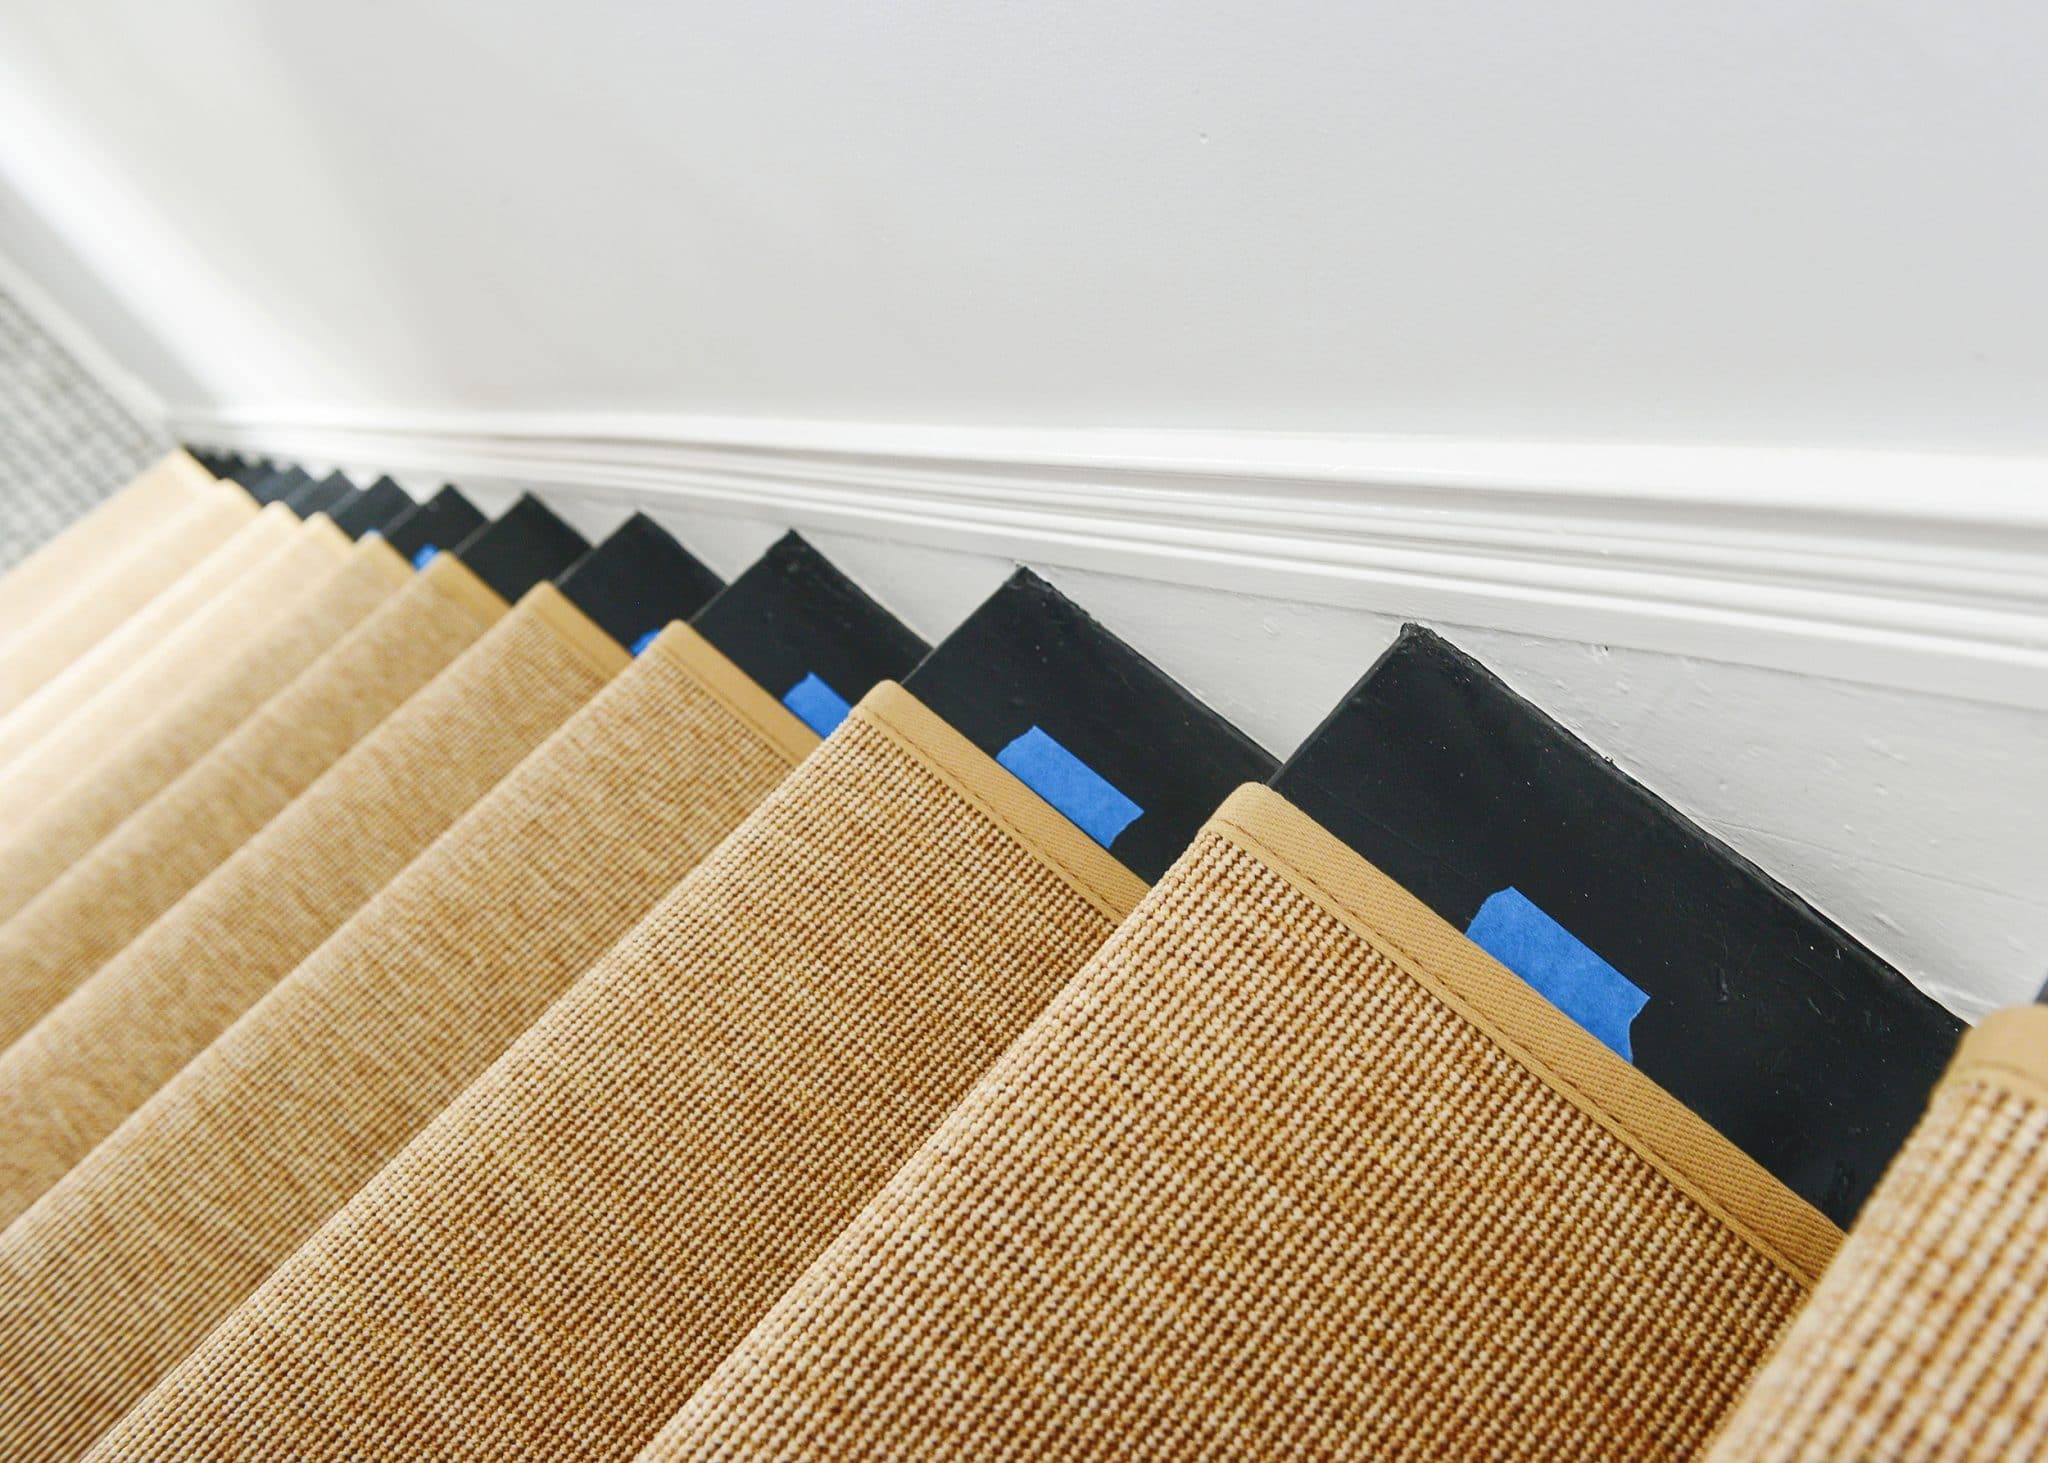
4| Mark the treads with painter’s tape
In our last step before the runner can be installed, we marked with painter’s tape the exact measurement of the outside edge of the runner. For example, our stairs are 34½” wide, and our runner is 28″ wide. We subtracted 28 from 34.5 and divided by 2. This would leave us with a 3 ¼” exposure on each side of the runner, and this is where I placed a strip of tape. That tape would be our very important visual guide.
5| Fold the runner + staple
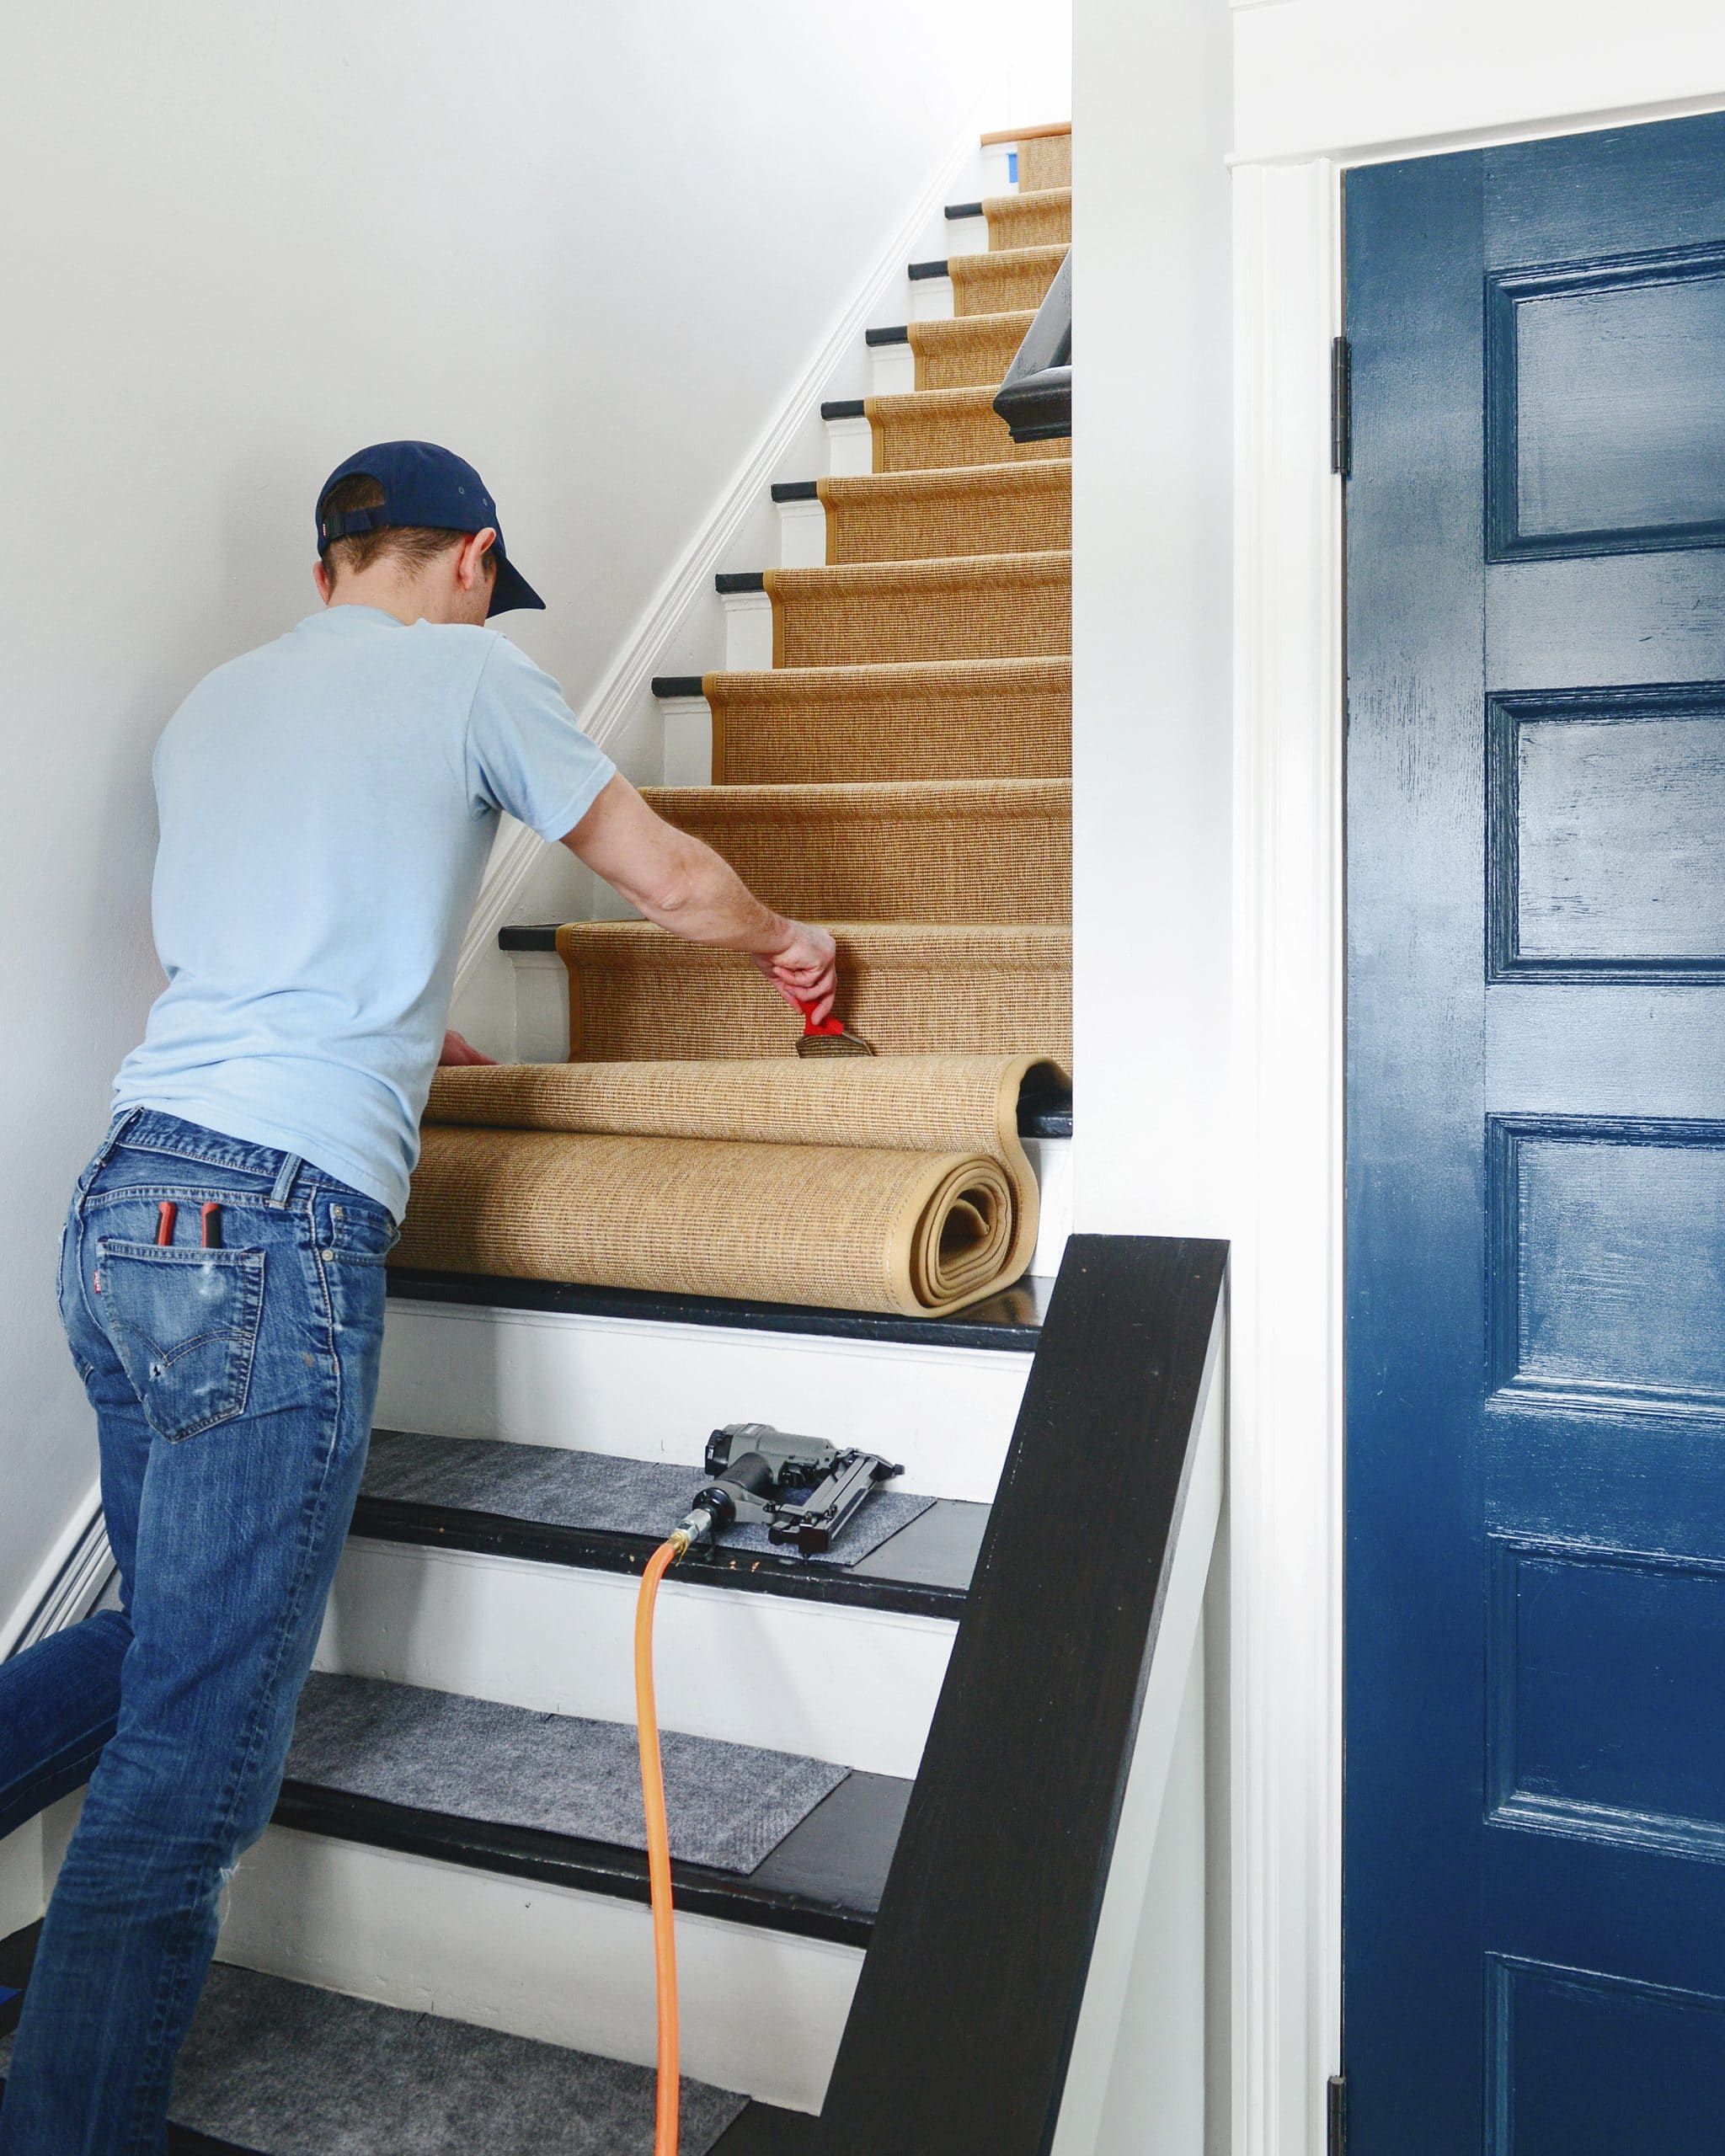
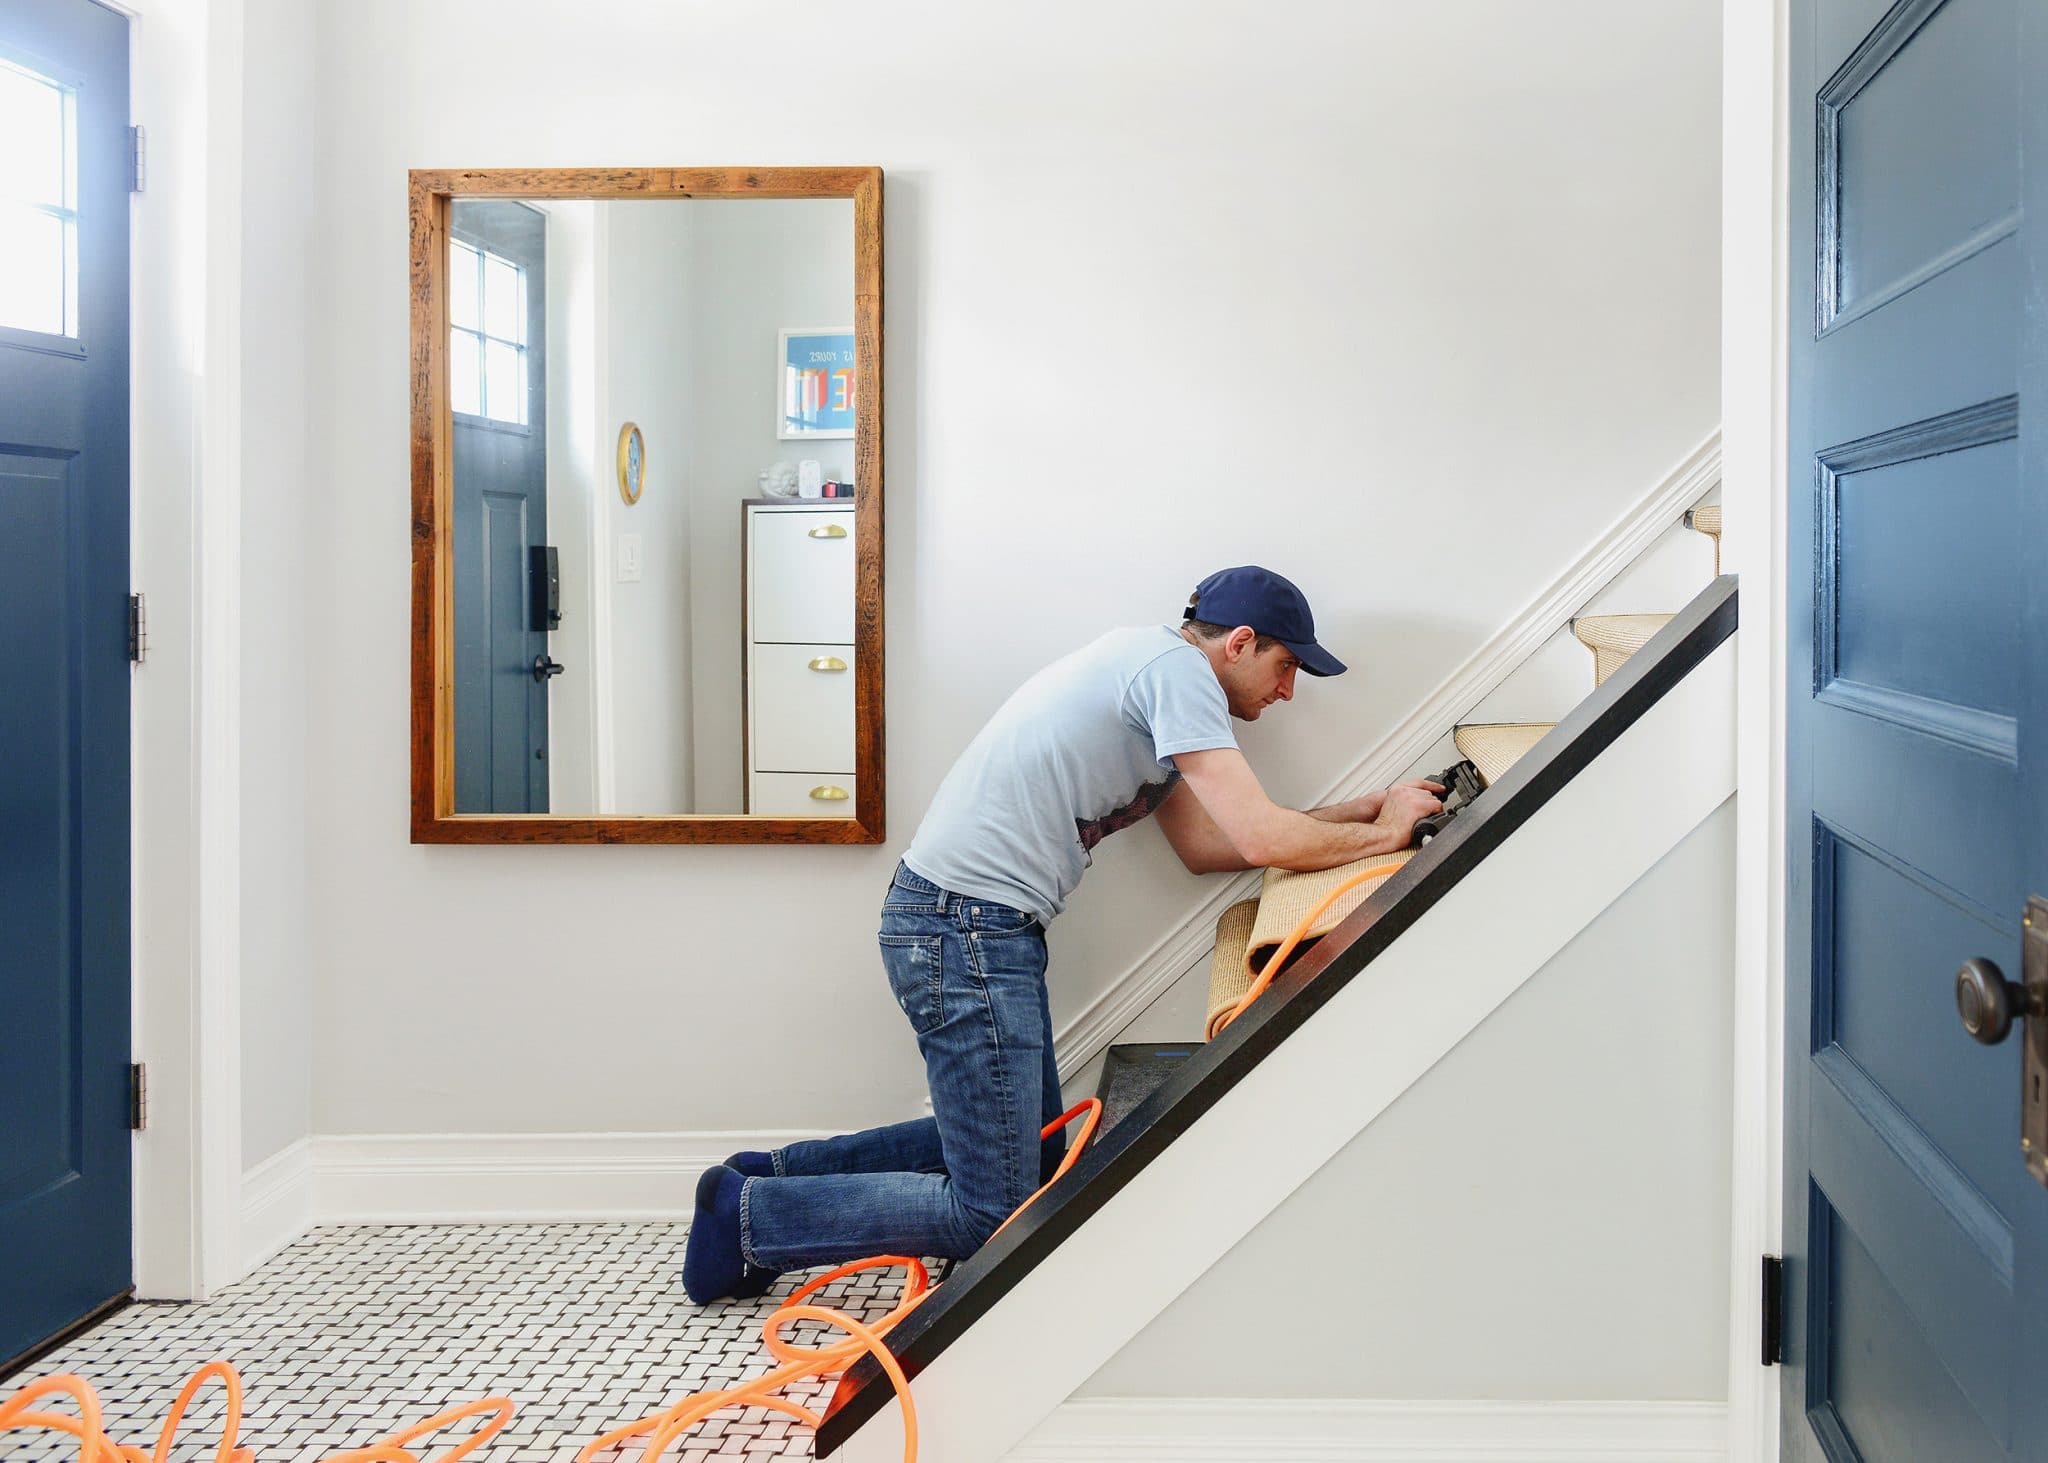
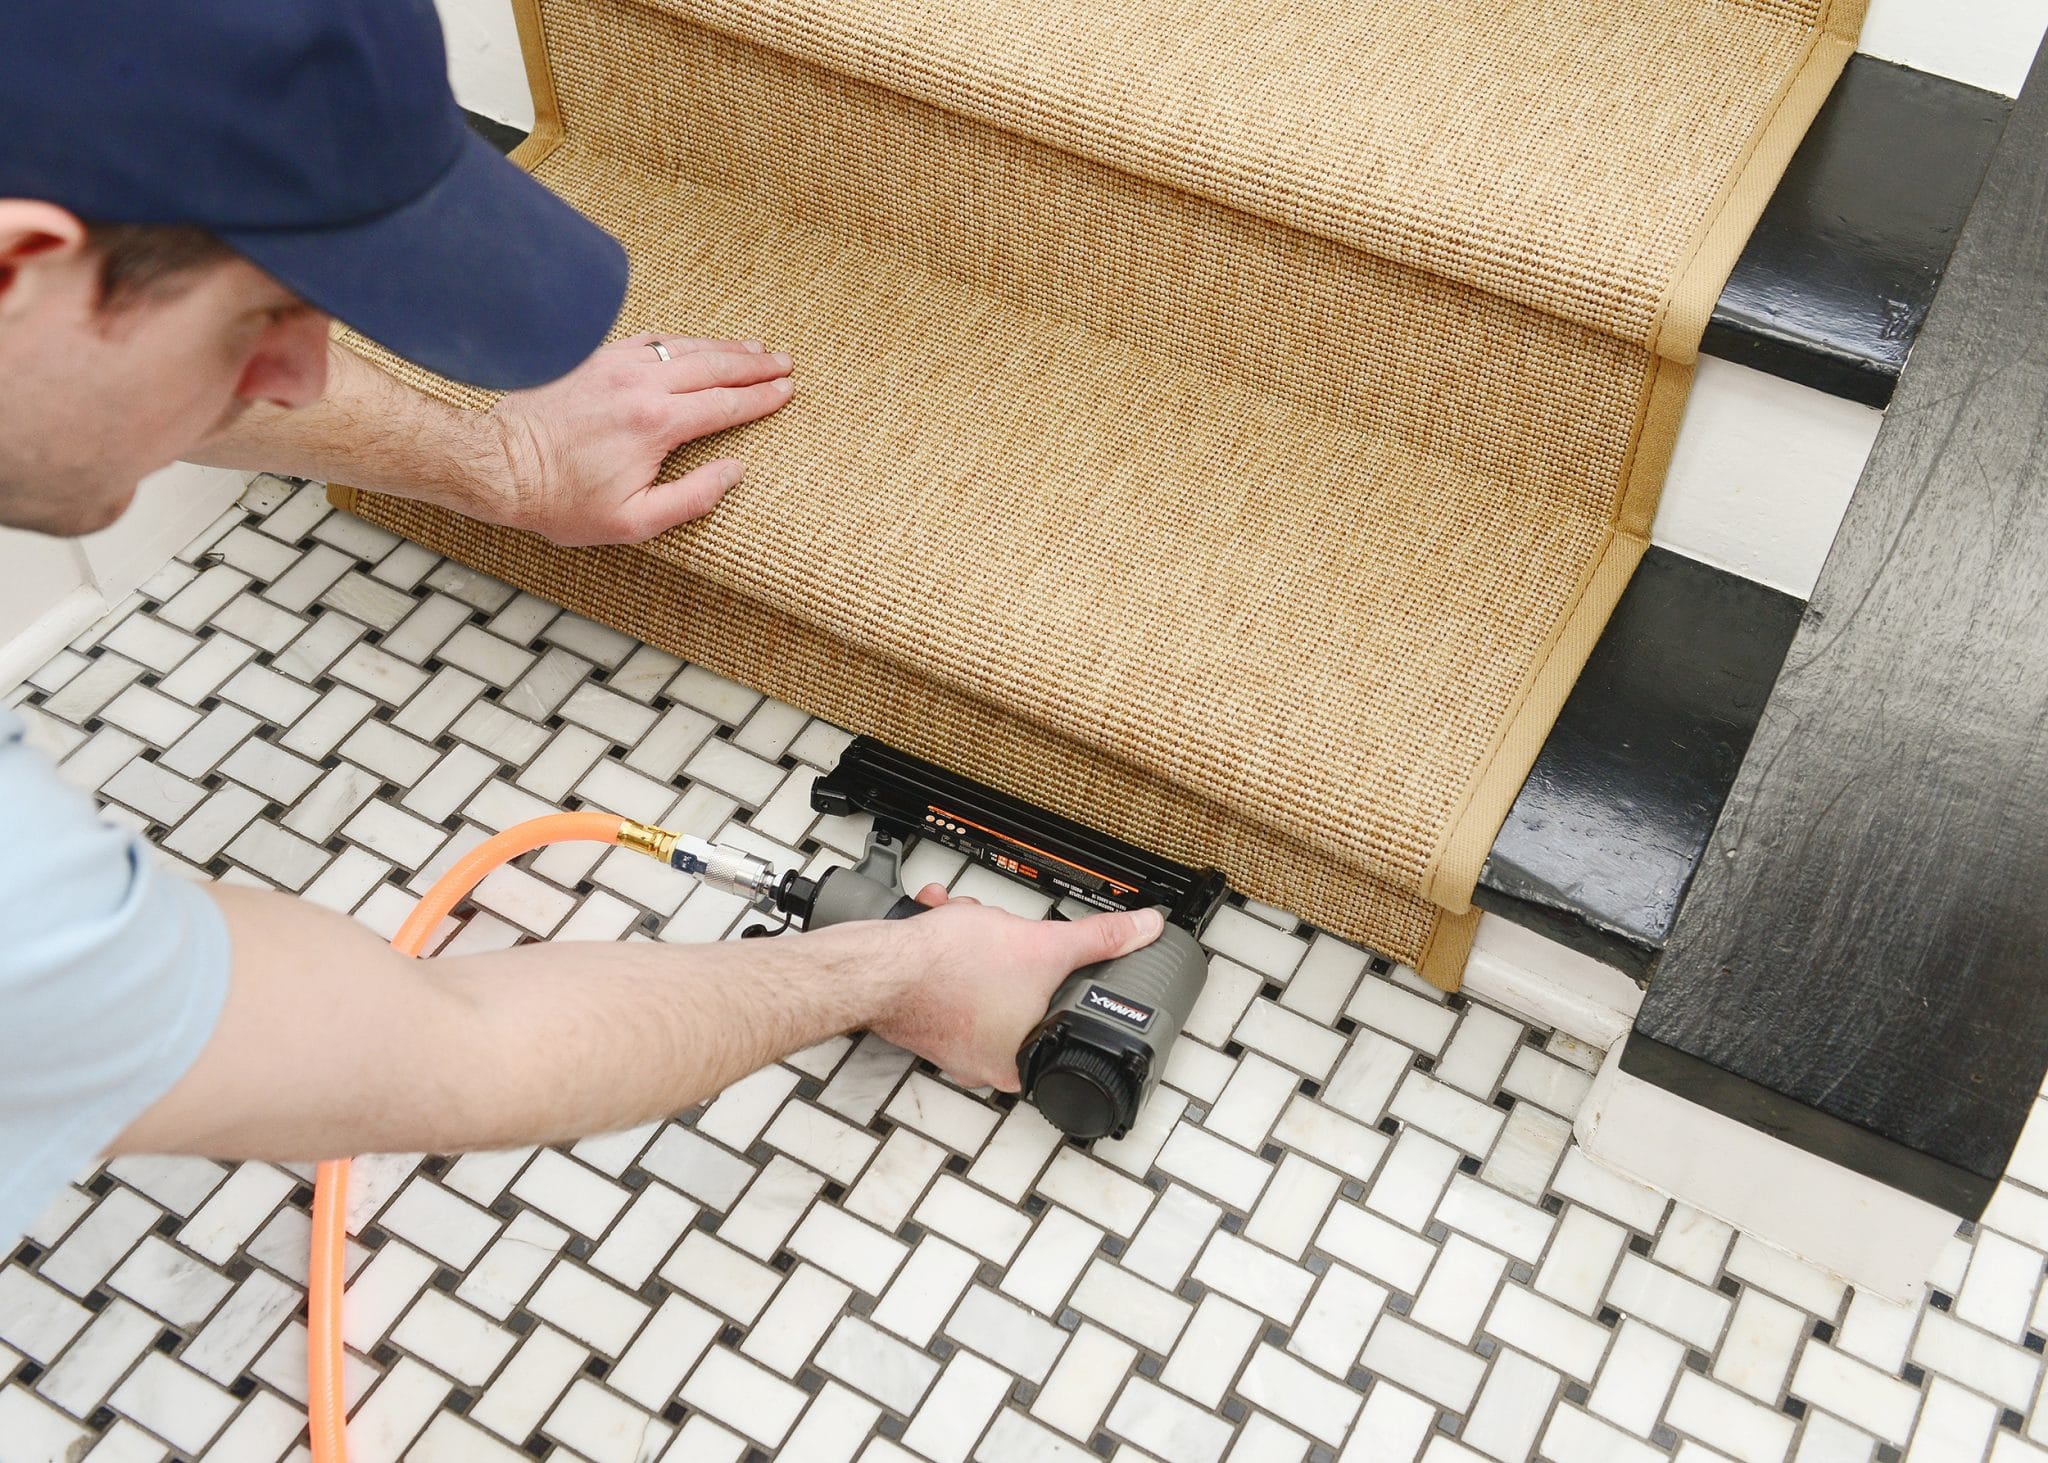
Okay, ready for the fun part? With the setup behind us, it was time to lay down that runner! Scott loaded our staple gun with 1″ staples to start. (We used this staple gun with our air compressor and loved it!) We made a 1″ fold at the start of our runner, and beginning at the top riser, we stapled every 3″ across the runner. One of the more challenging parts was balancing the weight of the rolled up runner.
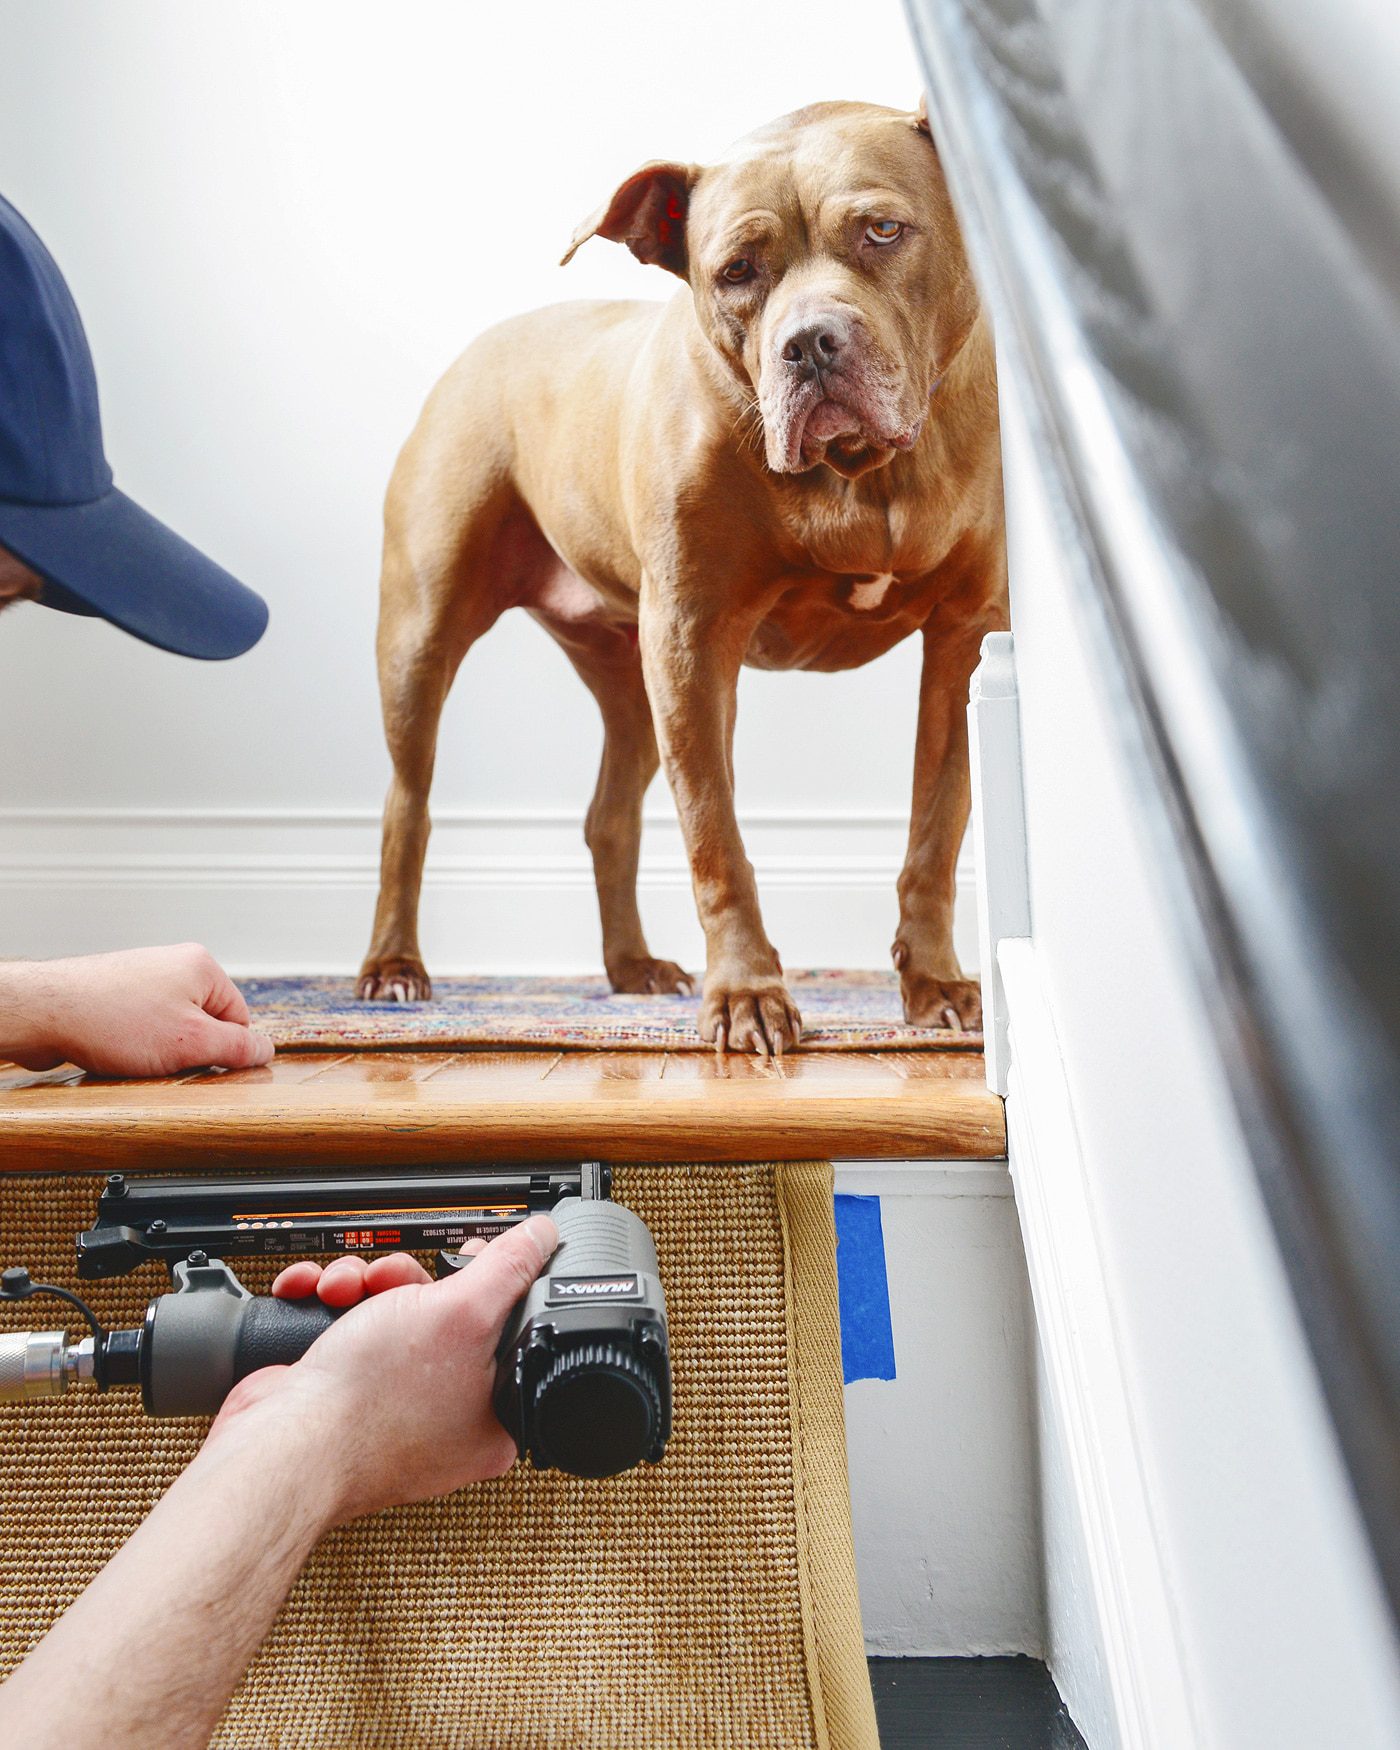
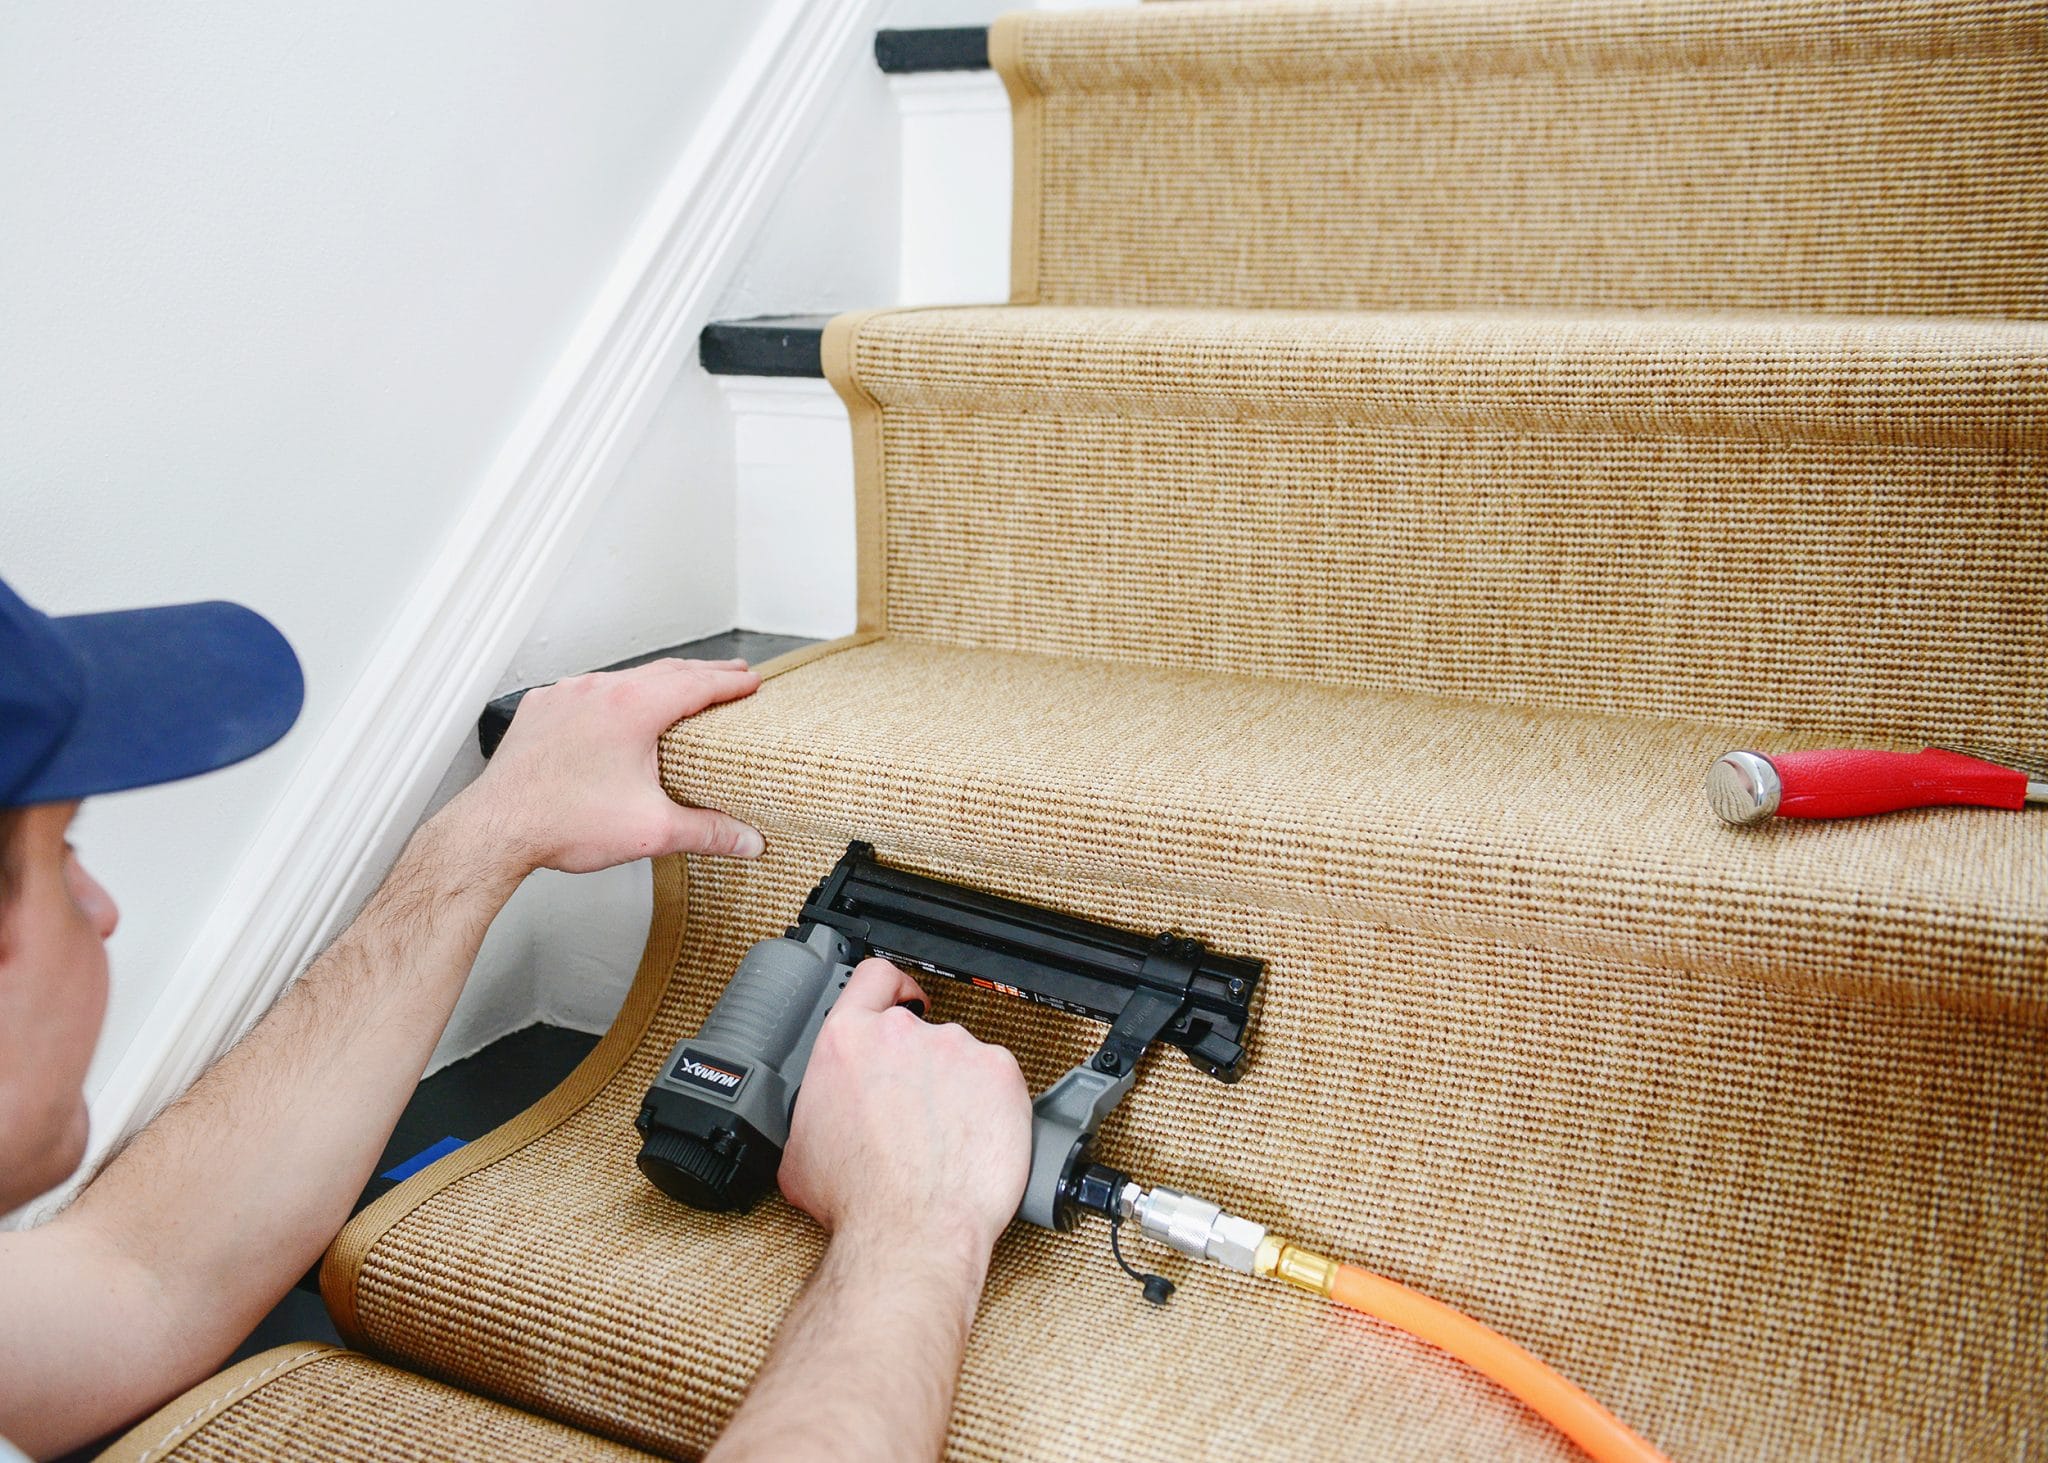
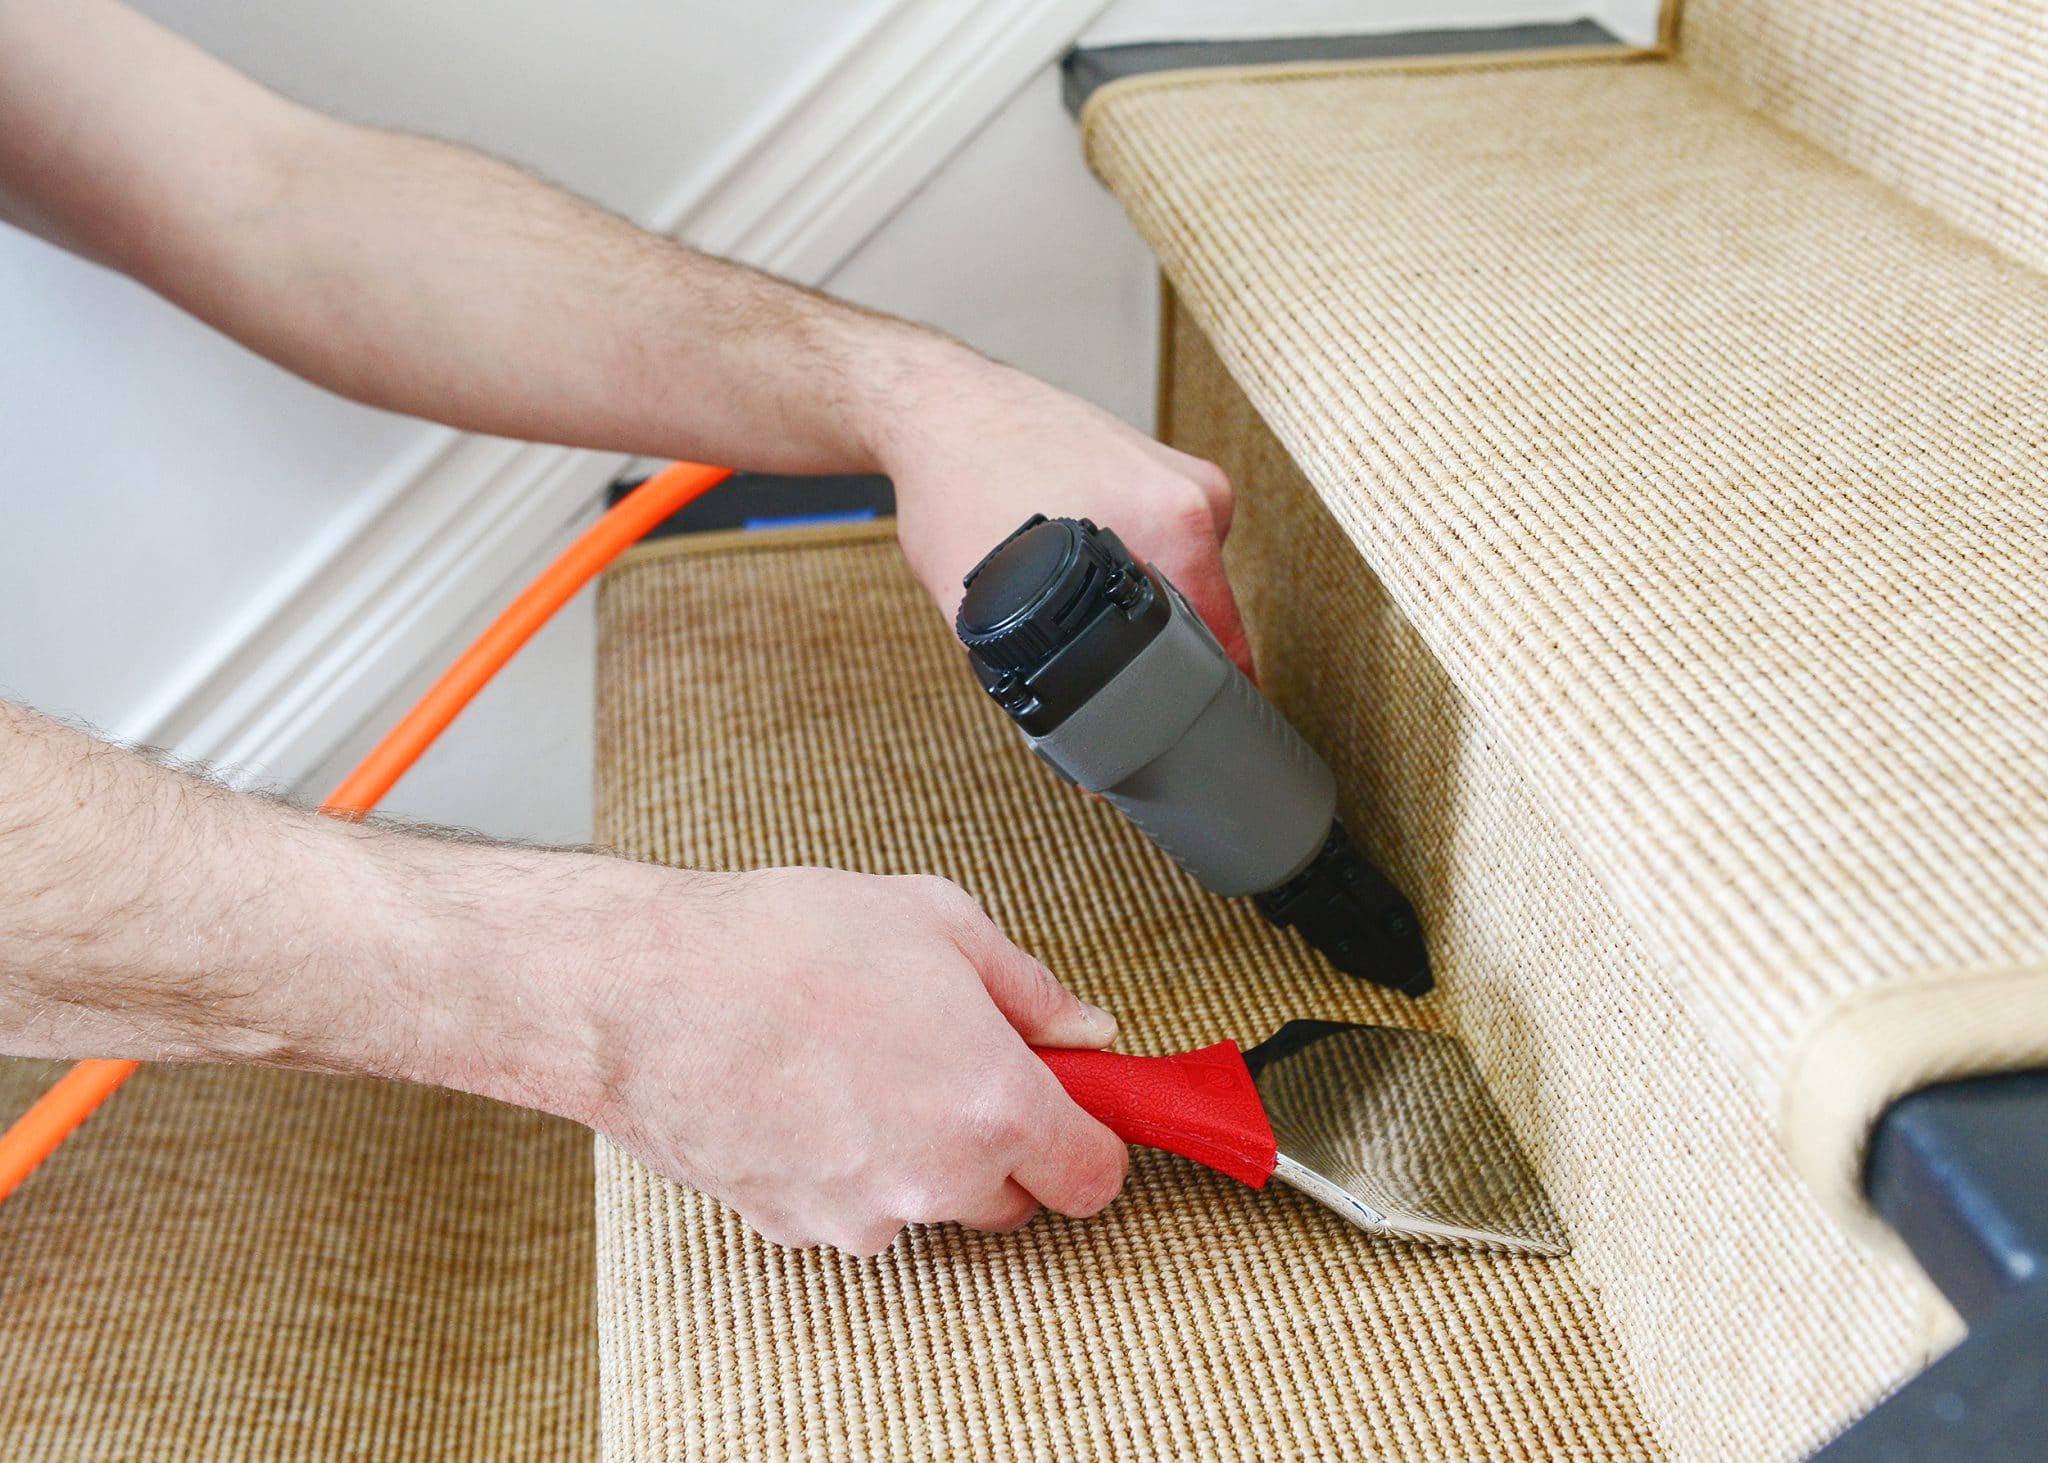
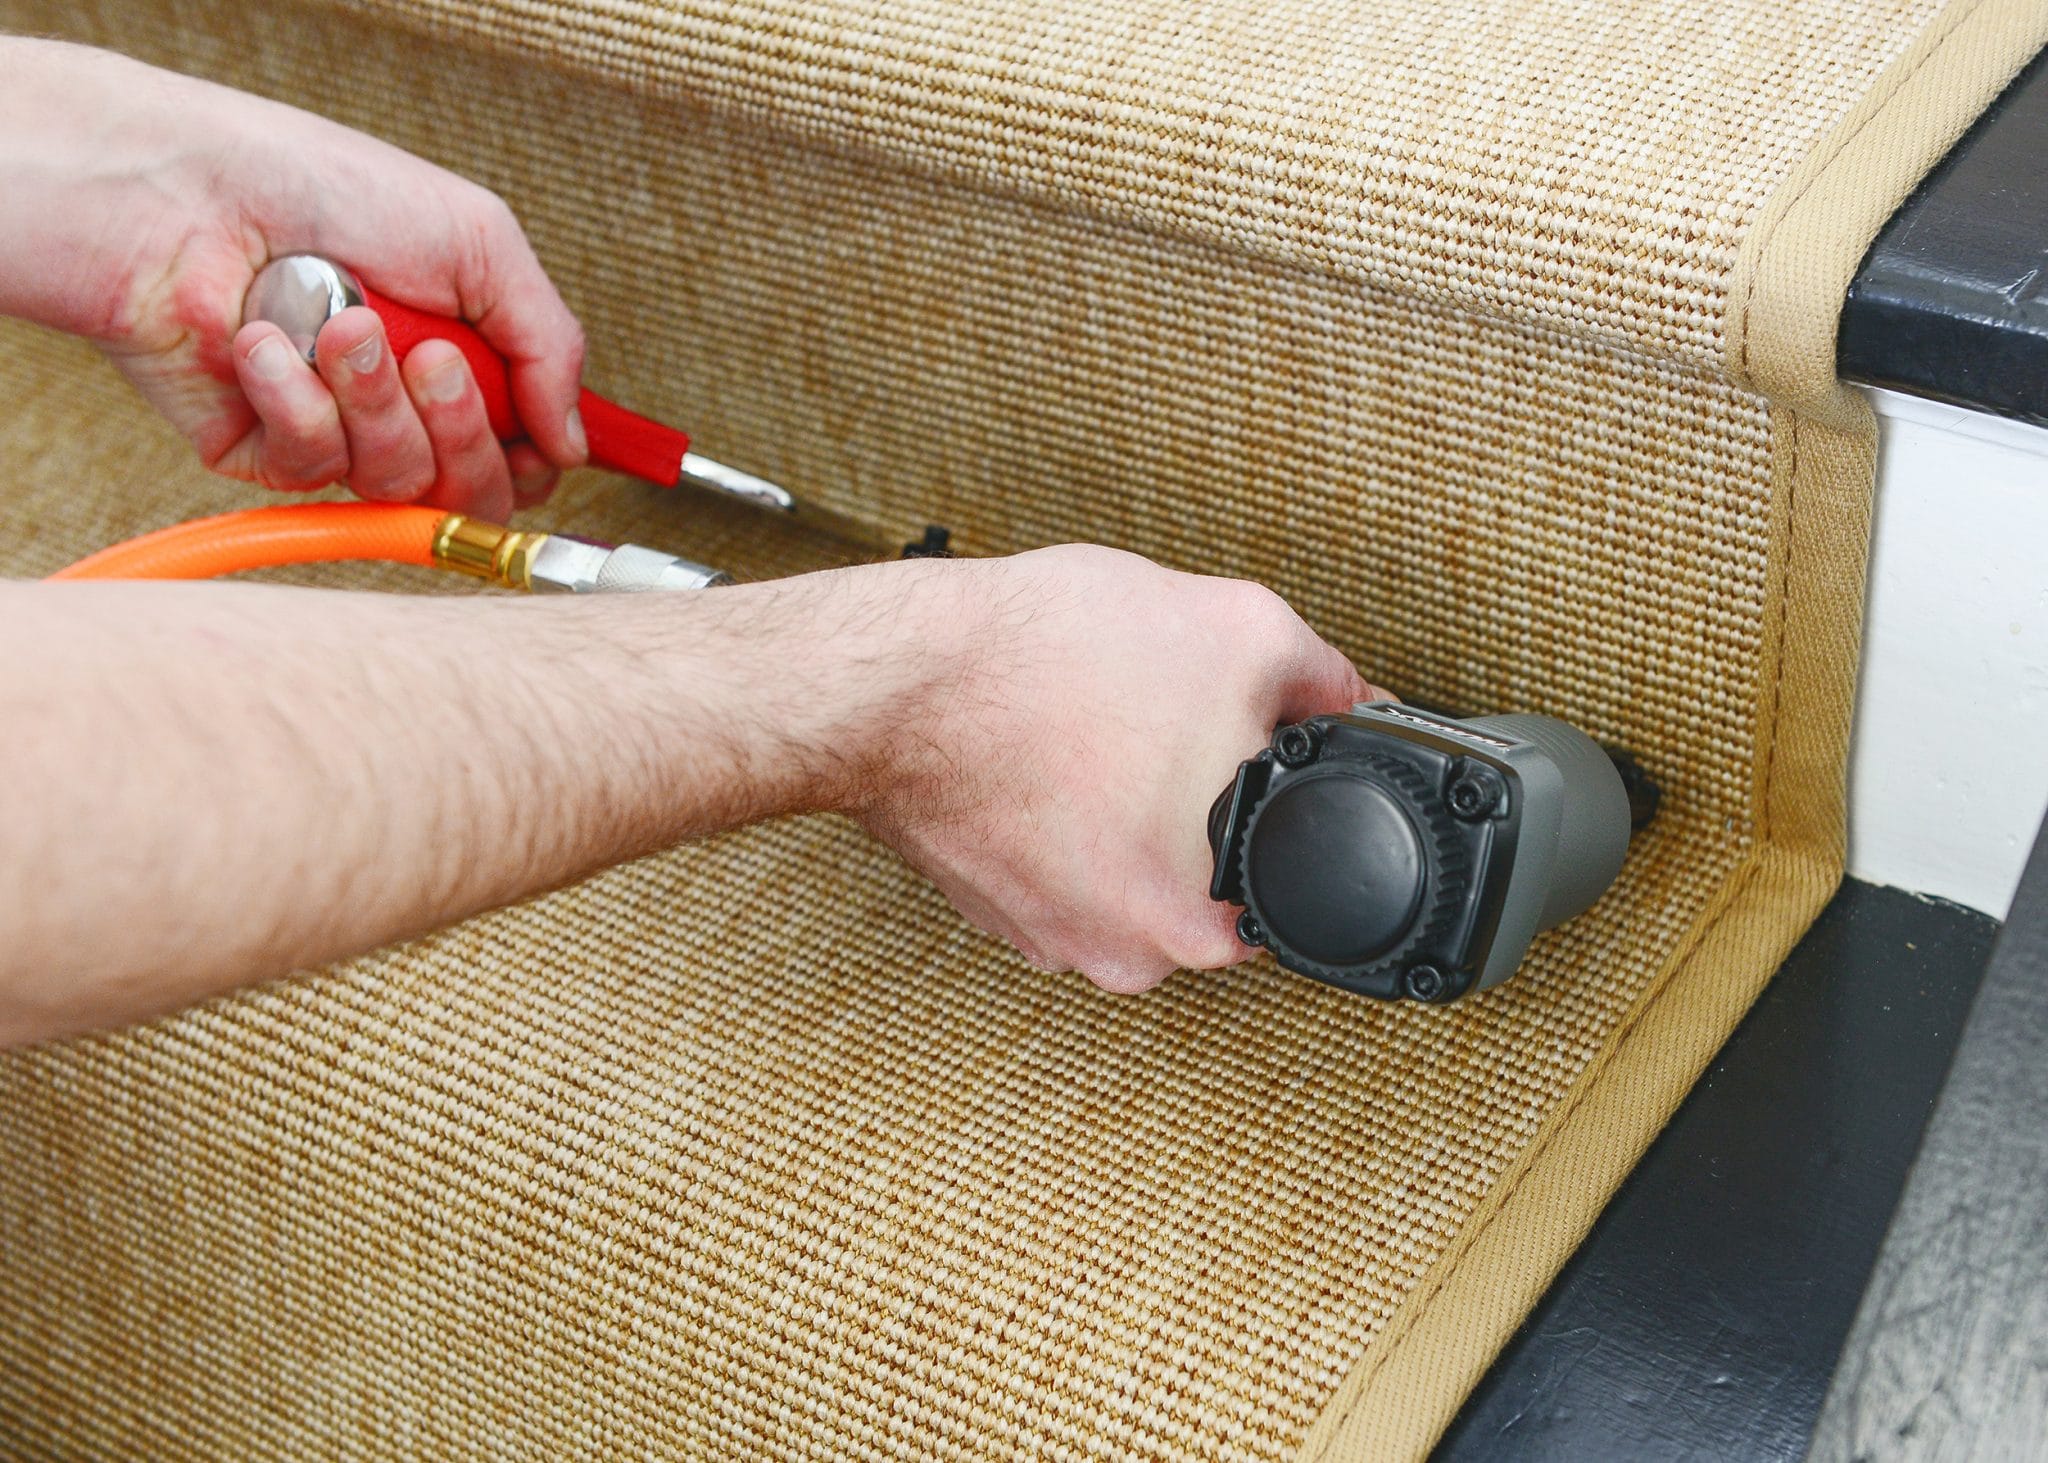
6| Use a bolster chisel
With the first row of staples complete, we swapped out the longer staples for shorter ½” staples. From this point on, our bolster chisel would be our best friend! The bolster chisel is used to tuck the runner as tightly as possible against the back of the stair tread, while also following our blue tape guide. It helped us to get a nice, deep crease. Our first staple went into the middle of the runner, and then we worked to the right and to the left, stapling every 3-4″. By starting with one staple in the middle, we were able to prevent the rug from pulling taught in one direction.
Tip: We considered using a sturdy putty knife in place of the bolster chisel, but having installed this runner, we both agree that we couldn’t have done the job without purchasing this handy tool.
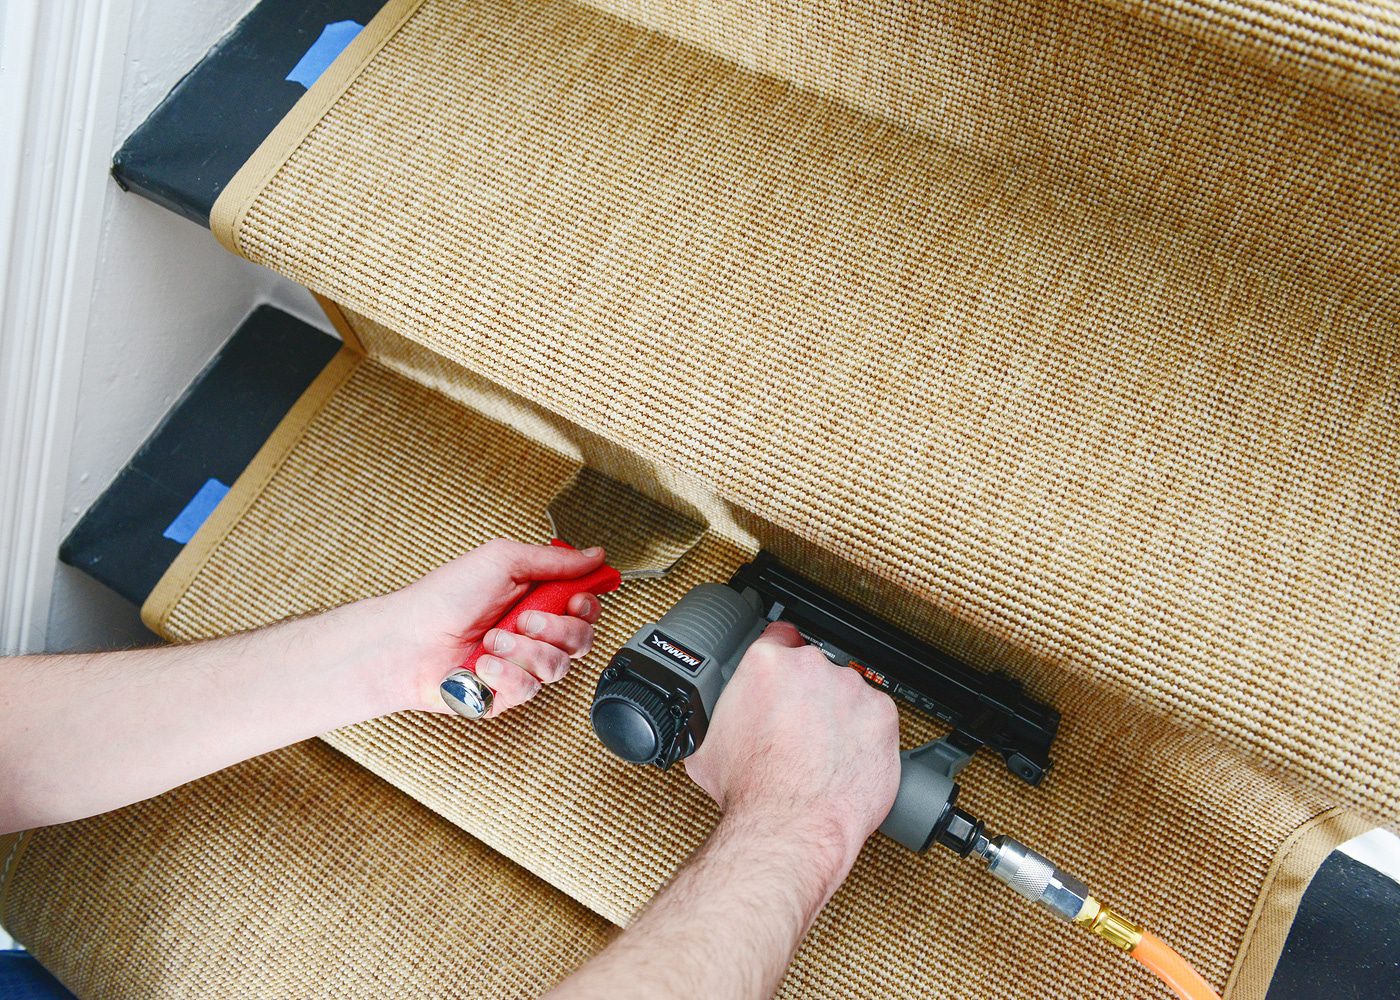
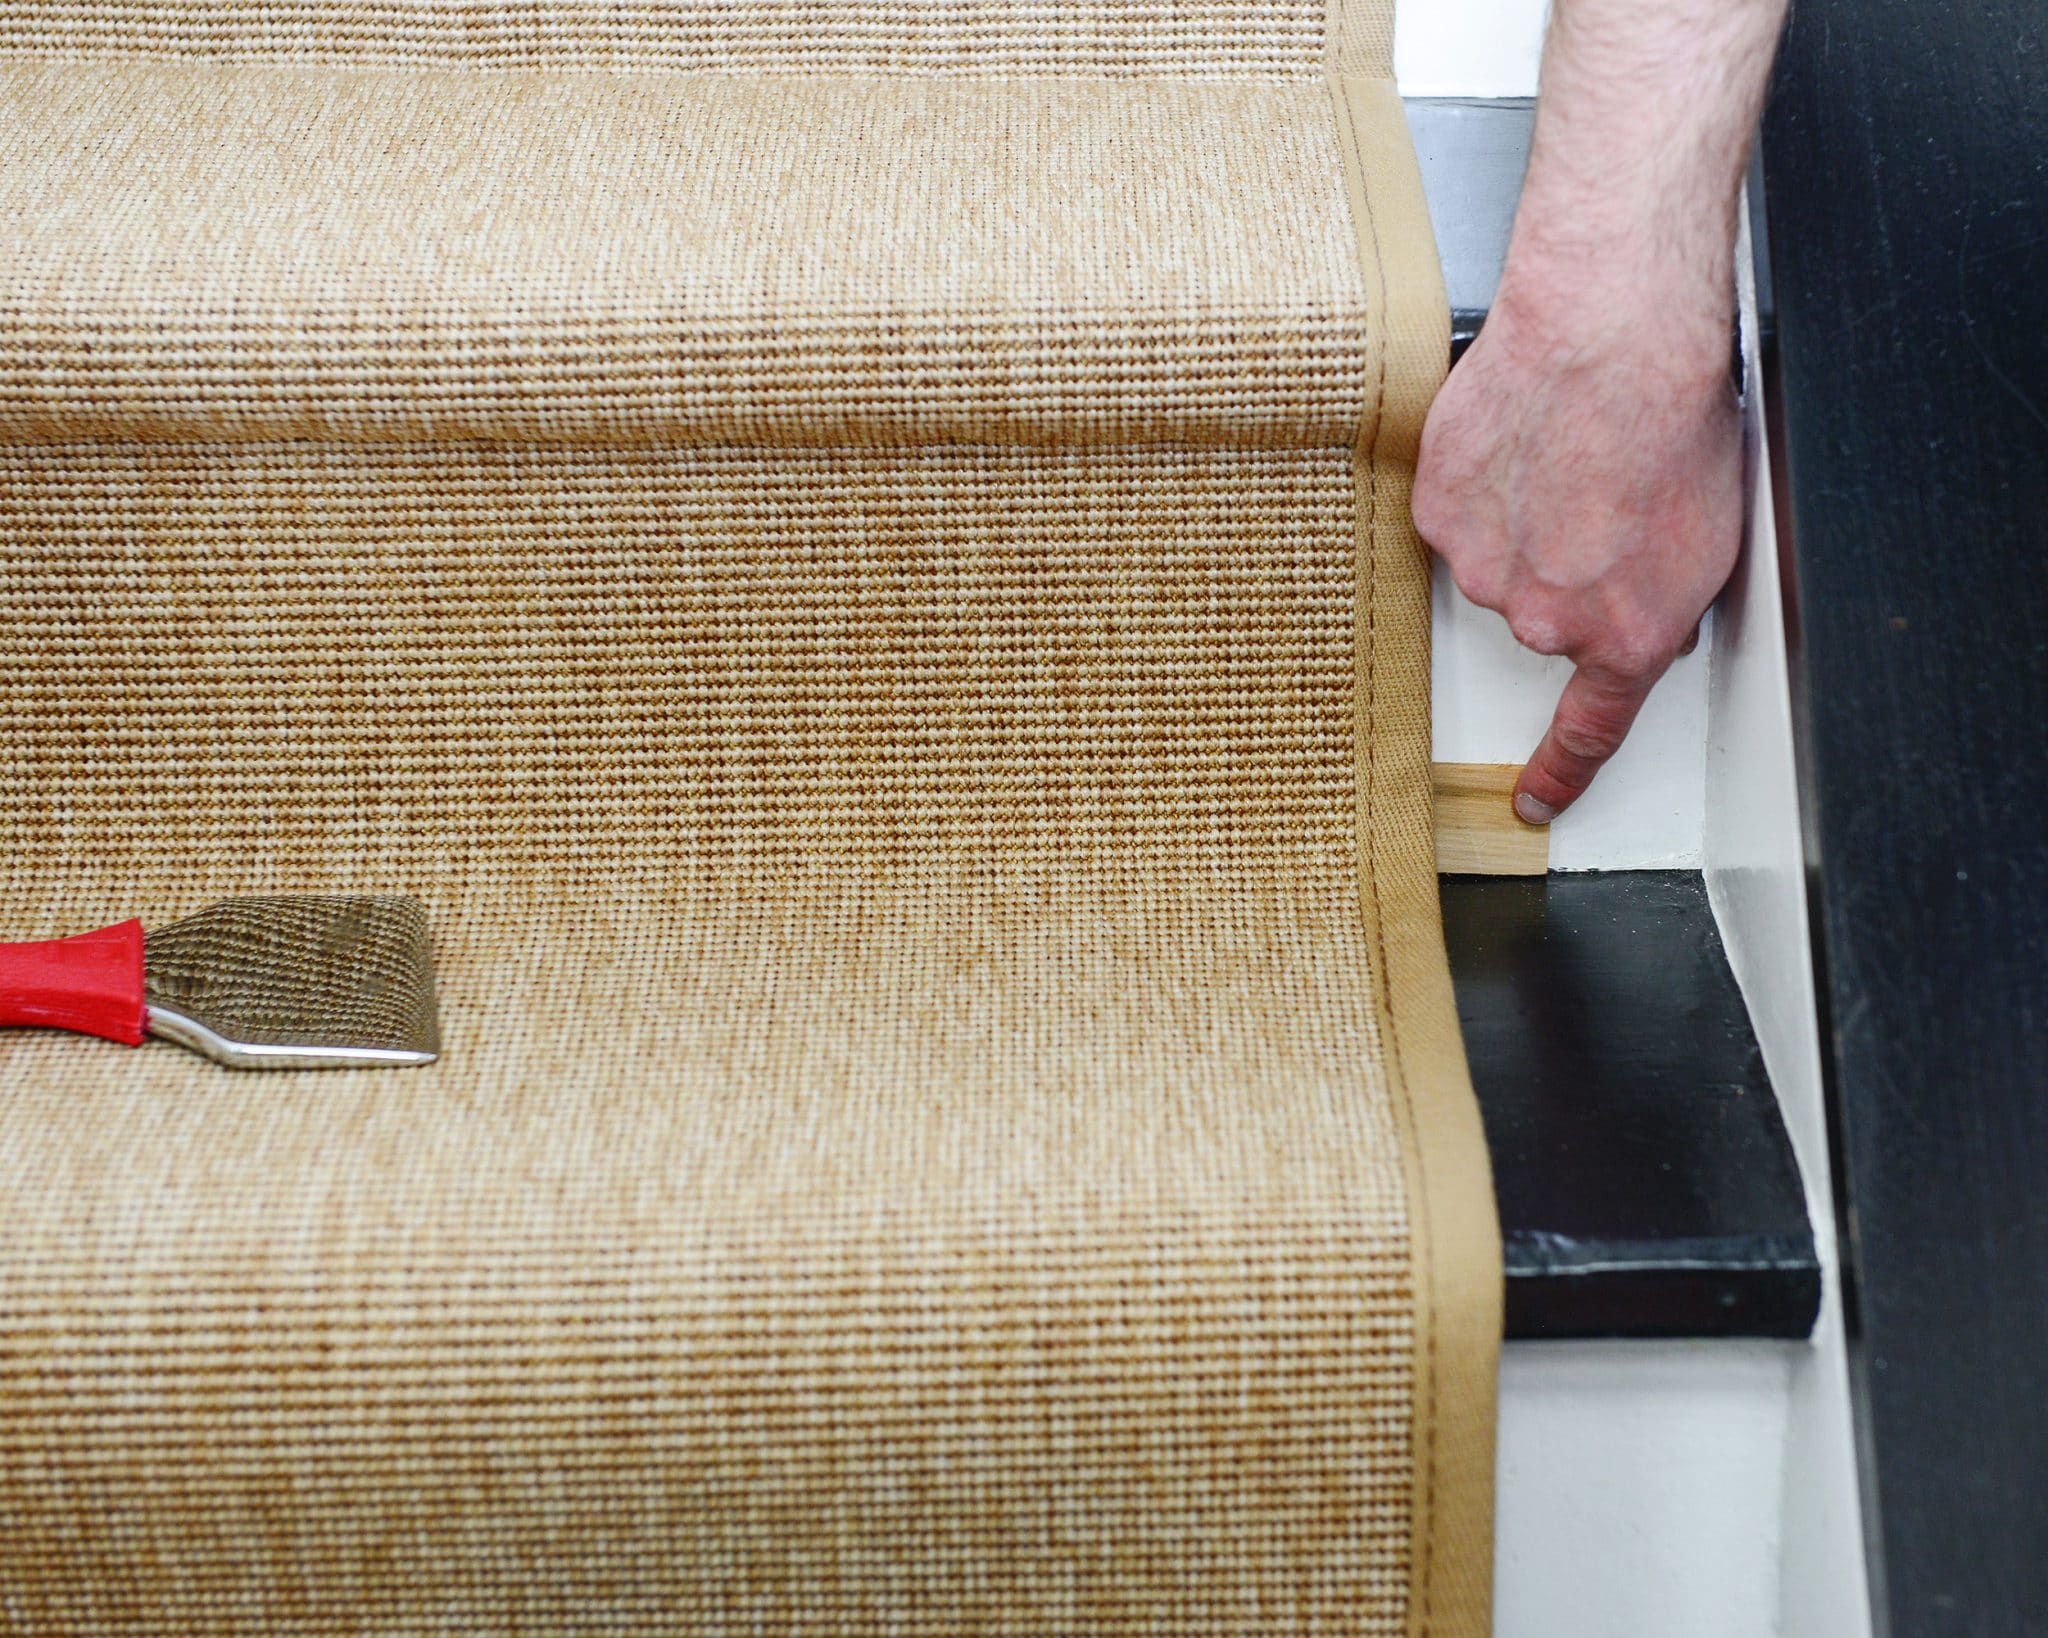
7| Staple the bullnose
When it came time to go around the bullnose, it was helpful for both of us to smooth the rug over the rounded edge together. Just like the rise of each stair, we started with one staple in the middle, right under the bull nose, before working left and right.
8| Staple, bolster, bullnose, repeat
As we continued down the stairs, we repeated the same steps as above, while also being extra cautious to stay aligned with our tape along the left side. Our process continued with more bolstering, stapling every 3-4″, smoothing over the bull nose, and stapling again. (Seventeen times over!)
My biggest tip? Be patient with the process. If we started to notice that we were slipping further away from our tape guide, we would pull out the staples from the stair and start over.
At one point during the install, no matter how hard we tried, we did begin to slip about ¼” away from that painter’s tape. We were perfectly straight mathematically, however, our century old stairs are just that – old. They’re not perfect, but they are full of charm! That said, we came up with a hack to pull us back into alignment – a small shim! Essentially, we tucked this tiny shim into one side of the runner, forcing the carpet to flow straight once again. The shim is secured with staples and hidden completely behind the runner. It’s so small that no one will ever know it’s there! We did this to two stairs, and it was our saving grace.
9| Shim as needed
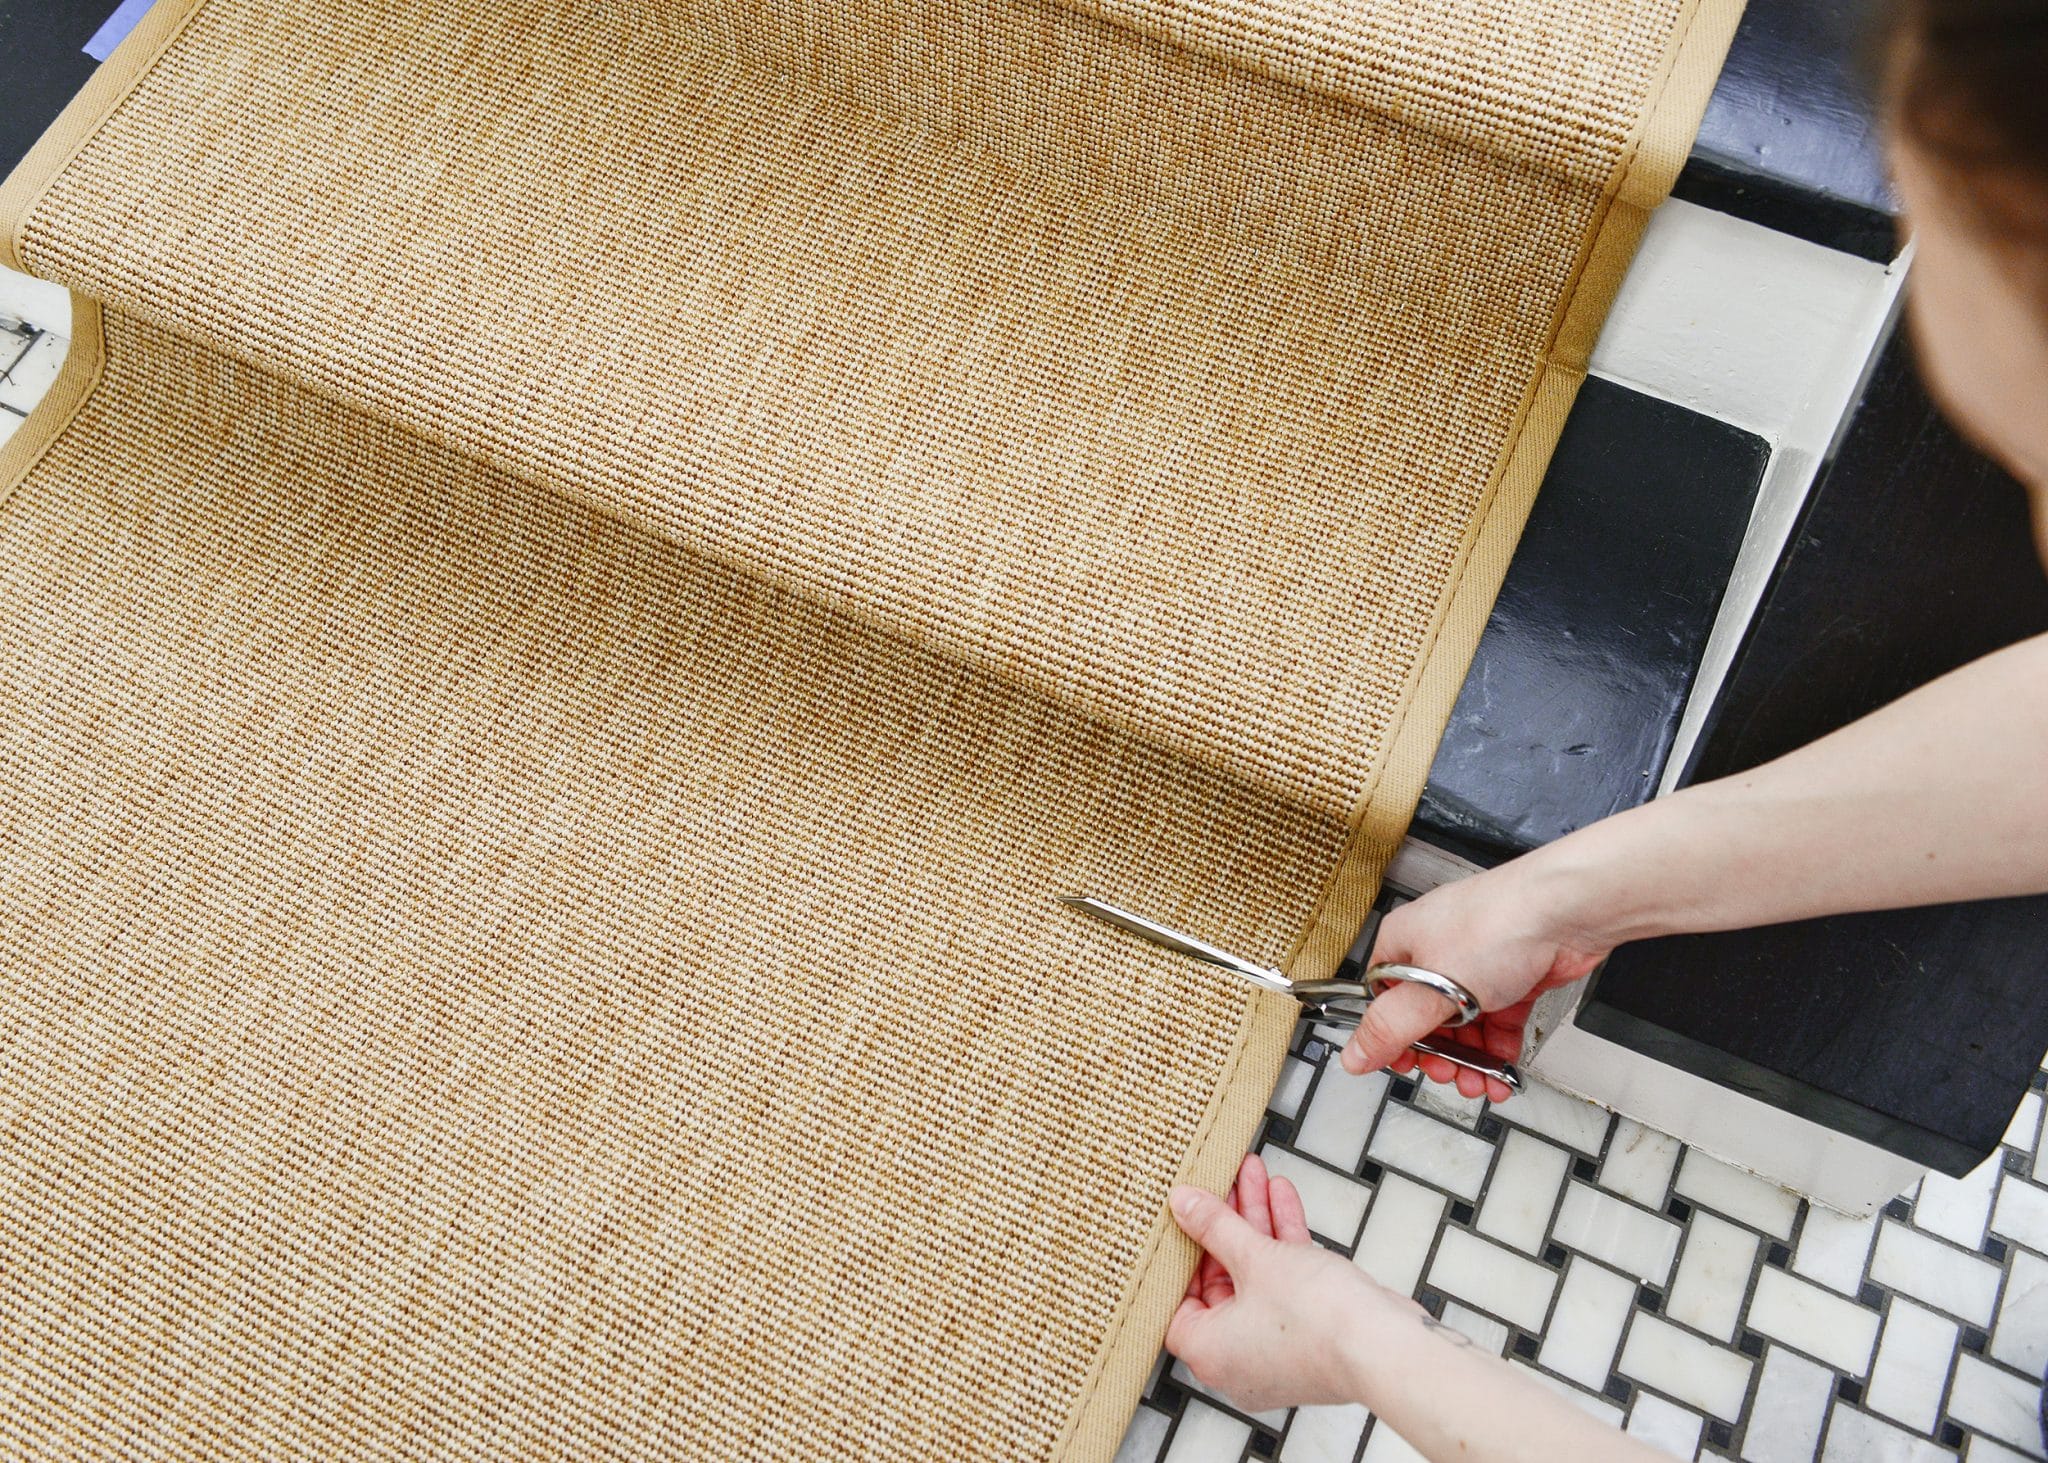
10| Cut, Tuck + Staple
At the very end, we had – get this – about one foot of leftover runner. Our measurements were spot on! Using those sharp fabric scissors again, I cut the end of the runner, leaving enough for us to tuck under the raw edge by about 1″.
While I did that, Scott swapped out the short staples for the longer 1″ staples, and we secured the remainder of the runner in place.
Step 11… CELEBRATE! It’s a very repetitive process, and we got the hang of it by two or three stairs in. The task was completed on a Saturday and Sunday afternoon, and by dinnertime on Sunday, we were admiring our cute new runner!
See also: Painting the entryway, when painted stairs and dogs don’t mix, and this is where we’ve chronicled every project we’ve tackled in the entryway!


Very smart and very safe idea!
We’re breathing a sigh of relief over here!
Of course it looks great. Just curios could you have gotten the sisal in black.? That may have been interesting and kept to your black and white scheme
There were definitely darker patterns, but we didn’t want to go TOO dark against the white risers. Instead, we opted for this more traditional – and crazy durable – feel.
Do you ever think of adding a railing to the other side of the open part of the stairs, especially now that you have a kid?
We have thought about that! Eventually, we’d like to replace the handrail and incorporate it into a railing with a minimal style.
LOVE this, we too are hoping to add some cushion to our stairs this year. Side note: tell me more about that beautiful cabinet by your front door? Does that hide shoes?!
It does! More on that here: https://yellowbrickhome.com/2014/12/16/winterizing-the-entry/
I feel like I must have missed a post on the organizational wall unit (with the darling brass handles). Can you please tell us more (or point me to the post where there’s more)? It looks like such an interesting solution!
Sure thing! We wrote about it more than 3 years ago, crazy, right? https://yellowbrickhome.com/2014/12/16/winterizing-the-entry/
Thank you for writing up and photographing the process! We are expecting twins in a couple months, and of course their nursery is downstairs while our bedroom is upstairs, so I’ve been thinking of adding a runner to our wood stairs just to make them a bit more comfortable as we’ll be using them a lot more. Your tutorial makes me feel like this is something we can actually do pretty easily. Thank you!!
You CAN do it. Congrats on your twins, how exciting!
That runner looks great! You did an awesome job!
Paige
http://thehappyflammily.com
We’re currently brainstorming a stairs overhaul here, so I appreciate the tutorial on the runner. Now if I could only make a decision on which runner to get… Ha,ha.
I’m surprised by the number of open steps you have at the bottom of the stairs. I think you need a railing there to meet code. I know you don’t have any interest in selling but we had that very issue come up in an inspection on a house we have on the market. . A minimal railing will look great there! I love the runner!
Yup, we’d like to replace the current handrail and incorporate that into a railing in the open area. This entryway has been the biggest work in progress!
I have a stupid question… does this improve safety because it is softer if someone falls? Or do you find it less slippery because of the material? I’ve always thought carpeted stairs were more slippery. We have hardwood stairs and the biggest issue is socks. We are generally barefoot or in hardsole slippers.
It improves the safety, because the polyurethane made our stairs slippery! We’re a shoes off household, and I was always so nervous going up and down the stairs in socks! Not anymore. :)
Hi Kim! Your stairs look great! I’d like to recreate this in my home as we have the same safety issues. However, we have a small landing followed by a 90 degree turn and two more steps down. In your research for this project, did you find any tips on how to handle a turn?
Thanks for your great tutorial (as usual!)
Ooh, I can see how that can be tricky! I did find this post from my friend Sarah, which features a turn in the stairs. You can see in the very LAST photo (with the pup), it looks like they started a new run of carpet: http://roomfortuesday.com/stair-runner-diy-with-sisal-rigs-direct/
The runner looks great. I like this color. I have no problem with my granite stairs, but I also want to do this in winter to keep feet warm.
https://www.thingstodopost.com/
Looks great! I’ve been wanting to do this in my own home, but my stairs turn. Do you think I could cut and mitre the runner?
A turn is definitely tricky! I would talk to someone at Sisal Rugs’ customer service number and ask. You can also see how it was handled in this post by our friends at Room for Tuesday: http://roomfortuesday.com/stair-runner-diy-with-sisal-rigs-direct/
We’re about to install a runner we bought from Annie Selke because we, too, are expecting a new member of our family due this August! We love the wood stairs, but they’re just too slippery for us (and for our pup, Ally, whom you’ve painted!) and it’s time for a runner.
I looked here and both on the homes.com blog, but didn’t see it mentioned. How did you decide on a pad? Where did you get it? I prefer what you guys used because it looks cushier than the other “kits” I’ve found online.
Oh, great question! When we ordered the rug from Sisal Rugs Direct, we selected to add the premium rug pad as well. So the rug pad is already cut to the same width as our runner, and then we just cut it up into tread pads. It’s the same type of pad we use for ALL the rugs throughout our home, which we get on Amazon right here!
Looks great! What is the paint color on the walls?
It’s BEHR Sterling
Is your post on Homes.com still available? The links in this post are no longer working. Thanks!
Oh, that’s so strange! I updated the post, but here’s a direct link: https://www.homes.com/blog/2018/05/how-to-install-a-stair-runner/
Thanks for letting us know!
[…] are a number of excellent tutorials out there and we used a mix of three in particular. We followed Yellow Brick Home’s tutorial the most, grabbed the same staple gun that Young House Love used, and took rug joining advice from […]
[…] about a year ago we saw our friends Kim & Scott’s stairs in person when we visited them in Chicago and, while it may seem weird for a staircase to […]
How has the runner held up over time for you? We have almost exactly the same stair – black treads, white risers. Love the look of the runner.
Looks as good as the day we installed it!
Hi there! I am about to install my runner from Sisal Rugs – there is a pretty thick rubber backing on it, why did you think the carpet pad is necessary? I have some, but I’m wondering if we really need it!
Hi Michelle! The carpet pad is going to provide cushion and protect your stairs from damage. I’d recommend using a thin pad regardless!
Hey! We just finished installing our stair runner using your amazing tutorial. Thank you for sharing! We are so happy with it but our staples are pretty visible. Did you do something to hide them?
We used the kind of staple where it barely leaves a dot. By chance did you use the staple with the bar?
I was also wondering about hiding the staple bar and wondered if there is a name for the type staple you used. Thank you; great tutorial.
Yup! They’re called narrow crown staples. They’re installed with a pneumatic nailer like this one. Hope this helps!
Do the black steps annoy you with dust? I am about to copy you but wondered if that’ll bug me. Love everything about your home!
Thanks, Sara! Honestly, it’s not a huge deal. I just run the vacuum over the stairs when I vacuum the rest of the house. The black/white treads with the natural runner are one of my favorite features in the home!
Do you remember if the the edge/border is the narrow 3/4″ or the wide 1 1/4″ size?