

Our kitchen island is complete!
First, I’ll admit that I really struggled with taking photos of the island since our kitchen is an oddly shaped box full of challenges (hi, furnace!), so you’ll notice that in most cases, it’s not actually in place. It’s also been an emotional roller coaster of a week with our kitchen in general, as timelines have been extended with the back door, which in turn prevents other things from happening (baseboards!), but has us turning our attention towards under cabinet lighting, tiling and even prepping some of our artwork. We know that these things will make all the difference in the world, but for some reason, this girl is having a hard time seeing the finish line. We’ve been spending a lot of time on those 5% fixes as well, and every decision feels so heavy. Perhaps it’s the middle-of-the-renovation blues? That stretch of sort-of-there but not-really-there-at-all? Or winter? Boo, winter.
In any case, let’s go back to what we did complete recently, and that’s the island! If you take a peek at our pins, you’ll notice that a lot of our favorite kitchens have a contrasting island. We love that look, as it feels so classic and right for this house.
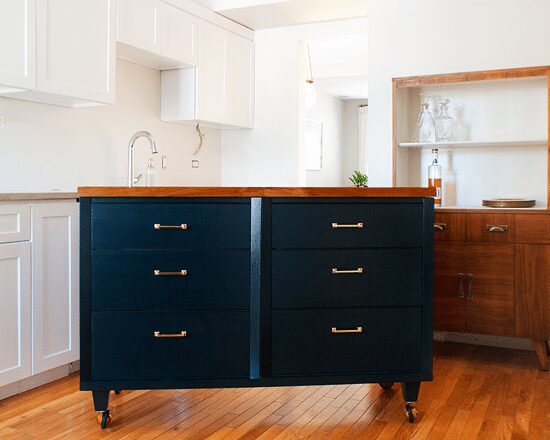
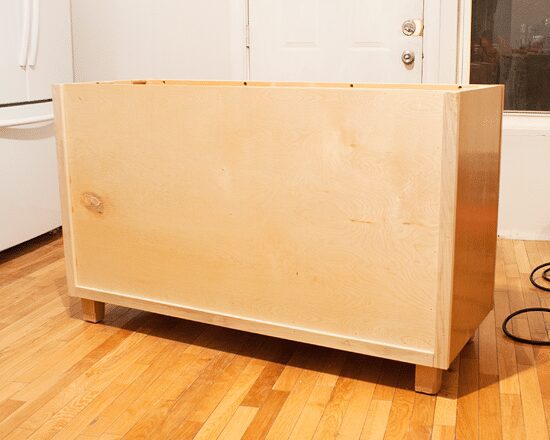
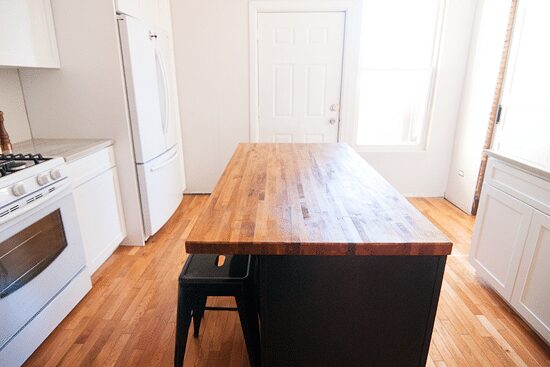
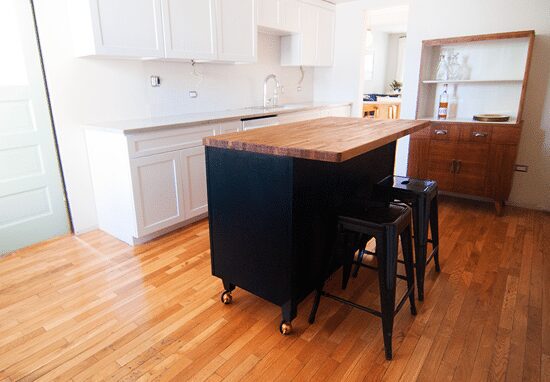
In person, it feels good and – after struggling with butcher block measurements – appropriately sized considering it’s living in the middle of the room. Being able to walk around it easily from stove to sink and sink to fridge was obviously important, and at its current length (54″), you can access all the appliances with ease. Remember when it looked like this?:
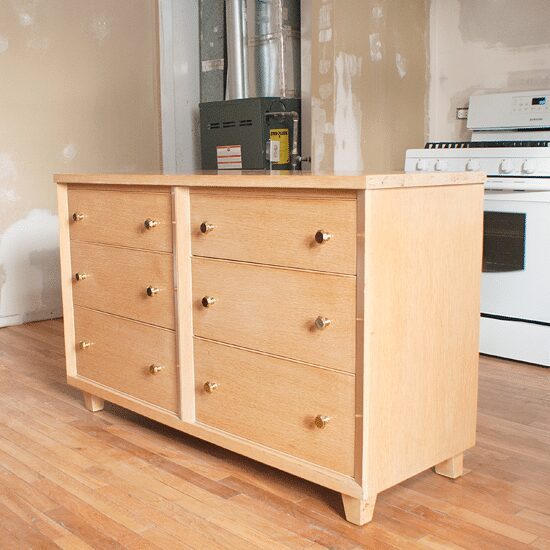
WHAT WE DID. First, we had to remove the dresser top, which included releasing a row of nails across the back and several screws from the underside.
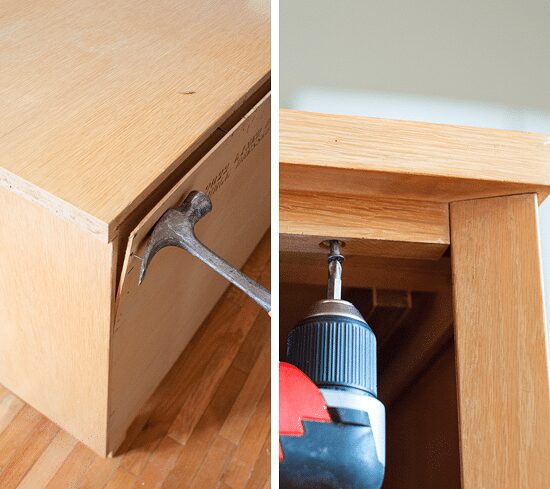
Once we were able to lift it free, we realized that there were several trim strips along the underside which acted as a ‘stop’ of sorts; they prevented the top two drawers from sagging when you pull them out. At this point, we set the top to the side, knowing we would re-use those strips on our butcher block.

The back of the dresser had a thin piece of board, and the surface was pretty rough to the touch:
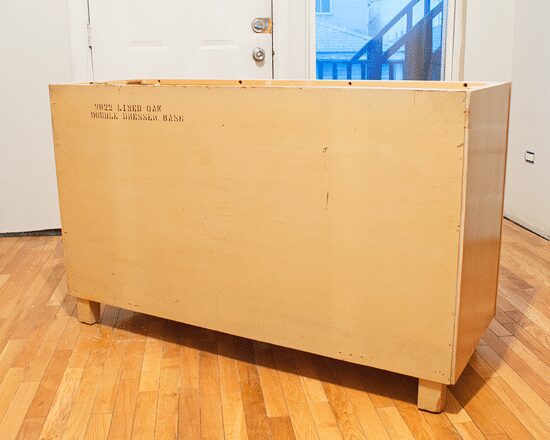
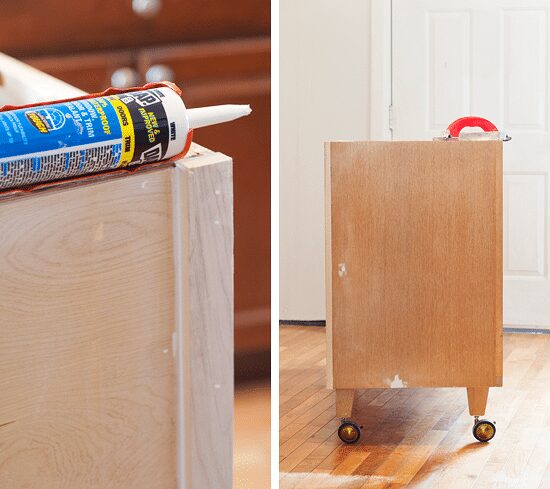
We left the backing board in place, but we reinforced it with an additional sheet of 1/8″ project board cut to size at the hardware store. At this time, we also cut down strips of 1″ x 2″ poplar trim for the sides and bottom of the dresser, which would balance the trim already in place on the front of the dresser. We applied heavy duty construction adhesive to keep it in place, and we finished it off with 1″ nails along the perimeter – that board wasn’t going anywhere!

Once that was complete, the result was strong and durable. I ran a bead of caulk along all the seams, and you can see now that with the addition of the poplar trim, the profile matches up with the front.
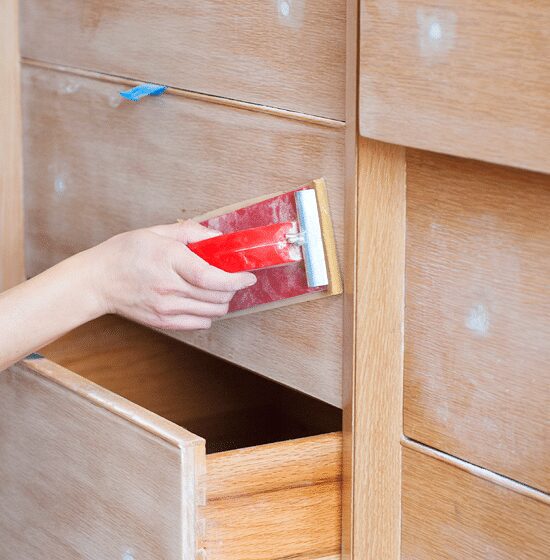
Throughout all this, we had begun the process of filling the knob holes with wood putty (all the dents and scratches, really). This took at least two rounds of putty, sanding between each application and finishing them off with a thin layer of drywall mud. The mud has such a smooth finish, that I found it helpful to make things as perfect as possible.
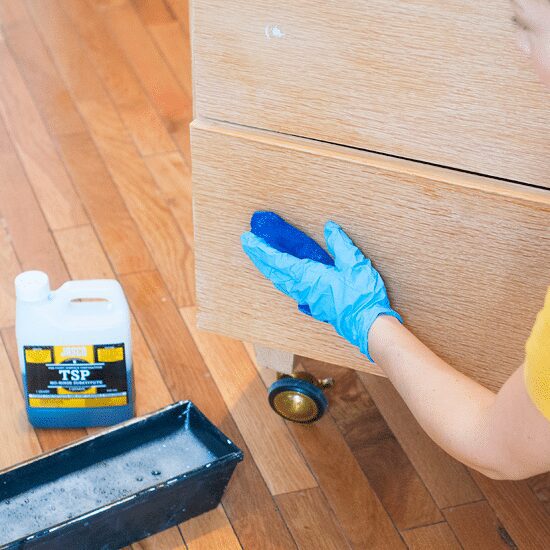
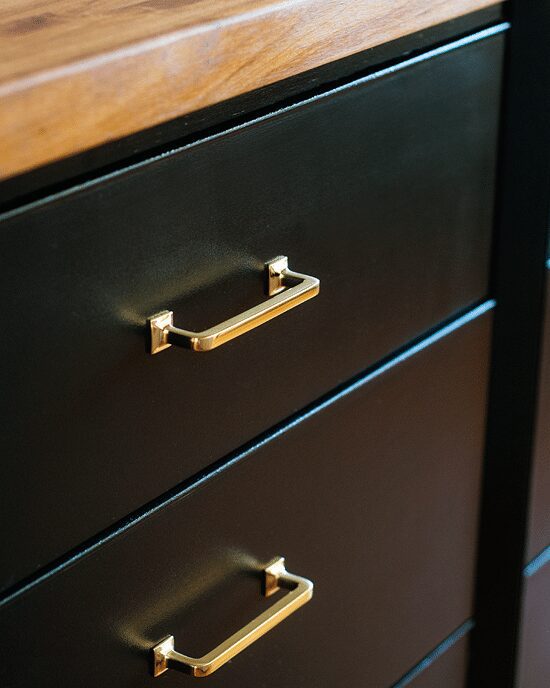
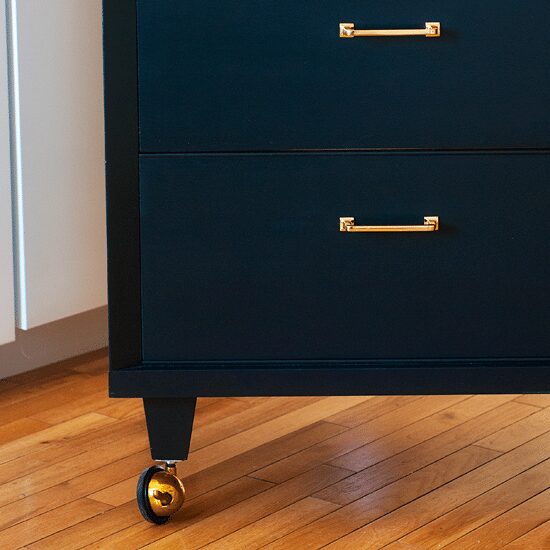
I ended up sanding the entire dresser by hand with 150 grit sandpaper, but I didn’t spend too much time doing so – just enough to give the surface a bit of texture for my primer to adhere to. To finish, I washed down every surface with no-rinse TSP, which removes any remaining dirt and grime while de-glossing the surface. You’ll notice that somewhere along the way, we also added these Shepherd casters, which are so, so good! They have a great weight to them, lock solidly into place and roll easily when needed. Plus, brassy.
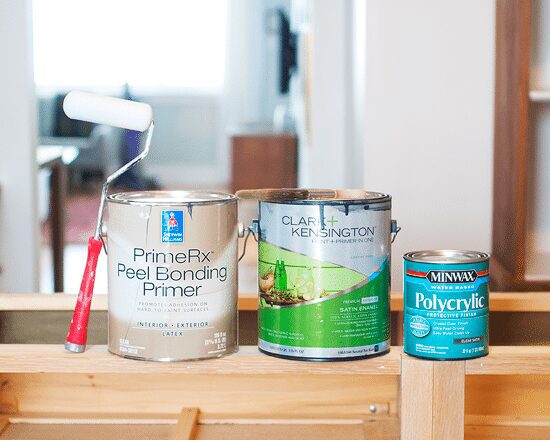
After all of that prep work, it was time to paint! I used the same PrimeRx primer that we’ve used on several doors, and it’s proven itself to be a powerhouse against scratches or chips. For the color, we went with our tried and true favorite, Nein! Nein! Nein! OK Fine by Clark+Kensington and completed the finish with three coats of Polycrylic in satin.
We allowed everything to dry for several days, and in the meantime, we went shopping for a butcher block top. We considered Ikea, local hardware stores and kitchen outlets, but ultimately, we found a friendly Wisconsin maker, Tony, specializing in maple. Although it wasn’t the least expensive option, his prices were extremely fair, and maple is a durable hard wood when compared to birch, so it’ll last for the long haul. When we gave him a call, it turned out that he was making a trip through Chicago, and would you just like me to drop it off for you? Um, yes!
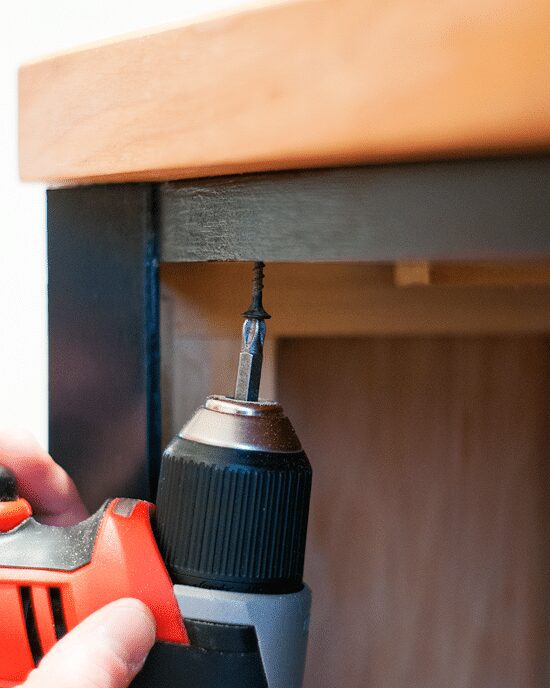
After carefully measuring and re-installing those ‘stop’ strips from the dresser top onto the new butcher block, we screwed it in place:
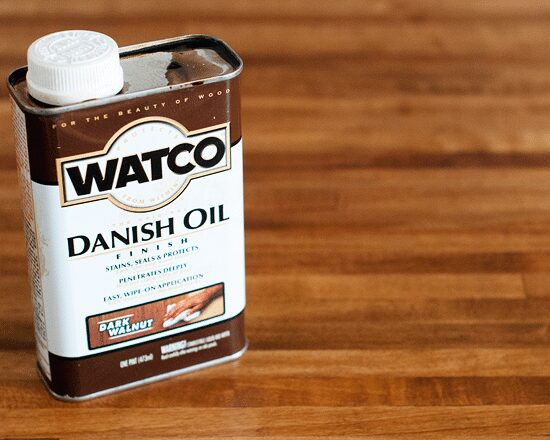
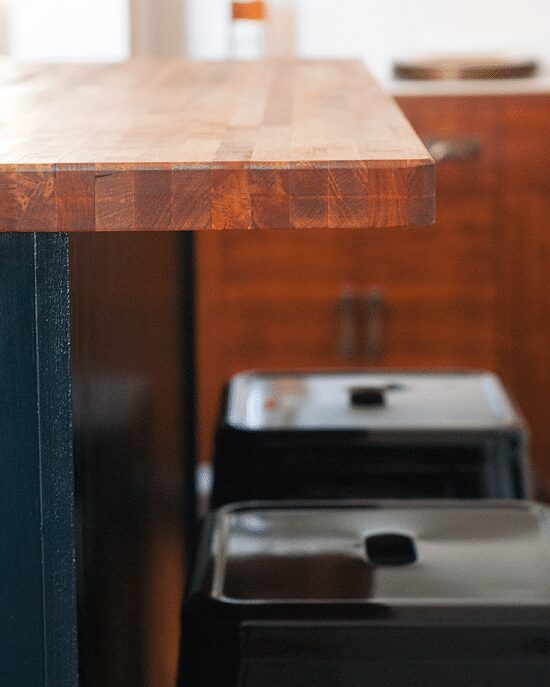
Tony told us that we could either oil it liberally (weekly) for the next month (and then once monthly after that), or we could apply an oil based polyurethane on top and call it a day. Because we have no intention of cutting or prepping food directly on the butcher block, we would have been fine going the poly route, but we personally don’t like how that will allow yellowing over time. Instead, he gave us the okay to use Danish oil, and we also got the green light to to darken it up in a walnut finish.
Before the butcher block purchase, we debated on its final size endlessly, measuring daily, taping it out and using an old sheet of MDF to see what felt comfortable in the room. In the end, we went for a 10″ overhang, which is the minimum (that is, according to Google!) considered for comfort when using a stool. While this may not be ideal for everyone in every height or size, we’re happy to have been able to accommodate an overhang at all! This house is a challenge, and the kitchen has been our biggest to date.
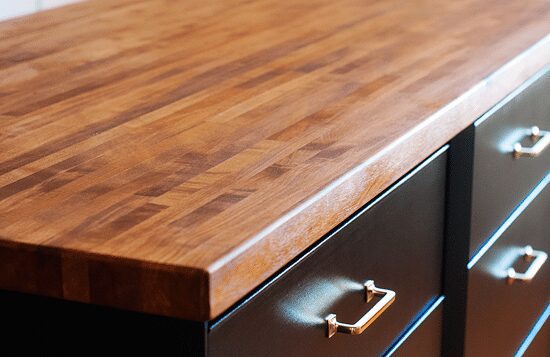
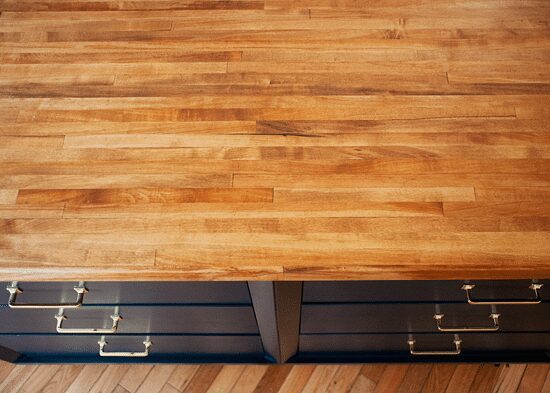
All said and done, our island measures 54″ wide x 29″ deep. I already mentioned the struggle to photograph the island as a whole, but I still think it’s necessary to show how it fits in the middle of the room while allowing movement and flow. My wide angle lens shows distortion, but there is 3′ between the island and wet wall, and the island and stove. You can access the sink from the stove without having to dip around the island, and as much as we agonized over a larger vs. smaller overhang (or no overhang at all!), we couldn’t be happier with how it fits in the room:
Looking at these photos has me itching to add color with art (in the works!) and, man, tile! We’re now back to debating between darker grout or something more soft. Looking at our pins has us realizing that there’s a lot of soft grout in our favorite photos, which surprised us since we were initially leaning so heavily towards a charcoal shade. What would you do?
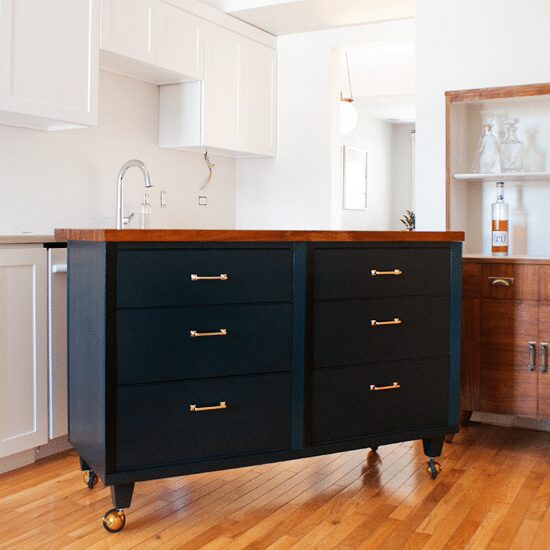
To play off of those brassy casters, we chose these 4″ Mission pulls from Rejuvenation. By opting for handles instead of knobs (these were a close second), we think it helps our island step away from its former life as a dresser. They are, hands down, the icing on the cake!
If all goes well, we’ll be working on our under cabinet and overhead lighting this weekend, as well as some 5%-ers, too. And maybe, just maybe, we’ll find a moment to step away from the kitchen and do nothing at all? I’d drink to that!
Rejuvenation provided the hardware for our island, and we’re so thrilled they wanted to be a part of our renovation. Also? There’ll be something in it for you – soon!


YOU GUYS! The island is gorgeous! Well done, you :)
Now for the great grout debate…. For my kitchen walls, I have white subway tile in a non-typical pattern. I used medium grey grout (maybe Delorean Grey?) and I think it was the right choice for me. Darker would be too busy and strongly graphic for my taste. I have a modernish kitchen though. I often see darker grout in more historical sorts of houses (hello, Daniel) and like it very much in that context. Given the rest of the your space as it SO beautifully stands now, I am leaning (with you) towards softer is better.
One thing I did learn though – those tubes of caulk that they sell you to match your grout and fill in along the counter, side walls, etc.? THEY DON’T MATCH THE &*^% GROUT. It drove me nutty. I had to go over it with watered down white paint to lighten it so that my eye did not go to it every.single.time. I went into my kitchen. Crazy detail freak – ugh.
Oh, wow, good to know about the caulk! We were starting to lean delorean gray a bit too… But, ugh, another reason for lighter grout would be to help conceal any imperfections! There’s not a single sheet of straight drywall in this house, and we wonder if dark grout would emphasize that.
Would you say delorean is a warmer gray? It looks warm on our color card, which would be helpful with our warm gray counters. Thank you so much for your input!
The Delorean is definitely a warmer gray. The Lowes subway tile leans just a touch pink so I needed something warm.
If I remember correctly, the tile you picked has a matte finish. In my inexpert opinion, that is going to greatly help with your uneven walls. It is much easier to spot ins and outs on the plain as the light strikes my shiny tile than it would be if it were matte.
You are the only ones who are going to notice if your grout lines are off 1/16″ somewhere. Really really :)
Haha, thank you SO much. Your input is really appreciated! And you’re right – not only did we love the look of matte tiles, but another bonus was not having the shine catch the imperfections!
wow! looks really great, guys.
i really like the darker butcher block top and yay for no yellowing. it pairs well with your dark paint.
nice stools, too!
I love the look of dark grout (and I used it in my bathroom), but I really think you’re right about going softer. It’s those beautiful countertops–it would be a shame to overwhelm them!
Your kitchen is gorgeous! I’m having island-envy. I know that dark grout is all the rage, but I don’t think it will work in your kitchen. Everything on the walls look so light and bright, if you add dark grout, then my eye would go directly to the grout and not the beautiful counters. I would try a medium grey to match those counters.
Looks fantastico! You cannot see your nail holes at all, and that is tough to accomplish! Love the overhang of the counter top to allow a small bar–that’s a great idea for the blank back. Love the rich color of the butcher block. It really complements your floors and hutch.
Awesome job. I think you’ll find the island is a game changer. Storage space, counter space, sitting space. I’d never had an island until our current house, and it’s transformed how I think about my kitchen. Enjoy!
Beautiful! The butcher block (and how you stained it) is a nice echo of the flooring. What will you be storing in the island drawers?
We have so many drawers in this kitchen right now, it’s crazy in the best way! Most of them are empty!
In the island we have dish towels, saran wrap, aluminum foil, gaggles of clips, and – Jack and CC’s favorite – a whole drawer dedicated to doggie treats / extra Kong balls / puppy medicines.
Oh! And a whole drawer just for tupperware! We can see it all, and it all matches up. Hallelujah.
I just set up a similar island from an old dresser…still measuring and thinking about butcher block top. I did a thorough cleaning and am getting new hardware, but your renovation is really making me think it would be worth the work for me to do something about dings and some beat-up veneer, especially before we spring for a butcher block top! Oh- the reason I started commenting is that I’m storing the light, bulky stuff in my drawers, too- esp. Tupperware! The top drawers have placemats and cloth napkins.
Gasp!! This is so gorgeous! I am drooling. Really informative post, too. I would love to see some slightly contrasting grout in here just because there isn’t a lot of contrast between walls, cabinets, appliances, countertops right now. It might help tie into the island. That being said, you have blown me away with each additional finish, I am sure you’ll get this one right, too.
Thanks, Julia! It’s like our own little slice of your future kitchen with the black/gold. :)
I would go with the darker grout! I think it would tie nicely with the dark island and bring some contrast to the currently very white and bright wall that is your cabinets/island/sink. With white grout, I feel like the tiles would get lost in a sea of white.
The island looks fantastic — great job. But I have tho say you really got me with the fact that you are storing your tupperware in one of the drawers. That sounds like nirvana! Being able to see everything and have all the matches. Small thing but the best feeling ever. Congrats again
It is truly nirvana.
The island looks so, so fantastic!
Insane! It is so gorgeous!!!! I would highly recommend a (super-thin) charcoal grout in there, I also debated between light(er) and dark in my kitchen, since we have SO MUCH tile, but I really ended up loving the dark grout. It was not as jarring as I worried it would be on that amount of surface area. Plus, it hides dirt and stains unlike lighter grout, which is especially nice to have around the sink and oven areas! If you hop over to my blog (http://dotluv.blogspot.com/2014/10/kitchen-remodel.html), you can see some pictures of what we did!
Keep up the great work, and dont stress too much. You guys are gonna love it when it’s done, regardless.
Allison
Yours looks awesome! I wonder if it works so well because your counters are black though? We have a few really dark veins, so darker COULD work, but, ugh, I just don’t know!
Did you use 1/16″ spacers?
WOW! Love how the island turned out. Gorgeous.
I love it, even though Hailey and I are rarely fans of painted wood furniture. This is a case where paint and hardware does wonders for the piece. I think our kitchen has similar dimensions and layout to yours, with the stove on one wall and the sink on the other. I was thinking about an island too but I don’t think that we could set it up so that you wouldn’t have to go around the island to get from the stove to the sink.
I still need to see your house in person! The stove on one side and sink on another is definitely a challenge, but it was the only thing that we were able to do without running all new gas lines along the ceiling or ripping up the floor (which causes a whole new slew of issues/problems/$$$). I imagine you guys are in the same boat. Maybe a smaller square shaped island could do the trick? Or even a little rolling cart! Miss you guys.
LOVE the island! Such a clever idea and so well executed.
My vote is for light grout where the interest is created by the change of material and texture. Dark grout emphasizes the pattern of the tile placement which can overshadow the beauty of the tile itself.
That being said, you have fabulous style, and I know whatever you do will be fantastic. I am so looking forward to your future posts.
Great input, Ann, thank you. I like how you said that – definitely something to keep in mind as we make this decision.
Love love love!
Are you adding hardware to the cabinets?
Yes! They’ll get really dark hardware, in the same style as the island. You can see it here: https://yellowbrickhome.com/2015/02/03/all-the-finishes/
What a change and what a good one! It looks stunning. I love the navy, and I love using furniture pieces as islands. It makes it look ore collected :) Well done!
xo Ashley
pennypickedrevival.com
Thank you! The color is more black than navy, but it does look a little blue-green in some lights, which is why we love it so much!
What’s is the name of the color you used
It looks beautiful!!!!! Congrats on your hard work! What a great contrasting piece. Love it!
I love that navy blue. I stole it for my own front door and now I’m thinking of using it on a bathroom vanity. Such a great color. You’re kitchen is looking great!.
This looks great! (Per usual!) You guys always do such stunning furniture updates.
I’m sorry you door situation is putting a kink in the overall reno. That has to be supremely frustrating. At least you can still keep checking things off the list while you wait. Before you know it you’ll be basking in the sunlight coming through your new door.
In the meantime, I second the need for a weekend with nothing to do except decide what to do (like brunch and antique mall browsing) :)
That paint job is perfection! And i love how you wrote S + K with the glue, very cute.
It’s looking absolutely fabulous! Well done. I especially love the island transformation. It’s beautiful!
I wouldn’t be getting too upset about the length of time everything’s taking though. My poor kitchen reno started in May 2014. The kitchen cabinets were removed in July and I was without a working kitchen until November. …and it’s still not completely finished…so take heart
It’s worth the wait.
xx
I personally would go with a lighter grout. Darker ones tend to look dirty and grimy a bit faster to me… I think about it all the time when I am at restaurants and public bathrooms. Something about lighter grout just gives the feeling of clean which is exactly what you want in a kitchen. just my 2 cents.
The island looks great… Love the hardware!
– Jaime
Total perfection! Love the color and wood combo
The “S + K” is too presh! You two are doing an amazing job. Well done on the island.
The island turned out so awesome!!!
Beautiful! Love it. Are you planning on switching up the barstools in the future? I like those stools (modern and simple), but in the photos, they sort of fade into the island. I bet a fun color would really pop against the dark island.
Thank you! We considered color, but in the end, we sort of wanted them to blend. Because the island is on wheels, the stools could end up on the other side by the sink as well, and we didn’t want a crazy color to go against our vintage runner that we’ll be laying down.
It might sound weird but I’d like to say I’m proud of you, guys. I love the way you keep going and I love everything you do because you always have great tastes. Your kitchen is awesome, really. And that island !
Marie, you are the sweetest. THANK YOU.
In the middle of deciding on stuff for our kitchen, we just gave up and started picking the first things we saw. It can be hard to wait for the exact right THING. We love everything in our kitchen, so just don’t over think it.
Looks good so far!
So – first off, I’m beyond excited that I stumbled across your blog today. Secondly, I’m insanely jealous of this husband + wife home reno blogging team, jealous in the best way possible as when I find myself a husband one day I want to do essentially the same thing (HGTV has rubbed off on me, a lot too much.) Last but not least, what a perfect idea for a dresser to become the center island, and love the overhang area for bar stools!
Best,
Josh – The Kentucky Gent
http://thekentuckygent.com
Thanks for leaving a note, Josh! Love your blog – you have a new follower!
[…] A gorgeous kitchen island DIY. […]
[…] dresser becomes a kitchen island. […]
I’ll start by saying “Wow!”, I love, love, love the island’s lines and paint color. Not to forget the walnut colored butcher block top. You really have me rethinking fitting an island into my kitchen. As a newbie DIY blogger myself, as well as a first time visitor to your page, I’ll certainly be checking out your past and future projects for more creative inspiration! Thanks,
Carol
Thanks so much, Carol!
[…] Get the tutorial at Yellow Brick Home » […]
Hi Kim! Beautiful work on the Island. I was wondering, it shows a nice smooth glossy look. Did you spray paint, use a brush, foam roller? I want to do my cabinets and have read too many postings so now I’m all confused which way to go. I want as smooth as possible! Any advice would be welcomed. Thank you.
We used a foam roller, which works great for us, but if you don’t have a lot of practice, you might be frustrated with the results… a sprayer would be your best bet for the smoothest finish, but I also think making sure you pick up cabinet self-leveling paint will make a big difference as well!
Hey! I love this so much! I’ve been dreaming up something almost identical and am thrilled to see it come to life! Would you mind telling me where you found the dresser? Thank you!
The dresser is vintage, we found it at Jubilee Furniture in Carol Stream, IL!
[…] and Scott of Yellow Brick Home struggled to find an island that allowed unrestricted access to the surrounding cabinets and had […]
[…] and Scott of Yellow Brick Home struggled to find an island that allowed unrestricted access to the surrounding cabinets and had […]
[…] ‘Yellow Brick Home‘, make a kitchen island from a dresser with this step by step tutorial. You could use a […]
[…] ‘Yellow Brick Home‘, make a kitchen island from a dresser with this step by step tutorial. You could use a […]