

This giveaway is no longer accepting entries. Congrats to Diana C, and thank you to all who participated!
If there’s one thing we could use around here, it’s a simple project (the most satisfying) and a teensy bit of normalcy. Unfortunately for us, the normalcy isn’t too close in our future, but fortunately for our spoiled, pampered (loved to bits) pup, we’ve squeezed in a mini project to enhance his every day routine. (In addition to his new yard, front porch and all day naps, this is just what he needs, right?) So while we’ve only just unpacked our plates and coffee mugs, we’ve taken the time to create a totally necessary pet food station for our main man.
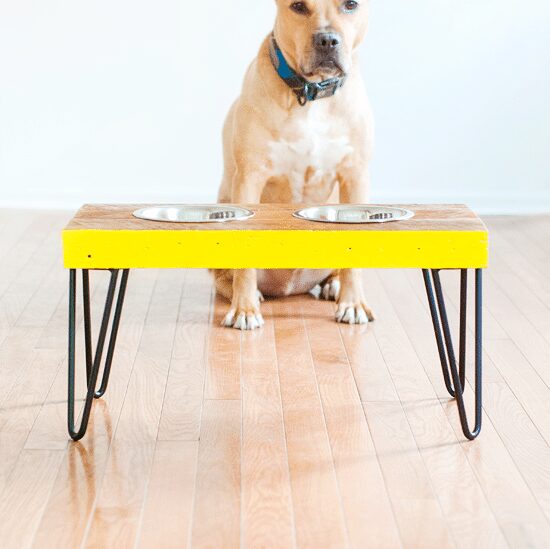


In partnership with ScotchBlue™ Painter’s Tape and The Home Depot as part of the Ready, Set, Paint Blog Hop, we put together this food station for Jack (and eventually, we’d like to make a mini one for the girls, too!) using leftover studs from our entryway. Which, besides being upcycled and doggone adorable – ha! – it also works triple duty to cheer up our sad kitchen.
MATERIALS USED:
1 – 6′ section of stud, saved from our entryway demolition
Hairpin legs (we used 9″ legs from Cream Street Shop)
2 – stainless bowls
4″ drywall screws (because our stud was so thick)
Test pot of Lemon Zest paint by Behr
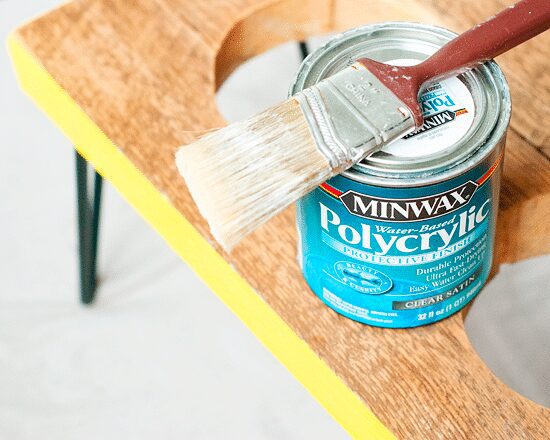
Minwax Polycrylic Protective Finish
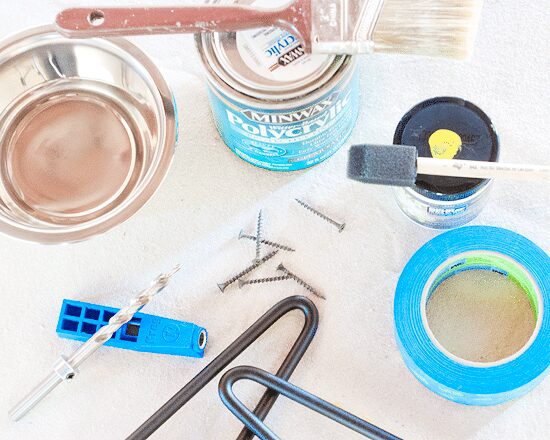
TOOLS USED:
Compound miter saw (to cut our stud into 3 usable sections)
Mini Kreg jig
Measuring tape
Drill
Jig saw
Sanding block / Mouse sander
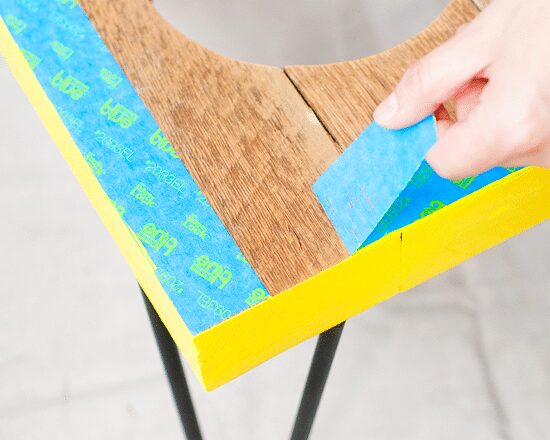
ScotchBlue™ Advanced Multi-Surface Painter’s Tape
Paint/Foam brushes
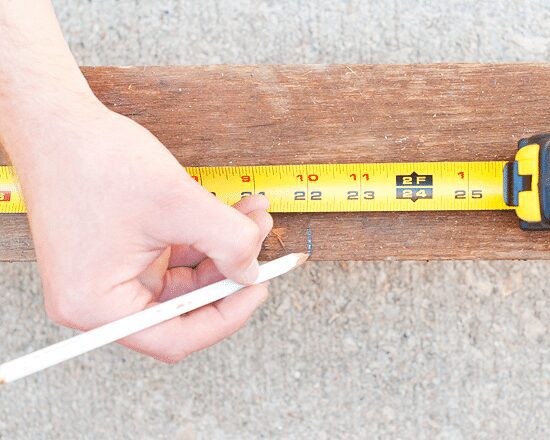
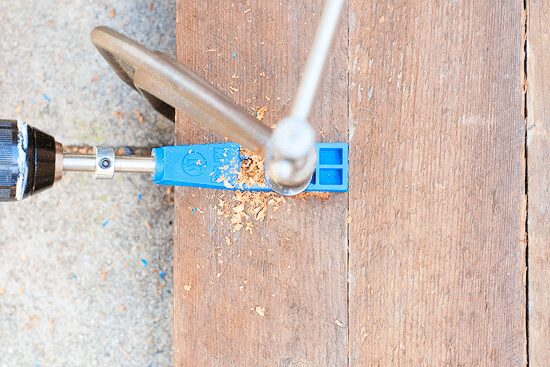
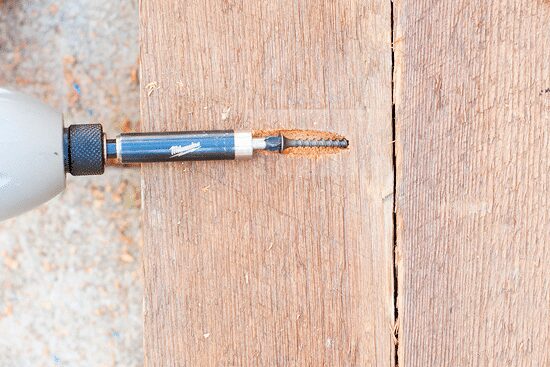
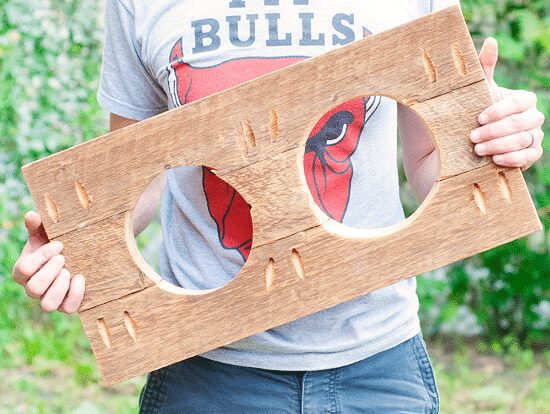
WHAT WE DID: We scavenged for a good looking leftover stud, and started by cutting it into 3 equal 22″ sections. Using our Kreg jig kit, we installed 4″ drywall screws on the ends and middle of each of the 3 pieces, creating one solid base. This will be the tray part of the food station.
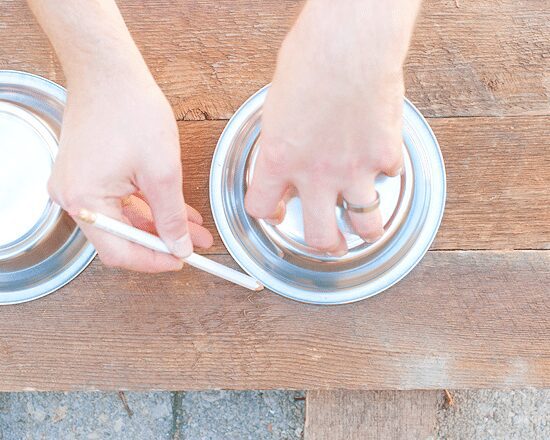
Once we had this, we took our food bowls and traced around the outside, mostly eyeballing the placement. We used our measuring tape to make sure they were floating evenly within the tray, then we…
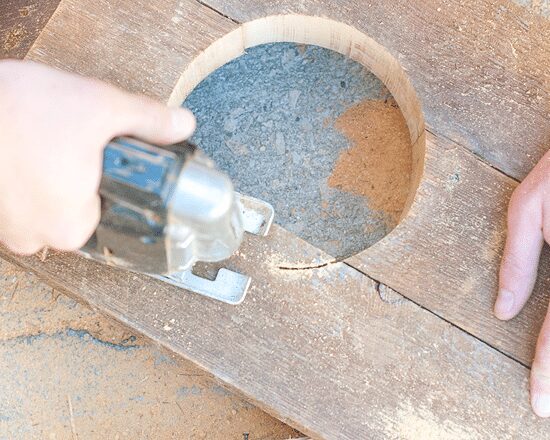
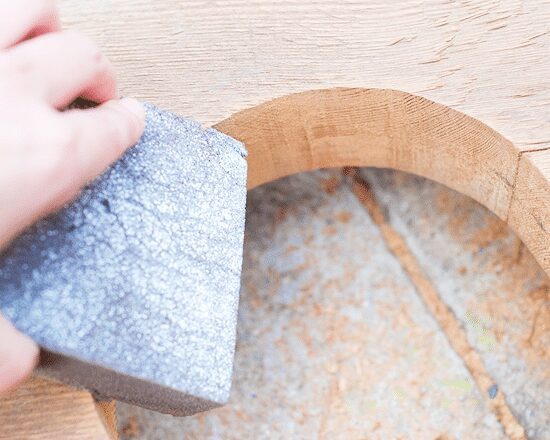
… used a jig saw to cut out each circle just inside the line. This would allow the lip of the food and water bowl to rest on top of the tray, while the remainder of the bowls would sit below the surface. I used a sanding block to smooth out any rough edges, and I followed that up with our power mouse sander to get rid of large splinters and (mostly) even everything out.
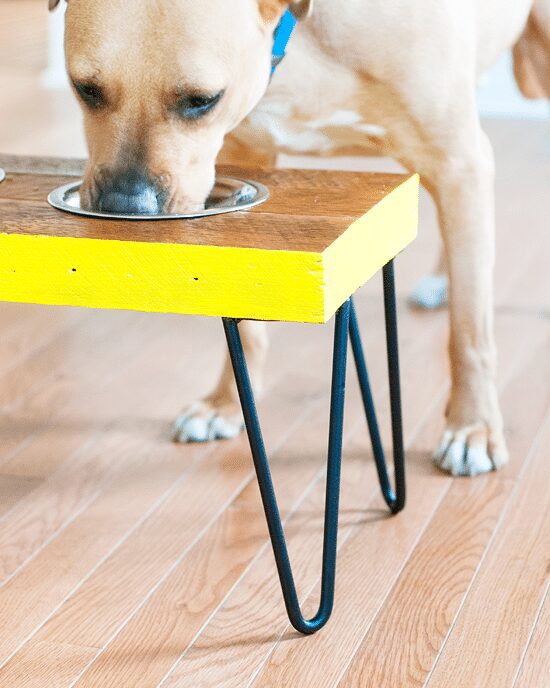
We tightened the existing screws and added a handful more – again, using the Kreg jig kit – to really pull everything together. (Below, you’ll see what the bottom of our tray looks like.) Once it was good and sturdy (and boy, is it!) we used more of the same drywall screws to install our hairpin legs.
Never having used ScotchBlue tape before, I put all my faith in it by really going for it. I lined the top of the food station with the tape, then used a small foam brush to paint the edges in the bright yellow paint (Lemon Zest by Behr). Because we like the look of the 100-year-old wood, we decided to keep all the scuffs and pocks in place – no spackle was used to fill any old nail holes.

To be honest, we were a little nervous to pull the tape up, but holy shmoly. The wood has a rough texture to begin with, and yet the line was smoother than we expected. Crisp, even.
Once the paint had dried, we applied 2 coats of Polycrylic to seal everything in and protect it from doggie water dribbles and food spills.
We allowed everything to dry and bond overnight, and by Monday morning, it was ready for its first run!

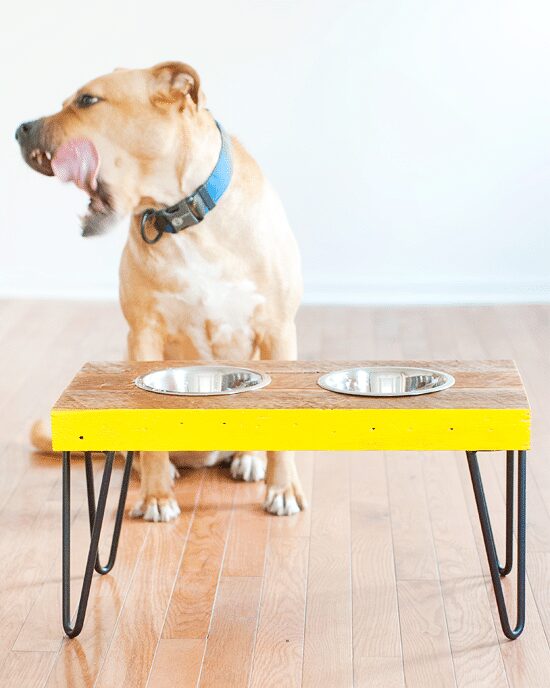
We had originally planned to trim the edge hot pink (you know we love that), but when nothing was hot enough for us in the paint aisle, we switched to the brightest yellow we could find. The bonus? The Pittsburgh pride in us loves any excuse to sing Black and Yellow.
But! There’s a bonus for you, too!
THE GIVEAWAY. As part of the Blog Hop team, we’re giving one lucky reader a $75 Home Depot gift card! The details:
- TO ENTER: Simply leave a link to your favorite summer DIY or painting project in the comments below (can be a link to your own blog, another website or Pinterest) for your chance to win the $75 Home Depot gift card.
- GIVEAWAY ENDS: Monday, August 12th, at 5pm CST
- SHIPS TO: USA only, please.
And if you’re still searching for that summertime (or painting or pet-loving) inspiration, we encourage you to check out the following projects from fellow Ready, Set, Paint Blog Hop teammates:
- Centsational Girl: Textured Panel Dresser Makeover
- Thrifty and Chic: Framed Stencil Wall
- The Design Confidential: DIY Concrete Color Block Painted Tables
- Sand & Sisal: Faux Etched Glass
- The Girl Creative: Summer Chalkboard
- PB & J Stories: Dipped Effect Outdoor Bench and Front Patio Makeover
- In My Own Style: How to Paint Outdoor Furniture
- Making this Home: Embellish with a Paint Border
- Rustic Bench Gets Modern Moroccan-Inspired Makeover
- Dream Green DIY: DIY Game Table


- House of Earnest: Fun with Fireworks
- Charles & Hudson: Wood Block Planter
- Love of Family and Home: DIY Striped Curtain
- LollyJane: Mailbox Makeover
- Nesting Place: Painting with Chalk
- Thistlewood Farms: How to Paint Stripes
- Live Laugh Rowe: DIY Drop Cloth Table Runner
- SawdustGirl – Spray-Painted-Striped Lemonade Stand Canopy


The lucky dog winner will be selected using random.org on Monday, August 12th at 5PM CST. Good luck and happy entering!
This post was brought to you in partnership with The Home Depot and ScotchBlue™ Painter’s Tape. Opinions, cute dog and Steel City love are all ours.


I love making things for my little girl. I’d love to make a sandbox.
My favorite summer projects would be yard twister or giant jenga (http://community.homedepot.com/t5/Playdate-Projects/Building-a-Giant-Jenga-Game/td-p/48259). When complete, it’s a great time for everyone!
I color-blocked a clock (mint and gold) earlier this summer and I’m still loving it! http://annebronkema.wordpress.com/2013/06/26/color-blocked-clock/
This DIY painted peacock chair is beautiful!–http://pinterest.com/pin/400046379370526761/
My favorite painting project ever was this stencil wall I did a couple of summers ago: http://placeofverdure.blogspot.com/2011/09/blue-on-blue.html
Your project turned out great! Nice to do something manageable in the midst of chaos.
Love that! My favorite summer DIY project was when Daniel made an adirondack chair out of an old pallet, but before this summer is through, I’d like to make a headboard for our bed and a $75 HD giftcard would be verrrrry helpful in making that happen! :)
I am hoping to find something similiar (and cheaper!) than this to pain bright pink for my 4 year old’s room:
http://www.rosenberryrooms.com/515-simplicity-mirror.html
That’s so funny, I was looking at doing something really similar to this a week or two ago, but couldn’t find hairpin legs within my budget. I was thinking about using a skateboard deck as the bowl base too.
A project I’d like to do this summer would have to be this: http://pinterest.com/pin/93520129734930522/ I’m all about making an entryway table with pipe right now…
i kicked off my spring/summer craft season this year with a little spraypainted tray for my coffee table.
http://amidawn.blogspot.com/2013/04/how-to-paint-tray-and-maintain-your.html
would LOVE a HD gift card – we spend so much time and money there :)
I’ve not tried this yet, but I think it would be a fun project: A combo planter/bird bath in a bright summer hue! http://pinterest.com/pin/68257750574408678/
I made this DIY chalkboard dog bowl which I love! http://www.ammothedachshund.com/2013/04/25/diy-chalkboard-dog-bowl-under-5/
P.S. Love Jack’s new bowls – so fun!
This is staining, but I’m in love with the darker stain on our front porch that I did a couple weeks ago. It’s so much better than orange!
This isn’t my project, but I love this project for painting glassware – it’s been so easy to do as a painting project in my tiny apartment!
http://ohsolovelyblog.blogspot.com/2012/05/entertaining-made-lovely-diy-glass_01.html
I was silly to not have taken a before photo, but I bought these matching side tables off craigslist that were solid wood, and unfinished! It was a total steal, so I bought them, brought them home and I am in the process of finishing them off. I am painting the bottom white, and staining the top and drawer fronts a beautiful dark walnut!
Here’s an in-progress! http://img547.imageshack.us/img547/6571/a54q.png
LOVE! We actually just bought Tess something similar, but this is SO. MUCH. COOLER. This might be what we have to do for Edi’s station.
Since painted front doors are all the rage, and ours is beige against the grey-white siding, I’d love to paint it a darker grey or blue, like this: http://www.younghouselove.com/2013/07/the-door-is-the-smile-of-the-house/
On my to-tackle paint list: Ombre Stairs!
http://pinterest.com/pin/265079128039788471/
Thanks!
Erin
I’ve got to get started on painting some walls in my new apartment. Thinking about doing something fun like stripes! http://pinterest.com/pin/96264510758258379/
We’re rebuilding the front steps to our little cape cod. Previously, we had this ugly, poured/molded concrete steps, but are replacing them with steps like this:
http://pinterest.com/pin/42713896437962656/
We’re using composite materials for the risers and exotic wood for the treads so they last for a good long while!
I am hoping to make a couple of these diy rope leases for my pups this summer! http://dog-milk.com/dog-i-y-modern-diy-rope-dog-leash/
I made a pallet table for my front porch this summer. We are loving it! http://www.thecreamtomycoffee.com/2013/06/diy-circular-pallet-table.html
http://ana-white.com/ Ana, is my go to for furniture plans, since my summer involves making tables and beds for family.
I love anything with chalkboard paint!
http://style-files.com/2011/12/20/diy-chalkboard-paint-mugs/
I would love to build some custom planter boxes for my balcony.
I did something similar for my dog’s food/water station with an old pear crate I had picked up at a local store months before I knew I’d even be getting a dog (it used to house blankets). :)
This was my inspiration: http://pinterest.com/pin/274367802270036917/
I’m wanting to do something like this project. I love a brightly painted door!
http://pinterest.com/pin/199002877253918915/
I’d have to say my favorite painting project so far this summer was when we de-wallpapered and repainted our entryway and stairs:
http://www.rathersquare.com/2013/07/painting-the-entryway-stairs-and-hallway/
It made such a difference (the original walls were mustard yellow with a blue-flowered wallpaper border), and since there was a lot of cutting-in around windows and doorways, we definitely taped those off. The new paint color is a pale warm gray and it makes the space so much brighter and cleaner looking.
Now I’m thinking about making this pet food station for our cat! It looks fun.
I’m trying to convince my boyfriend to do a frosted glass treatment to let some light in but maintain privacy. Just trying to find the cheapest yet most functional solution. http://ricedesignblog.com/2013/04/24/diy-frosted-glass-and-our-upstairs-bathroom/
I hand painted and sewed a duvet cover for summer!
http://sewbon.com/2013/07/09/tutorial-hand-painted-duvet-cover-from-two-flat-sheets/
Love the hairpin legs on your pet food station! And yay for giveaways!
I’m loving the following bench right now. It’s the perfect mix of wood and paint to me and would be perfect for our dining table. I hope to build one soon and paint the middle white instead of orangey. :) http://pinterest.com/pin/85427724153989977/
Yours and Daniel’s posts lately have been my favorites, since you’re both tackling an old house like me (though mine is a baby compared to yours). So I’m gonna link to Daniel’s painted kitchen, because he is working miracles in there: http://manhattan-nest.com/2013/07/30/paint-and-tile/
I love this pet bowl you made too! I need something like that to keep my dogs (and husband) from kicking over the water bowl onto the laminate.
My favorite is the “Jar of Summer!”
Also, I’m IN LOVE with your blog; I hope I win the gift card! It would be an amazing kick start to my fall crafting! Thanks <3
I forgot to post the link! Woops : )
http://gardenmama.typepad.com/my_weblog/2010/09/my-entry-1.html
I’m still a huge fan of the pallet wall we did in our living room: https://houseofgold.wordpress.com/2013/06/18/this-project-is-brought-to-you-by-the-number-zero/
Painting, salvaged wood, and free! Doesn’t get much better than that…
love this! been looking for a raised dog food station for our little mutt but none of the standard heights out there are what we want and the adjustable ones are unattractive. this is perfect, thanks (=
I love this! Now if only I had a dog… does this work for children’s food, too? Haha!
I am a sucker for bringing nature in as home decor, I also love painting whatever nature I can find to add color for some interest. So my favorite DIY so far has been painted tree rings. http://www.turningithome.com/2013/02/pinterest-challenge-painted-tree-rings.html
I repainted the edges of my coffee table a bright tangerine orange. I love the unexpected color :)
I’m using this porch as inspiration for a small side porch diy project. Adding new posts and a railing system, painting the concrete because the old carpet glue won’t come off, and a paneled ceiling painted blue rather than gray.
http://www.sdimn.com/sites/default/files/imagecache/full_size_rounded/gallery/HPIM0434%20front%20porch%20and%20railing.jpg
Wow, I LOVE your pet food station! The yellow + hairpin legs + rough wood is a stellar combo. Really nicely done!
I’m still digging this dresser makeover I saw on Pinterest a while ago: http://www.brittanymakes.com/2013/04/09/craigslist-dresser-makeover/
Thanks for hosting this giveaway!
I like this:
http://pinterest.com/pin/6614730675803884/
Great job! Maybe we should make this for our cats. A painting project I’ve like this summer is that Moroccan inspired bench on Curbly: http://www.curbly.com/users/diy-maven/posts/15113-rustic-bench-gets-modern-moroccan-inspired-makeover
Love this! We’ve been meaning to make something like this for the dogs’ bowls.
So far my favorite summer project this year was installing our new front door (this one from Home Depot), and it goes hand in hand with my favorite summer project of all time, which was our 2011 curb appeal.
I love love love this kitchen reno by Chris Loves Julia.
http://pinterest.com/pin/224968943859189487/
It’s simply stunning.
I am in the middle of painting most of the rooms in my 1950’s home right now…so any inspiration I find online is a help! $75 to Home Depot would be wonderful!!!
We are in the process of building this: http://pinterest.com/pin/219761656789768942/ for our new deck.
My favorite summer paint project so far has been painting our dining room from hurt-my-eyes red to cottage gray! http://lifesoneextra.com/2013/07/17/c-ement-to-be/
I saw this one off of pinterest! http://www.bhg.com/decorating/do-it-yourself/accents/easy-decorating-projects/
Super easy way to make some low price artwork for bare walls.
My wife and I recently refinished a vanity we bought for her turquoise – it was a ton of fun!
What an awesome project… maybe Boomer and Dottie should have eating stations once we move…
Anyway… my favorite project and one that I hope my hubby will tackle in the future is this DIY mirror from Our Waldo Bungie. http://waldobungie.wordpress.com/2012/08/13/seven-years-of-bad-luck-avoided/
I love the idea of doing something liket his for a pop of color in our soon-to-be office! http://pinterest.com/pin/38702878018918590/
I will be moving soon, so a gift card of ANY kind would help a lot! :D :D
My favorite paint/diy project this summer is one my friend Kirsten recently blogged about. She and some friends repainted the roller hockey rink for the Virginia Tech Roller Hockey Club!! It looks awesome, and Bonus! – they used what looks like blue painter’s tape.
http://paintspeckledpawprints.blogspot.com/2013/06/a-roller-hockey-rink-reveal.html
I like this project-http://pinterest.com/pin/56787645274304342/
This is the cutest food bowl! Love the bright color.
My end of summer project is going to be along the vein of Thistlewood Farm’s sofa table but to be used as a console table in our entryway. We just bought an old 1910 Colonial house with a lot of charm and instead of using a sofa table that I can buy (also because none really speak to me) I decided I wanted to make one that had just as much character as my house.
I love the idea of taking table legs and another piece of wood to craft a table. I am thinking a twin sized footboard and some legs might do the trick! A gift card from Home Depot would surely make the project go that much smoother :)
http://www.thistlewoodfarms.com/how-to-build-a-sofa-table-the-easy-way-2
I already have the cart, now it is time for the hack!
http://www.thekitchn.com/an-ikea-kitchen-cart-with-a-bi-149629
I want a Mini Kreg Jig!! I painted and spruced up my small washer/dryer closet! I made it fun and added polka dots in metallic silver paint…it looks WAY better! Hope to win thank you!
I love garden projects, so here is mine:
http://www.scotts.com/smg/goART2/InfoHowTo/creating-a-vertical-garden/10700020/1700014/21300005/7800010
That is FANTASTIC! I must make that sometime this summer.
For now, my little project is making pots like these. I just am sick of plain terracotta!
http://pinterest.com/pin/153122456053393612/
this lazy day hammock is my fave summer diy project http://pinterest.com/pin/100768110385525151/
I’ve discovered Aura paint (Benjamin Moore) which is my dream paint. Painted my dining room, doing the accents (trim, inset) this weekend. Hallway is next!
http://annienpaulsworld.blogspot.com/2012/10/paul-v-screen.html
Ok, so replacing the screens in our windows isn’t my favorite project, it’s about the only DIY project on our blog. Happy Tuesday!
I love these DIY Industrial Shelves:
http://pinterest.com/pin/122512052335160071/
I like this pumpkin DIY:
http://pinterest.com/pin/25755029092206523/
Because it’s summer, I have time to pretty up all these would-be storage in time for school.
http://cynthiashaffer.typepad.com/blog/2010/12/painted-tins.html
I would LOVE a fire pit for our (shared) backyard!
I REALLY want to try this because my sister wants an upholstered-framed mirror!
http://pinterest.com/pin/18718154673632314/
http://media-cache-ak0.pinimg.com/originals/5b/26/a7/5b26a7b6244533b8f95b8e7aa6f72b1d.jpg
This full-length mirror hides storage between wall studs. Awesome!
I like yellow too!
I Like this project to create a butterfly container garden
http://pinterest.com/pin/190206784235172613/
I really want my husband to make a pergola like this:
http://pinterest.com/pin/53832158019156704/
demureprincess7(at)gmail(dot)com
http://www.younghouselove.com/2010/02/nursery-progress-getting-the-hang-of-it/
We only have blinds at the moment.
Cornices for baby’s room: http://pinterest.com/pin/228557749808535594/
With all the sun Seattle is getting…I needed to brighten up my room with some colorful prints. I was browsing blogs and came across these free printable art! I love them. Now, I need to run to ikea and pick up some frames so I can put this babies around the house. (http://smittenonpaper.com/blog/?p=5211)
p.s. I have been scouting for dog bowl ideas and I have always been fond of the bowls being off the ground, but I can never find one in the store that matches my style. I might have to reconstruct this for my two pups because I love the way it looks! Thank you for the tutorial.
I want to make an herb garden using an old pallet this summer: http://diyshowoff.com/2013/05/15/free-standing-pallet-herb-garden/
We’re finally getting around to repainting some furniture. I’m planning something like this for an old dresser:
http://pinterest.com/pin/255157135111154657/
As a mom of 4 I love this
http://pinterest.com/pin/85357355407375401/
Just bought a house and can’t wait to put a swing on my giant oak tree in the backyard. Like this: http://www.etsy.com/listing/54946917/repurposed-dining-room-chair-tree-swing
Not a tutorial but looks easy enough!
The tutorial calling my name is: http://www.lovepomegranatehouse.com/how-to-paint-your-front-door/
Paint my front door a fun color!
I’d love to get to these painted travel boxes soon!
http://anightowlblog.com/2013/02/martha-stewart-living-march-issue-crafts.html
A couple years ago my father in law made a dog bowl station for our Bernese since she was getting old and I thought it was help her. She completely refused to eat from it, but would drink her water. She was such an odd one. When we got our bully he was happy to use it though.
Wow – that pet food station is just awesome – I love that! I really love this painting project and would love to try this in my office! http://thepaintedfurniture.com/chalkboard-paint-a-great-idea-for-kids-furniture
http://www.dreamgreendiy.com/2013/06/24/bloggers-hop-game-table-featuring-scotchblue/
current favorite completed project is my backsplash!
I love this patio table DIY – wish I had the space to create it!
http://decorandthedog.blogspot.com/2013/06/diy-outdoor-patio-table-tutorial.html
I love this DIY headboard project!
http://www.instructables.com/id/Woven-Headboard/
I would like to glaze the cabinets in my laundry room.
http://pinterest.com/pin/277675133248225811/
jslbrown_03 at yahoo dot com
[…] ONE // Love this dog bowl holder from Yellow Brick Home TWO // Loving the black walls in this inspiration post from 6th Street Design School THREE // This mug from Etsy store ChantillyStay is SO GREAT FOUR // Loveeeee this pipe desk from Cafe Cartolina. I MUST MAKE ONE FIVE // Mandi from Vintage Revivals is seriously my idol. Love this Concrete planter idea! […]
i love the bench with the Moroccan-Inspired Makeover, although i’ll definitely need help to make it look half as nice
http://www.curbly.com/users/diy-maven/posts/15113-rustic-bench-gets-modern-moroccan-inspired-makeover
As a dog rescurer we have several older smal dogs that crave sunbathing. We are in the process of constructing them an outdoor “sofa” found on Pinterest using concrete blocks and smooth concrete block tops. I purchased some clearance patio chair pads to cover it. .Just trying to find time to finish up. Would so love to win a Home Depot gift card. fingers ( and paws) crossed.
Here’s a link to a website. I love this porch swing, perfect for summer nights!
http://www.shanty-2-chic.com/2013/06/porch-swing-diy.html
Cute project! I am going to pin it for a future project, my poor dog lays down to eat!!
This project is another one of my faves
http://www.twindragonflydesigns.com/2013/05/plant-print-paintings.html?m=0
and I plan to get to it as soon as I finish all the other ones I have planned.
http://tradewindtiaras.blogspot.com/2011/09/how-to-make-mirrored-cake-stands.html. Love dollar store crafts!
http://pinterest.com/pin/206180489163646063/
Looking forward to painting my jewelry box!
I would like to re-do my garage floor like this blogger did – so nice!! http://www.shanty-2-chic.com/2013/05/easy-garage-makeover-and-a-giveaway.html
Im loving this paint chip art http://www.craftaholicsanonymous.net/paint-chip-art-with-ombre
I love these swings: http://www.designrulz.com/design/2013/07/fantastic-summer-diy-project-build-swings-around-a-campfire/
I love gardening, so this year I planted out on my balcony – found a bunch of ideas on pinterest how to use the small space better next year by building racks
Love this wall http://pinterest.com/pin/28780885091809993/
Thank you for offering such a generous giveaway. I absolutely love Charlie’s washer and dryer retro makeover!
http://alittleoffcolor.com/laundry-will-never-be-boring-again/
I like this dresser makeover:
http://pinterest.com/pin/110478997082301452/
I’ve gotta say, THIS is my favorite Summer DIY project! I’m going to make two for my pups this weekend! https://yellowbrickhome.com/
I want to make this: http://www.apartmenttherapy.com/the-unwaste-station-a-cool-diy-145463
I would love to make this three dimensional photo collage.
http://pinterest.com/pin/243968504786668847/
Diana C
unachica_latina(at)yahoo(dot)com
This is just like the headboard I made. Mine was king size and I’m super proud to have made it myself! I let my husband help me screw the 4 x 4 posts on and then finished the top myself. Love it!!!! :)
http://pinterest.com/pin/238690848970608623/
[…] a unique pet bowl station for your pooch with Yellow Brick […]
[…] gets donated every month to a local dog rescue. Those are definitely MY kind of people. And the dog food stand they made for their main man is definitely MY kind of style. This probably also clarifies as a […]
This wall-mounted desk is on my list — http://www.flickr.com/photos/16nine/2187592263/in/faves-soyousay/
[…] DIY Pet Food Station […]
[…] with Chalk Sawdust Girl – Lemonad Stand Canopy Thistlewood Farm – How to Paint Stripes Yellow Brick Home – DIY Pet Food Station Design Love Fest – Make it 40 Vintage Revival – Color Blocked Wicker Headboard At the […]
[…] Runner SawdustGirl – Spray-Painted-Striped Lemonade Stand Canopy Make It: Painted Horseshoes DIY Pet Food Station Spearmint Color Blocked Vintage Wicker Headboard DIY Mason Jar Dining Caddy Build a Large Wall Frame […]
[…] : SawdustGirl – Spray-Painted-Striped Lemonade Stand Canopy : Make It: Painted Horseshoes : DIY Pet Food Station : Spearmint Color Blocked Vintage Wicker Headboard : DIY Mason Jar Dining Caddy : Build a Large […]
[…] Get those messy bowls up of the floor (& looking stylish!) with this diy from Yellow Brick Home. Use shorter legs for smaller furry family members […]
What size wood did you use? I love the thickness of this!
Thanks, Korrin! We actually repurposed old 2×4 studs from our house!
[…] making Jack his personal set-up, we introduced Chunk to the family, and so we made a larger one, as any sane pet owner would do […]
[…] 1 – 6′ section of stud, saved from our entryway demolition Hairpin legs (we used 9″ legs from Cream Street Shop) 2 – stainless bowls 4″ drywall screws (because our stud was so thick) Test pot of Lemon Zest […]
[…] Made from old studs, this adorable dog feeding station works double duty to cheer up a dull kitchen. Get the procedure here. […]
[…] Made from old studs, this adorable dog feeding station works double duty to cheer up a dull kitchen. Get the procedure here. […]
[…] Made from old studs, this adorable DIY dog feeding station works double duty to cheer up a dull kitchen. Get the procedure here. […]
[…] bowls so you dog can be more comfortable. Add your own twist to this simple design featured on yellowbrickhome to make it […]
Love that you are using hair pin legs, my coffee table has