

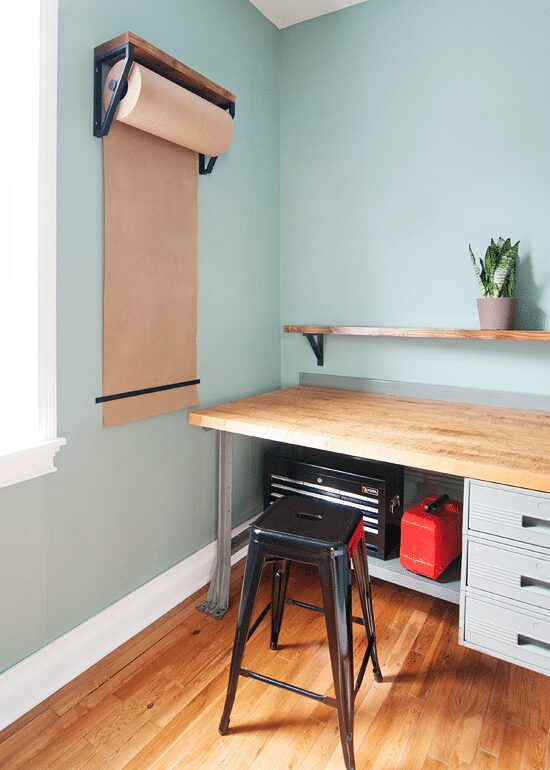
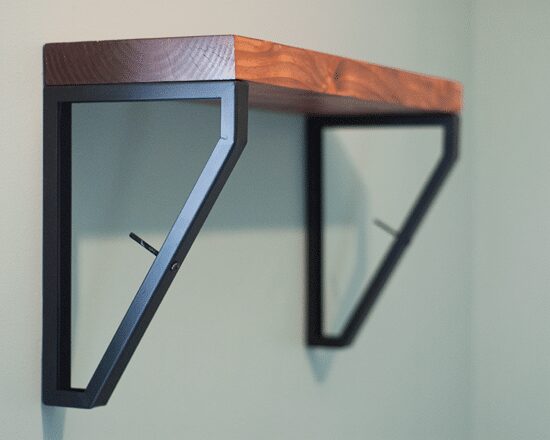
We’re all about the wall mount in this tiny workshop, apparently! I was completely inspired by this studio roller, and after running the idea past Scott – we can make this!, I said – he was on board and agreed it would be a simple enough DIY. It is a simple enough DIY, although we did run into one glitch – more on that in a minute. In our execution, we liked the idea of adding a shelf across the top for stashing a plant or leaning a photo – or for the extra tall (aka: anyone but me), it would be a landing spot for storing markers.
Before any weekend, we typically go through a list of home-related to-dos, often times drawing each other diagrams on scraps of paper to get our ideas across. These papers are tacked to the fridge so we can both stay on track while having the satisfaction of crossing items off, but now? We can keep these lists, notes and sketches in the workshop and use a big red marker to slash through the completes. Yea!
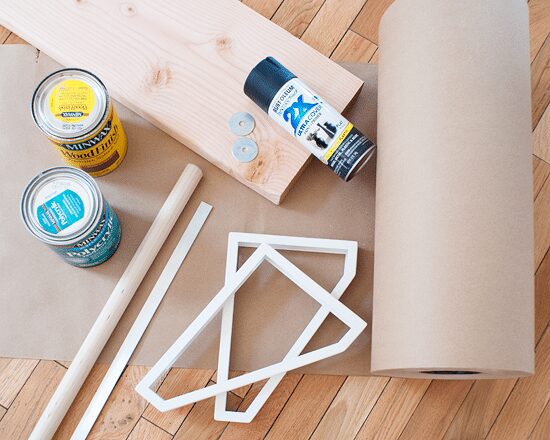
SUPPLIES USED FOR 20″ KRAFT ROLL
20″ kraft paper roll
2 – Ekby Lerberg IKEA shelf brackets
1 1/8″ dowel rod
2 – 1 1/2″ washers
3′ flat aluminum bar
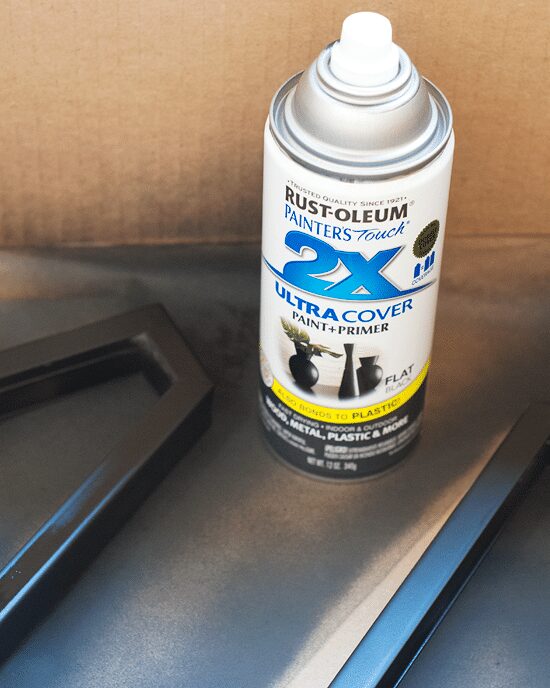
Flat black spray paint
2″ x 10″ x 8′
Wood stain in Special Walnut
Polycrylic in satin
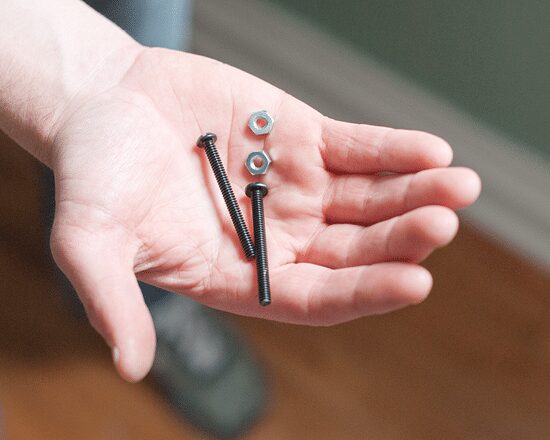
2 – 2″ nuts + bolts (not pictured above)
50 lb. anchors (not pictured above)
Drywall or wood screws (not pictured above)
TOOLS USED
Miter saw for cuts
Table saw for squared edges (see alternative in step-by-step)
Dremel w/ metal attachment
Drill + right angle adapter
Measuring tape
Orbital sander
Paint brush and/or rags for stain/poly
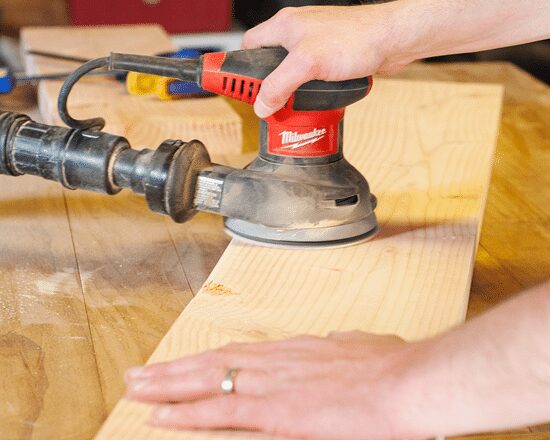
WHAT WE DID. We prepped all of our supplies by making cuts, drilling pilot holes and spray painting. In our supply list, you’ll notice that we used a 2″ x 10″ for the shelf, which might be overkill to replicate since it bears little to no weight. In our case, we pulled double duty and built that shelf along the wall above the workbench, squaring the edges on our table saw and ripping everything down to the right depth. For anyone else, a 1×8 piece of pine would work just as well, since you’ll want to have a 7.5″ depth once you’re done.
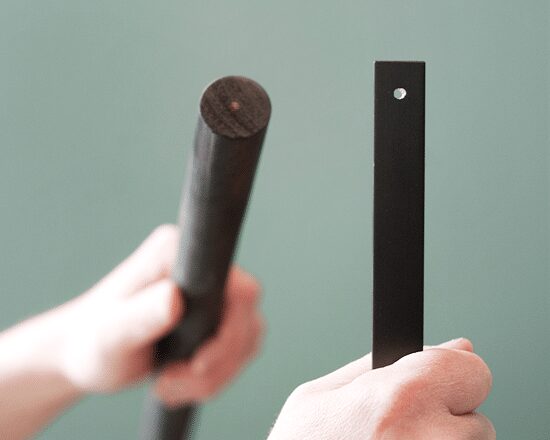
For a 20″ kraft paper roll, we cut our 2×10 to 23″ x 7.5″, the dowel rod to 23 1/8″ and the aluminum flat bar to 22″ (using the dremel). If you’re using a smaller or larger paper roll, you can add or subtract your measurements all the same! I then sprayed the brackets, dowel and washers with flat black spray paint.
Scott drilled pilot holes on both ends of the dowel rod and aluminum bar, with the bar’s holes being large enough to easily fit a drywall screw:
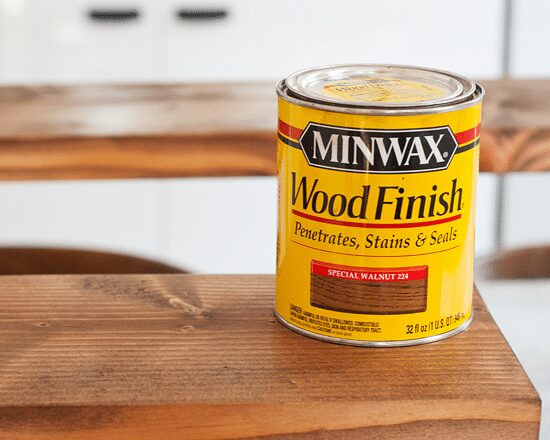
The shelf was sanded with our orbital, and I followed that up with two coats of Minwax Special Walnut stain using a rag, and with a paintbrush, I applied two coats of Polycrylic in a satin finish.
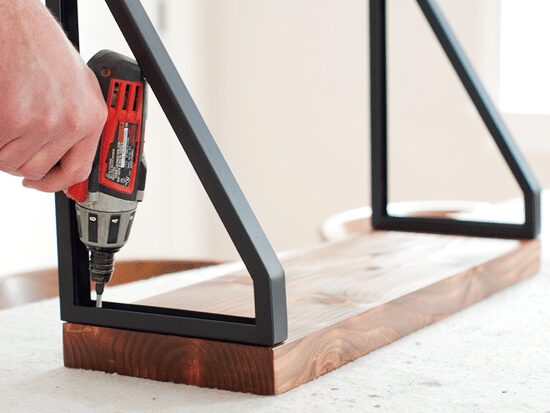
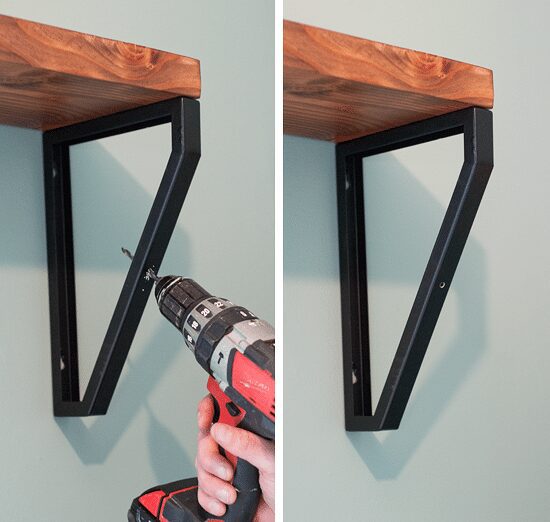
Once the poly was dry, Scott drilled small pilot holes and used wood screws to attach the brackets. Our preference was a perfect fit (as our measurements above indicate), so the brackets went end-to-end and edge-to-edge.
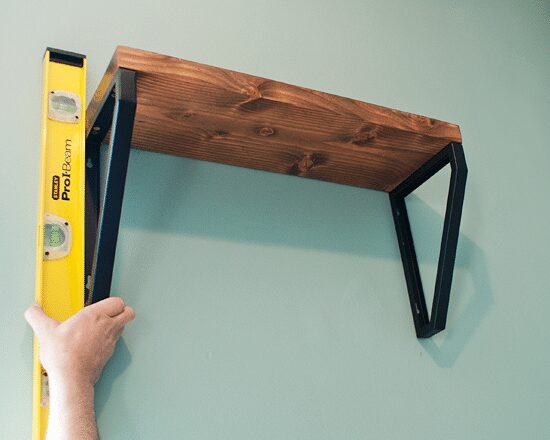
We eyeballed the height and placement, keeping in mind that the writing area is below the bottom of the brackets! The unit was anchored into the wall, using a level to ensure everything lined up properly. A right angle drill adapter was used to anchor everything in place, but measuring everything beforehand and slipping it on would work too for a little extra effort. On a side note, we’ve been using and loving all in one anchors (50 lb.) to make the job even easier! Tip: The brackets needed leveled along the sides and a gentle nudge to make sure they were straight up and down. They flexed easily enough to make this happen.
With all the drilling and anchoring, you’re bound to have a few scuffs on your freshly painted brackets, so we touched those up using a cotton swab. I’ve shared this before, but I think it’s worth mentioning again; just spray the paint into the lid until you have a small pool to pull from!

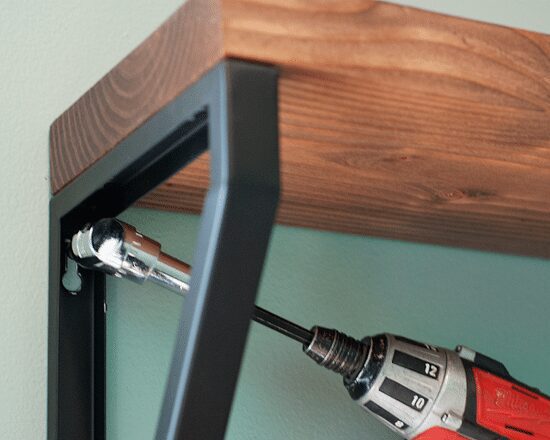
Now, here’s where things fall off track. The idea behind using these particular Ikea brackets was to build in a self-roll-down – meaning, as the paper roll gets thinner with use, it will naturally roll down the bracket and stay flush against the wall. Unfortunately, once we put the dowel rod + paper in place, the roll itself was too heavy, and the friction against the wall proved to be too much! It would. Not. Budge. We had discussed beforehand that this might happen, but I was stubborn and wanted to push through, so, lesson learned.
But! Scott came up with the EASIEST solution! We rummaged through our bins and buckets of loose screws and found these 2″ nuts and bolts (which I sprayed black for a seamless look).
Then, Scott drilled right through the bracket, about a 1/2″ up from where the dowel rod was originally sitting. We just screwed the bolts into place…
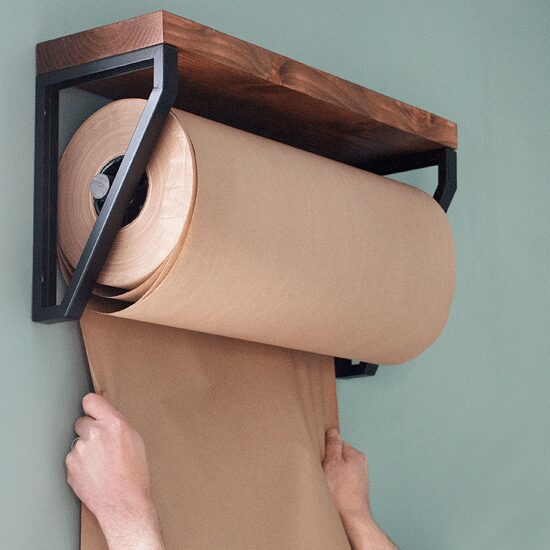
… and then we put the dowel and roll back in place, now resting on the 2″ bolt. It worked! It rolls! The dowel stays static (so there’s no paint rubbing or chipping), and the kraft paper is off the wall just enough that it spins with ease. From there, we used wood screws to secure the washers to the ends of the dowel rod.
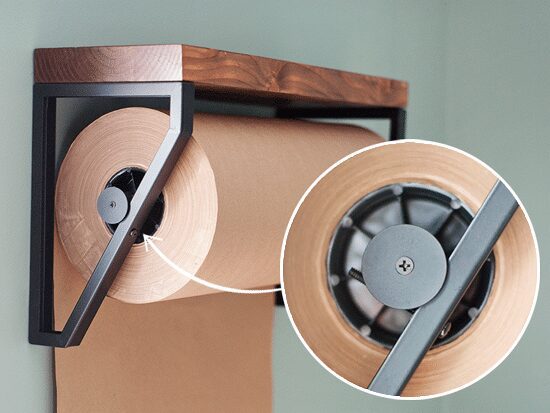
While our solution gives the roll a fixed place, we still love the look and simplicity of the brackets. As the paper gets really thin down the road, we’ll likely have to install another aluminum bar under the base of the brackets, or if the paper gets light enough, we could move the dowel + paper under the bolts and roll with the original plan.
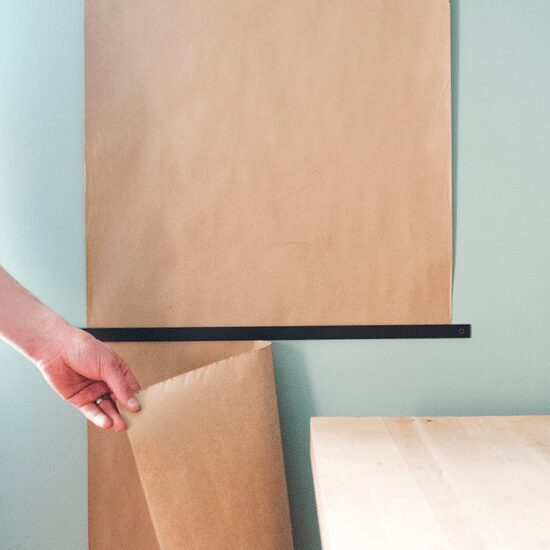
Finally, we used drywall screws to attach the aluminum bare towards the bottom of the paper – loose enough so that the paper doesn’t get stuck, but no loose that they feel flimsy. When we’re ready for a fresh sheet (and ready to kiss last week’s to-do buh-bye), the paper easily tears away!
Again, the leftover 2×10 was turned into a long shelf above the workbench using the Ekby Valter brackets. It’ll stay mostly empty as an additional space to spread out and, most importantly, be the space where we keep those jars of loose screws. We’ve got plenty of those. (Ha!)


So this DIY is great. But what is awesome is the anchors & the right angle drill attachment. Um, I hang a lot of things on walls and put together a lot of awkward furniture- why did I not know about these?!!? Mind blown.
love this! a mini version would be great a kitchen for grocery lists. thanks for the idea!
p.s. just curious, but why didn’t you just use a 2×8 for the shelves?
It would be great for a kitchen – or a playroom too! A 2×8 is really only 7.5″, so once we rip off the rounded edges, it would fall short at about 7″. We just prefer the look of the squared edges! On the other hand, a 1×8 would be perfect, since those edges are already squared, but we wanted the leftover for that hunky shelf above the workbench.
Love this idea! It would work great for so many ideas!
This is awesome! I absolutely love this! I bet you could use something like this in your studio for packaging up those amazing little portraits you do. :)
I’ve wanted one since I was a little girl and I used to draw all over my grandma’s. You’ve totally inspired me and reignited that desire! Awesome DIY, Vargos!!! Can’t wait to find a spot for this in our house!
I could not love this project any more. I have a honking roll of craft paper that I just feel moving around and hiding behind doors and in corners. No more! Thanks for the inspiration!
I am in LOVE with this DIY – I so want to replicate this for our boys’ playroom! :)
I love this! So functional and stylish.
I love this so much it makes me want to just freak out! Seriously haha. You both are just so amazing, and talented. I was reading the past post for grouting tiles and shook my head in just at how beautiful the kitchen came together, down the cabinet pulls. At this point, youre pretty much building my dream house. Love the paint color in here too with the wood and black accents. Bravo!
Well, you know how to make a girl happy. Thank you!
what right-angle adapter are you using? we totally need one of those!
It’s just the Milwaukee brand adapter that goes with our Milwaukee drill! Best drill ever, by the way.
A compulsive list-maker (me) fantasy project. :)
Looks so good, and convenient! Really loving the stain color too. :)
This workshop is turning out so cute! Love this idea.
Josh – The Kentucky Gent
http://thekentuckygent.com
what an awesome DIY! I’d love to use something like this in a kids space too!
thanks for sharing
xo
megan
http://www.otomihome.com
Hi Kim! New to your blog and love it.
Did you use wood conditioner before applying the stain?
Also wondering if it was significantly lighter after only the first stain coat? I’m trying to find the right stain shade for a new pine table. Thanks!! :)
Hi Sarah, welcome! The stain does get darker with each coat, but it really depends on what color/look you’re going for. We wanted to darken these up a little more than the first coat color for a medium tone, but one coat is a tiny bit lighter… Darker stains (such as dark walnut, Jacobean or Ebony, all Minwax products) get MUCH darker the more you layer in our experience. I’d suggest buying a plank of pine and playing with a handful of stains – mixing and matching until you get the look you want! It’s worth it to spend the extra money on smaller pots before committing to your whole table.
Hi Kim, great idea. Thanks for the advice :)
Maybe this is already mentioned but I am curious… I had a wall mounted wrapping paper roll like this and once you pulled on the paper it never stopped. Have you experienced this with this setup or gotten to the last bits of the roll to see if it does that ? I love this but I have a active 2 year old that would go crazy with it if it came off like a roll of toilet paper. Thanks!
Hi Annie! Hmm, we haven’t experienced that yet. We’re only about 1/3 through the roll, so I’ll have to keep that in mind as we near the end. Also, the metal strip along the bottom is tight enough that paper doesn’t continually slip through.
[…] yellowbrickhome […]
[…] yellowbrickhome […]
[…] grow. They can even use the paper to takes notes as a daily planner as they grow into their teens. Check out this tutorial for DIY instructions on how to install […]
[…] Yellow Brick House […]
[…] Yellow Brick Home […]
[…] (Image credit: Yellow Brick Home) […]
[…] (Image credit: Yellow Brick Home) […]
I purchased a roll of kraft paper to use in my kitchen once the “remodel” was done. Not having the means to spend a fortune on brackets to hold the roll securely I came across your project thru Apartment Therapy. WOW!!! A perfect and inexpensive DIY project. I really like the idea of adding the bolts to hold the dowel rod in place allowing the paper to roll freely, not rubbing against the wall yet setting close to the wall. I’m looking to find a used wooden school ruler from when my kids were in school to use as the bar for tear off. If not I will go with your aluminum bar painted black.
This will go well with my cast iron brackets used for my open kitchenshelves.
Do you still use this diy? What happens when the paper is light enough? Do you move it under the bolt? Did you also install another aluminum bar to keep the paper flush against the wall?
I’m thinking about making this!
[…] Foto: Yellow Brick Home […]
[…] Foto: Yellow Brick Home […]
[…] seem fairly easy to make (check out this DIY from Yellow Brick Home) or maybe splurge on one of these wall mount List Rolls created by George […]
[…] Source The Kraft paper roll can be very convenient for making storyboarding, lists or even keeping a bored child jovial when one is carrying out other tasks. This paper roll can be made for the office in which the shelf above can be utilized to store markers and pens. […]
Love this! Just a little worried about the wall holding the weight. Did you secure it into studs, or were the types of screws key to ensuring it was secure on the wall? I think my studs are further apart so if I had to use that approach, I’d need to have a weird gap. Hoping it’s a case of what is used to screw into the way. Thanks.
We always screw into studs or use heavy duty anchors or toggle bolts!
I have the same setup upside down. The roll is knew high in a “u” shape box and the paper goes up.