

When our friend (and neighbor) Liz started asking us for recommendations on where to get textiles framed, I was curious to see what she was framing. We agreed to a lunch date so I could check out the subject, and before I knew it, I was committing to making her one using our usual go-to method, if only because framing something of this size would cost little more than a good down payment on a new car. Friends don’t let friends do that!
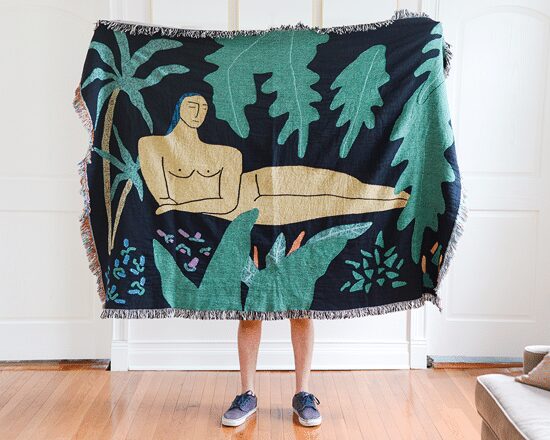
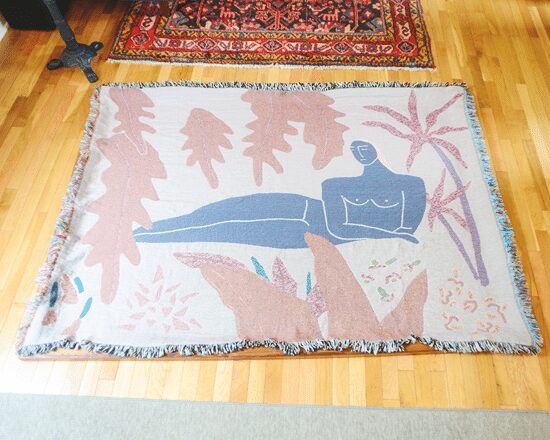
She got this pretty jungle blanket from BFGF as a super sweet Mother’s Day gift, but she was hoping to display it on the wall. After a brainstorm session over a bowl of pasta – Should we just, like, tack it up? Can we sandwich it between glass? Maybe we could wrap it around a canvas and call it a day? – I realized that a few small tweaks to our DIY frames would work just fine and really make it more of a showstopper! We’ve used this method on our dinos, the tool print and even our entryway mirror, but in this case, we’d need to make it semi-permanent (in the off chance they’d like to use it in the more traditional sense down the road) and, most importantly, lightweight. Because of its large size (coming in at 4′ x 6′), anything too heavy would not only be a burden to hang, but it would be too stressful on the longer lengths of wood.
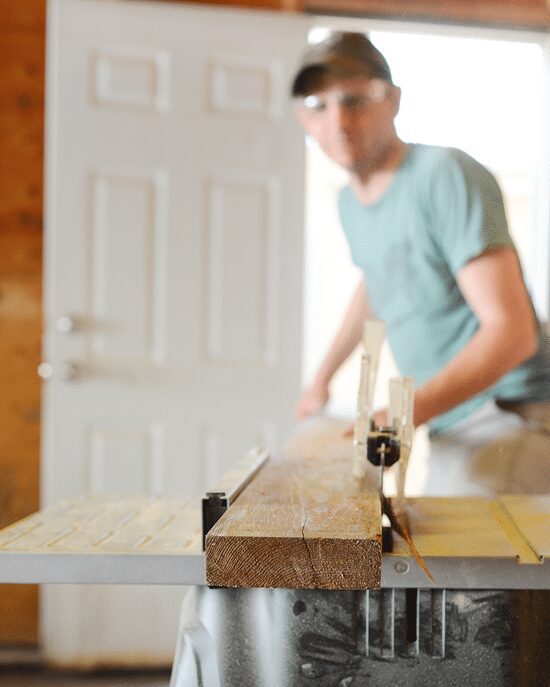
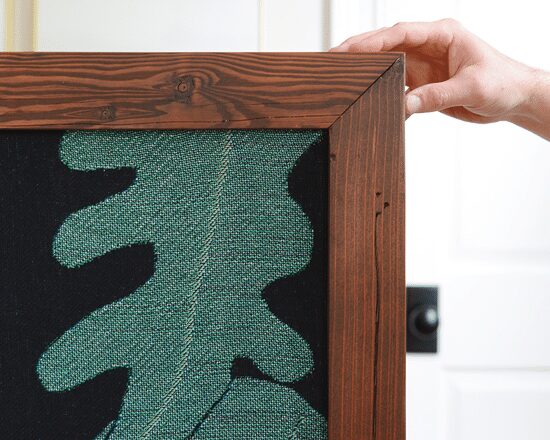
Liz loves the look of our salvaged wood shelves, so we opted for a similar theme by using mid-century lumber from our favorite building supply warehouse, Rebuilding Exchange. We picked up old 2x6s and used our table saw to square the edges and rip down the four sides with a 2.5″ front face. From there, our router sort of helped to notch out a recessed lip for the blanket to sit in, although we did run into an issue with this dense wood. In the end, Scott ultimately rigged up a system with a steady hand and our circular saw – my hero!

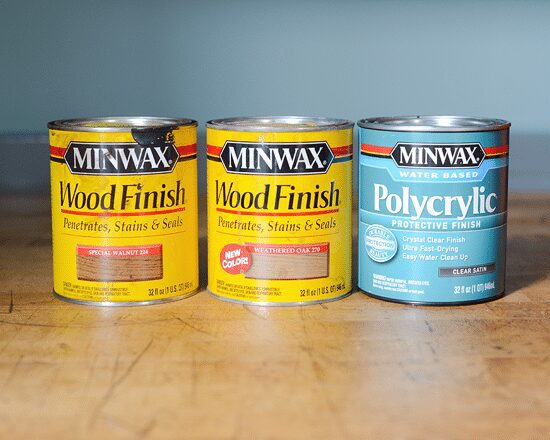
Everything got a really good sanding (starting with 80 grit and working our way down to 150 grit), and I got to work staining. I used one coat of Special Walnut, but to tone down the redness, I applied two additional coats of Weathered Oak. Once that was dry, I brushed on a thin coat of water-based Polycrylic on the front and back. The poly will act as a barrier on any part of the frame that will touch the blanket, preventing future discoloration or bleed through.
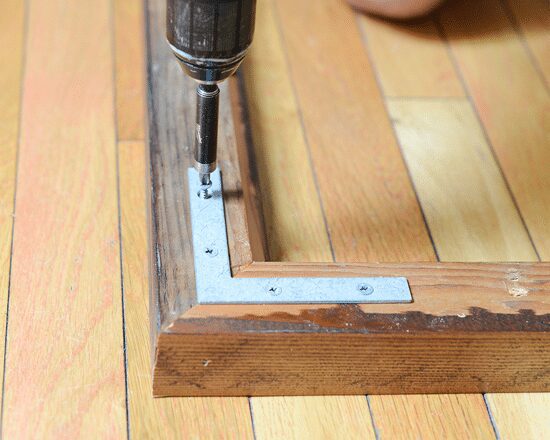
We used the miter saw to cut down the proper lengths, which were measured from the inside cut, about 4″ smaller overall than the size of the blanket. Using wood glue first, we secured the mitered edges with our nail gun and 3″ corner braces:

We had to work on the floor – the only space big enough to accommodate this large frame! – and once the actual frame was complete, we laid it down face first and put the blanket over that, upside-down. In keeping with the lightweight theme, we used a sheet of 1/2″ acid free foam core cut to the exact opening size and slowly pushed it into place.
At this point, we were honestly sort of winging it, but our plan was (surprisingly?) working!
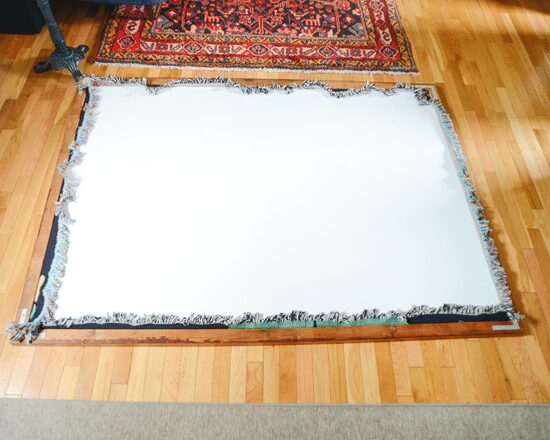
The blanket was snug, but not so snug that we couldn’t move it around. Working opposite each other, Scott and I very (very, very) gently tugged on the blanket from the back, firming it up against the front face of the foam core while keeping things as even as possible. Once it was no longer loose, Scott held it up while I looked from the front, and we worked together to stretch it over the board without stressing the fabric.
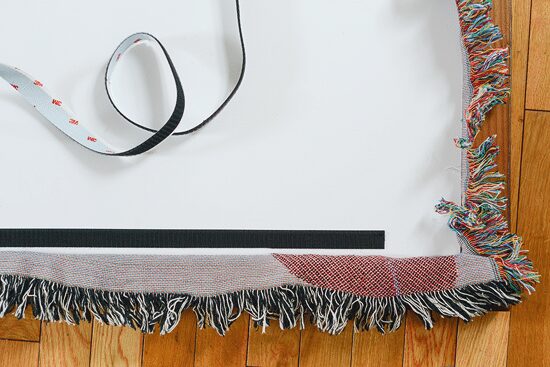
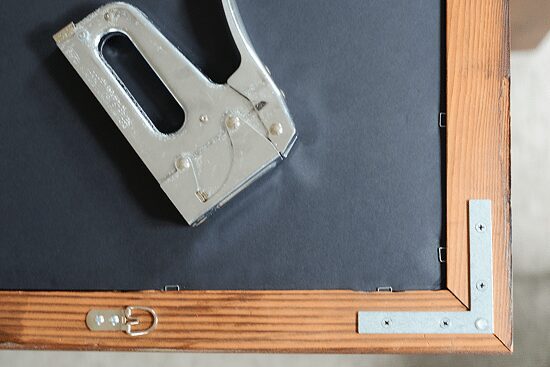
For added security and to keep the blanket from sagging over time, we used male velcro only on the back of the foam core. The part of the blanket that wrapped to the back easily caught onto the velcro, but it wasn’t so much that it caused the fibers to snag. We then sandwiched another sheet of foam core onto that, and I used my staple gun to keep everything in place. If Liz ever wants to take the blanket out of the frame, the blanket will still be in tact and – after a good dry cleaning, most likely – good to go! Note: Glass was nixed to allow the texture of the blanket to shine through, but it also drastically decreases the overall weight.
Finally, we added a large D-ring to each side of the frame, purposely installing them vertically so each one could get its own 50 lb. anchor. Because of the large size of the artwork, we decided to ditch hanging wire altogether.
That said, we succeeded at keeping it incredibly lightweight! If it wasn’t for the awkward size, it can easily be held upright by one person, but I would go one step further and say that it’s much lighter than any of our other DIY frames, mostly attributed to the lack of glass.
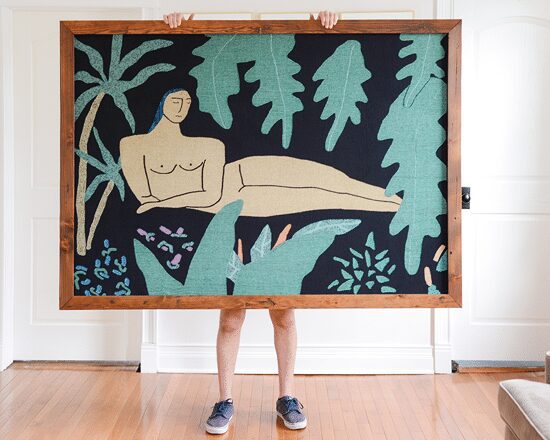
Even in photos, it’s really tough to tell the scale of the frame, but it looks so striking hanging just to the right of their front door. This photo shows an itty bitty Liz beneath the frame, which is probably the best representation of how massive this thing is!
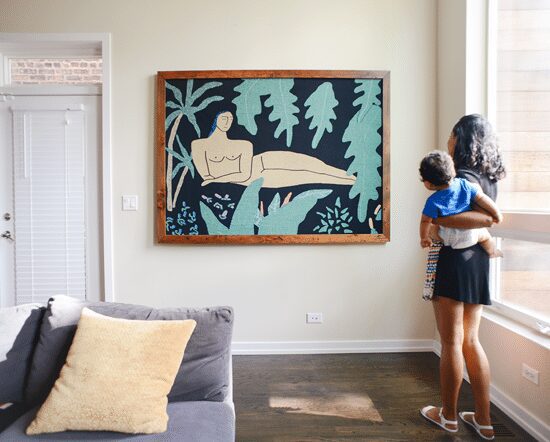
Going the DIY frame route was a bit more labor intensive overall, sure, but it was absolutely worth it! (And for other ways to display textiles, I did find this link to be helpful, too.)
PS… Debating navy shades on the Bali Blinds blog today – and convincing Scott it’ll be worth it! You can never have too much navy, really.


This looks great! I have a large african wall hanging that I just have pushpinned to the wall. I definitely need to try this for a more grown up look.
I was really skeptical, but this looks incredible! Great work, guys.
Girl, we were skeptical the whole way through, but you never know until you try! :)
i was skeptical too! thinking no, this is not what i would have done! but wow…i’ve been looking for a large scale art piece (at least 5 feet wide), and now i want a blanket. A framed blanket!
where did she get the blanket?
Hi Joelle! She got the blanket here: http://bfgf-shop.com/product/jungle-blanket
That looks great! Good idea to keep in mind should I have a pretty rug to display in the future… :)
You guys.. make the best looking frames/wood work pieces. Seriously.
And I NEVER in a million years would have guessed that was a blanket. It looks gorgeous.
Josh – The Kentucky Gent
http://thekentuckygent.com
Wow! I didn’t really care for the blanket in the first picture, but that last picture makes it look fantastic! Great job! Who’d a thunk about hanging a blanket?! The possibilities! :)
I love how this turned out! Where are you able to find foam core in such a large size?
We got ours at Blicks, but any art supply store should have sheets in a 4′ x 8′ size.
I probably would have ended up using the various quilt hanging products to put it up, but it wouldn’t have looked this good! Now I’m looking at the heirloom baby quilts in my daughters’ rooms and pondering frames.
[…] Photo: Yellow Brick Home […]
[…] body{font-family:"Titillium Web",Arial,sans-serif;}.sidebar .widget{padding-left:20px;padding-right:20px;padding-top:20px;}::selection{background-color:#ff3399;}::-moz-selection{background-color:#ff3399;}a,.themeform label .required,#flexslider-featured .flex-direction-nav .flex-next:hover,#flexslider-featured .flex-direction-nav .flex-prev:hover,.post-hover:hover .post-title a,.post-title a:hover,.s1 .post-nav li a:hover i,.content .post-nav li a:hover i,.post-related a:hover,.s1 .widget_rss ul li a,#footer .widget_rss ul li a,.s1 .widget_calendar a,#footer .widget_calendar a,.s1 .alx-tab .tab-item-category a,.s1 .alx-posts .post-item-category a,.s1 .alx-tab li:hover .tab-item-title a,.s1 .alx-tab li:hover .tab-item-comment a,.s1 .alx-posts li:hover .post-item-title a,#footer .alx-tab .tab-item-category a,#footer .alx-posts .post-item-category a,#footer .alx-tab li:hover .tab-item-title a,#footer .alx-tab li:hover .tab-item-comment a,#footer .alx-posts li:hover .post-item-title a,.comment-tabs li.active a,.comment-awaiting-moderation,.child-menu a:hover,.child-menu .current_page_item>a,.wp-pagenavi a{color:#ff3399;}.themeform input[type="submit"],.themeform button[type="submit"],.s1 .sidebar-top,.s1 .sidebar-toggle,#flexslider-featured .flex-control-nav li a.flex-active,.post-tags a:hover,.s1 .widget_calendar caption,#footer .widget_calendar caption,.author-bio .bio-avatar:after,.commentlist li.bypostauthor>.comment-body:after,.commentlist li.comment-author-admin>.comment-body:after{background-color:#ff3399;}.post-format .format-container{border-color:#ff3399;}.s1 .alx-tabs-nav li.active a,#footer .alx-tabs-nav li.active a,.comment-tabs li.active a,.wp-pagenavi a:hover,.wp-pagenavi a:active,.wp-pagenavi span.current{border-bottom-color:#ff3399!important;}.s2 .post-nav li a:hover i,.s2 .widget_rss ul li a,.s2 .widget_calendar a,.s2 .alx-tab .tab-item-category a,.s2 .alx-posts .post-item-category a,.s2 .alx-tab li:hover .tab-item-title a,.s2 .alx-tab li:hover .tab-item-comment a,.s2 .alx-posts li:hover .post-item-title a{color:#ff7abc;}.s2 .sidebar-top,.s2 .sidebar-toggle,.post-comments,.jp-play-bar,.jp-volume-bar-value,.s2 .widget_calendar caption{background-color:#ff7abc;}.s2 .alx-tabs-nav li.active a{border-bottom-color:#ff7abc;}.post-comments span:before{border-right-color:#ff7abc;}#footer-bottom{background-color:#222222;}.site-title a img{max-height:52px;} window.dynamicgoogletags={config:[]};dynamicgoogletags.config=["ca-pub-0608523117907226",[[[["ARTICLE",0,,[],0],["10px","18px",0],0,,"5724944077",0],[["ARTICLE",0,,[],2],["10px","10px",0],0,,"5011432472",0]]],[[[],[],[]]],"WordPressSinglePost","1654355679",,0.01,0.4,[0,1435253421671],0.01,0,0];(function(){var h,aa=function(a){var b=typeof a;if("object"==b)if(a){if(a instanceof Array)return"array";if(a instanceof Object)return b;var c=Object.prototype.toString.call(a);if("[object Window]"==c)return"object";if("[object Array]"==c||"number"==typeof a.length&&"undefined"!=typeof a.splice&&"undefined"!=typeof a.propertyIsEnumerable&&!a.propertyIsEnumerable("splice"))return"array";if("[object Function]"==c||"undefined"!=typeof a.call&&"undefined"!=typeof a.propertyIsEnumerable&&!a.propertyIsEnumerable("call"))return"function"}else return"null"; else if("function"==b&&"undefined"==typeof a.call)return"object";return b},l=function(a){return"number"==typeof a},m=function(a,b){function c(){}c.prototype=b.prototype;a.ua=b.prototype;a.prototype=new c;a.prototype.constructor=a;a.sa=function(a,c,f){for(var g=Array(arguments.length-2),k=2;k Photo: Yellow Brick Home […]
Hi there, this looks AWESOME! How far away does the piece hang out from the wall? With the fringe being behind the frame, there’s obviously a protrusion, am I right? Just curious to know how flat it actually sits against the wall please…
Thanks Melissa! The fringe was wrapped around the back of the foam board in such a way that it didn’t impact the protrusion from the wall at all. Hope this helps!