


With a place for everything, and everything in its place, we’re officially calling the bathroom done! It’s been a few months since we first shared our plans, but the entire process felt surprisingly painless. After last year’s kitchen debacle still weighing heavy on our minds, we’ll be the first to admit that we were overly cautious when it came to hiring a contractor to rough in the new room layout, plumbing and electrical. We took a different approach and hired Jen, a designer by trade (more details here), but looking back, we could really consider her service as a peaceful, pre-demolition therapy session. Her role was to help us plan a proper layout (i.e., what works vs. what doesn’t), but the most invaluable part of her service was interviewing and negotiating with contractors. As a result, we hired a GC that we love (this was half the battle!) who carried out the plans – on schedule! – and left us with a big blank slate we could dive right into. Side note: If you need a Jen in your life, feel free to send me an email. Depending on your needs, it may be affordable than you’d think. I’m happy to spread the good word!
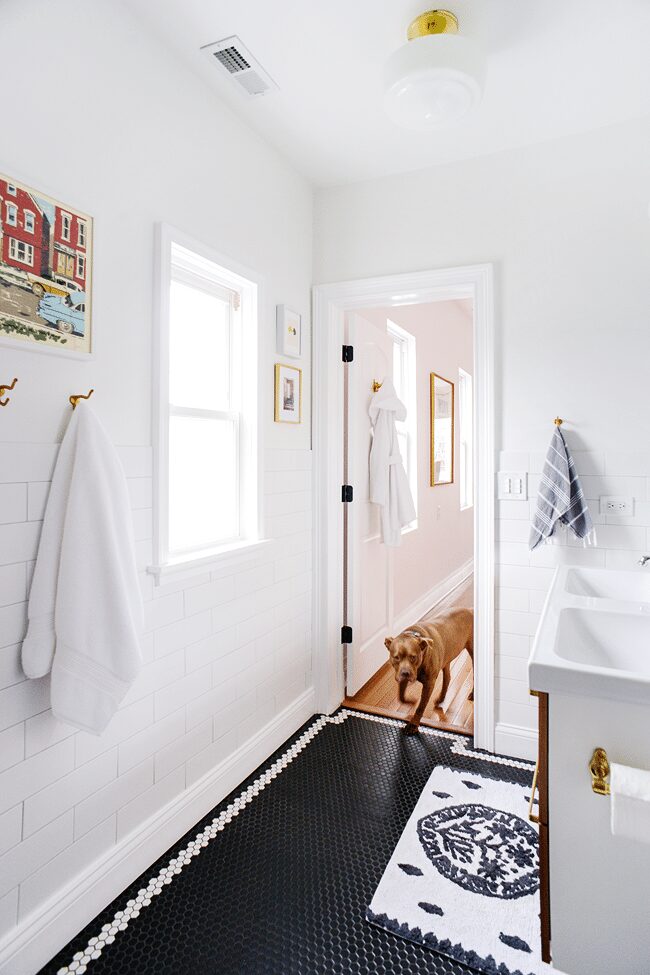
Our goal was to keep it feeling pretty and fresh, minimal for the most part. While we debated a soft color for the walls (even going so far as to paint swatches of soft grays, greens and pinks!), the simplicity of a bright white bathroom can’t be beat. On our walls: Silent White by Clark+Kensington.
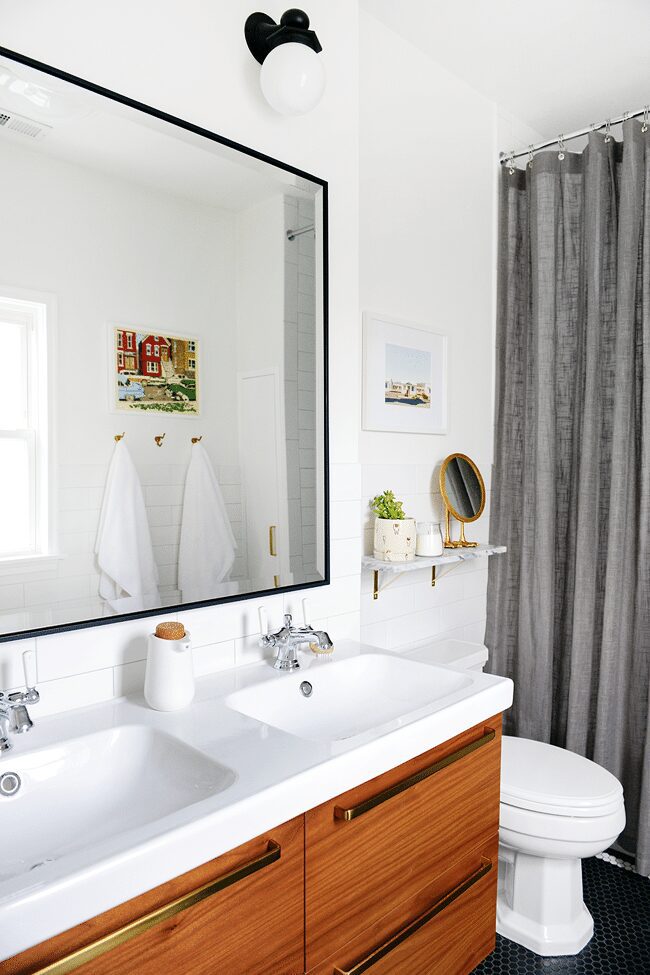

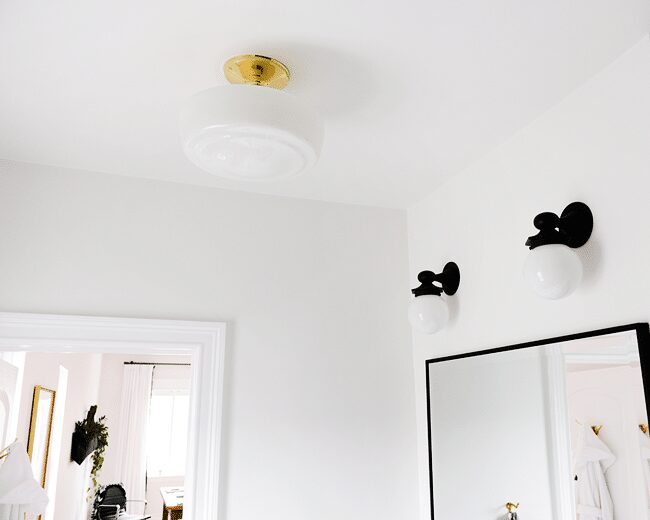
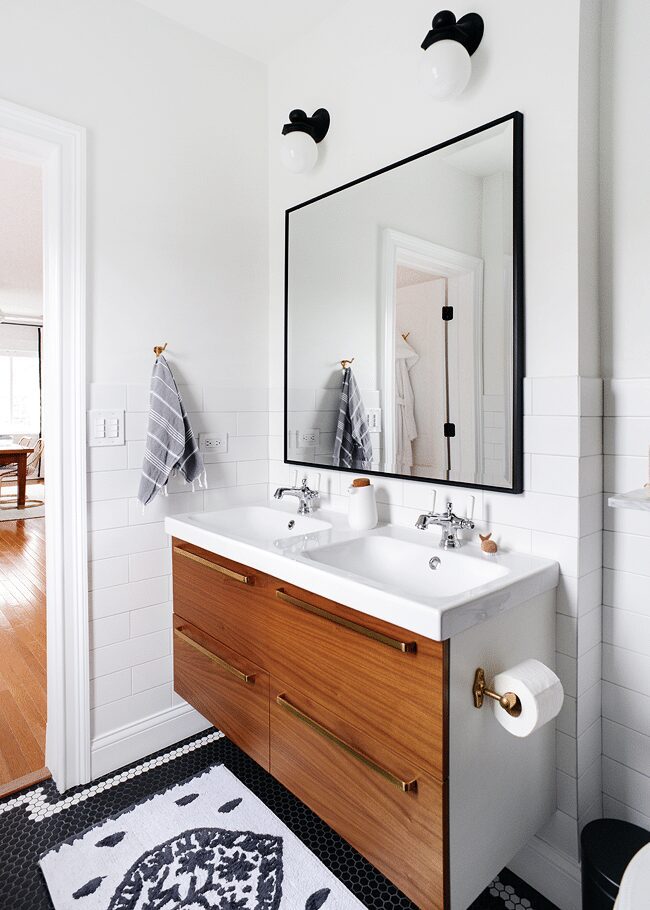
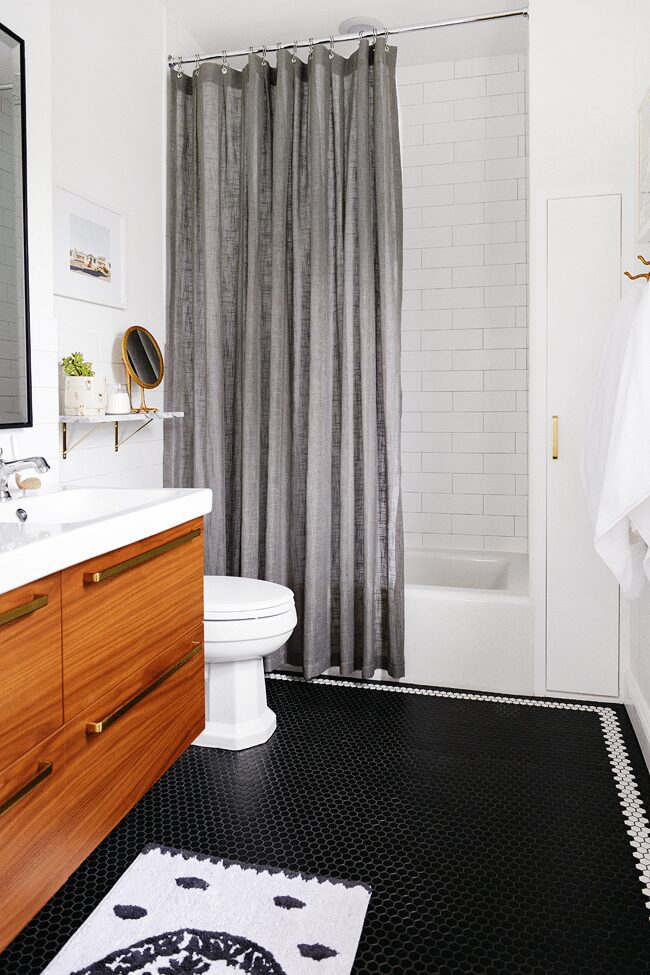
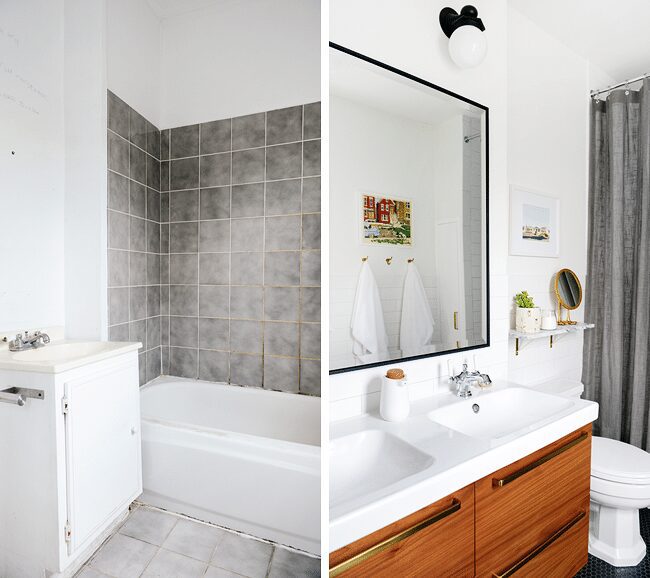
We were able to enlarge the footprint of our bathroom by pushing back the shower wall almost 3′, but despite this leap in space, it was still somewhat challenging to find a double sink in the 48″ we’d allotted. Enter: IKEA! We personalized a GODMORGON cabinet with walnut fronts from Semi Handmade and topped those with 18″ Larkin pulls. The warm brass in the room mixed with a base layer of polished chrome and topped with these hearty oil-rubbed bronze sconces has our hearts. We say, mix all the metals!
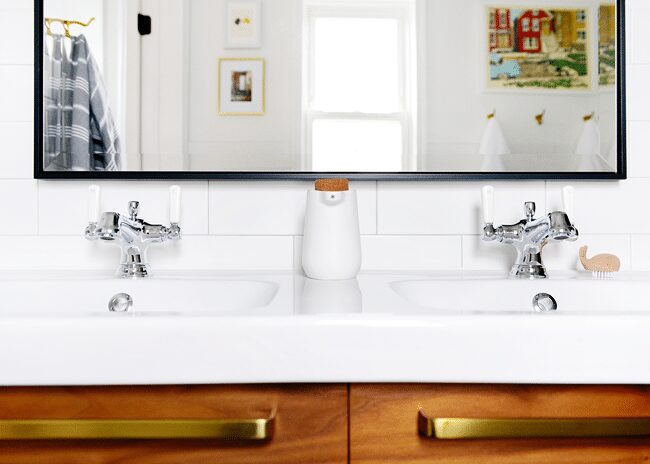
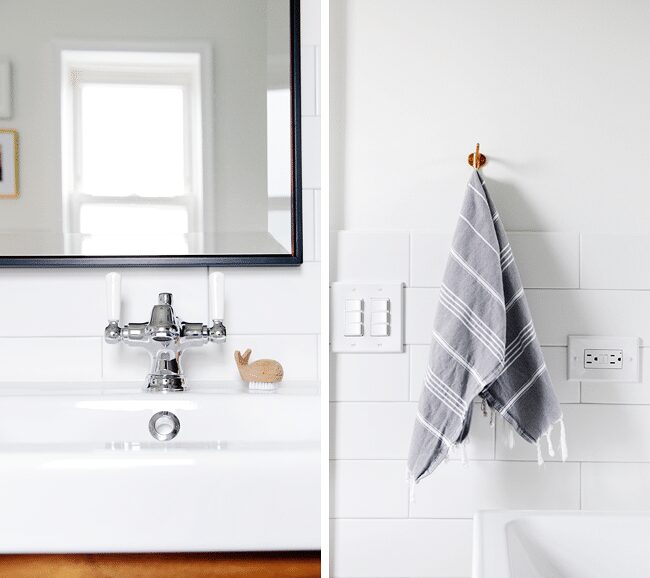
mirror | faucets | vanity | whale brush | soap pump | hardware | hand towel
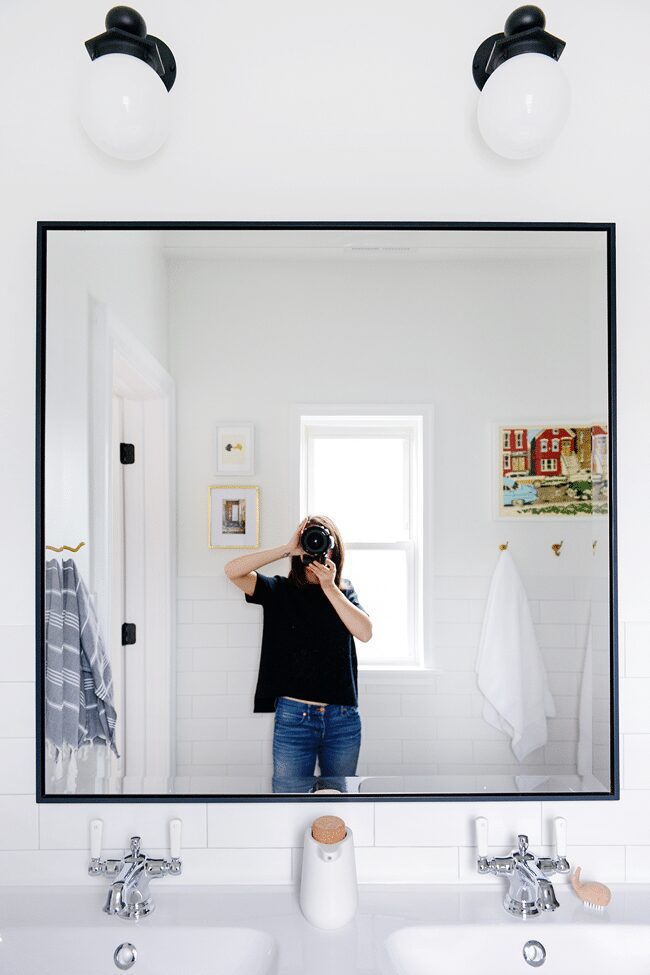
With the vanity cabinet chosen and installed, the next hiccup was finding a mirror that was wide enough to span both sinks and still be tall enough to fill the space! Originally, you might remember that we were leaning towards double mirrors, but with two sinks, two faucets and two sconces, we realized that two mirrors might be overkill. We ultimately landed on the Upton mirror, a 40″ square, which, you guys, is huge! At the time we decided that this one fit the bill, it was out of stock, but we pre-ordered during a holiday sale and crossed our fingers that it wouldn’t be delayed too long (luckily, it only took a month, arriving during tile install). We weren’t in love with the mahogany finish, so I used a small foam roller to brush on two coats of our favorite black, Nein! Nein! Nein! OK Fine by Clark+Kensington. Side note: We started with 1 gallon of that color in an exterior grade satin finish years ago! We’ve since painted our porch swing, kitchen island, sliding doors and now this mirror – and we still have paint left.
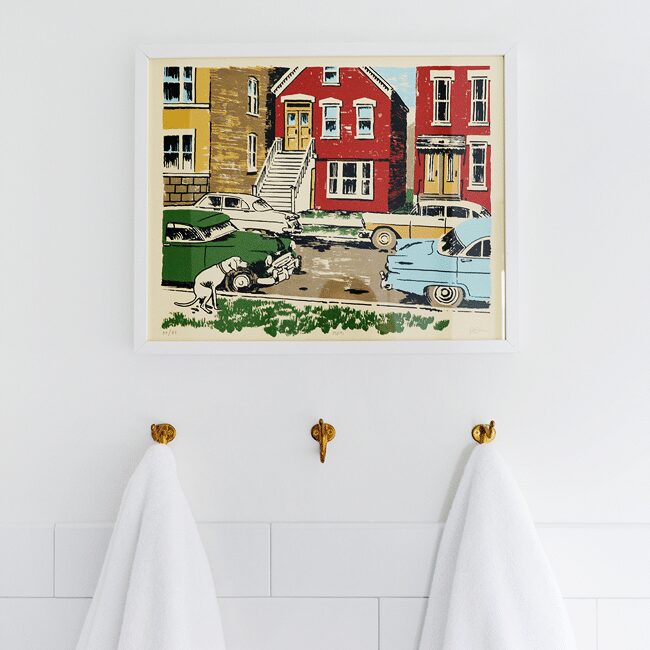
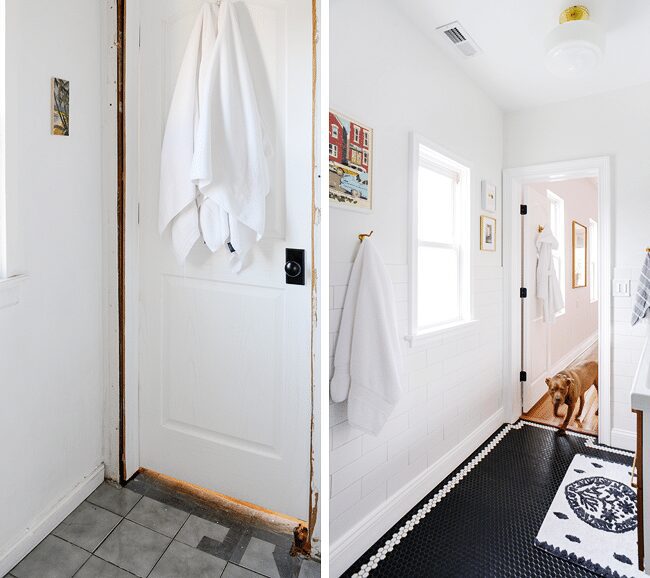
We love the idea of art in the bathroom – the quirkier, the better! With the room’s color scheme falling heavily into the black and white category, we wanted to have a little fun with it.
We picked a couple of new pieces for the room, one of our tops being from local artist, Ryan Duggan. It’s a typical Chicago street view, but do you spot the dog? Ryan created an entire series around shitting dogs – it’s true! – and what better room to make an appearance? (If you’re not a fan of his already, you’re about to be! We have this one hanging in our entryway, and it makes us smile every day.)
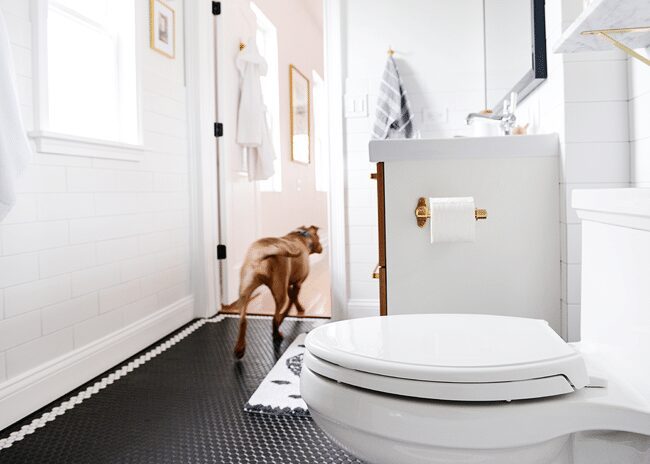
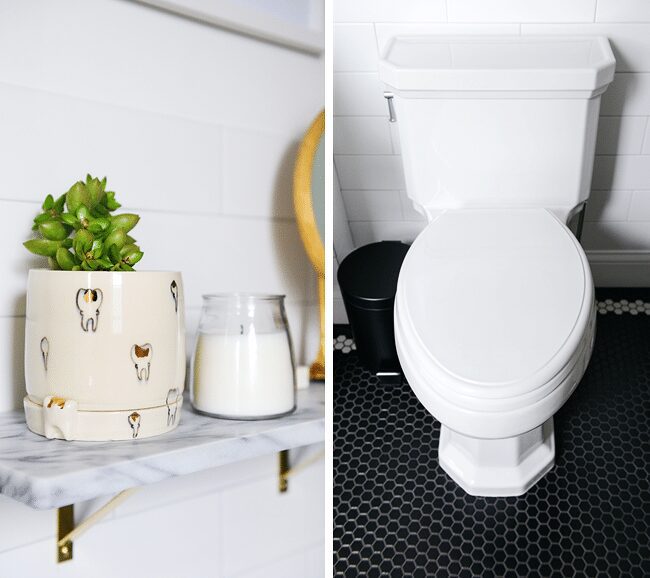
Speaking of, uh, dogs, can I just say, we love our toilet! We thought we’d go with something sleek and streamlined, but we surprised even ourselves by choosing the more ornate Kathryn toilet during our trip to Kohler. The flush is quiet and oddly powerful at the same time, and the lid has a soft close which is so, so nice.
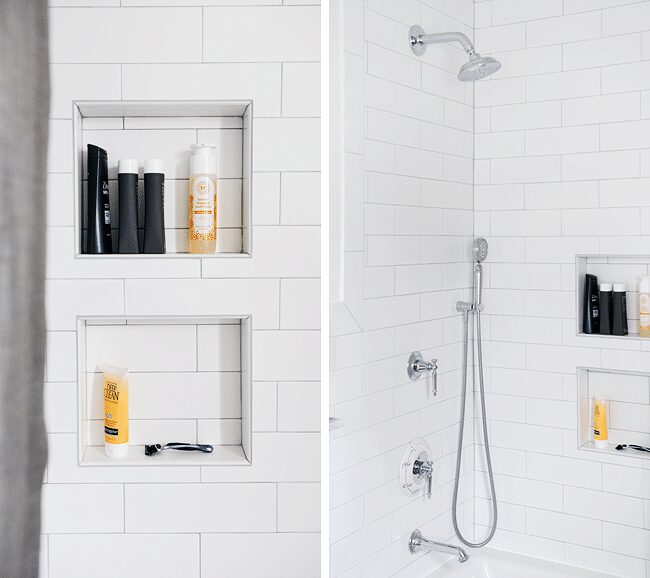
With minimal counter space on our sink vanity, we opted to install a sweet marble shelf above Kathryn, having only minor hesitation about drilling into our new tile. (We even picked up a marble toilet brush which is part ridiculous, part awesome.) With the first pilot hole done, there was no turning back – and we are thrilled with it! The marble pattern lends so much on its own, but I was happy to have a landing spot for this gold tooth planter by Christi Ahee we’d been eyeing for a while.
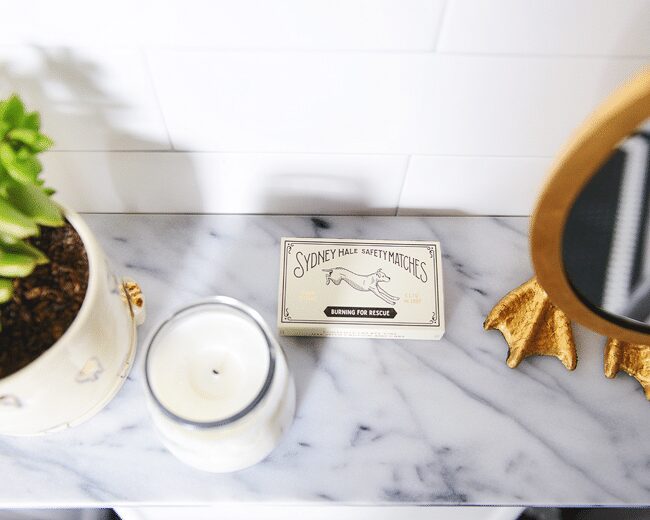
To top it off, we hung a photo from our recent travels down Route 66! I love nice repetition in photography, and we liked the soft colors from this abandoned motel in Amboy, California. Side note: I’ve since added Amboy #1 to The Print Shop, and Chicago locals, you can pick up the planter and more of Christi’s work at Humboldt House, too! HH is worth the trip.
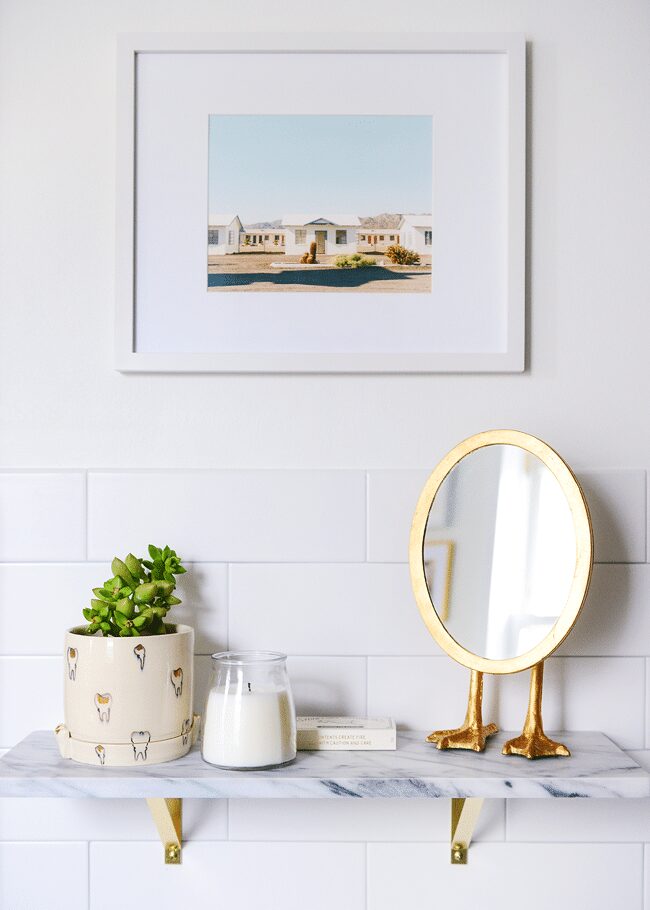
marble shelf | tooth planter | vetiver candle | mallard mirror | rescue pup matchbox | Amboy #1 photo
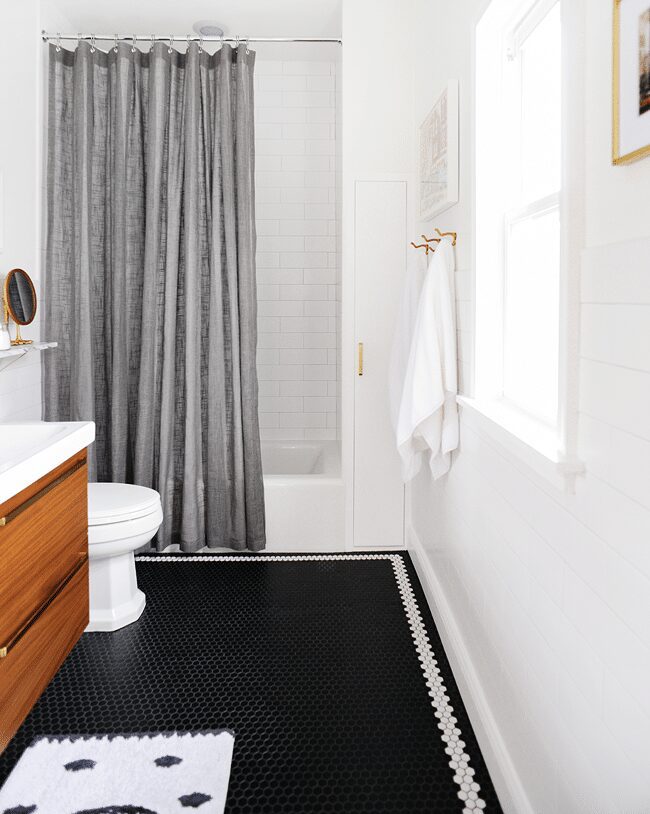
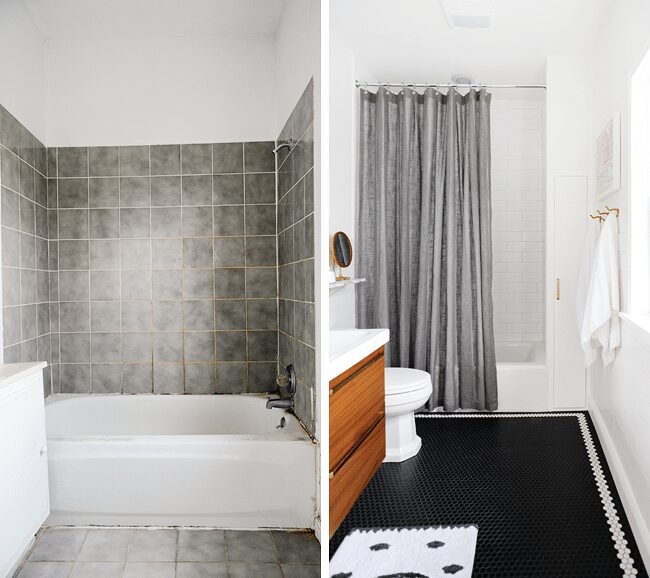
Moving on to the floors, as much as we love the look of a vintage rug in a bathroom, we were determined to find something that was easily washable. The simple pattern on this one was a win for both of us, and it allowed the focus to remain on the black and white hex tile we worked so hard on! It’s nice and thick, but the back isn’t as non-slip as I’d like, so I cut down a rug pad remnant to keep it in place.
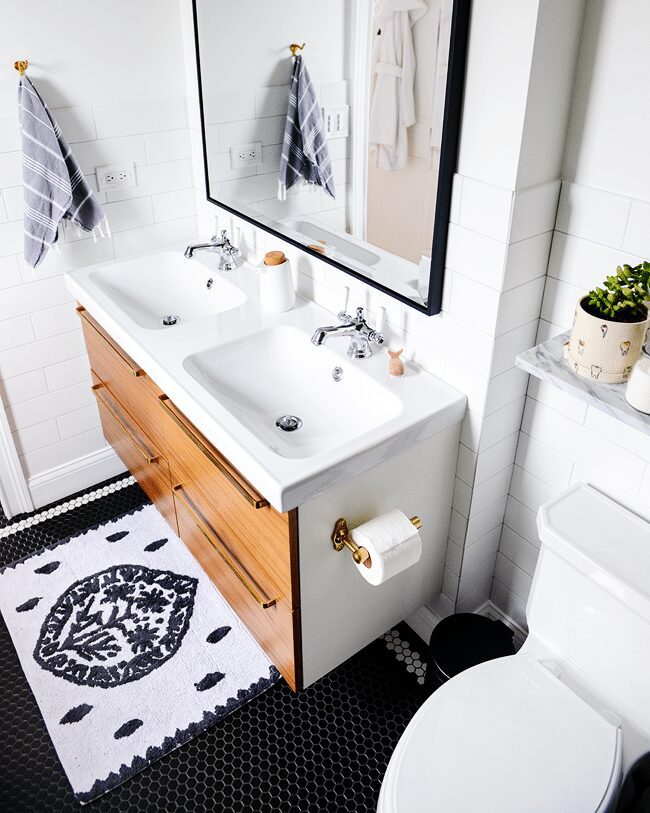

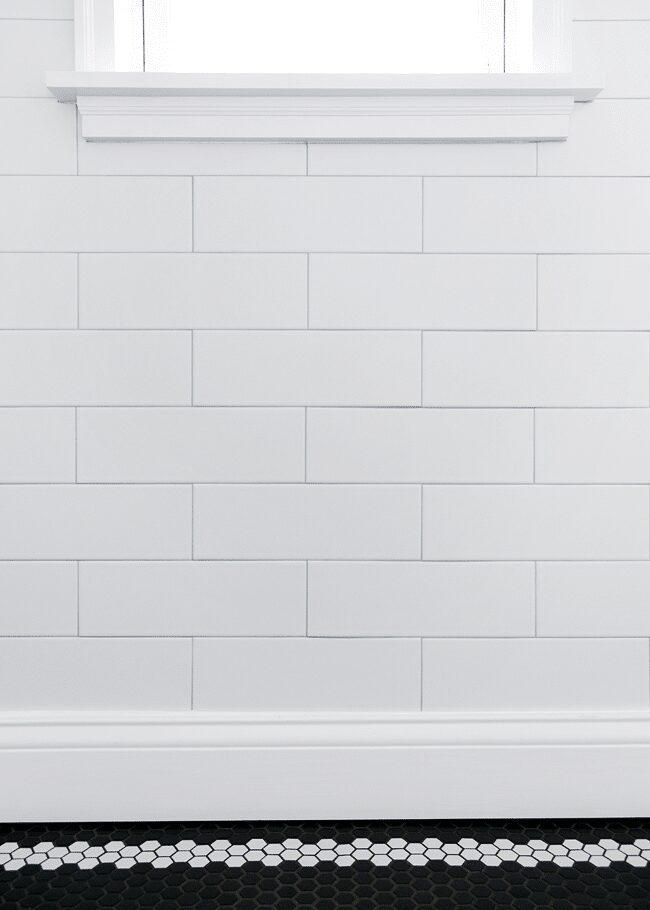
Finally, the shower! The extra long shower curtain was worth the hunt, and all our chrome finishes look like jewelry. But that ceramic dial plate? It’s from Kohler’s Antique line, and it might be our favorite embellishment in the room. We took the matte white oversized subway tile to the ceiling, and it’s been both people and pet approved!


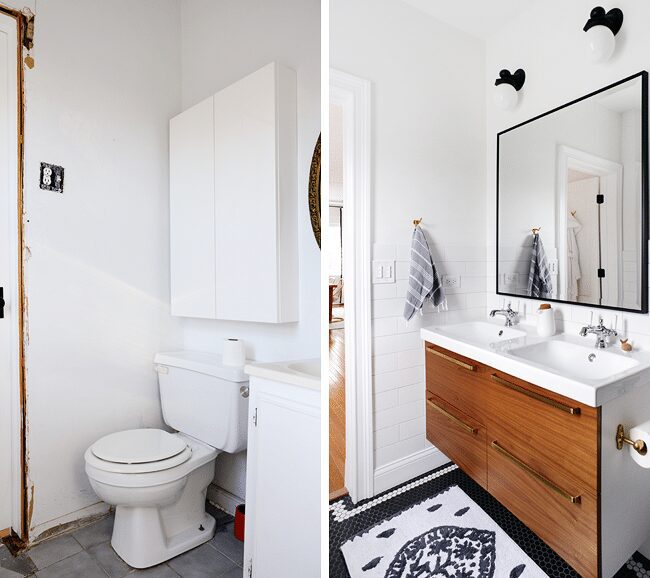
We couldn’t be happier with how the room turned out – a result of 3 weeks of demolition, an endless amount of tiling and a good month (or two!) of painting, fussing and installing those final layers that brought us to completion. Of course, what’s a reveal post without the satisfying before and afters? Until I dug up these photos, I had forgotten how bad it really was. Oof. But moving on! Let’s go!
![]()
To really stick a fork in it, we celebrated the completion with a demolition photo. Bathroom, you’ve come a long, long (long!) way.
Most items in this room have been linked throughout, but to make it easier, here’s a round-up of the things that make up the room! If I’ve missed anything, just ask.
1. mirror | 2. soap pump | 3. robe hook | 4. semi-flush mount light | 5. faucets | 6. photo print | 7. whale nail brush | 8. bathmat | 9. turkish hand towel | 10. brass frame | 11. black and white hex tile | 12. sconces | 13. brass hooks (vintage from eBay) | 14. marble shelf | 15. fluffy bath towels | 16. dog art print | 17. mallard mirror | 18. gold tooth planter | 19. vetiver + sage candle | 20. brass pulls | 21. sink + vanity, walnut face | 22. marble toilet brush | 23. brass TP holder | 24. toilet | 25. oversized subway tile | 26. shower curtain
PS! To follow the play-by-play from the very beginning, click on any thumbnail below. Thank you for always encouraging us as we figure out what this old lady of a house wants. You’re the best.


It’s amazing! Congratulations.
Quick q — did I miss the source link for the bathtub? Thanks!
I’m sure it’s not the first thing I’m going to miss! It’s the Bellwether 60×32 tub from Kohler. She’s a beauty.
It looks gorgeous!
(however, one piece of feedback – since this was party sponsored by Rejuvenation, it feels a little cheesy to have rstyle links to the Rejuvenation products, like you’re double-dipping. Same with the original post with the Rejuvenation products…)
Thank you, Sarah! (They’re on board with it as part of the partnership, and I appreciate your feedback!)
Ahhhh! I love it!!!! Also I’m now about to fill my home with Ryan Duggan prints!!!!!!
His work is so good!
It turned out so great! I love all the little details. Thanks for sharing all the sources too.
We recently built a house and in our master bathroom we opted for only one sink on a 60″ vanity so that I would have room for ‘stuff’ while getting ready. Just curious your thought process in needing two sinks right beside each other verses having some counter space. I see this a lot and maybe my husband and I are the odd ones but we are hardly ever in the bathroom at the same time – let alone using the sink at the same time. Not a criticism at all just wondering.
Thanks for sourcing the extra long shower curtain too! I have been looking for one just like this!
Before we ended up going the IKEA route, we were thisclose to giving up on the double sink – but it was a big must for Scott! We are often in the bathroom together in the evenings especially, brushing our teeth and getting ready for bed. It was one of those things where we always said, “wouldn’t it be nice if you could brush your teeth while I wash my face, and we don’t have to wait in line?!”
I guess everyone does it differently! I can definitely see how a 60″ vanity with one sink would be pretty glorious for the counter space though. :)
omigosh, this reveal could not have come at a better time…we are working on our bathroom right now, and i’ve been so inspired by yours as we go. tile is going in as i type, and an end is in sight but can’t come soon enough! this gives me strength for a few more inconvenient days :-)
(hi! i emailed you guys about jen awhile ago, thanks for your help and your encouragement of a fellow logan square homeowner!)
Hooray! Best of luck finishing up your renovations!
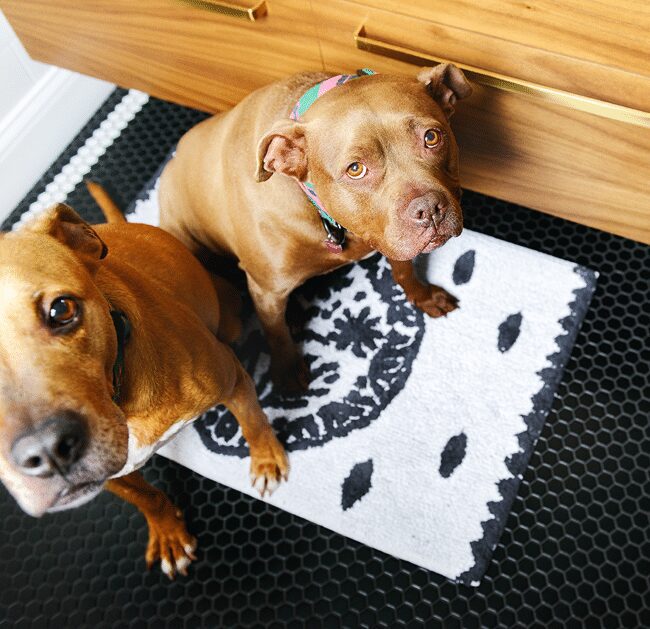
It looks great! (And I love all the artwork + Chunk’s expression in that bathing photo…)
Her face, like, literally kills us.
I could practically hear him saying “Oh, the indignity!” in a droll British accent!
Gorgeous, chic, timeless. This is the best and I can’t wait for more reveals of your triple room renovation!
Us either, haha!
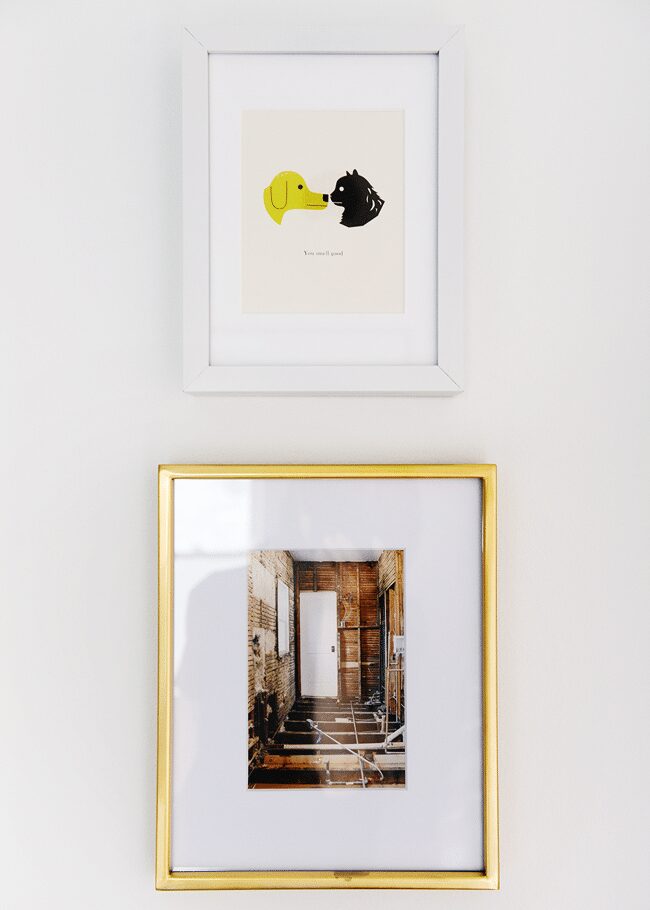
Hi! LOOOVE how the bathroom came out! It looks so refreshing and clean :) I also love the yellow lab black cat “you smell good” art print. Care to share the source? Thanks!!!
Ruth
Hi Ruth! It kills me, because I don’t know…! When putting together this post, I even took it out of the frame to see if there was a maker on the back – and nothing. We’ve had it for years (it used to be in our condo’s home studio), and I just cannot remember. I wish I had a better answer for you!
Aw, no worries! Thanks for such a quick response! Looking forward to hearing more about your next project!
Everything looks SO GORGEOUS, Kim! I’m not sure I’ve ever commented here before, but I’ve been reading for years, and always appreciate your writing, details, and collective good humor! Thank you and Scott.
I’ve come out of the woodwork to ask about the Turkish towel — unfortunately your Etsy links don’t work. Could you please point me in the correct direction? I LOVE fluffy white bath towels, but ours always smell musty after a couple of days, thanks to our window-less bathroom. I shake my fists! I’m contemplating just getting Turkish bath towels for us all, even though they may not have the same fluff factor.
Hi Yasmine! The Turkish towel is just a smaller hand towel, but we love it! You can see the whole shop right here. The quality is really nice! I bought a few other Turkish hand towels from other sellers, and they started unraveling in the wash. This one held up like a champ!
ohmygoodness, gorgeous towels AND they’re having a sale! Thanks so much, Kim! =)
Ahh, I might need to stock up on more now!
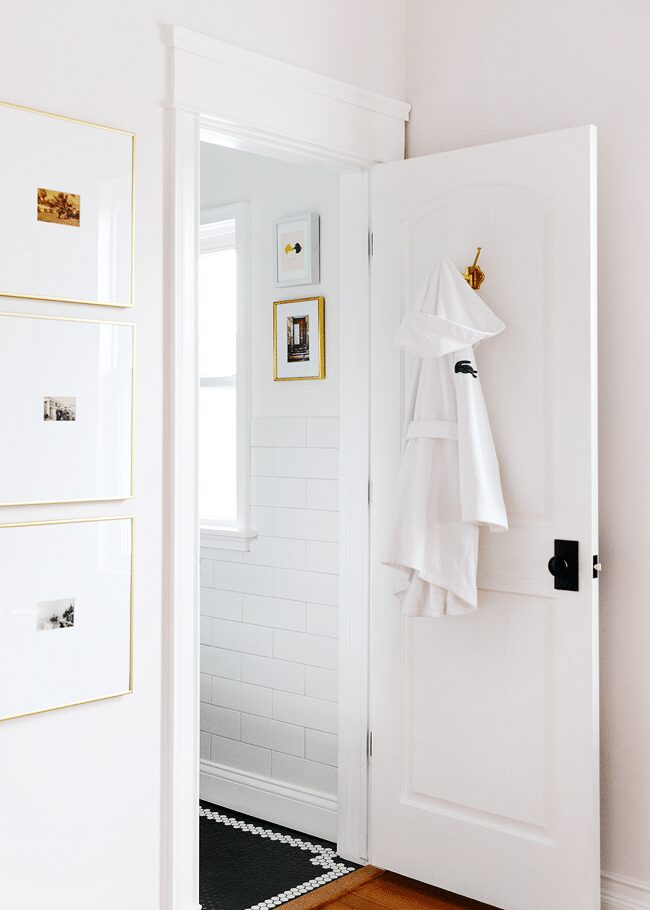
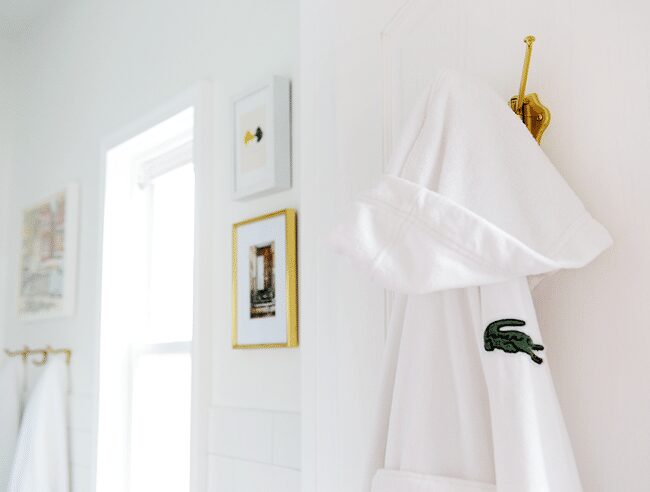
Love the room, but I’m dying over the bathrobe (I know it’s silly, but I’ve been wanting a bathrobe and holy crap I love that one!!).
So funny! I have been stupid picky over bath robes for far too long, and then I found this one on clearance at Macy’s over the holidays! I love that it’s short, has a hood and is super thick. It doesn’t look like it’s available anymore, but it’s called the Lacoste Smash Robe.
This is absolutely incredible. I love the art, the side by side before and afters. That cheeky tooth planter, the mixed metals AND your cropped black tee. Love it all so much.
xoxo
So funny! I just used that whale brush in a style board this morning! Right here: http://danielleandco.com/blog/2016/4/10/design-around-vintage-pink-tile
I love how style and sophisticated your space is, but still playful – the tooth planter and the artwork show you can have a lovely space and still be fun and relaxed at the same time. Great job!
Oh CC. Those photos of her are maybe my favourite part of this post. But only by a bit. The bathroom is beautiful. You guys have impressive attention to detail and DIY skills. Very good job. Oh and I covet that mallard mirror so, so much.
Hi Kim! The bathroom reveal looks great. Just curious, do you step out of the shower directly onto the tile floor? Or do you plan to buy another bath mat/rug?
Right now, we’re stepping onto the tile floor BUT we do have a white IKEA mat (one of their cushy ones that wears surprisingly well!) that we were using in the downstairs bath while this one was being renovated. We just haven’t brought it up yet! We’ll probably start using that one again. :)
You could totally sell ‘Sad Dog Eyes in the Shower’ as a print! Great work on the room!
In that case, I could also start a collection: ‘Sad Dog Eyes in Kitchen’ and ‘Sad Dog Eyes in Living Room’ and ‘Sad Dog Eyes on the rug’ and ‘Sad Dog Eyes on a walk’… the list could get really long, LOL.
What’s your experience with art in bathrooms + leftover steam from the shower? I have a lot of various things that I’d really like to hang on my bathroom wall, but I don’t want to damage anything given that our old Logan Square two flat apartment bathroom doesn’t have very good ventilation .
I’ve always hung art in bathrooms, and knock on wood, we’ve yet to run into issues. We do turn on the ventilation fan when we’re showering. If you think the ventilation in your apartment isn’t going to cut it, I wouldn’t hang anything too precious, OR you could always do a test with a framed piece of paper, hang it on the wall, and see how it fares in the coming weeks/months? That would certainly be dedication, but I think you’d be surprised by how much the glass and backing protects prints and photos. Another thing to consider would be framing items that have a thicker stock, like a cute greeting card.
You guys! It’s SO beautiful!! If you hadn’t had such a tough time with the kitchen, I’d totally be hating you for this seemingly effortless bath reno, lol. Mine has taken SO much longer and although I’m so very nearly done, it’s been a struggle with tons of screw ups and delays, most by local trades. Blah. I’ve been totally jealous watching yours unfold so beautifully, if I’m being honest. But I can’t begrudge you because it just looks so amazing, it put a smile on my face today! I was so thrilled to see the review and I’m pinning every single photo. I adore the pooping pup art, the hex tile floor is stunning, the quirky touches are perfect and I just love how this bathroom looks eclectic but pulled together – like it happened over time. That designed over time feel makes it belong so perfectly in your home.
Well done! You did an amazing job.
This is so incredibly nice, Tanya, thank you! And we will be crossing all our fingers and toes over here for a smooth ride to the finish line for you – all of our worst renovation experiences have involved the local trade, in one way or another. We were sort of expecting this renovation to take a year like the kitchen (ha!), but thank goodness it all went pretty smooth – with the exception of the water heater! Gotta have at LEAST one hiccup to call it a real renovation, right?!
I have major bathroom envy. This turned out SO well. It’s absolutely gorgeous! I love the simplicity that’s made fun with all the interesting art and decor.
One question about your hand-held shower – I like that it’s offset and not attached to the higher shower head. Did you have to run separate piping for that? I don’t remember reading about it in previous posts. I use my guest bath to wash my dogs and would like to do something similar.
Hi Sarah, our old shower head was a hand held and head in one, but when we knew we would end up having to move the plumbing wall to the opposite side, we took it as a an opportunity to REALLY get the set up we wanted. That included a separate hand held, and yes, it did require separate pipes. The faucet, shower head and hand held are all controlled by a transfer valve, and we relied on our contractor to ensure everything was run properly with new copper pipes.
It looks amazing! Awesome job bringing everything together.
Wow.
I have anxiously been waiting for the reveal and it’s beyond amazing! My favorite room you’ve transformed so far, but I love everything you’ve done. The details are so, so perfect, but of course my favorite thing is the bath photo of Chunk. I LITERALLY CANT EVEN. ?
We feel that way about her EVERY DAY. She is just the biggest smooshy lover!
Is it weird that when I saw the pulled back photo of the bathroom door and how it ties in to the gallery wall, I pictured a spiral staircase in front of the gallery wall? Your house is so elegant and dreamy now; such a far cry from how it started!
Slowly but surely, we are getting there. Thank you, Kathy!
STOP. It turned out AMAZING!! Great job you guys, I love everything about it!!!
xo
m
Mandi, hi! Thank you!
Love this space, it is perfect and so unique! We are currently renovating our bathroom and so I’m obsessed with this!!
Hi! The bathroom is gorgeous. I didn’t see the source for the bath fixtures. Would love to know if it is a set of individual pieces. We are renovating a bath and I love the look of these.
Hi Debra, we talked about our experience shopping at the Kohler Design Center right here, but basically, everything is a mix and match of pieces that we loved. Kohler has the ability to make every last detail your own, it’s pretty incredible! For example, we chose the shower head we wanted, and we paired that with the showerarm, and THEN we paired THAT with the flange. Here’s a little more info on what we ended up with:
Artifacts bath spout
Artifacts shower head with Purist showerarm and flange
Artifacts hand held shower with Toobi holder + 72″ hose
Antique valve trim with lever handle (the hot > cold lever)
Antique ceramic dial plate
Antique transfer valve
Pureflo bath drain and trim
Thanks, Kim!
Sure thing! Also, every finish was polished chrome.
Where did you get that cute little dog and cat photo over your demo photo?
Hi Sarah, I wish I had an answer for you! I think it was actually a card that I framed, but I don’t have the maker info. We’ve had it for YEARS (it used to live in our old studio at the condo), and when putting together the source list, I even took it out of the frame to check for a source – but there’s nothing.
I wish you could hear it over the internet – I’m squealing in excitement for you guys over how AMAZING this space turned out! Absolutely incredible, but I’d never expect anything else from you two! Stunning!
Brynne! So nice. Thank you! Hope you’re doing great!
Thank you for this inspiring bathroom reno! Our bathroom is about the same size – love your vanity solution. Lovely, as always. Cheers!
You guys did an awesome job! I love the mix of all the metals, wood, and black and whites. I love watching the progress you guys have made! It’s quite inspiring. And I’ve been eyeing that mallard mirror for literally YEARS and had no idea rejuvenation sold it! So thanks for that!
It is so adorable, Cassie! It makes us chuckle.
OMG!! WOW!! YOU GUYS!!! it looks so great!!! i love everything! congrats on tackling that!!! absolutely stunning! :)
it is stupendous – for reeeelz. Love it! That CC all soaped up is perfection.
I LOVE that you have one of Ryan’s shitting dogs in the bathroom. He’s a dear friend of ours and that one is my favorite in the series. Everything looks amazing, of course, and has me itching to begin our much needed (tub leaks into the basement) bathroom redo.
We had such a hard time deciding, but the everyday Chicago street view HAD to win out. Plus, that sort of looks like Jack, right?! We got some of our friends on the west coast on board with the prints too, and they chose the MCM house with the barbecue in the yard. :)
Love that! Perfect for a west coast house. And it totally looks like Jack.
It’s beautiful! I’m always afraid to mix metals in rooms (must be my undiagnosed OCD, ha) but you did it so beautifully here. I might just have to give it a try now! :)
We also just finished our master bathroom ourselves. It’s amazing how long a little space can take to redo, huh? But it’s SO worth it. Can’t wait to see what you guys do next!
Absolutely adore everything you’ve done with it! I especially love the floor. Black is such a great look for a bathroom floor and I just never thought about it before.
This looks so great! I love everything! I’m putting a bathroom together right now too and am having total indecision about the shelving situation above the toilet. Cabinets? Shelves? How many? Just when i was about to order the shelf brackets for two today, you made one look so good!
AY DIOS MIO! ¯\_(ツ)_/¯
Haha, sorry to have made it more difficult, Gloria! :D
Hi! This bathroom is so beautiful!! Love the transformation. Do you have standard 8′ ceilings in the bathroom? I’ve fallen in love with that mirror but I feel like it would take up most of the space on our wall and we couldn’t do sconces above the mirror as you did.
Thank you!!
Thank you! We have 9′ ceilings in the bathroom, and the lights go almost all the way to the ceiling. This mirror might be a bit too big for 8′ ceilings, unless you have room to put a sconce on each side! That would be so pretty, too.
Hi Kim,
Commenting a bit late here – I love the bathroom reno and definitely have bathroom envy! You guys did a great job. I was wondering if, down the road, you’ll be doing a post on installing the ikea vanity? I’ve been searching the internet for tutorials on installing ikea vanities but those are few and far between. I’m considering an ikea vanity for my own bathroom reno but not sure of the quality and whether my DIY skills can stand up to installing as it seems a bit tricky.
Thanks in advance!
Hira
Hi Hira, unfortunately, we didn’t take any photos of the process, but we simply used toggle bolts to attach it to the wall. That’s it! We used the instructions from IKEA which were really simple – basically, you attach the brackets it comes with, and secure with toggles. Please let me know if there’s something specific that you’re wondering about, and I’ll do my best to answer those questions directly!
Glorious! I love everything in it, including all the tiny decisions you made that make it YOURS. Repainting the mirror, the special faceplate for the shower. So lovely.
The demo photo made me smile too. :) I’ve printed a few of those for clients over time, and they never cease to be a dramatic reminder of where a space has come from.
Spent the morning poking through your site with a cup of coffee. It’s almost like hanging out! hehe. Hope you’re great.
x
Aw, so great to hear from you!! xoxo
HI Kim,
LOVE the Bathroom! We are about to begin our bathroom remodel and have been struggling with a stylish vanity. We went to IKEA today and picked the same one as you! My question is what is the exact color you had semi-handmade do? We love it! Did you buy the whole unit from IKEA? And then semi-handmade sent you the doors? Again so GORGEOUS
Thanks Jen
Thanks, Jen! Yes, we did have to buy the whole unit from IKEA. We donated the white drawer fronts, and we installed the Flatsawn Walnut drawer fronts from SemiHandmade. We couldn’t be happier with the look!
Quick edit to say, we learned that we HAD to buy the doors for the IKEA vanity. We didn’t have the option to not include them (and therefore, to lower the overall price of the unit). If we were doing a kitchen, then we would have had the option to not buy doors and ONLY buy SemiHandmade door/drawer fronts.
Hi Kim!
I’ve been drooling over your bathroom reno for months and now my husband and I are finally getting around to redoing ours. I have a question about the IKEA cabinets and sink: how is it holding up? Does it seem like good quality? The price couldn’t be better and I love this style. ALSO: do you find the sinks to be too small? When we looked at them in the showroom at IKEA they seemed more shallow and small than I would expect or like. Do you find this to be a problem or concern ever? Thanks SO much for any feedback you have. Would love to know your thoughts now that you’ve lived with it for a few months!
Sarah
Hi Sarah! Great questions. We are LOVING our IKEA cabinet and sink, and it still looks brand new! Keep in mind that we swapped out the doors for Semihandmade doors (in walnut), and those also look good as new. We especially love the 4 deep drawers and the IKEA plumbing, which allows us to use pretty much every square inch of storage space inside (as opposed to traditional plumbing with a much larger p-trap).
As far as the sinks, they are more shallow than our old (and horrible!) sink, but it’s not an issue at all. We’ve been enjoying the double sinks in such a compact size, so I honestly hadn’t thought of anything other than how nice that has been! The ONLY thing I would say about the IKEA sink is that the plug for the drain isn’t attached to the faucet, so it’s more of a plug that pops on and off. It’s been fine for us, but that’s the biggest difference between our last sink and these.
I hope that helps you out! Best of luck on your renovations!
I should have said ‘drawer fronts’, not ‘doors’ but I hope you understood that!
This is SO helpful. Thank you so much. I was trying to find reviews on the sink depth but was striking out. You’re such a great resource!
I was not aware that that’s how IKEA did their drain plugs, but I don’t think that’d be a big deal for us. Now to convince my hubs that the shallower the sink, the less cleaning surface! HA!
Thanks again!
Glad to help! :)
HEy there!
I am redoing our bathroom and modeling it after yours! I love it so much and excited to finish. I am on the step on installing the vanity and sink. I think I am going to hire a plumber to do the IKEA replumb. I upgraded to a nice faucet but my faucet didn’t come with the plug for the drain. Did you IKEA vanity come with that or did you buy seperatly?
Hi Amy! The ikea vanity came with a plug, so we just use that. :) We’d love to see pics when you’re all done!
Hi,
Would you mind sharing how you DIY’d using your non-IKEA faucets with their Godmorgon vanity? I would love to use the sink base but my own faucets. Did you have to configure a smaller/tighter/closer to the wall P-trap?
Thank you!!
Hi Alana! We didn’t need to do anything different with the P-trap. We used what was provided to us by IKEA! The only thing you’ll need to keep in mind is that you’ll need a single hole faucet. If you stick with that, you should be able to use virtually any single hole faucet you’d like – IKEA or not.
Hi Kim, it looks amazing… what are the dimensions of your bathroom? I want to know if my small bathroom will fit all that you added.. thanks!
Hi Andrea, there is a breakdown of detailed dimensions in this post here: https://yellowbrickhome.com/2015/11/03/bed-bath-laundry-but-first-bath/
Hope that helps you out!
Hi Kim, the bathroom looks really great which excites me as we are currently renovating our main bath and spookily picked out the same Ikea vanity (single sink though) with semi handmade fronts and same floor! Now I know it will all look awesome together. I’m curious to know what the little door is to the right of your bath and what you use it for? We have a similar wall jut next to our alcove bathtub and I was thinking of putting recessed shelving or something but I think it might be too narrow, but maybe it’s not…thanks!
Hi Lisa, that little space IS really narrow! We retrofitted an IKEA cabinet to work in there. Here’s the whole post and all the details on that: https://yellowbrickhome.com/2016/03/01/skinny-space-bathroom-storage-solution/
Oh so cool! Genius idea. It turned out beautifully! Thanks for the tip :)
Hi! Beautiful bathroom! I came across your site searching for details about the storka tile you used. We are thinking of using this same tile in our master bath shower. I’m curious how it’s holding up and if you still love it as much? My husband is worried about going with matte, thinks it will be harder to clean and will wear worse than a gloss would. I think it would be a cool choice to go with the basketweave tile we chose for the floor and in which the white tiles in that are also matte. Interested in your experience with it. Thanks so much!
Simply put, we love it! We have matte subway in our kitchen renovation, too. It cleans no differently than gloss, and if anything, it hides soap scum a bit too well! Even still, we clean the tub and tiles like we would if it was gloss, and it always looks great. Go for it!
Hi Kim, this looks so great! Can you please enlighten me as to how much work it took to paint your mirror black? I’ve been searching for a 40″ square black mirror and love the look of this, but I am a terrible DIY person! I’m not sure how one could even paint the inner seam of this mirror frame. How did it go?
Hi Ginny! Our secret: I didn’t paint the inner seam! Because it was already a rich/dark colored wood, you really can’t tell much of a difference. I simply used a mini foam roller and used black paint I had on hand to roll all the front and all sides. It took me 30 minutes!
Another option would be to tape off just the mirror (which you could easily do with this one) and cover the rest of the mirror with kraft paper or plastic or something similar. Then, use spray paint! This will get the inner seam better, but again, you really can’t tell where the black begins and the wood starts. Promise!
I came here with a similar question, except that we actually have the mirror! Since you promised, I’m going to go for it.
I love everything you did with this bathroom! I am looking at the same ikea sink and wondering- did you butt the sink right up to the wall on the left side? Do the doors open up and hit the molding on the wall?
I know these are really specific, I am essentially just wondering if you have to have a small gap between the left wall and the sink counter.
Thank you! Yes, there is a small gap that will allow the drawers to clear the trim on the door. :)
Hi!
I know this is an old post but do you remember the grout colors you used for both the floor and shower tile? Everything looks fantastic!!!
We used Platinum grout, and all that info can be found here: https://yellowbrickhome.com/2016/01/27/happy-tile-day/
What a great work! That mirror with chicken legs is so awesome!
https://igviewer.org/
[…] Yellow Brick Home – This DIY loving couple gave their bathroom a total overhaul and achieved a gorgeous and minimal new look. It is fresh and calming and I love the pops of bright color in the art! […]
Stunning bath and your dogs are the sweetest!
Absolutely adore everything you’ve done with it! I especially love the floor. Black is such a great look for a bathroom floor and I just never thought about it before since I am not that fan of color black, but after seeing your floor and realizing how beautiful it is I instantly fell in love with the black color for the floor!
Hi guys! Sorry for commenting on an old post, but I recently bought “vintage” brass-plated hooks on eBay and I was wondering how you were able to get yours looking so bright? I tried washing with warm water and Dawn, but haven’t been successful with getting the tarnish off. Thank you for any help you can provide!!
Ours were pretty bright to begin with, but we share some tips in this post! https://yellowbrickhome.com/how-to-clean-a-brass-light/
Love your bathroom remodel! Stumbled here because I’m going with the Semihandmade doors as well and liked yours. Where’d you get the storage cabinet above your toilet? I may have missed it in but looked for awhile.
It’s a marble shelf from CB2!
Hi there!
Love the bathroom and considering the Godmorgen/Semi-Handmade mix for our kids bathroom. Question – I can’t quite tell, does your vanity sit flush to the wall on the one short side? If not, does that gap bother you? :D Thanks!
It’s a couple of inches from the wall, and it doesn’t bother us one bit. :)
[…] zien van deze badkamer? Klik hier om alles over de badkamer van Kim en Scott te […]
Hello! I love the bathroom, and ended up using the same vanity in mine with non-ikea faucets. How did you deal with plumbing and the drawer depth? I find that the plumbing interferes with the depth of the top drawer and I worry I am going to lose drawer space. Did you have similar issues?
Thanks!
We still used IKEA plumbing, even though we didn’t use IKEA fixtures. :)
Can you tell me the color of your grout?
I think it was sterling?
Hi there! I came across your blog and absolutely love everything! I clicked on the link to the sconces and was wondering if you selected different globes? The ones on the Rejuvenation website are called “opal” but they look white in your photos. Thanks so much!
Opal is white!
How do you like the sink faucet? I’m struggling to find one that is truly spot resistant!
Hi! Gorgeous bathroom. What color grout did you use for the walls and floor?