

It’s a Monday Rewind! Yellow Brick Home has over 11 years of archives, so from time to time, we’ll be sharing our favorites from posts past. This tutorial was originally published in April 2017. Enjoy!
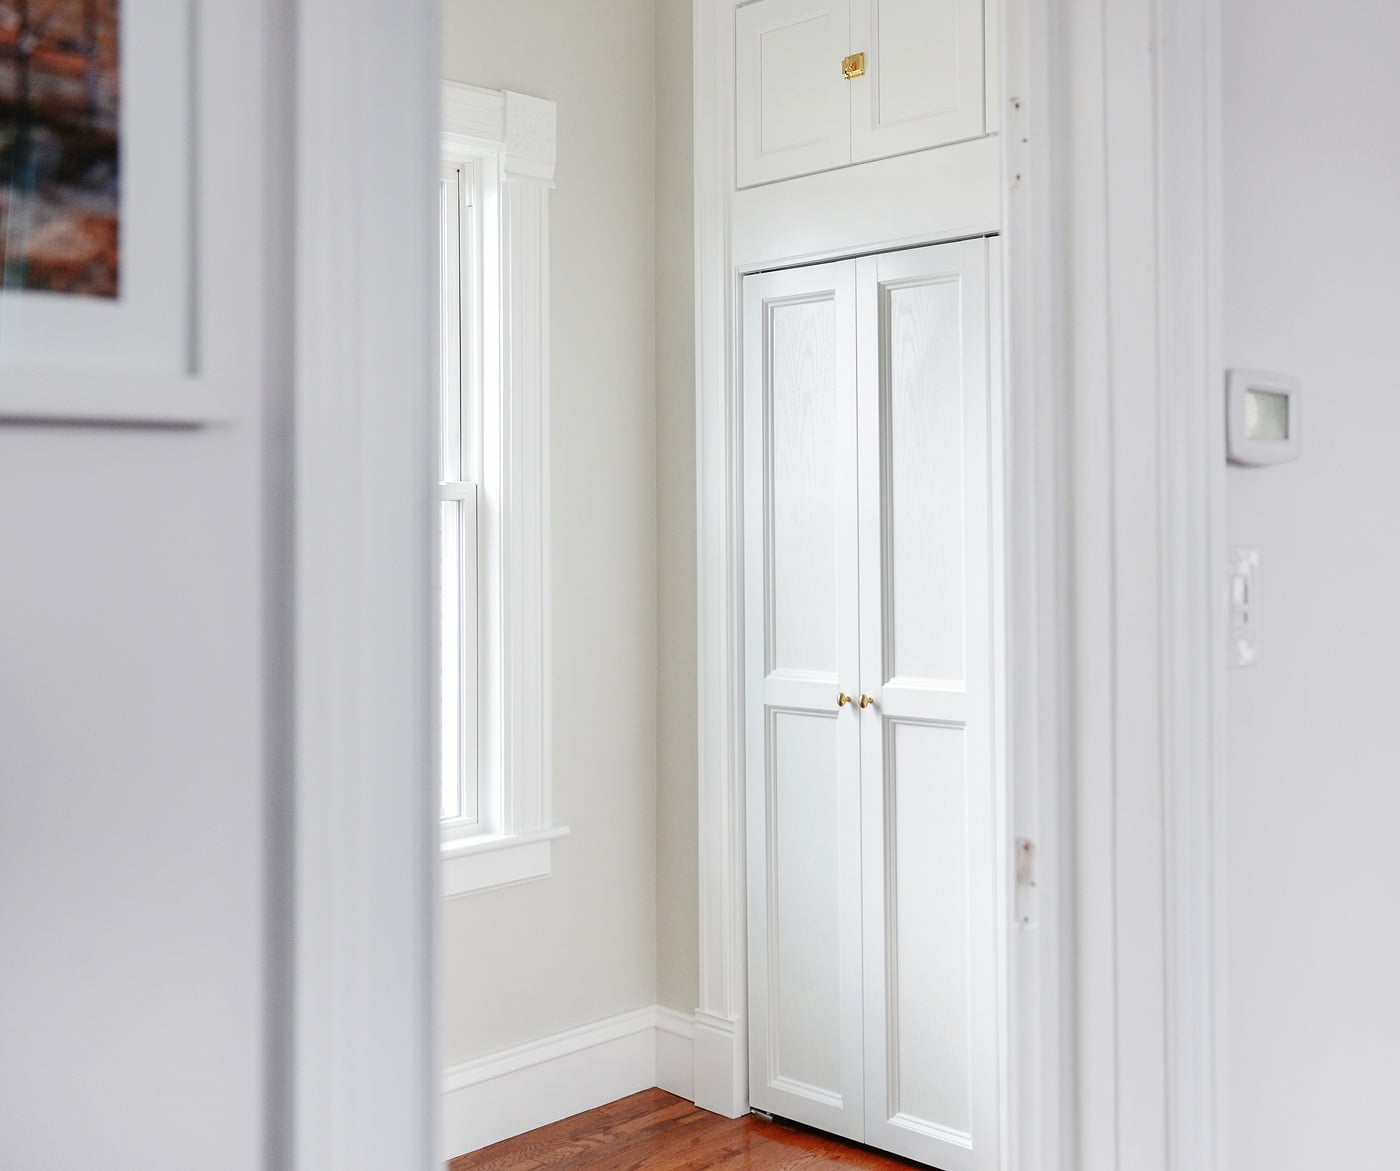
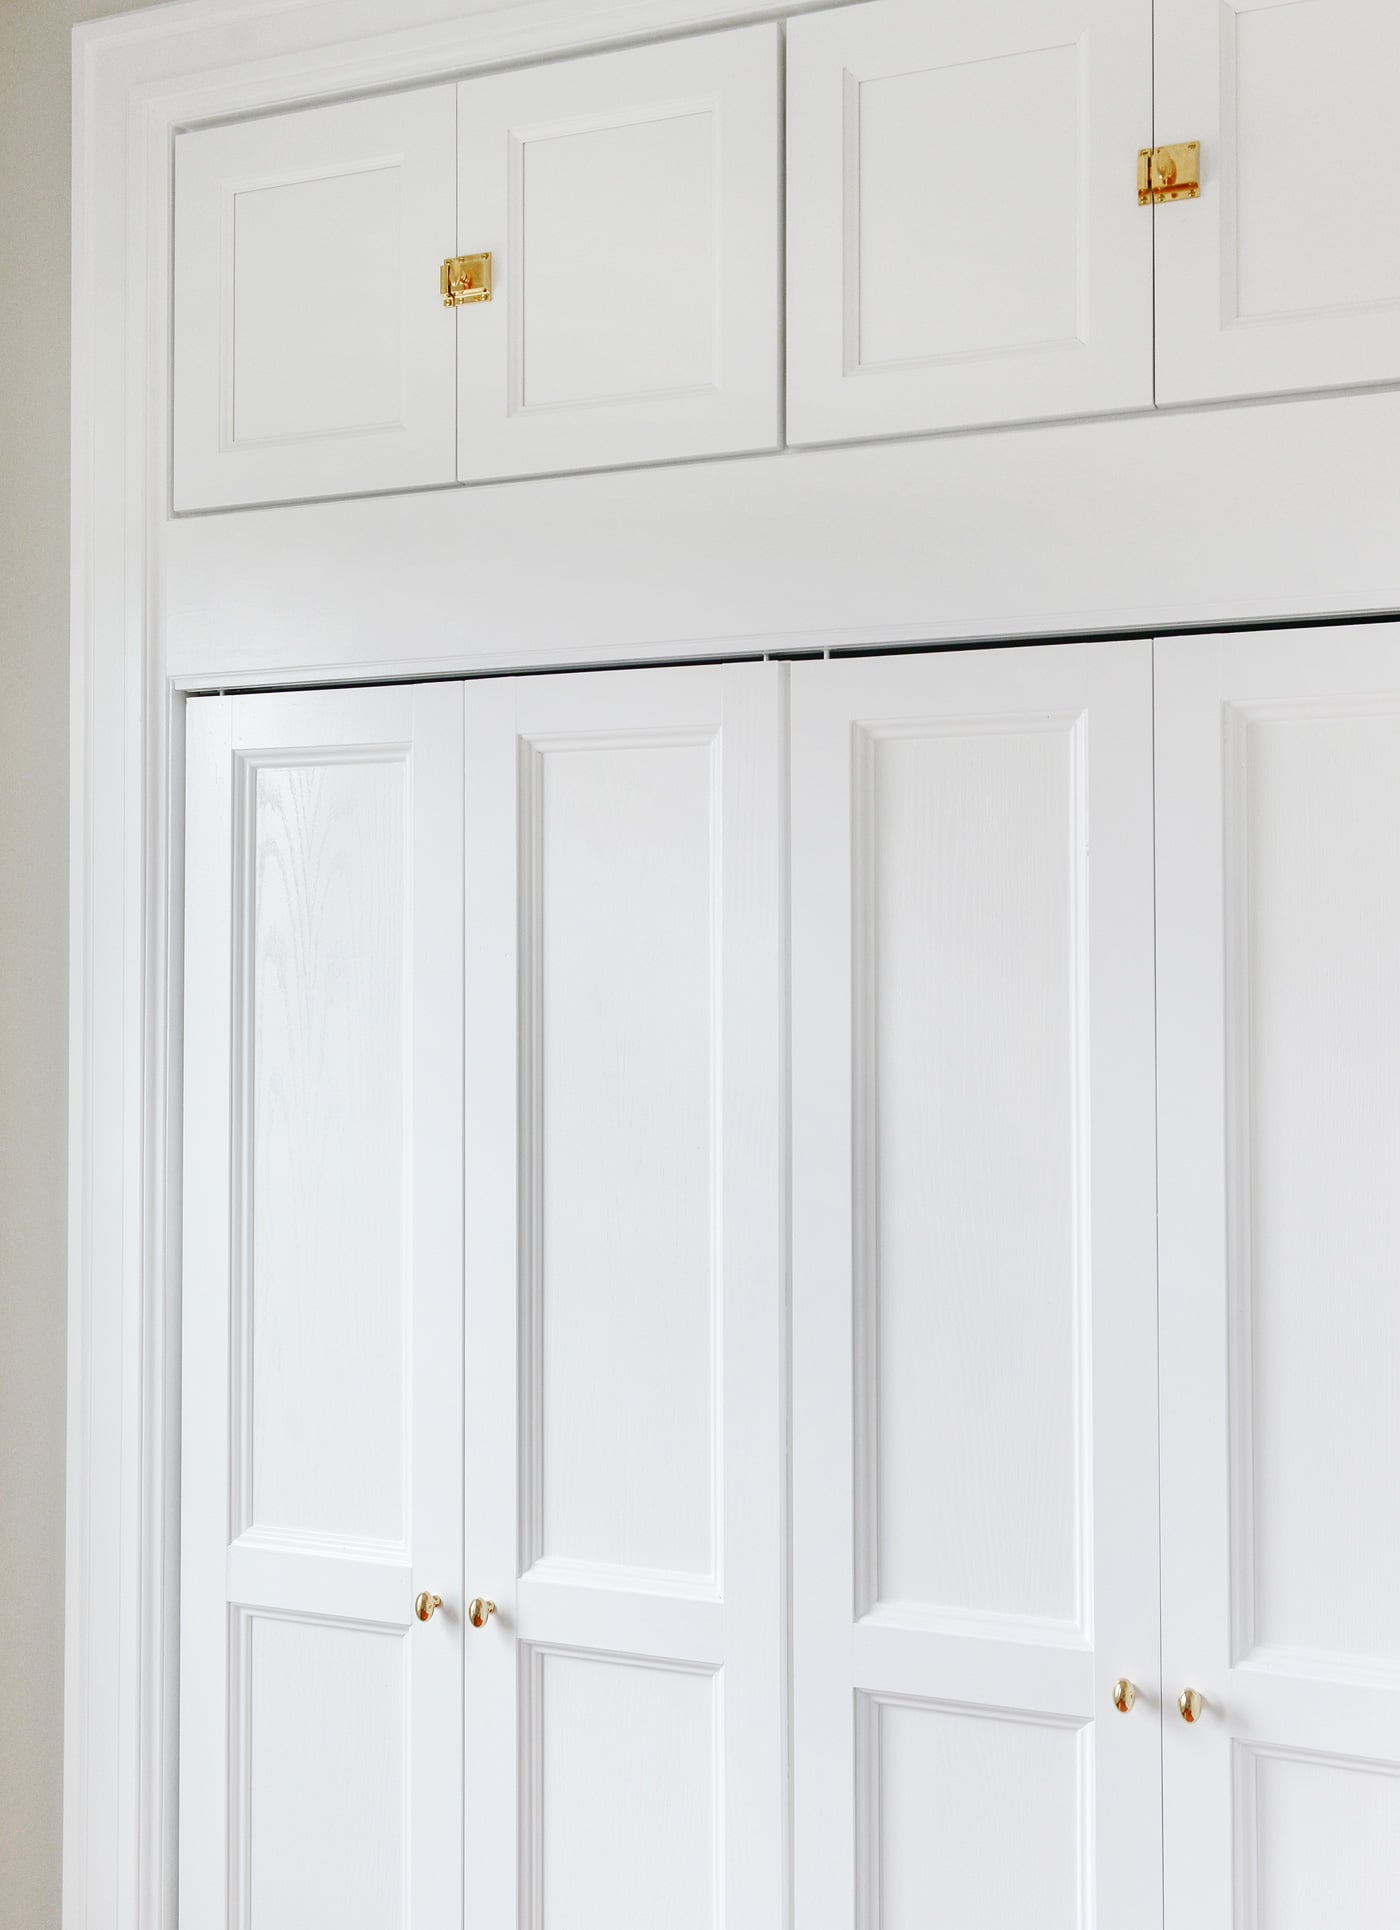
Adding decorative trim to bi-fold doors to turn them into something more custom is nothing new (we used inspiration from Room for Tuesday and DIY Playbook, and Project Palermo recently turned her doors inside out to do the same!), and we were determined to make this work for the closet in our Scary Room, too. It’s a great solution to create a higher end look from an everyday item! As much as we would have preferred a set of side-by-side swinging doors, space is limited in this already narrow room, and we want to have full access to the contents of the closet. The trick with ours is that we wanted the doors to mimic the look of our extra-deep RTA cabinets installed above, and a closer look at the cabinet doors had us realizing that we could, fingers crossed, easily replicate this look with the use of 1″ x 3″s and decorative molding. Luckily, we found a near identical match for the detail trim at this Chicagoland lumber supplier, and we got to work, hoping and wishing that we really could make a pair of bi-fold doors look, well, nice! Fancy, even.
Tools + Supplies Used
Flush bi-fold doors
1″ x 3″ pine boards
panel molding / small decorative trim
Semi-gloss paint
2 x hardware per set of doors
Spackle (our pick)
Caulk (our pick)
Construction adhesive
Square
Finish nailer with 1 1/4″ and 1″ nails
Miter saw
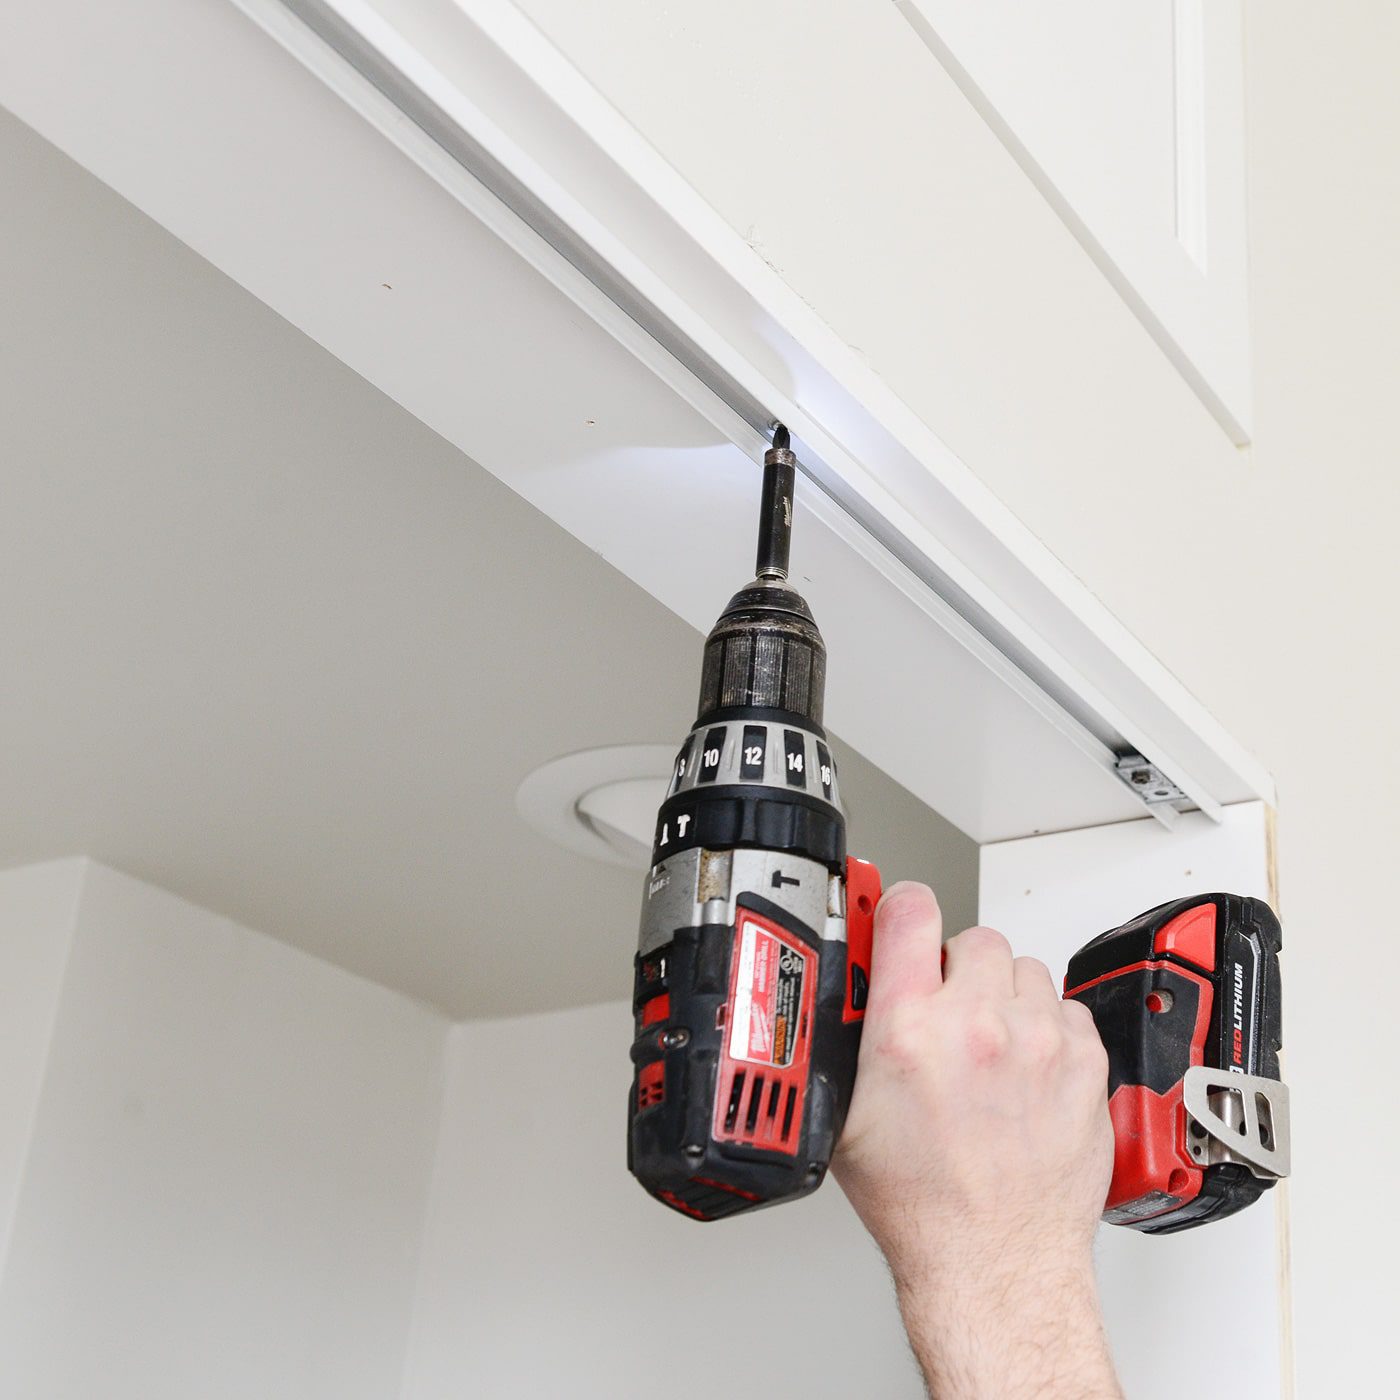
Screwdriver / drill (to install track)
Paint sprayer or brush + foam roller
Fine grit sandpaper
Measuring tape
Pencil
What We Did:
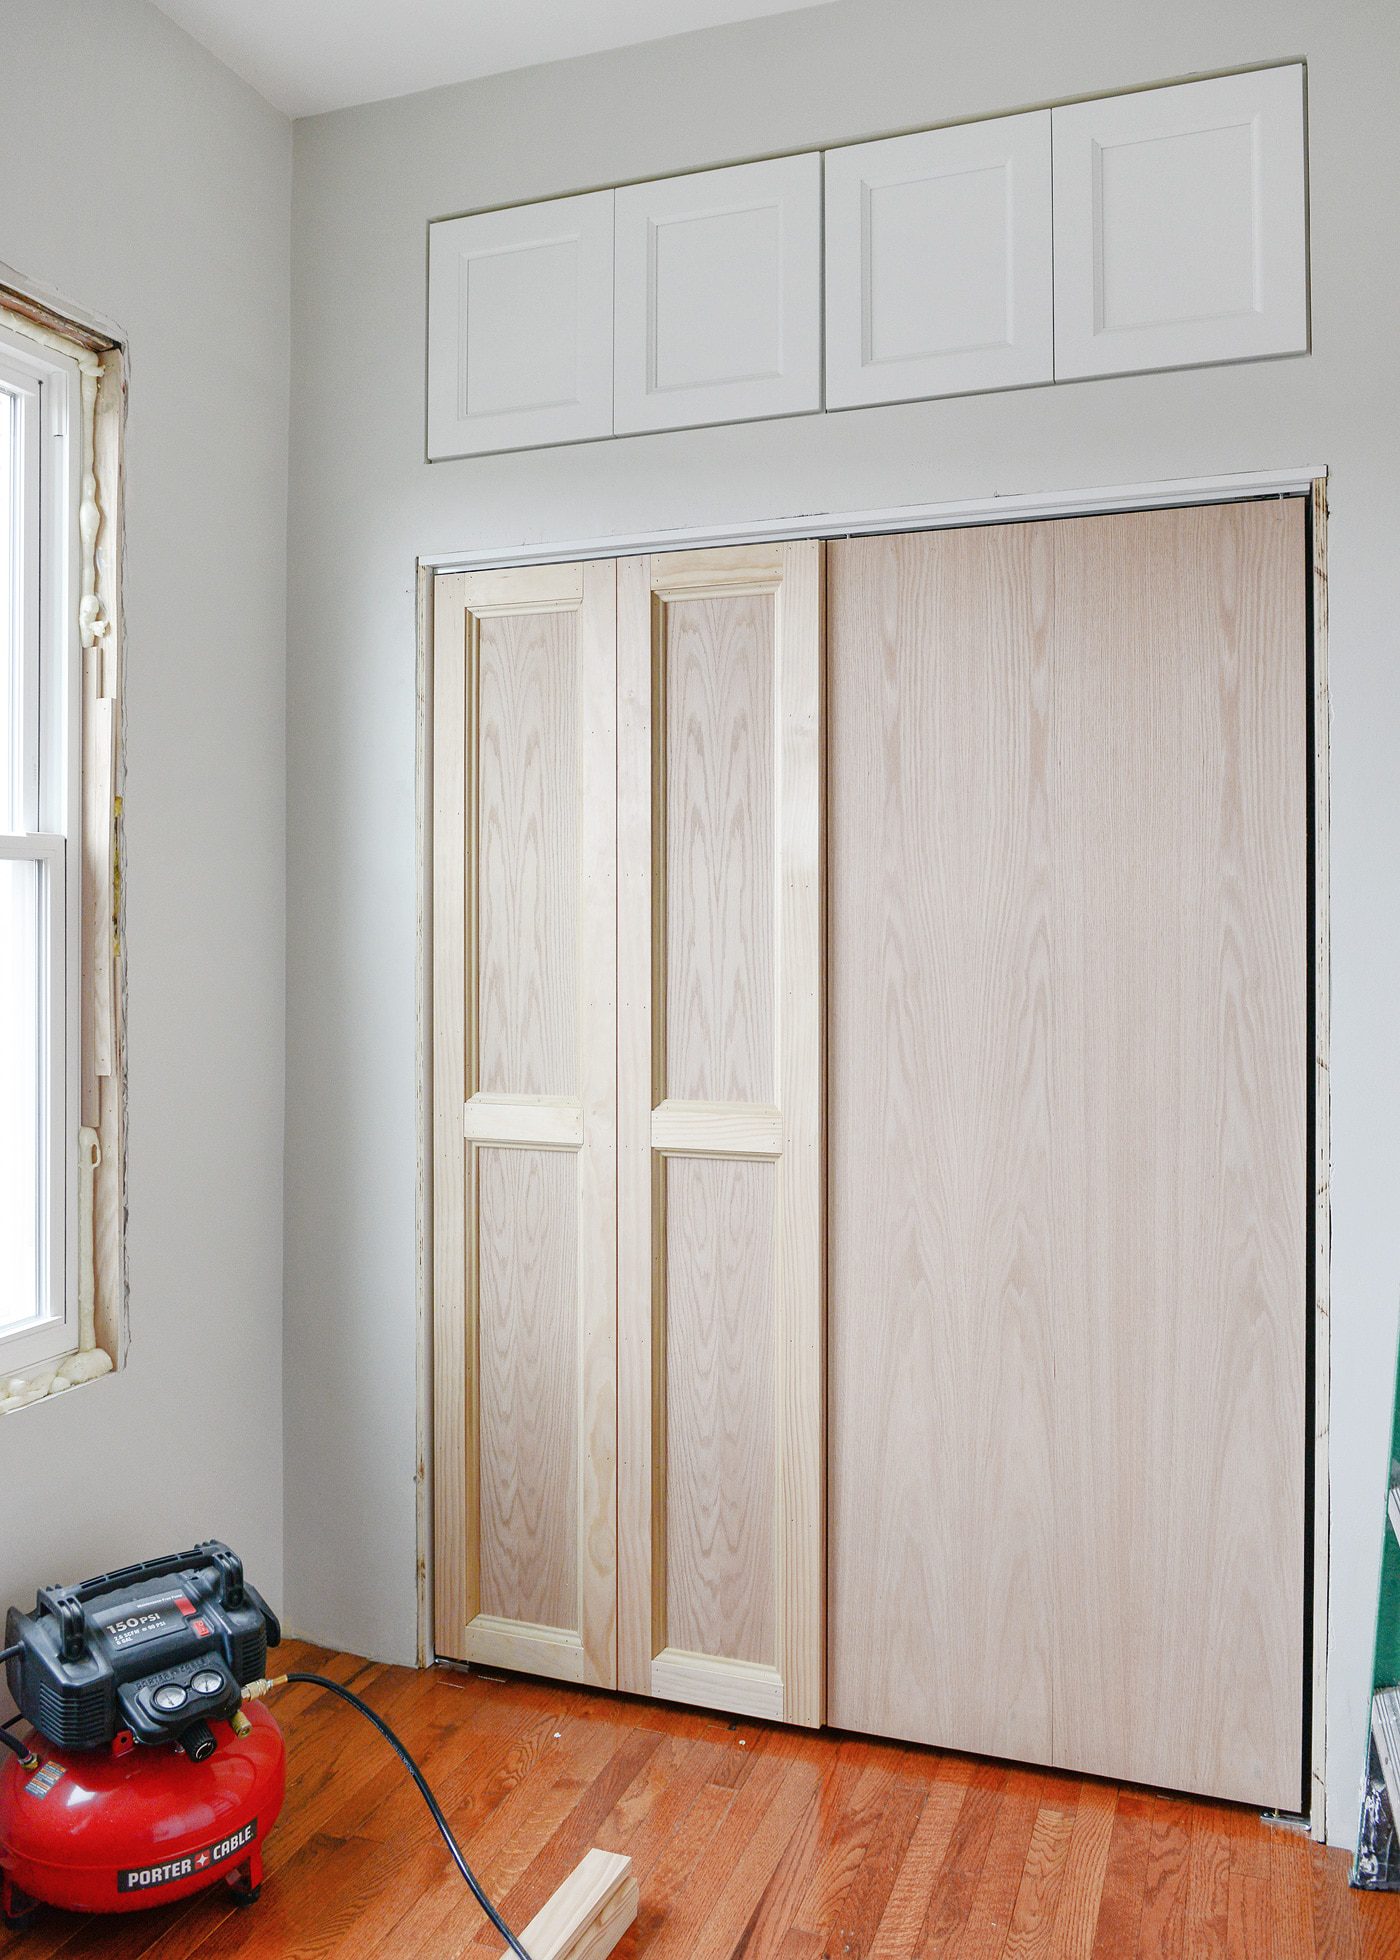
A 1″ x 3″ common board is really only 3/4″ thick x 2 1/2″ wide – which is also the exact dimensions of the paneling around our cabinets. The end goal was to have the front of the newly trimmed bi-folds be flush with the front face of the surrounding drywall, meaning, we needed to figure out the placement of the track after the 3/4″ thick trim detail had been added. Essentially, we simply needed to recess the bi-fold track by at least 3/4″ inside the door jamb to account for the additional trim. Then once we add the 1x3s to the doors, they’ll be nice and flush to the front of the drywall!
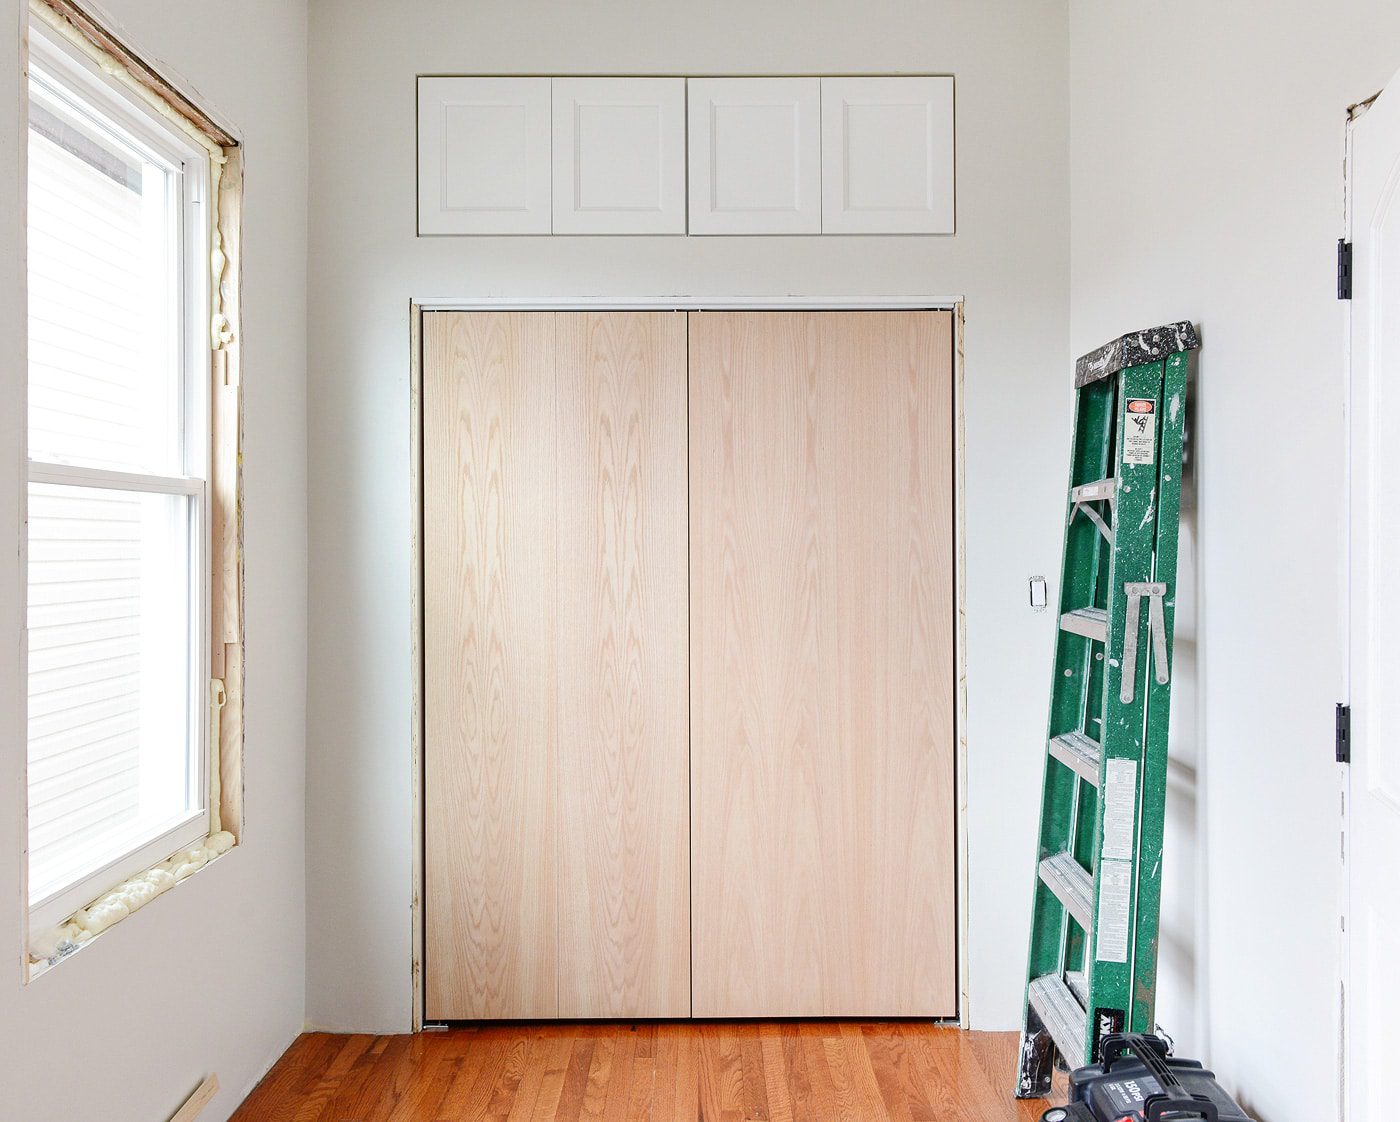
We made sure that everything aligned properly – check! – and then it was time to add the trim! Here’s what we did:
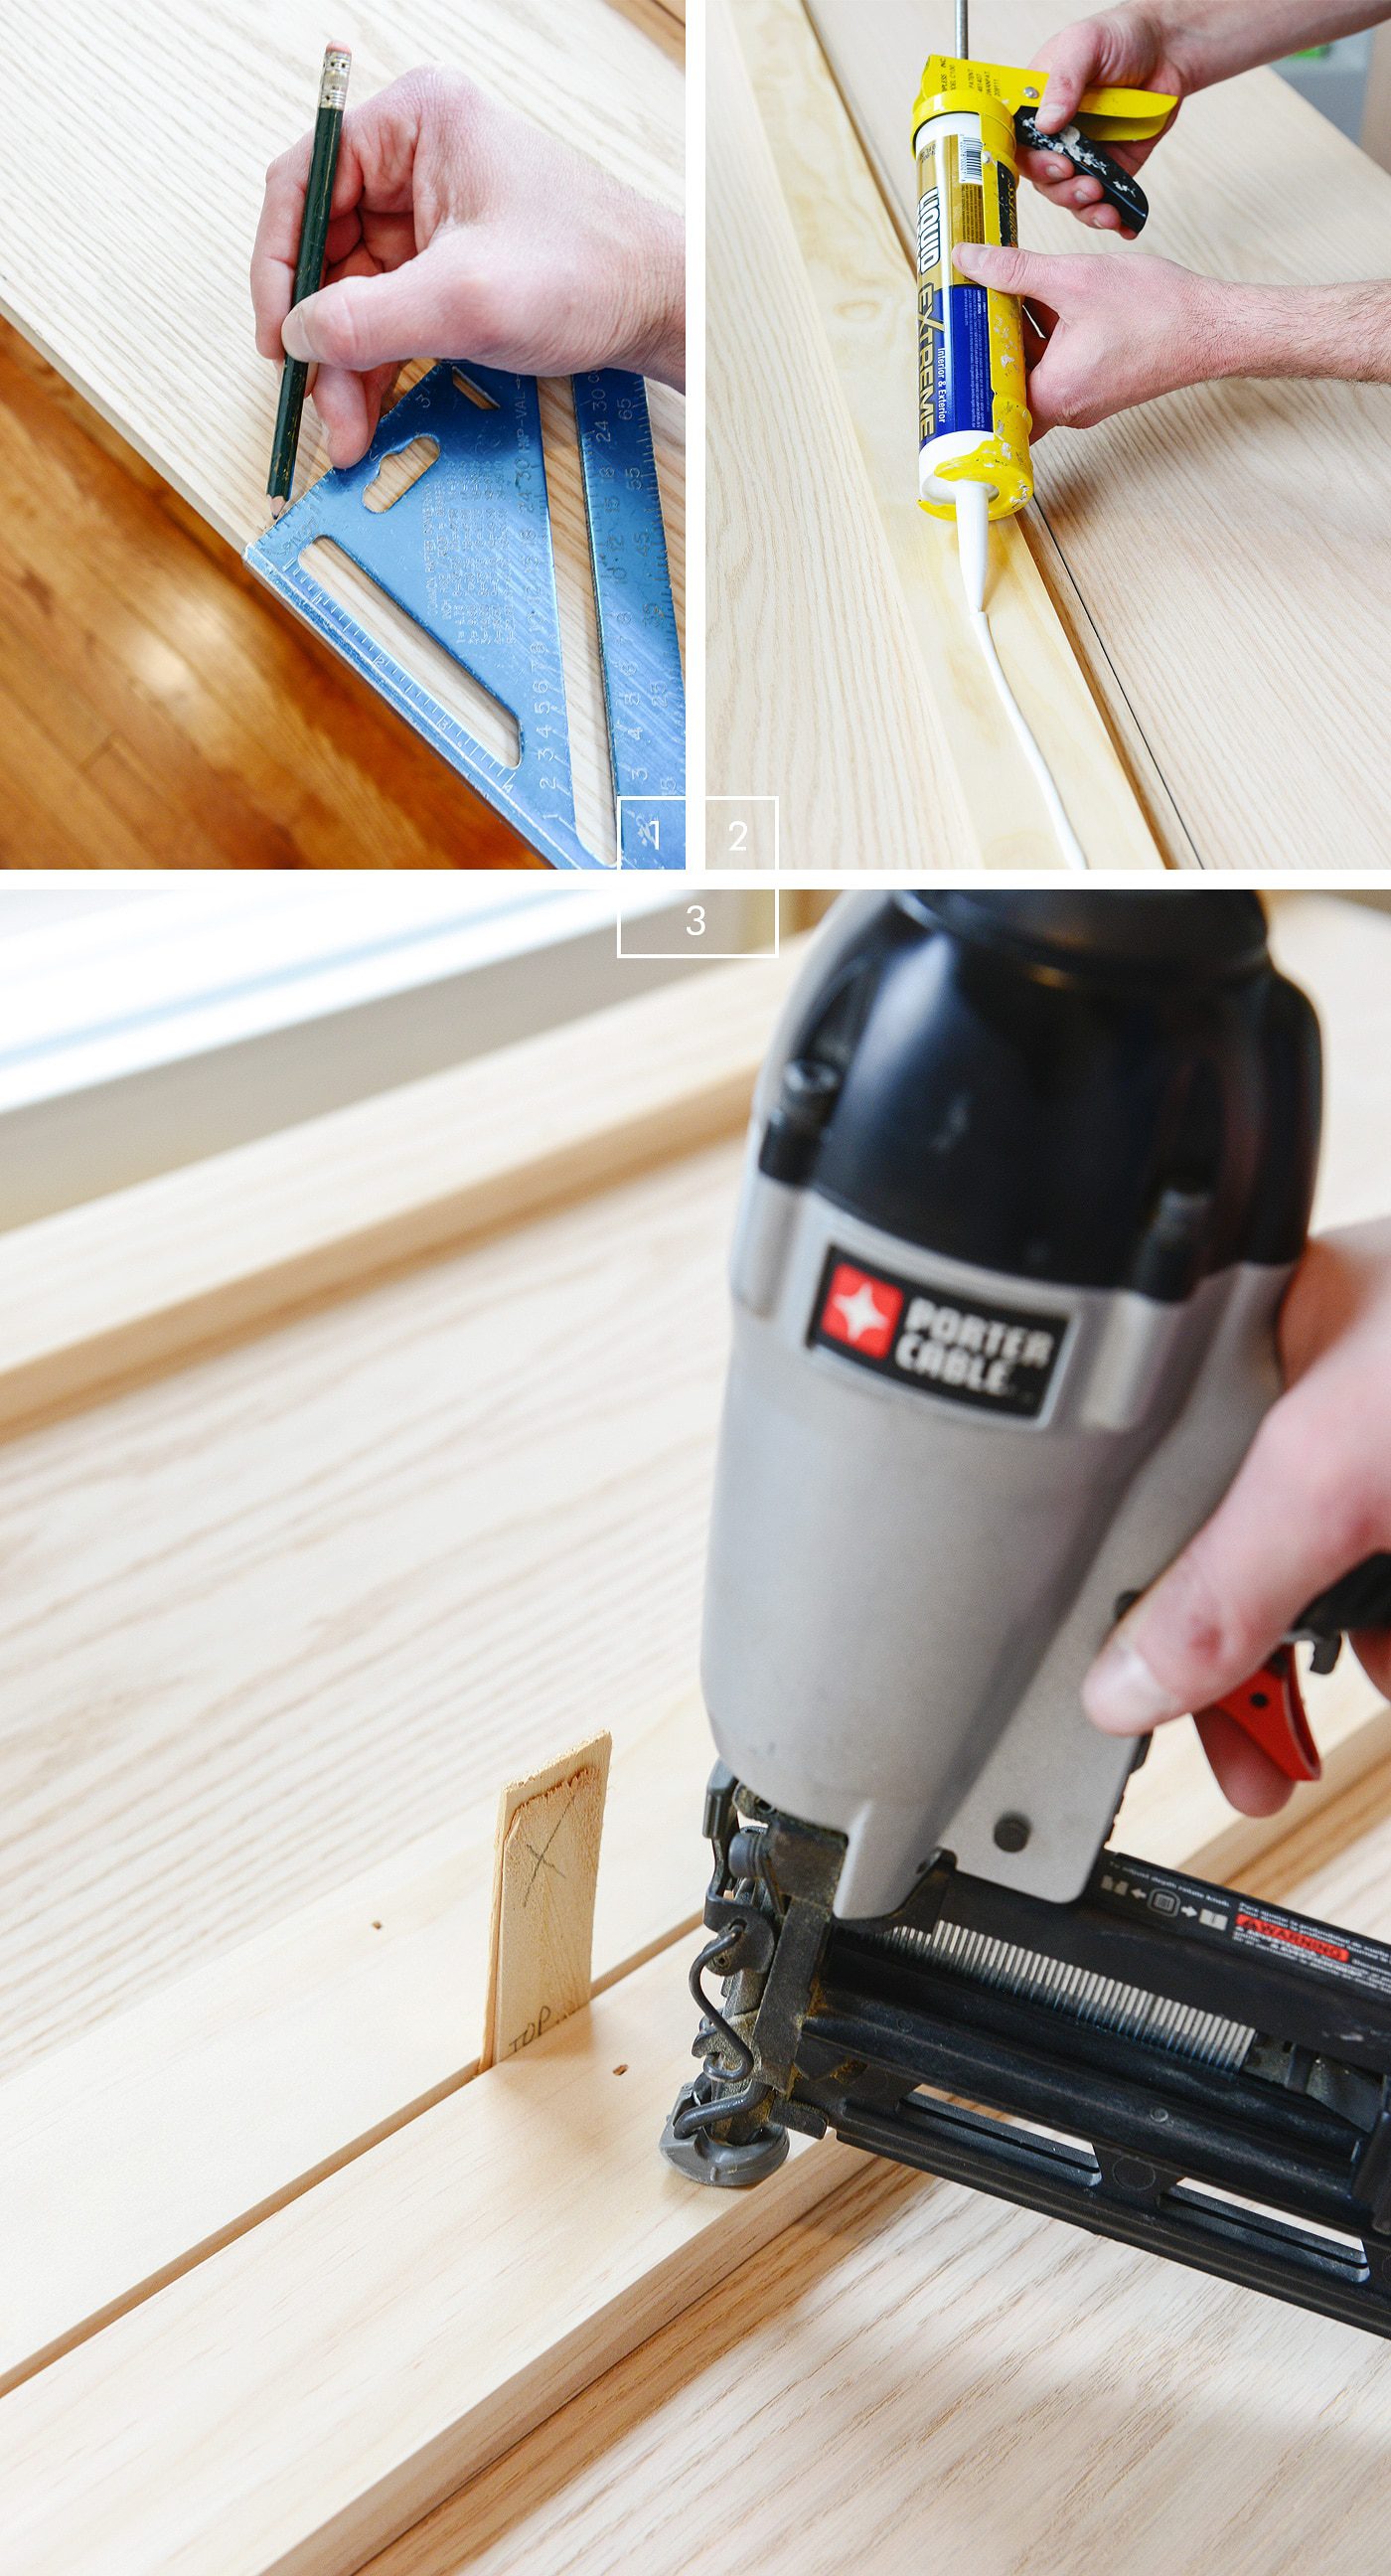
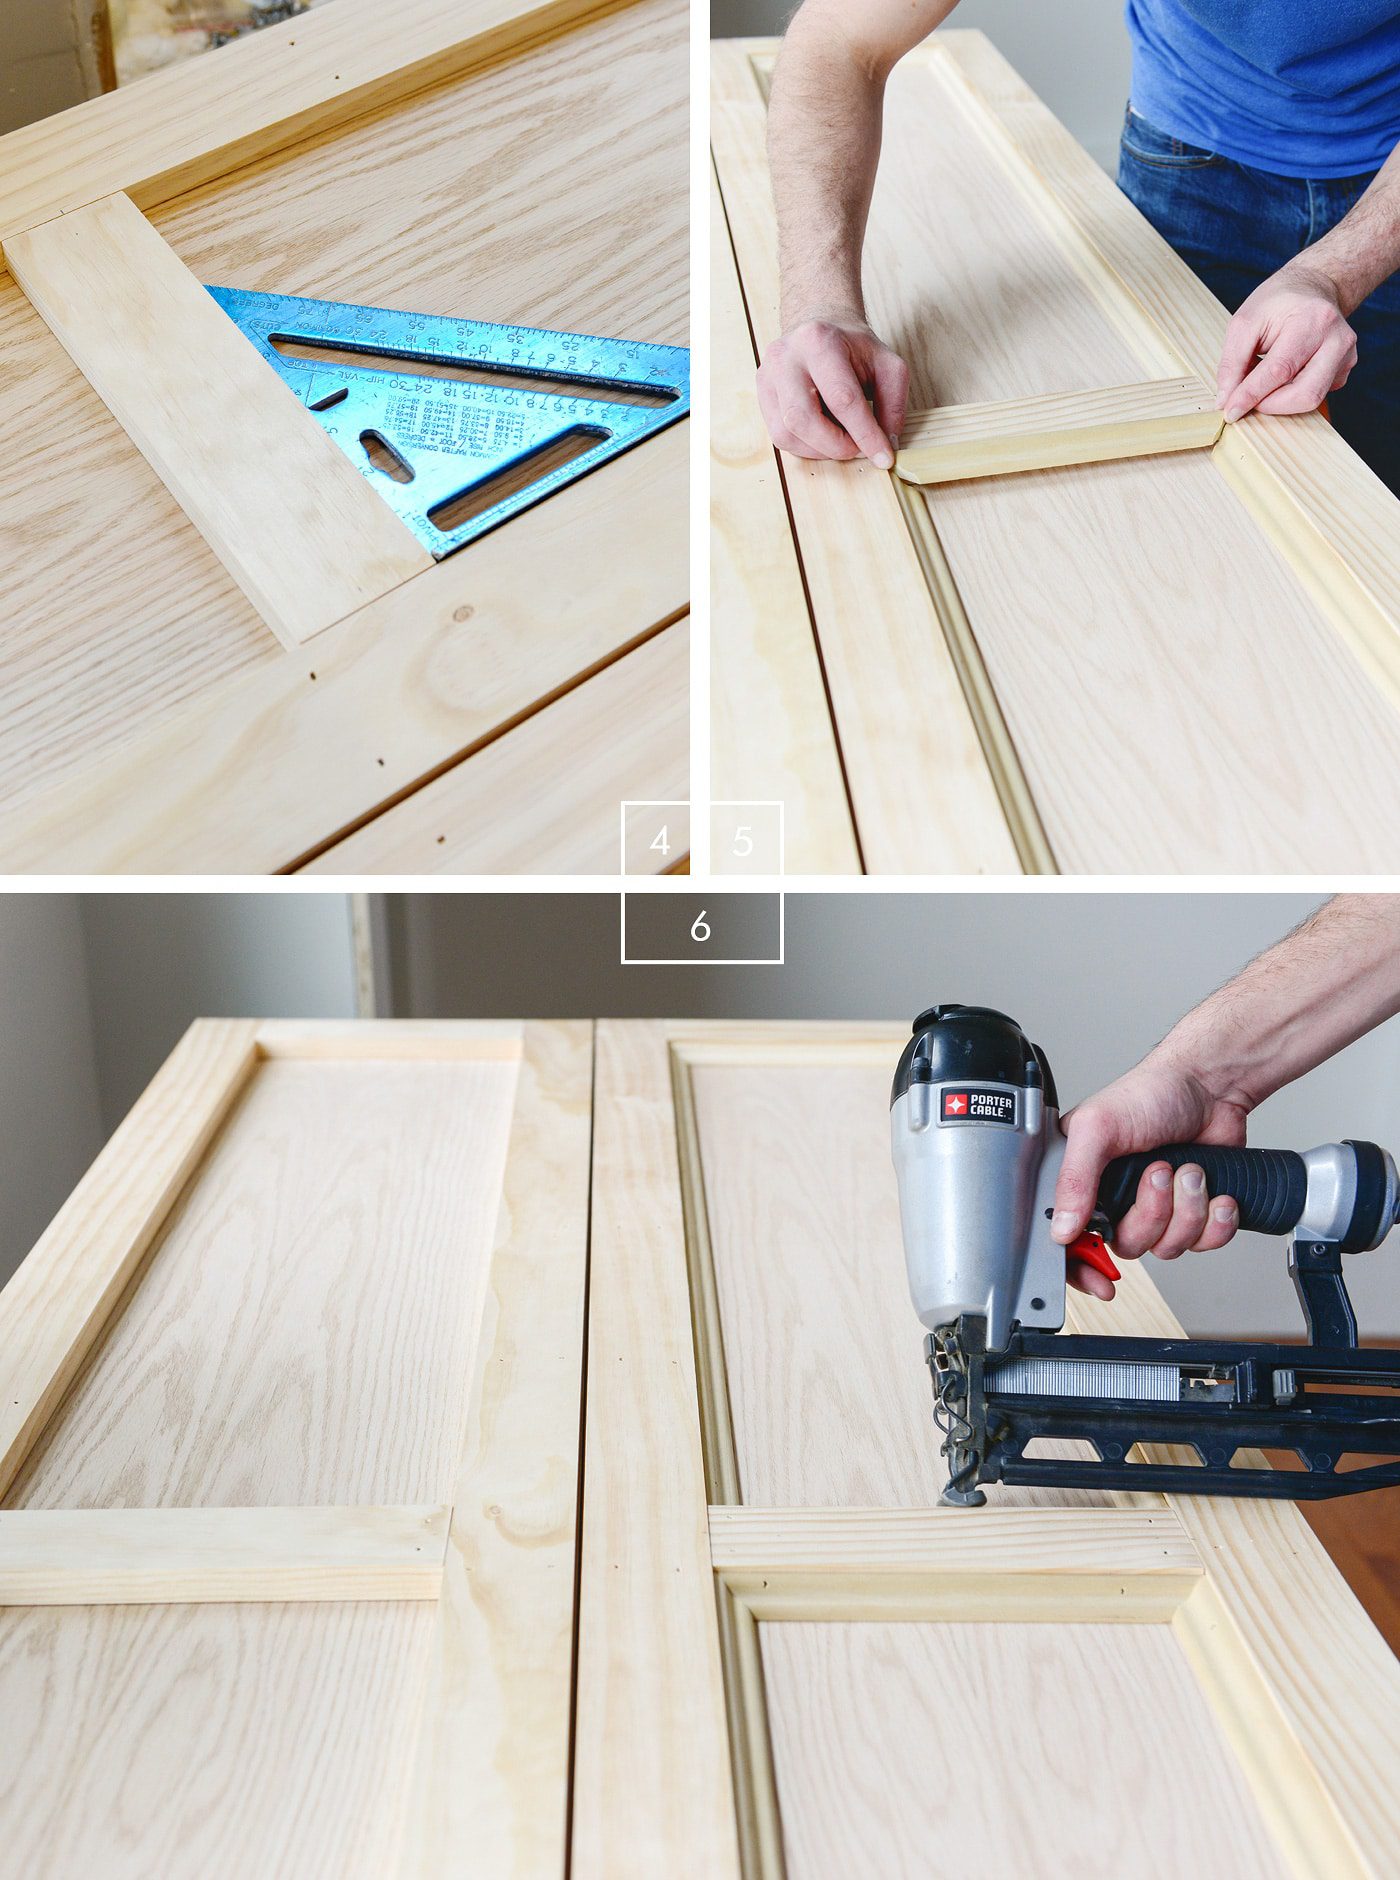
1| We made 1/4″ marks all around the outer edge of each set of panels. Where the two panels meet (at the hinge), we only came in 1/16″. The trim will need to be installed on the inside of these marks, an absolute necessity for the doors to properly open and close on the track without rubbing against the door jamb.
2| We cut the vertical lengths of 1x3s on our miter saw first, lightly sanded the freshly cut edges, and ran a line of construction adhesive along the back. These were all straight cuts.
3| After aligning them along our tick marks, we used 1 1/4″ finish nails to set them into place:
4| We chose to have only one horizontal panel in the middle of each door, and we cut those next. Using our square ensured that we stayed nice and level!
5| With all the 1x3s in place, we could move onto the smaller panel moldings. These cuts required mitered corners, and we did a dry fit in each section before…
6| …securing them into place with 1″ finish nails:
We excitedly hung the first completed door to make sure we were on track (see what I did there?), and after one round of practice, we were able to finish up the second set in about half the time! All the nail holes were spackled and sanded, and I even ran a thin line of caulk around the inside and outside of each panel for the most seamless look.
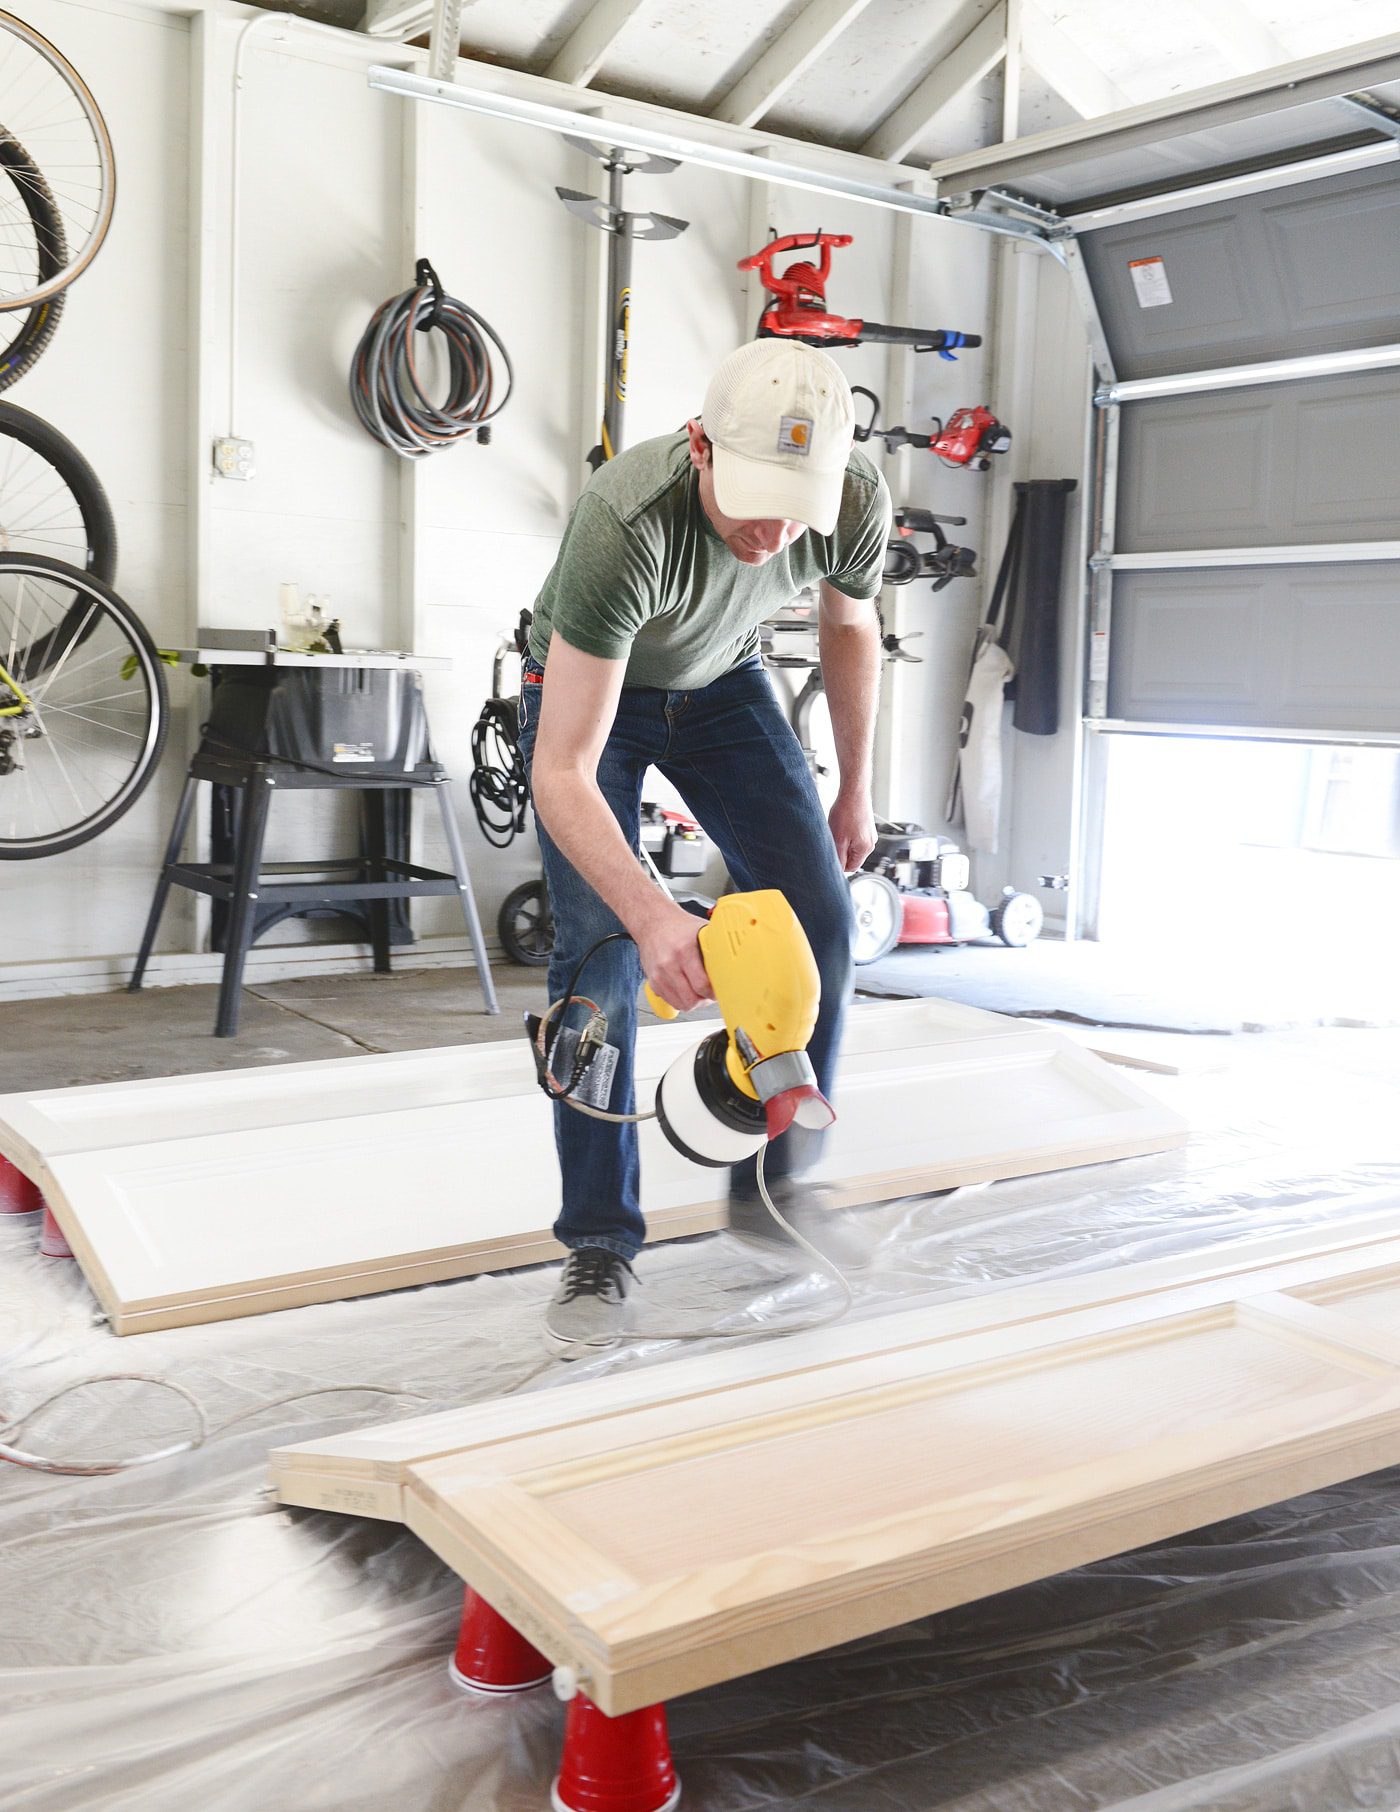
Finally, it was time to paint! We used our paint sprayer, but a foam roller and brush would work well, too. The color is Behr Ultra Pure White in a semi-gloss finish, the same trim color that’s in the rest of our home. Tip: We used disposable cups to prop the doors up – a bit of advice we picked up from Julia years ago.

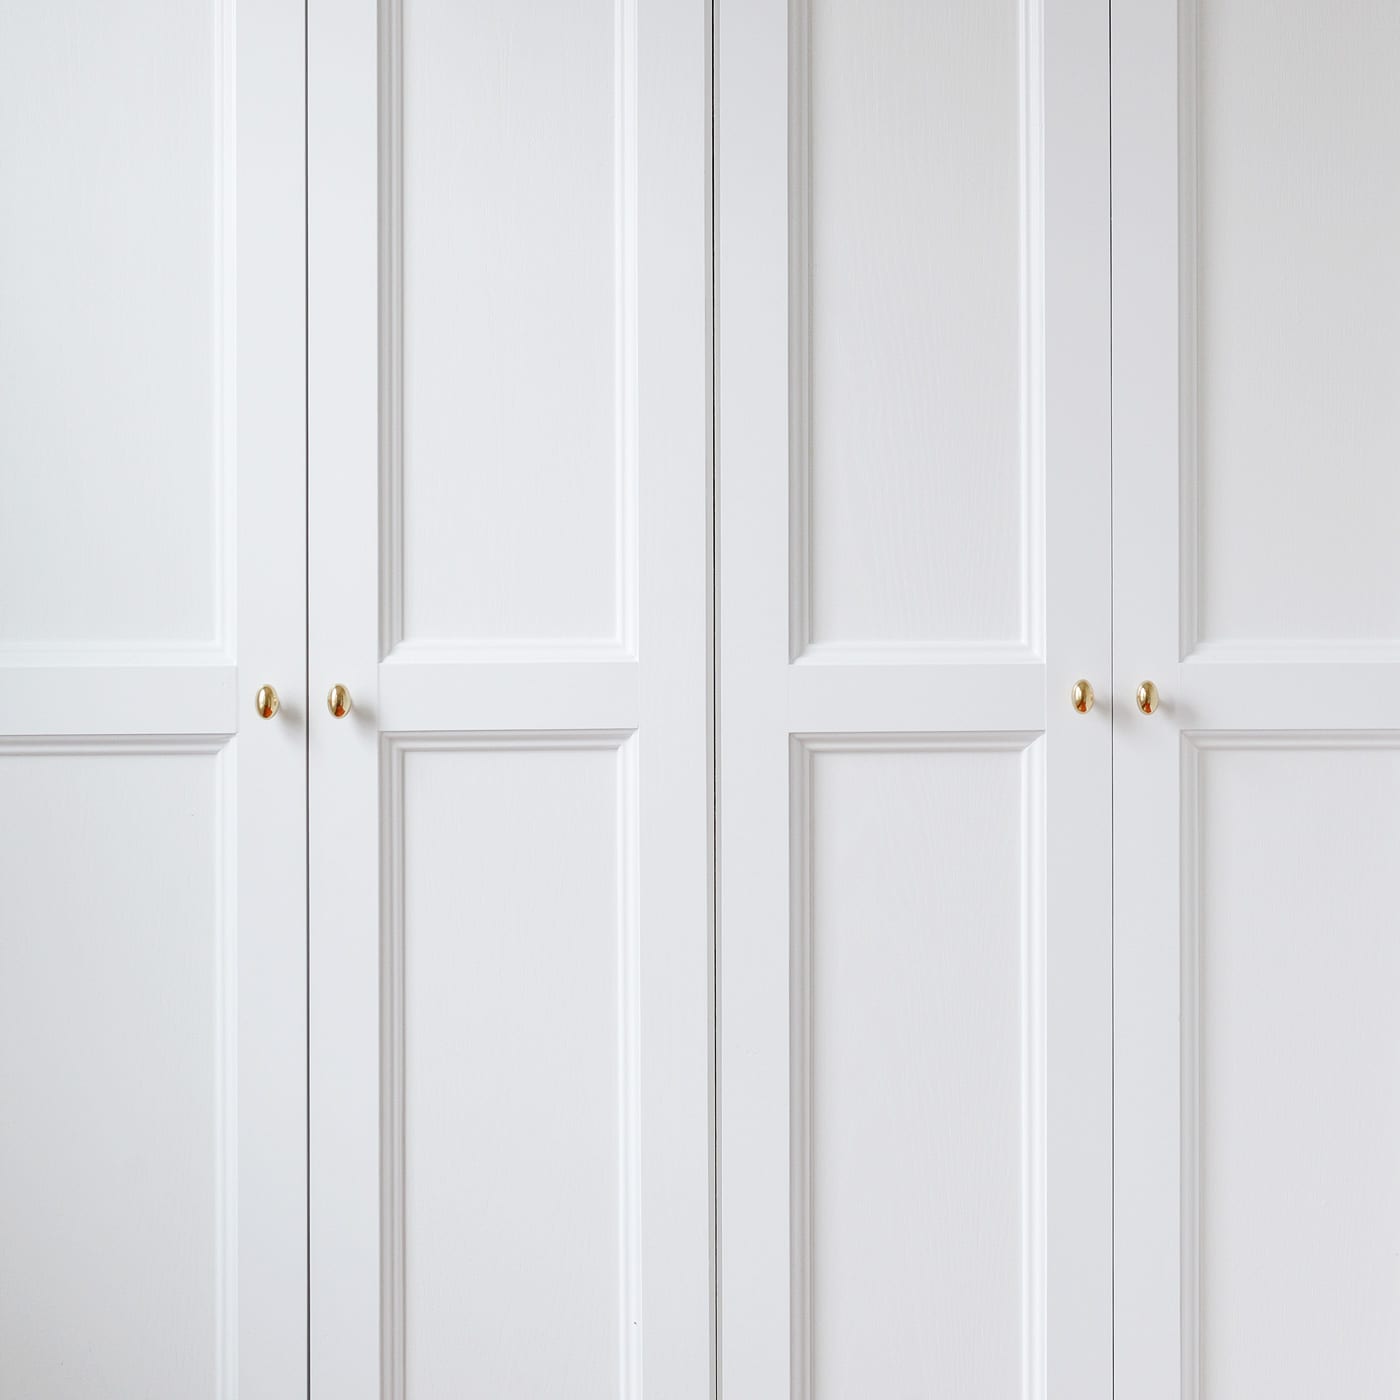
Our bi-fold doors are hollow core, and we’re happy to report that the addition of 1x3s gives the doors so much strength, and all our initial worries flew out the window. Most importantly, the 3/4″ thickness of the 1-bys paired with the panel moldings is a near identical match to the cabinets above:
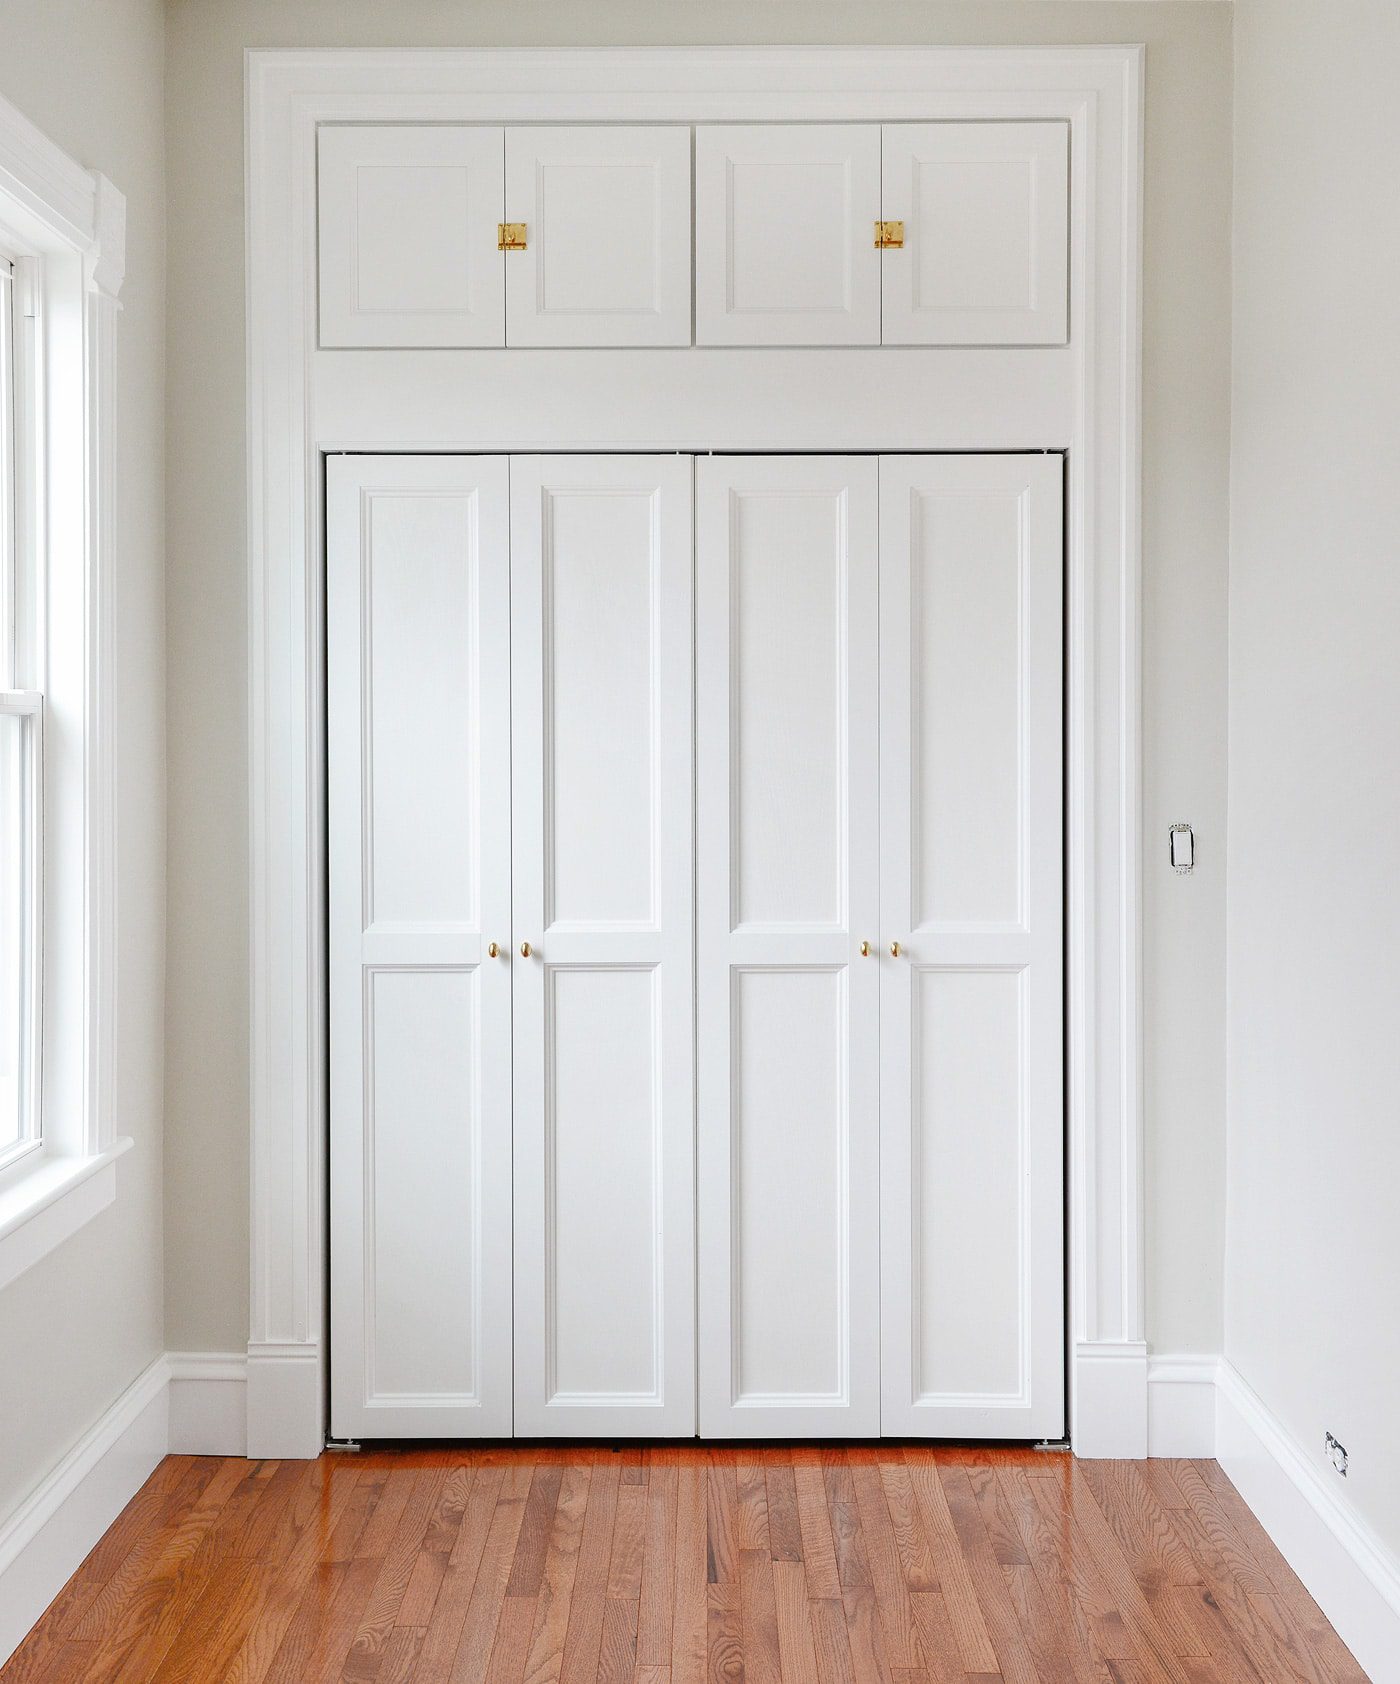
Below, you might be able to notice that we added a small strip of pine stop in front of the track, making it completely invisible and elevating the look. We also added two knobs on each set of doors to give the illusion that we have four separate doors, rather than a pair of bi-folds! (Plus how cute are these latches?)
Since diving into all things Scary Room, we’ve been able to almost double the amount of usable closet space, and although we’re not quite to the point of closet organization, we’re just thrilled that we’ve gotten this wall – this room! – to an official starting point. And hey, we’re not too far off from our original plans!
So, go forth! Show those bi-folds a little love.
PS: This room ultimately became Lucy’s nursery! This is her completed room, and here’s a tour inside the (now pink!) closet.


Looks amazing — especially the two knobs in the center of each!
That’s so hardcore!
This turned out beautifully!
Thanks for the link – I saw a jump in traffic yesterday, which was really fun! And, I think it’s a sign that you blogged about this paint sprayer on my birthday: I need to treat myself and finally buy one.
Happy birthday, Marti! And yes, we love Wagner and have used several of their sprayers (in all price ranges), but we always go back to this one when we want the smoothest finish possible. Treat yourself!
WOW VERY CLASSY!!! I am so addicted to your site that I am getting ideas all the time. I am currently remodeling a bathroom and you have helped me so much. You have increased my confidence to do DIYs that I thought I could no way do. THANK YOU SO MUCH!! LOVE YOUE STYLE and Dogs. I have 7 of my own.
Wow, that’s a full house! Thank you for the kind words, Kim!
Hey there! Great project, this looks amazing!!! Did you have any issue with function, now that the doors are 3/4″ thicker? How much more space did you need to add to the outside edge gap to accommodate that? Thank you for all your great work :)
No issues with function with the thicker doors, and we came in about 1/8″ overall. The ONLY thing that became unexpected was that the added weight popped the middle hinge from one of the doors, so we replaced it with a longer piano-style hinge, and that solved the problem completely.
[…] not a plastic laminate. And this flooring isn’t thin – it’s a hunky (I see you, Kim) 5/8″ thick. That means it can even be sanded (twice) and […]
Did you cut each door in half? If so how did you cover the open ends since the doors were hollow?
They look terrific! Have you tried this on hollow hung doors? Was wondering how you would do the lock set.
You could do this on any hollow door, but you’ll need to make sure there’s enough room on the edge for the door to swing open and close properly. If it’s an interior door, you can put any handle set on it!
[…] to add a bunch of decorative trim and molding to make them look anything but off-the-shelf. We used this tutorial by Yellow Brick Home as our inspiration and […]
I did a similar trick with closet doors in my previous home. They didn’t look as good as yours but I suddenly feel very smart since that project was 16+ years ago. :D It’s amazing how good bifold doors can look! Totally unrelated, I wanted to share a blog post where one of your photos was used uncredited. Giving them the benefit of the doubt, I posted a comment that they forgot to credit you. It has not yet been corrected so just wanted to make you aware. https://mariakillam.com/magic-questions-decorator-should-know
[…] I have been seeing a lot of door makeovers. This one shows how to go from boring to fab bifold doors. […]
[…] I’ve been seeing quite a lot of door makeovers. This one exhibits how one can go from boring to fab bifold doorways. […]
Great tutorial! How wide are these bifold doors? Mine are only 12 inches each so wondering if adding trim all around will make them look too narrow? Thanks for your help.
That might be a bit narrow to do trim all the way around, but you might want to consider looking at the doors as a whole and doing the trim around them that way!
[…] I have been seeing a lot of door makeovers. This one shows how to go from boring to fab bifold doors. […]
[…] Source: https://homeworlddesign.com/1908-flat-mixes-contemporary-design-with-victorian-details/Source: https://yellowbrickhome.com/add-molding-to-bi-fold-doors/ […]
Great door update! Thank you for sharing! I’m starting this project now, and I wanted to get clarification on this instruction: “We made 1/4″ marks all around the outer edge of each set of panels.” Does that 1/4″ margin include the top and bottom, or just the outer sides? Also, what “longer piano-style hinge” did you use?
We kept it consistent all the way around, although it’s not technically necessary on top and bottom. And the king piano hinge can be found at any hardware store!
Great, thank you, Kim!