

No more sorting laundry! This is how we created a built-in laundry sorting system using budget-friendly items. Yellow Brick Home has over 11 years of archives, so from time to time, we’ll be sharing our favorites from posts past. This tutorial was originally published in July 2016. Enjoy!
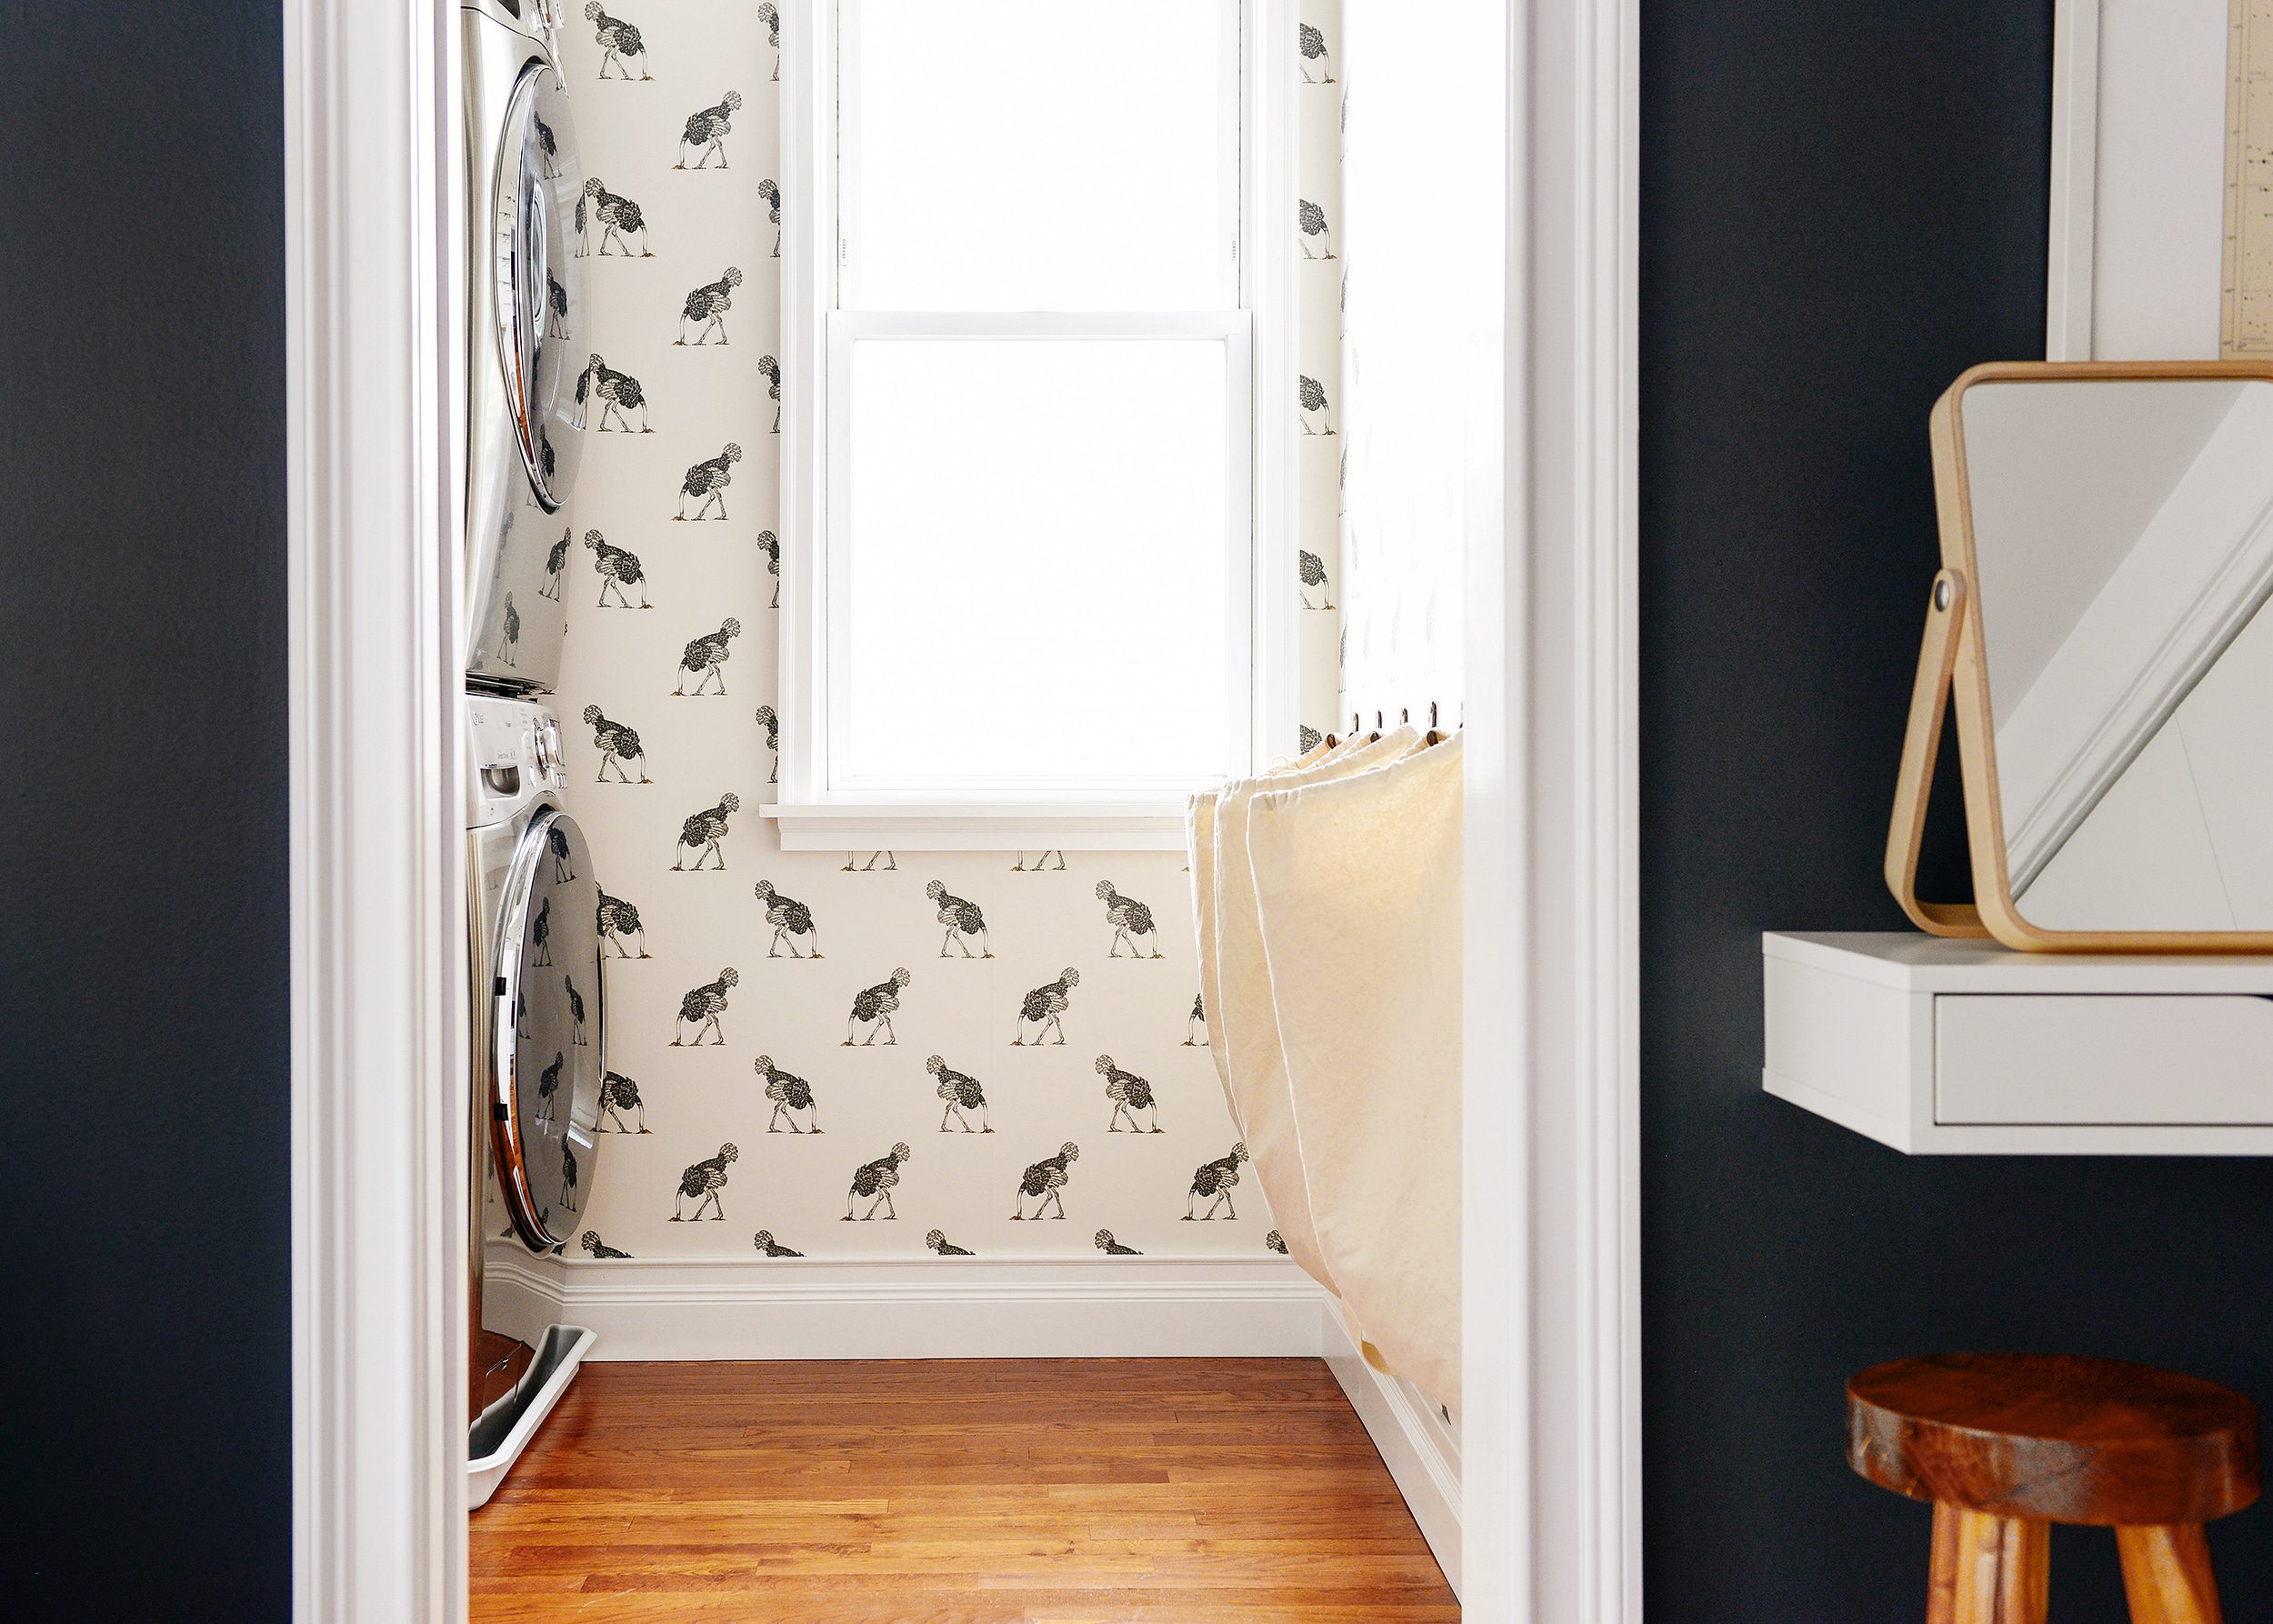
Wanting to see how the laundry room would take shape over the course of its renovation, we waited until the cabinets and machines were in place before deciding on a laundry sorting system. For as long as I can remember doing laundry (both growing up and in my adult life), all of our clothes went into one basket. When one could no longer possibly stuff one more sock in the hamper, it would all get dumped on the floor for sorting, and those piles would remain for the day (or two) until every last load had been washed.
A Built-In Laundry Sorting Solution
This time around, I wanted a true sorting system. Something that would make laundry day more efficient, something that would be so easy to use, there’d be no excuse not to use it! There’s no point putting systems in place if it’s a pain to keep up, you know? In a few hours, we DIY-ed this simple 3 bag set up, and we’ve been loving it – and most importantly, using it. Plus, cute!
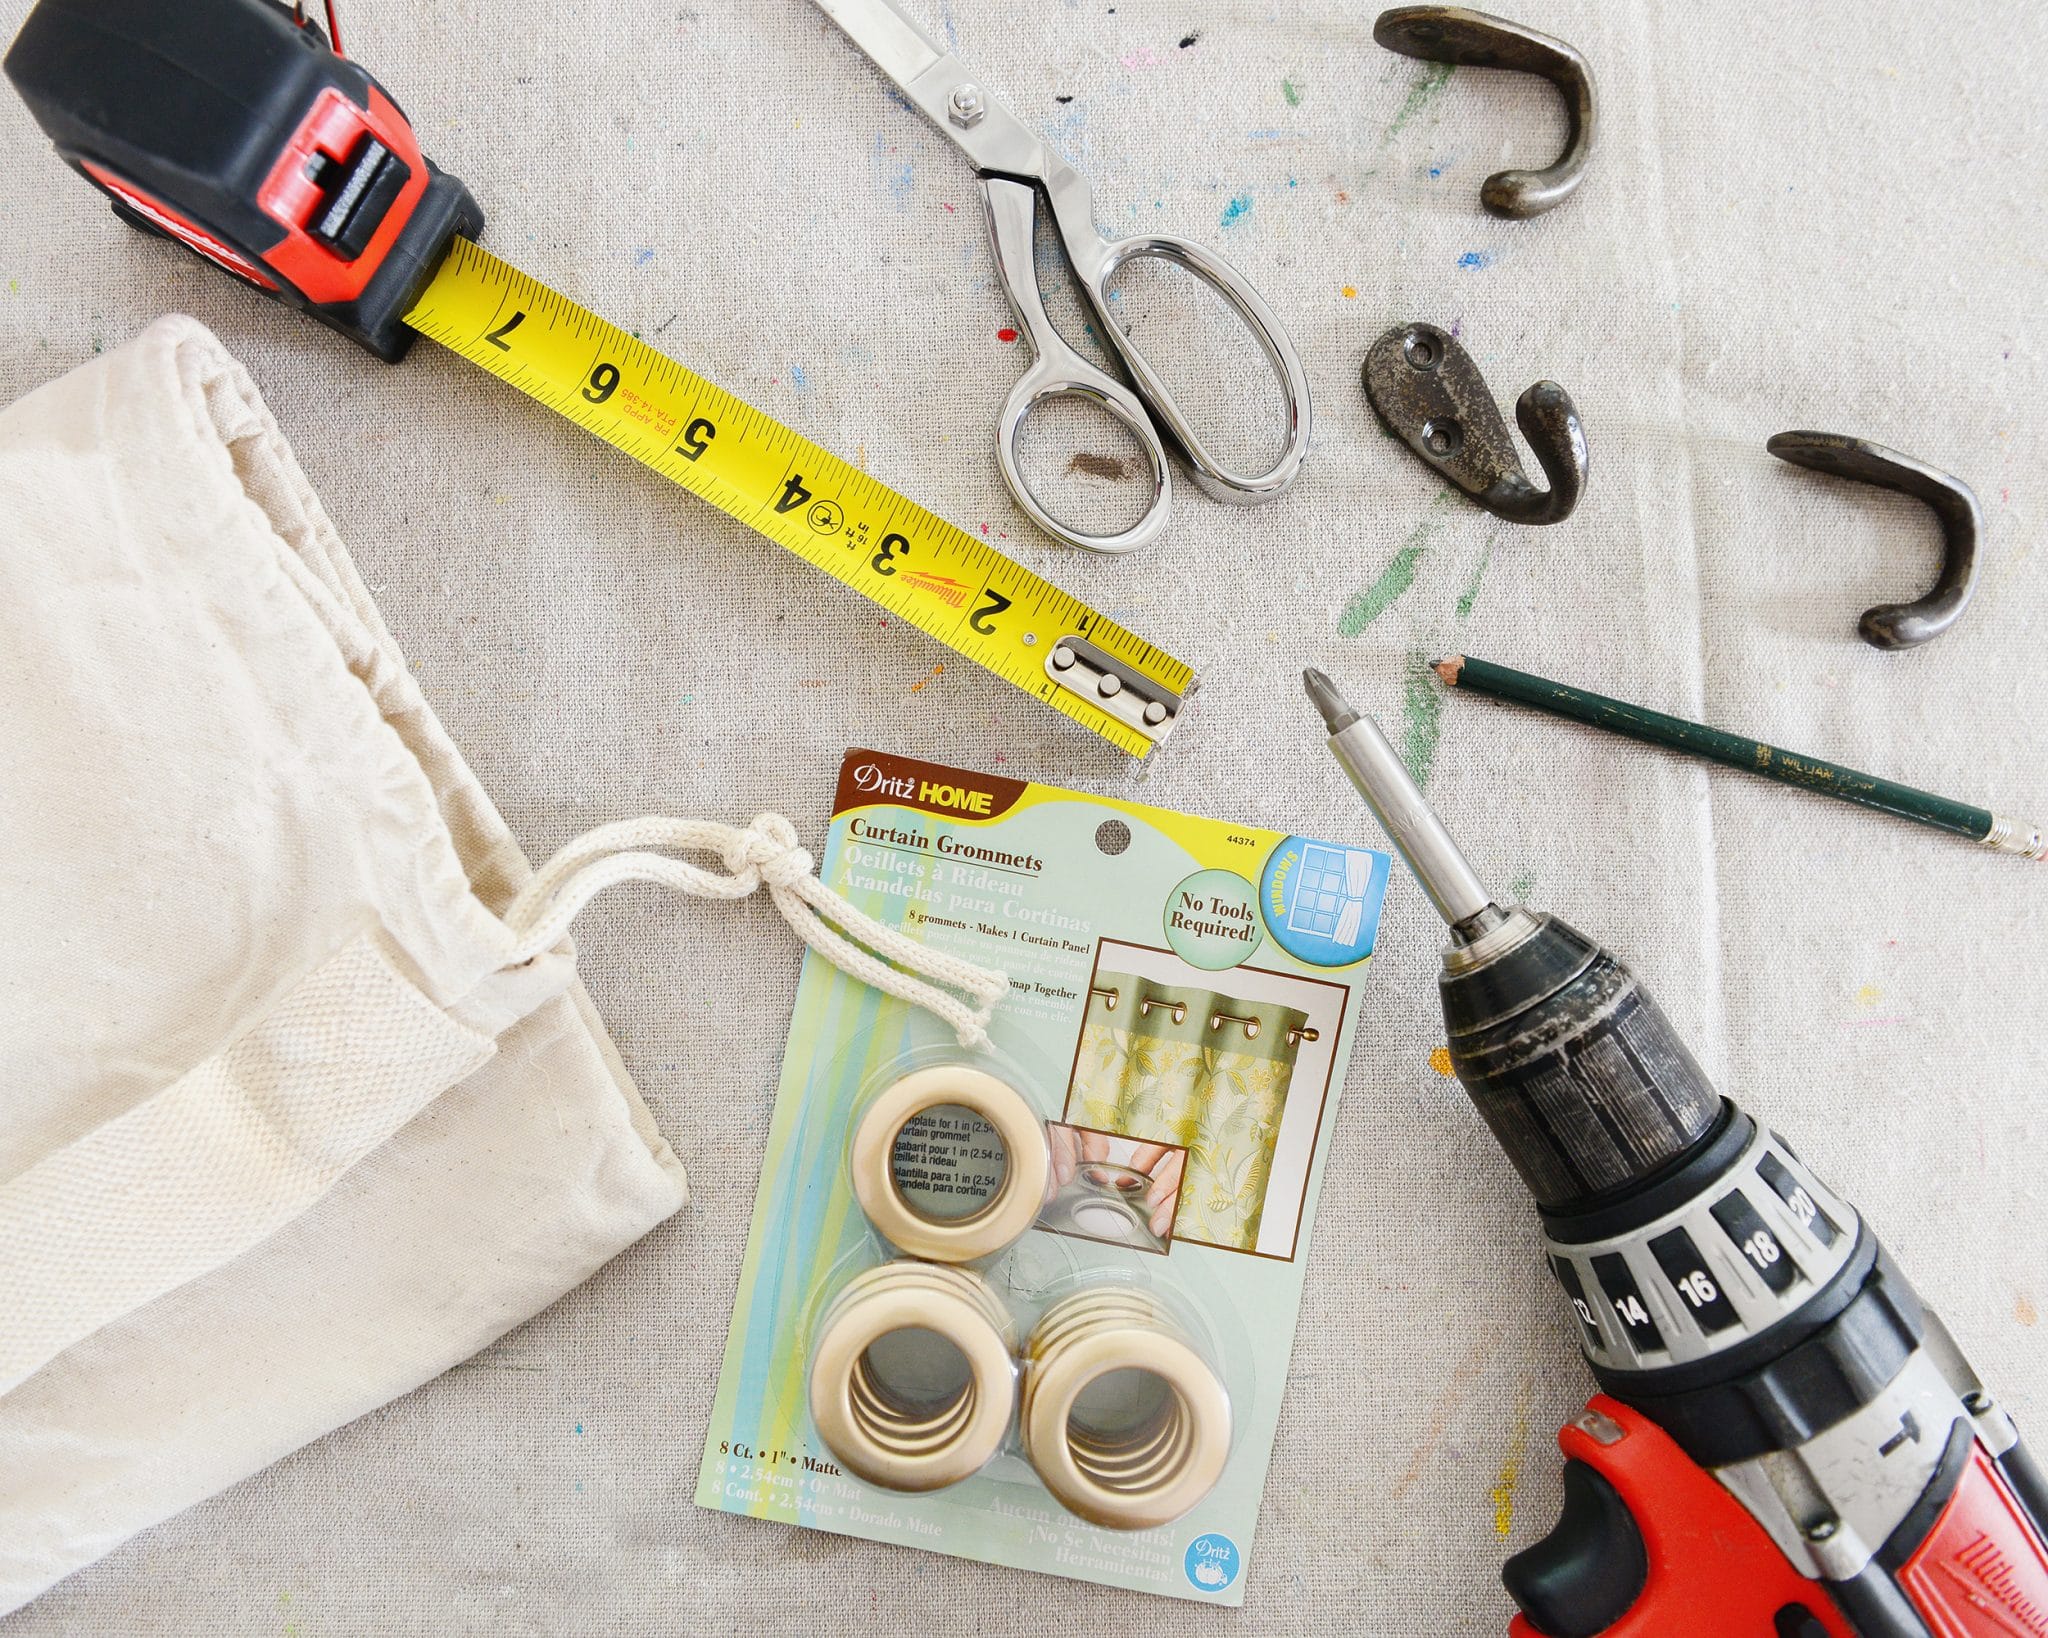
Materials Needed
3 x canvas bags
1 pack curtain grommets
6 x hooks
44″ of scrap wood (1″ x 5″ pine board works great!)
2″ wood screws
Paint or stain of your choice
Wood filler
Tools Used
Sharp scissors
Measuring tape
Pencil
Putty knife
Fine sandpaper
Drill / driver
Stud finder (our favorite)
Chamfer bit (optional)
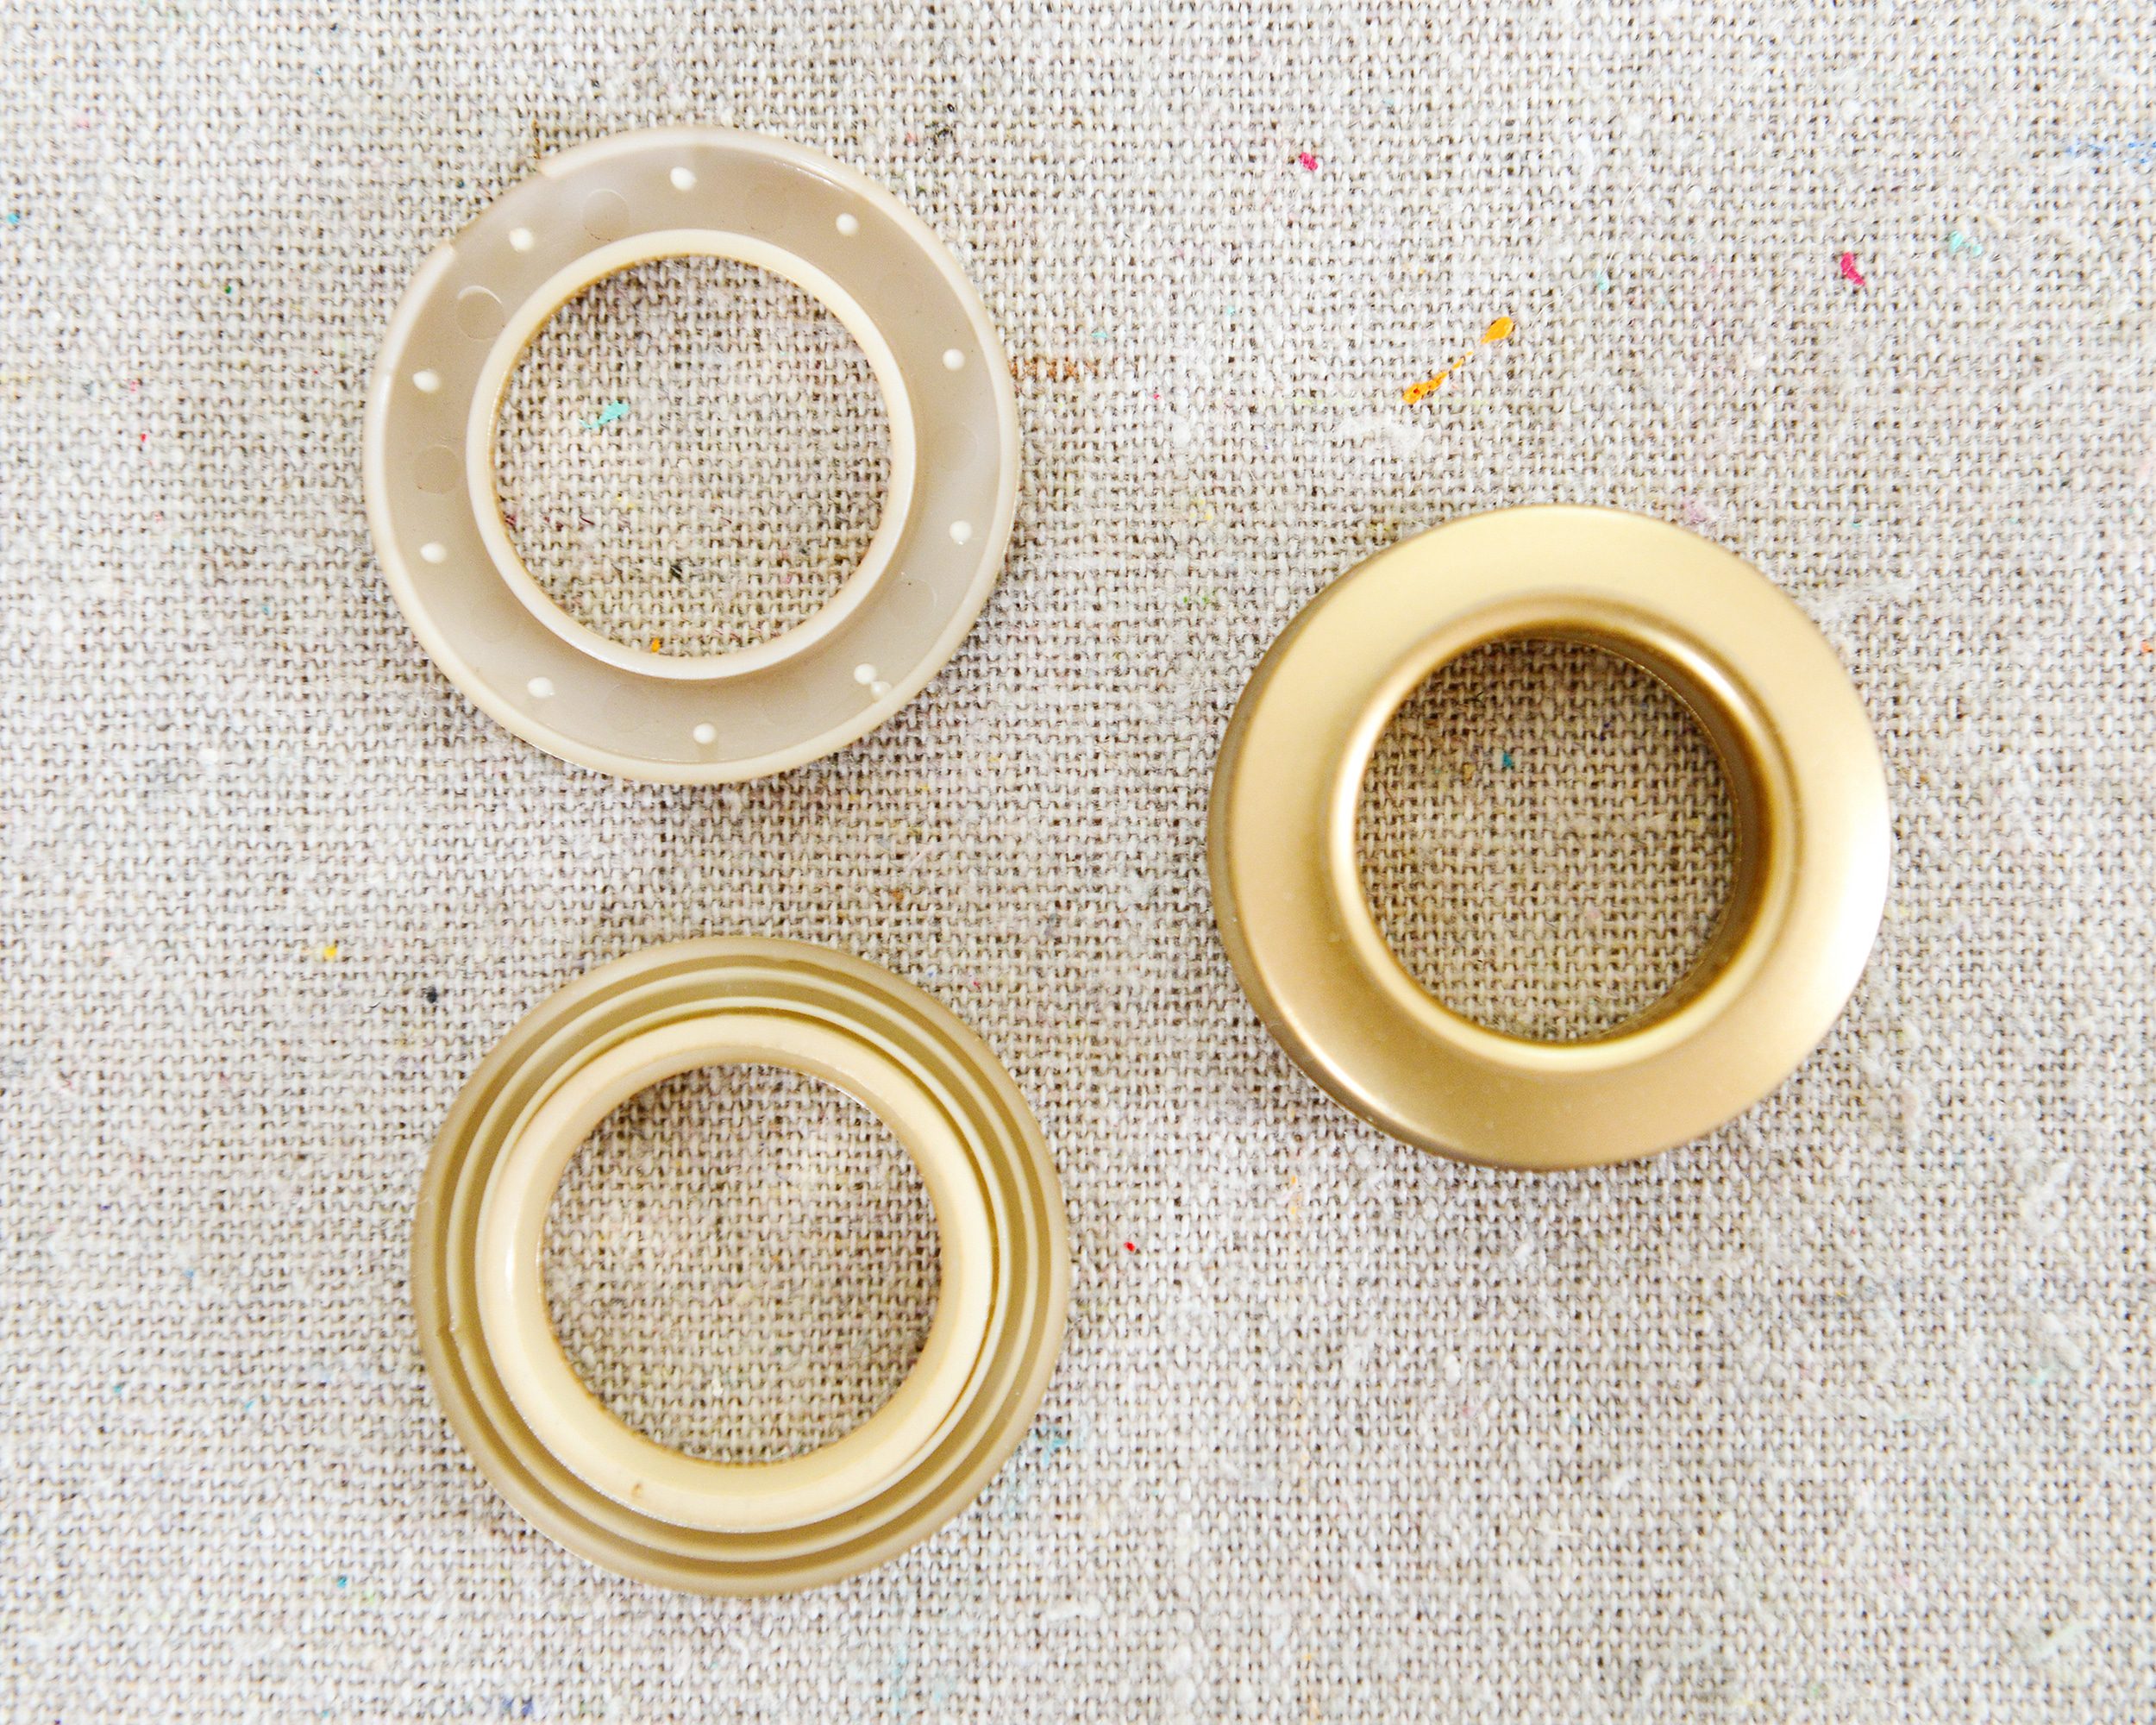
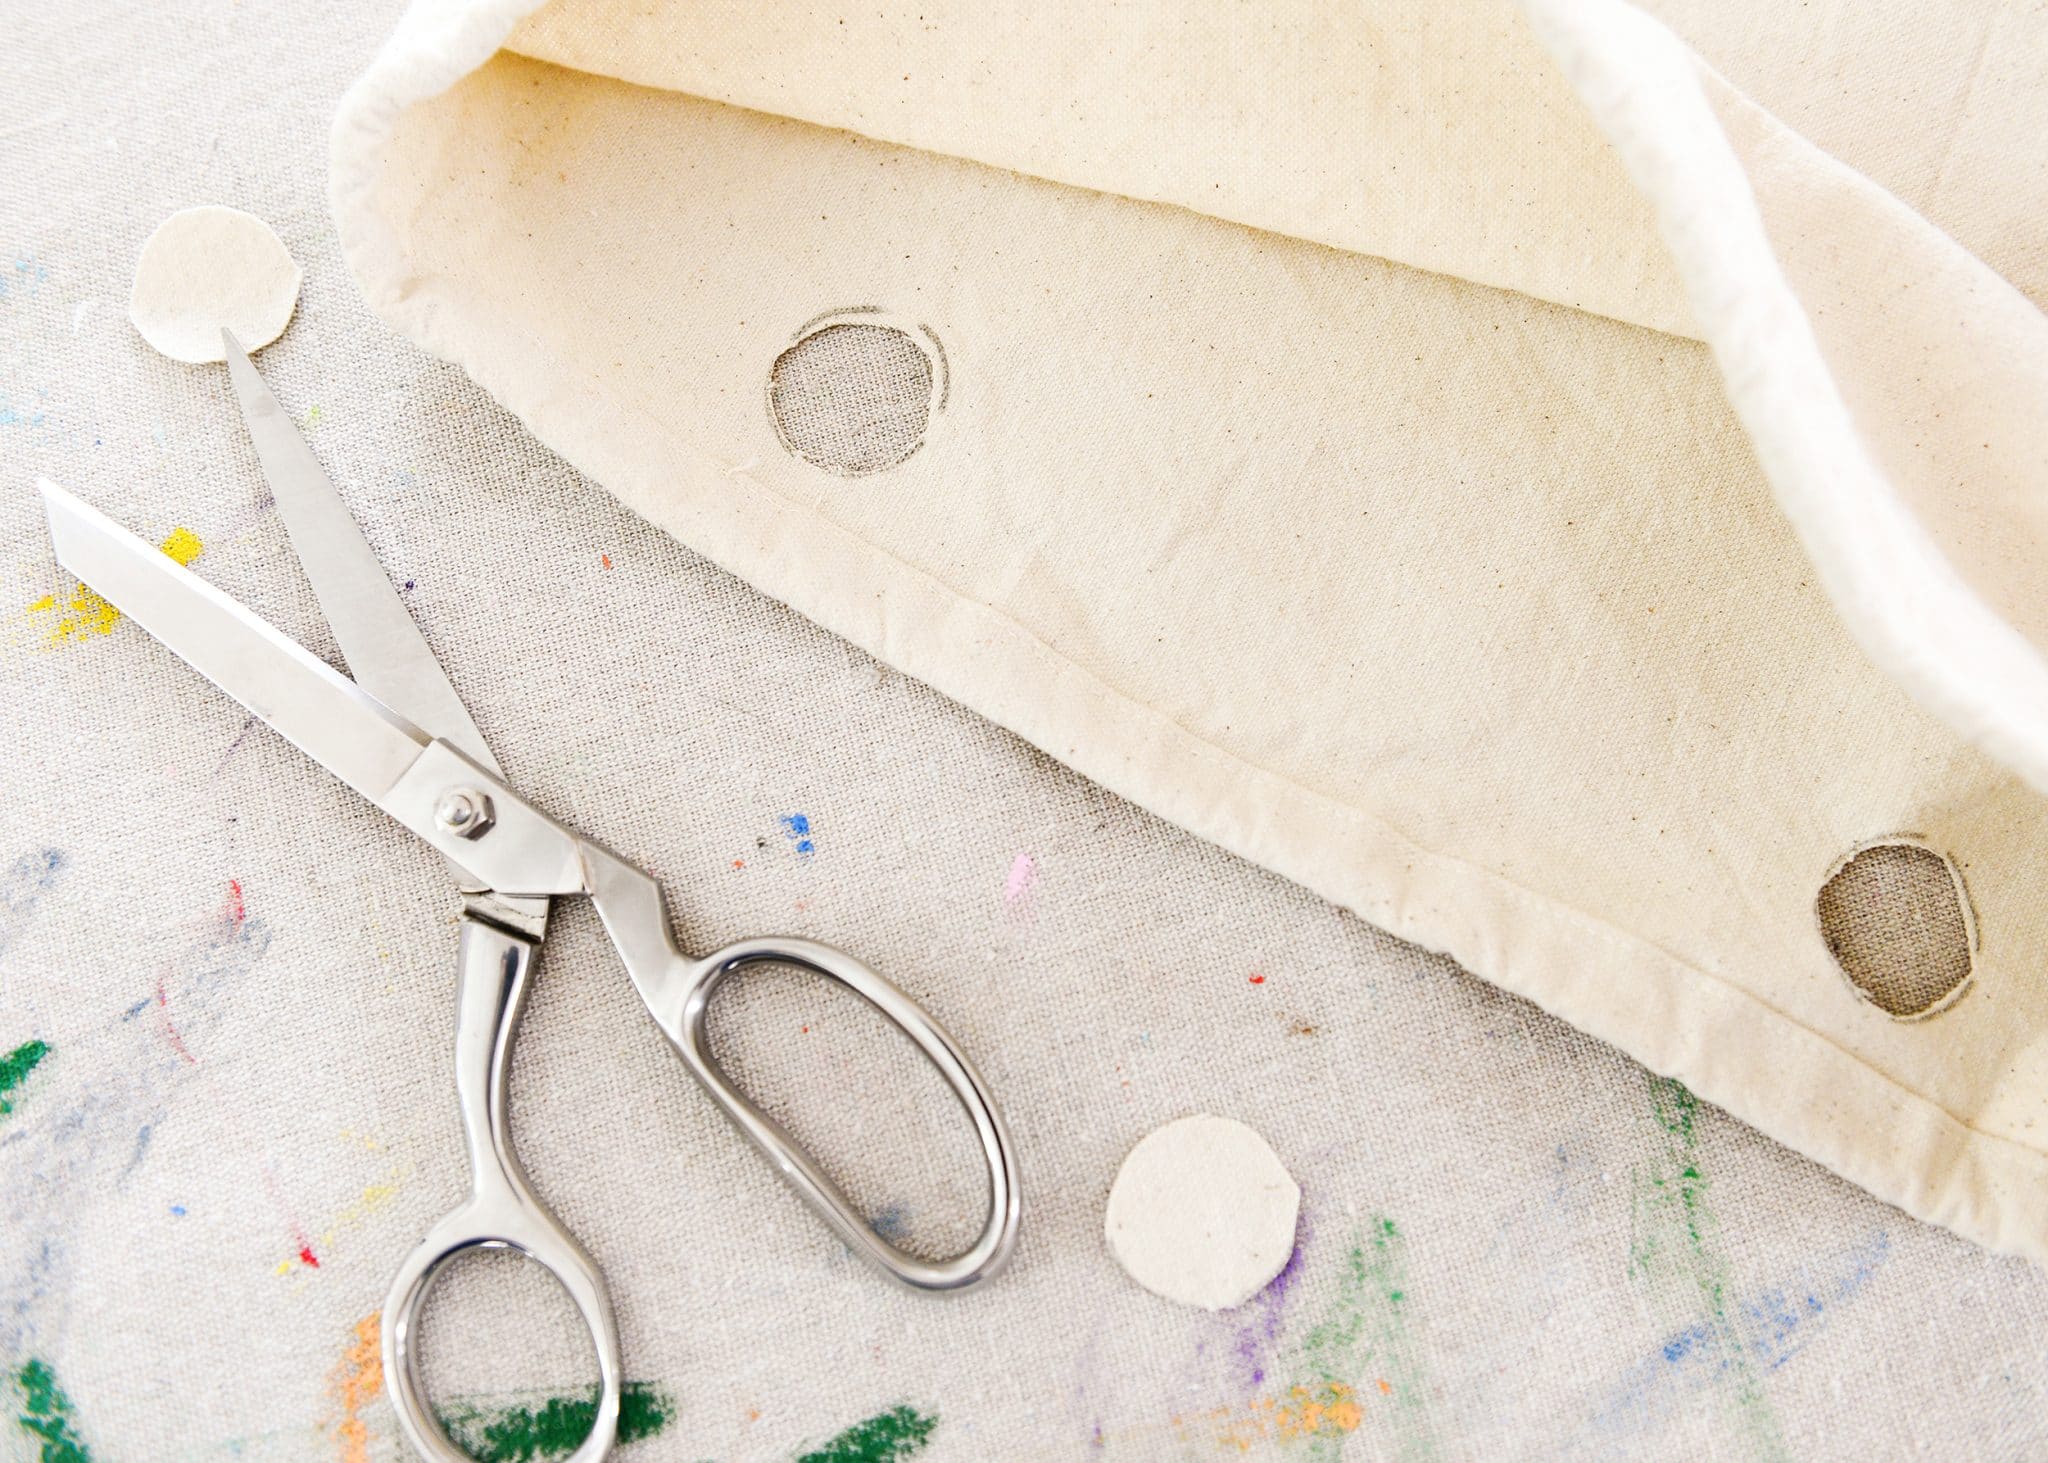
1| Install Grommets to Bags
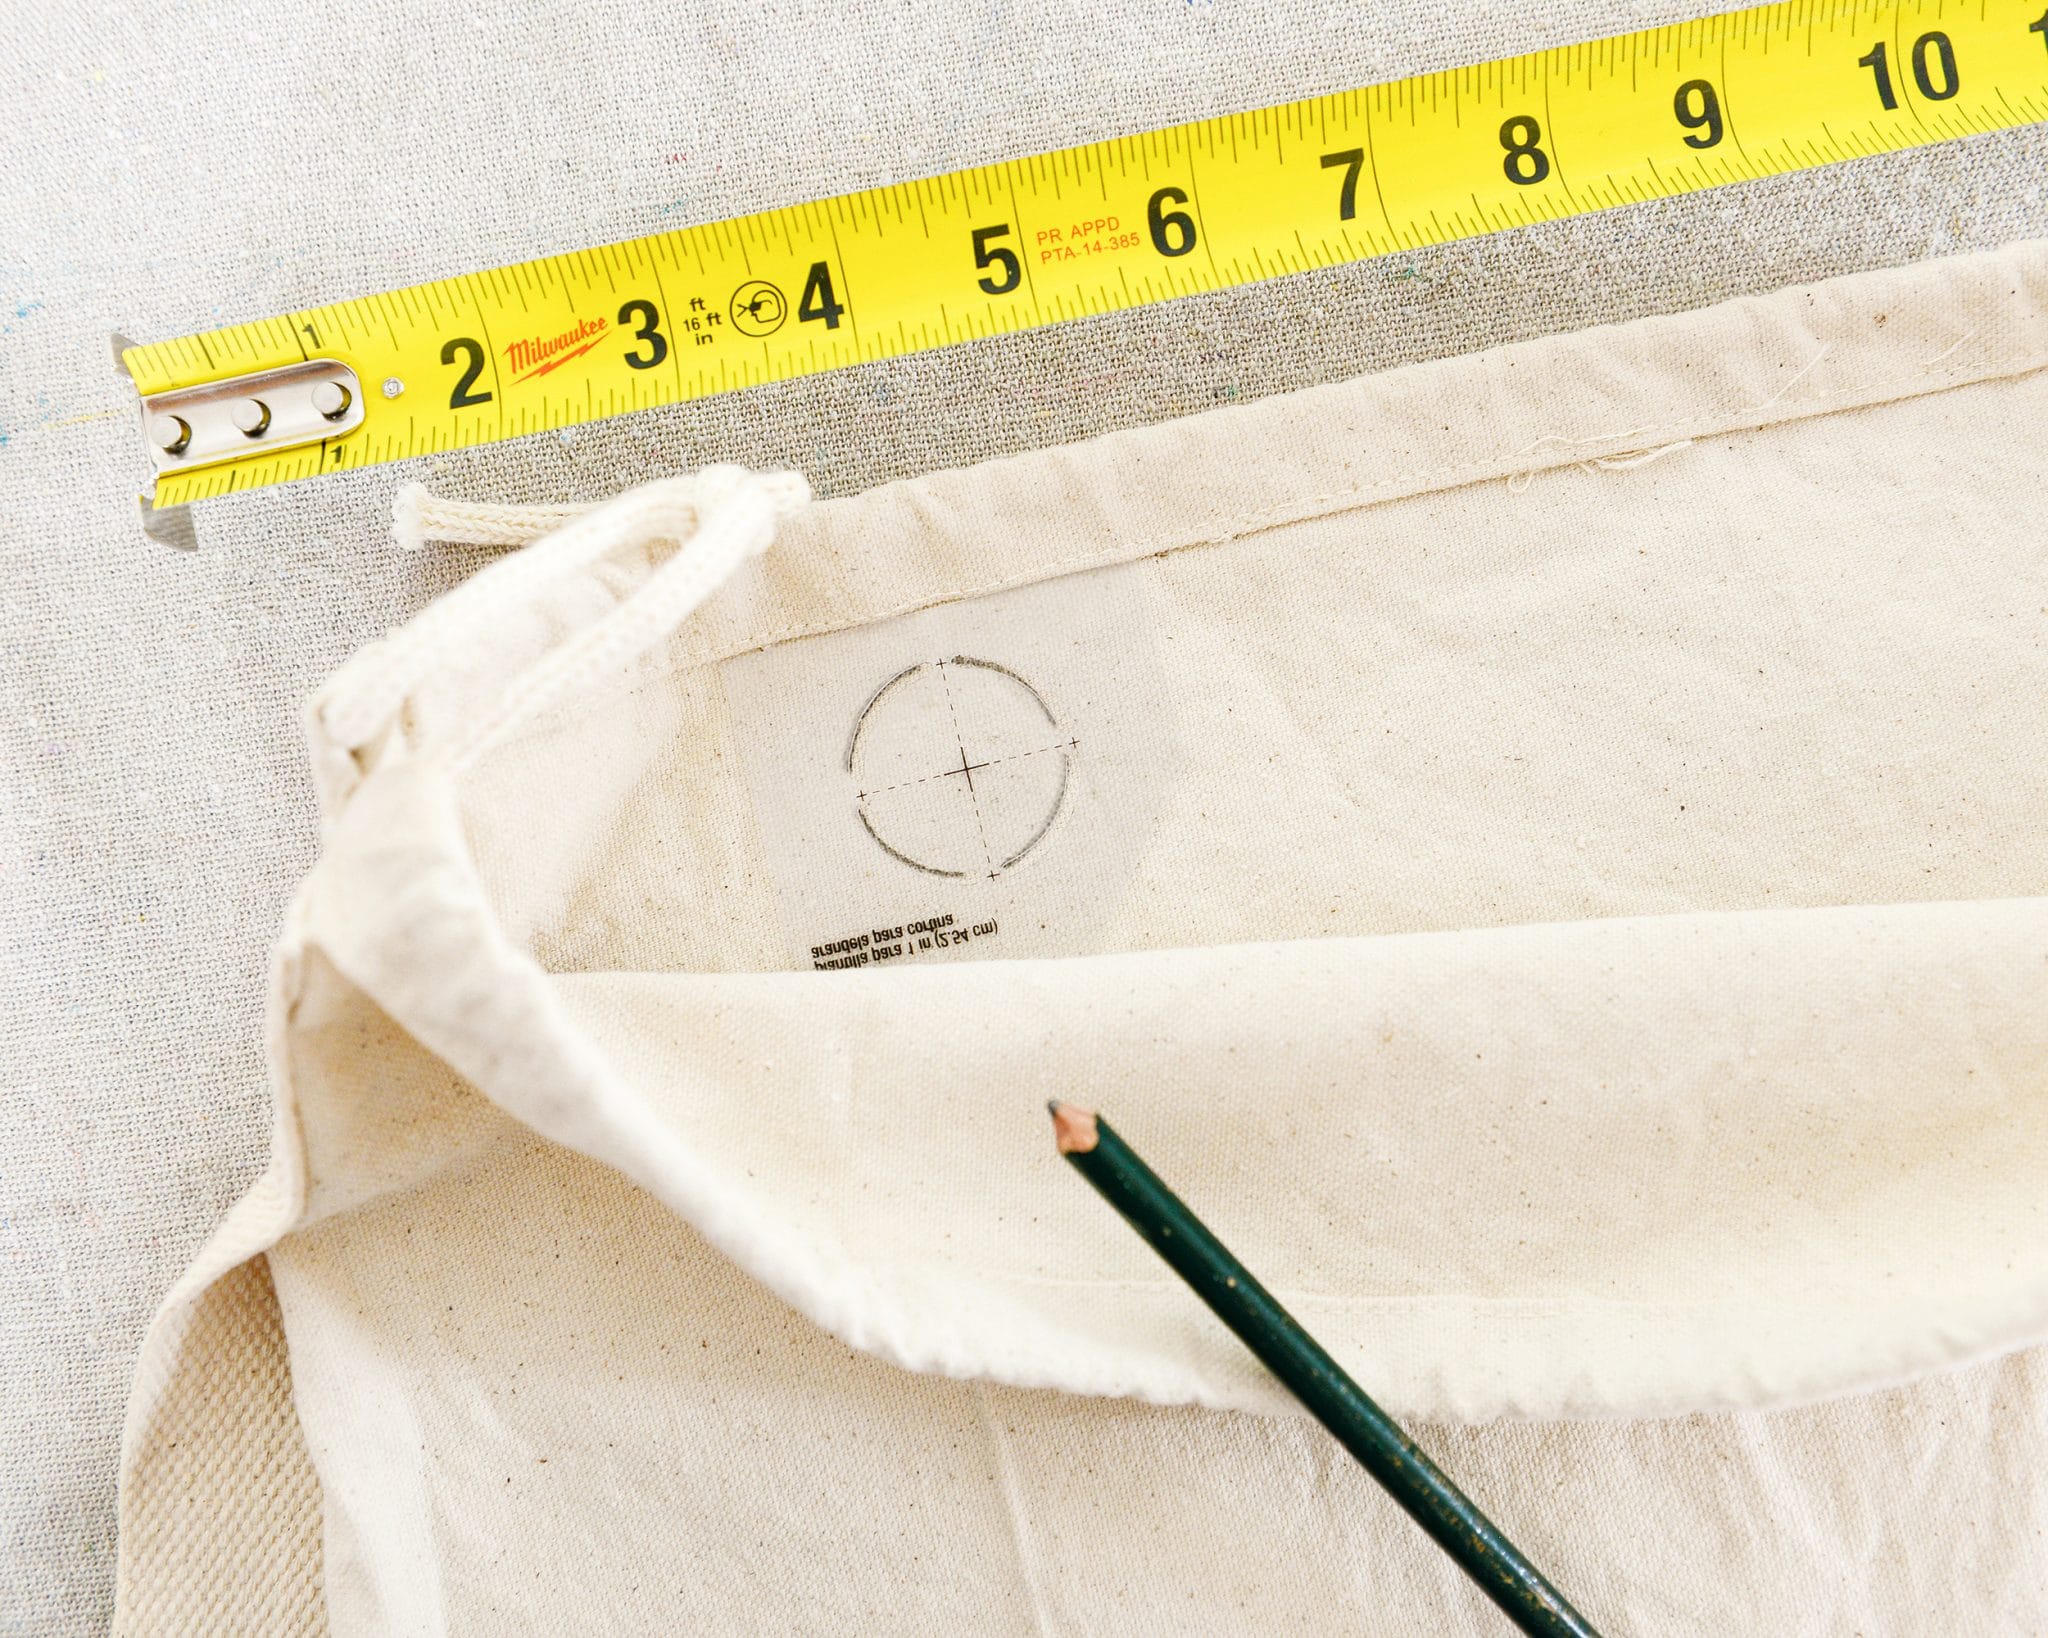
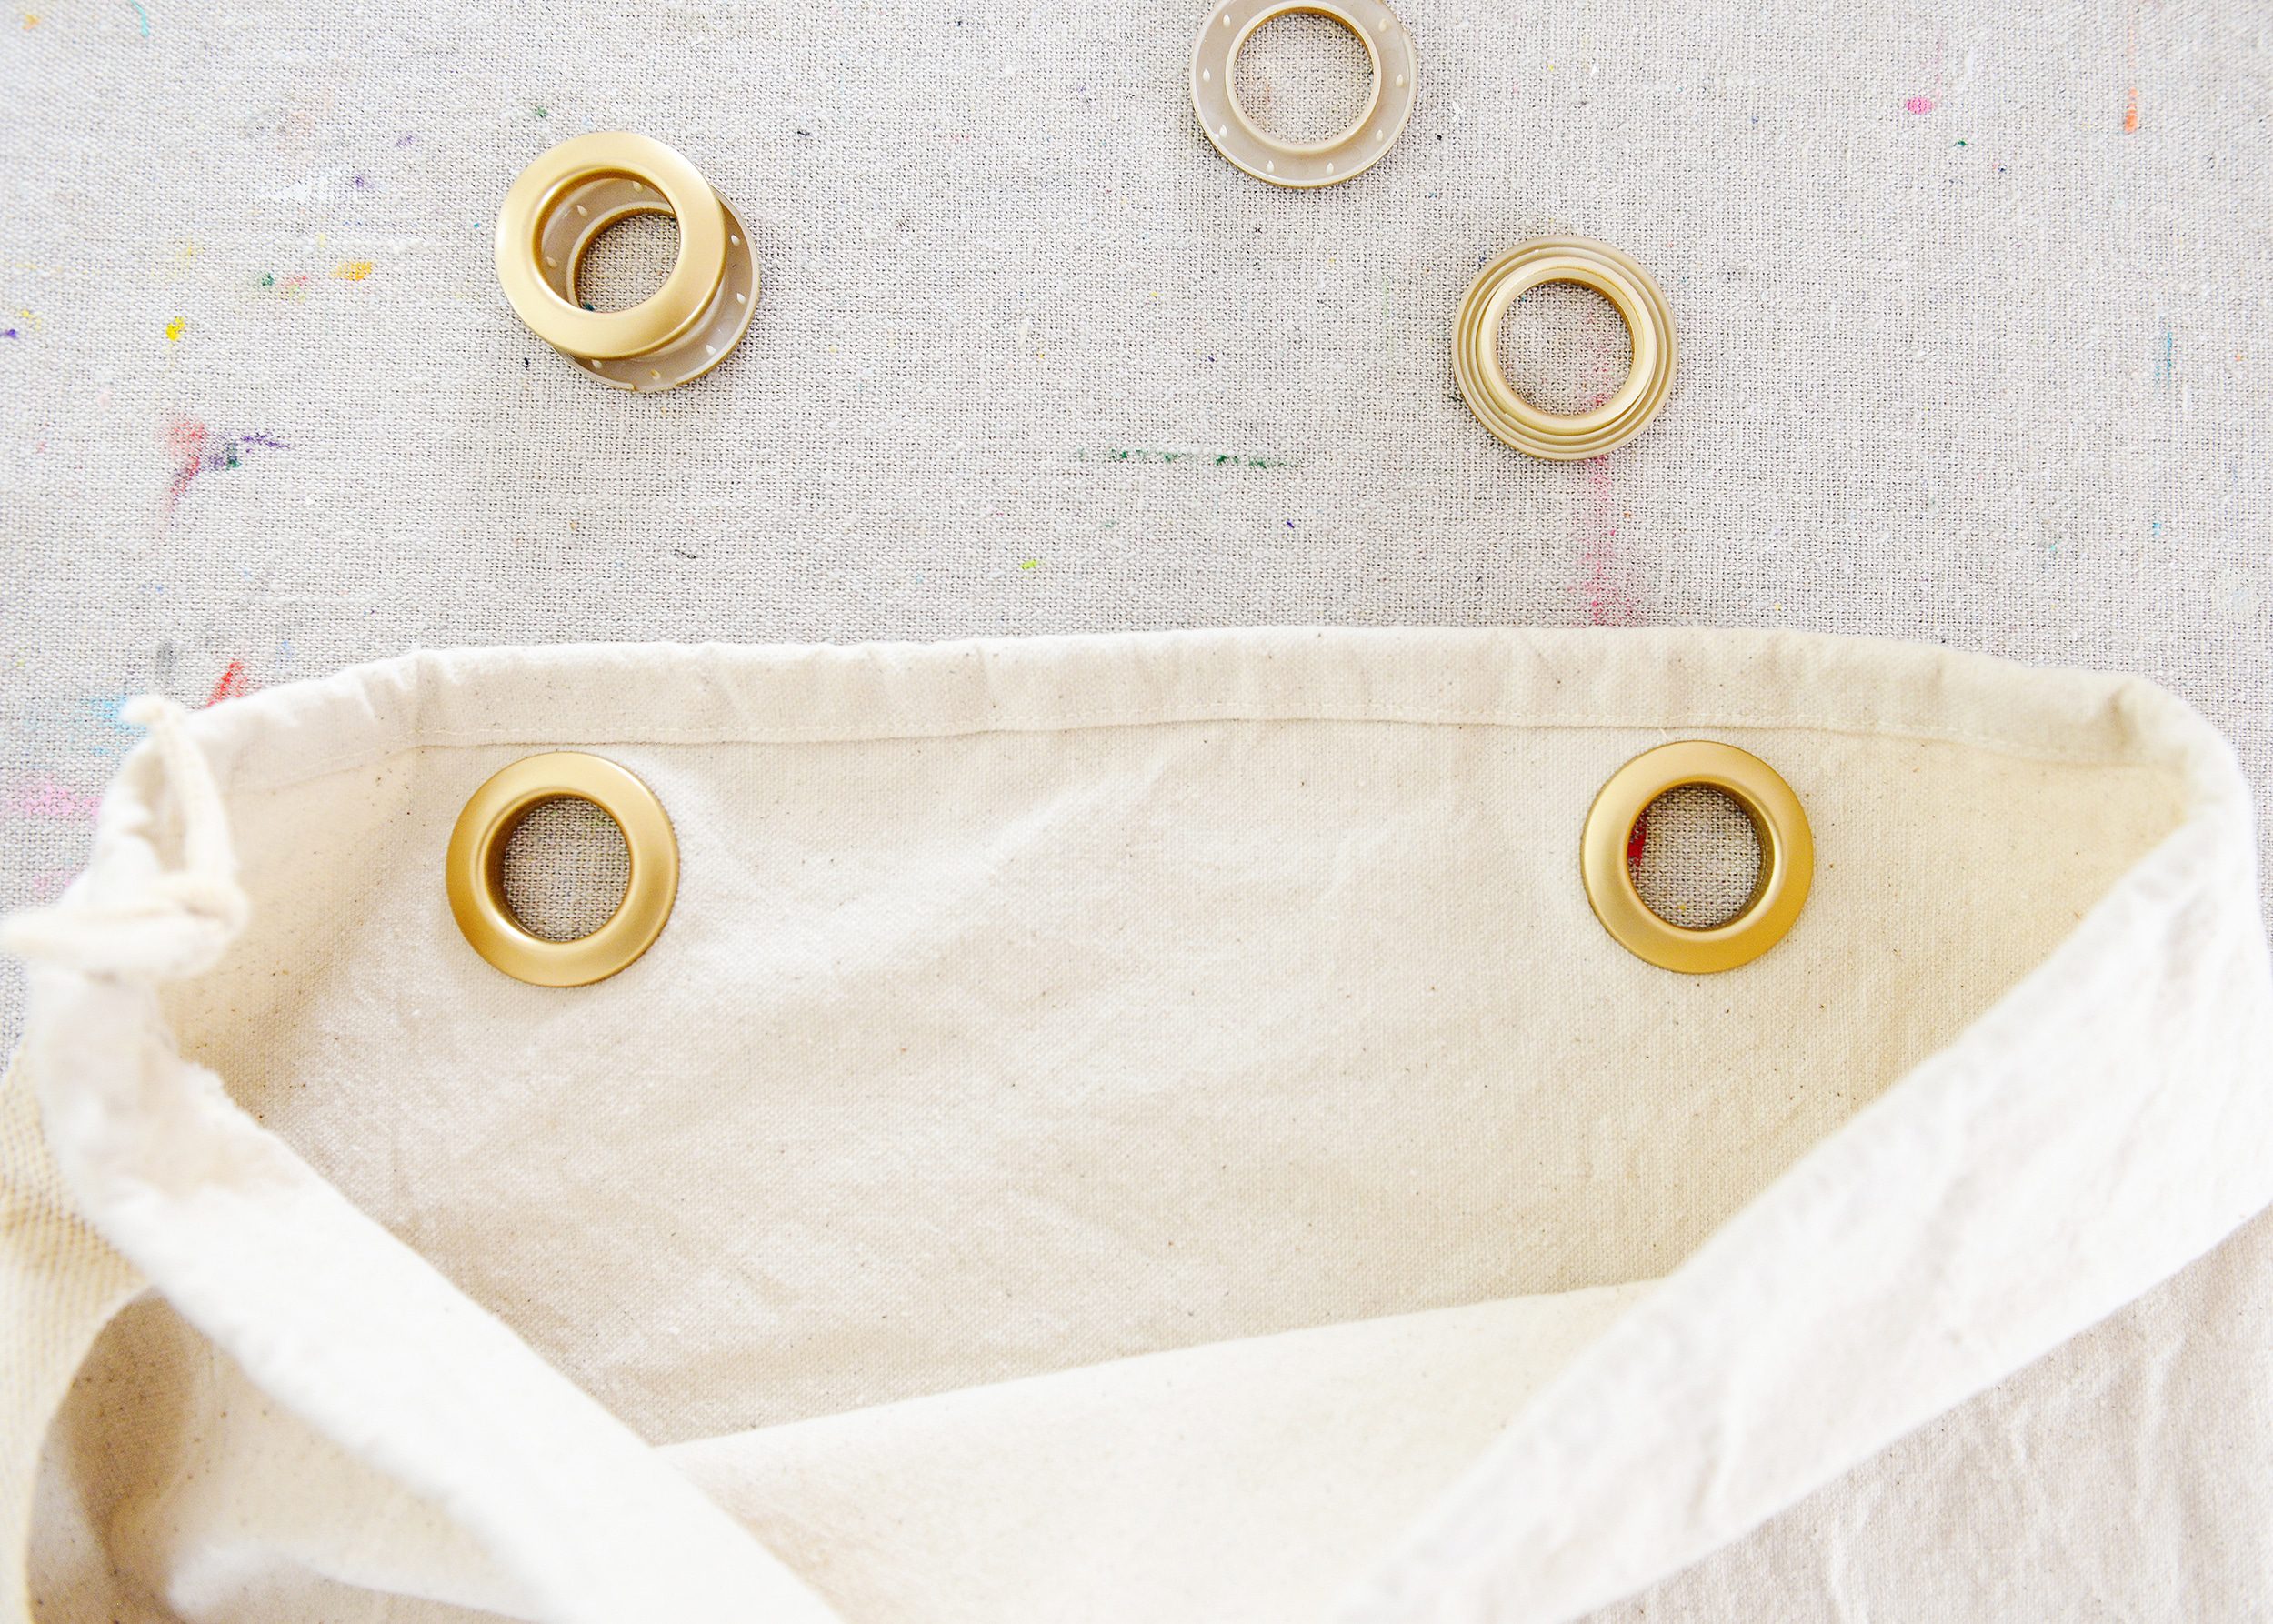
We used these canvas bags that could be thrown in the wash if needed, and the size felt good for manageable laundry loads. I picked up the bags for a steal, but I needed a way to hang them in the laundry room. That said, the bags only took me 10 minutes to complete, thanks to these no-fancy-tools needed curtain grommets! They have little teeth on one side to hold the fabric in place, and a small template is included with the pack.
I used the top seam of the bag as my guide, and I centered the included template 4″ in from each side of the bag. After tracing all my circles, I used a pair of sharp fabric scissors to get a clean cut.
Tip: It was easier to fold each circle in half before cutting, and it’s best to make your cuts on the inside of the circle. Too small is better than too big!
The grommets snap right into place by placing the ‘prong’ side underneath the bag and clipping the ‘finish’ grommet on top. Those little teeth latch onto the fabric, but if you make a mistake, a small screwdriver on the ‘prong’ side will pop them off if needed.
2| Prep the Hook Rail
Although I would have preferred the cleaner look of all the hooks hanging directly on the wall, the thought of using anchors on our precious wallpaper (and possibly messing up!) gave me pause. Instead, we opted to install our hooks – 6 in total, 2 per laundry bag – on a piece of 1″ x 5″, aka, our ‘rail.’ Our rail is 44″ wide, painted white, and we made 4 pilot holes total, 2 for each stud we wanted to hit. Using a chamfer bit first (below on the left) would allow our wood screws to sit below the surface of the rack.
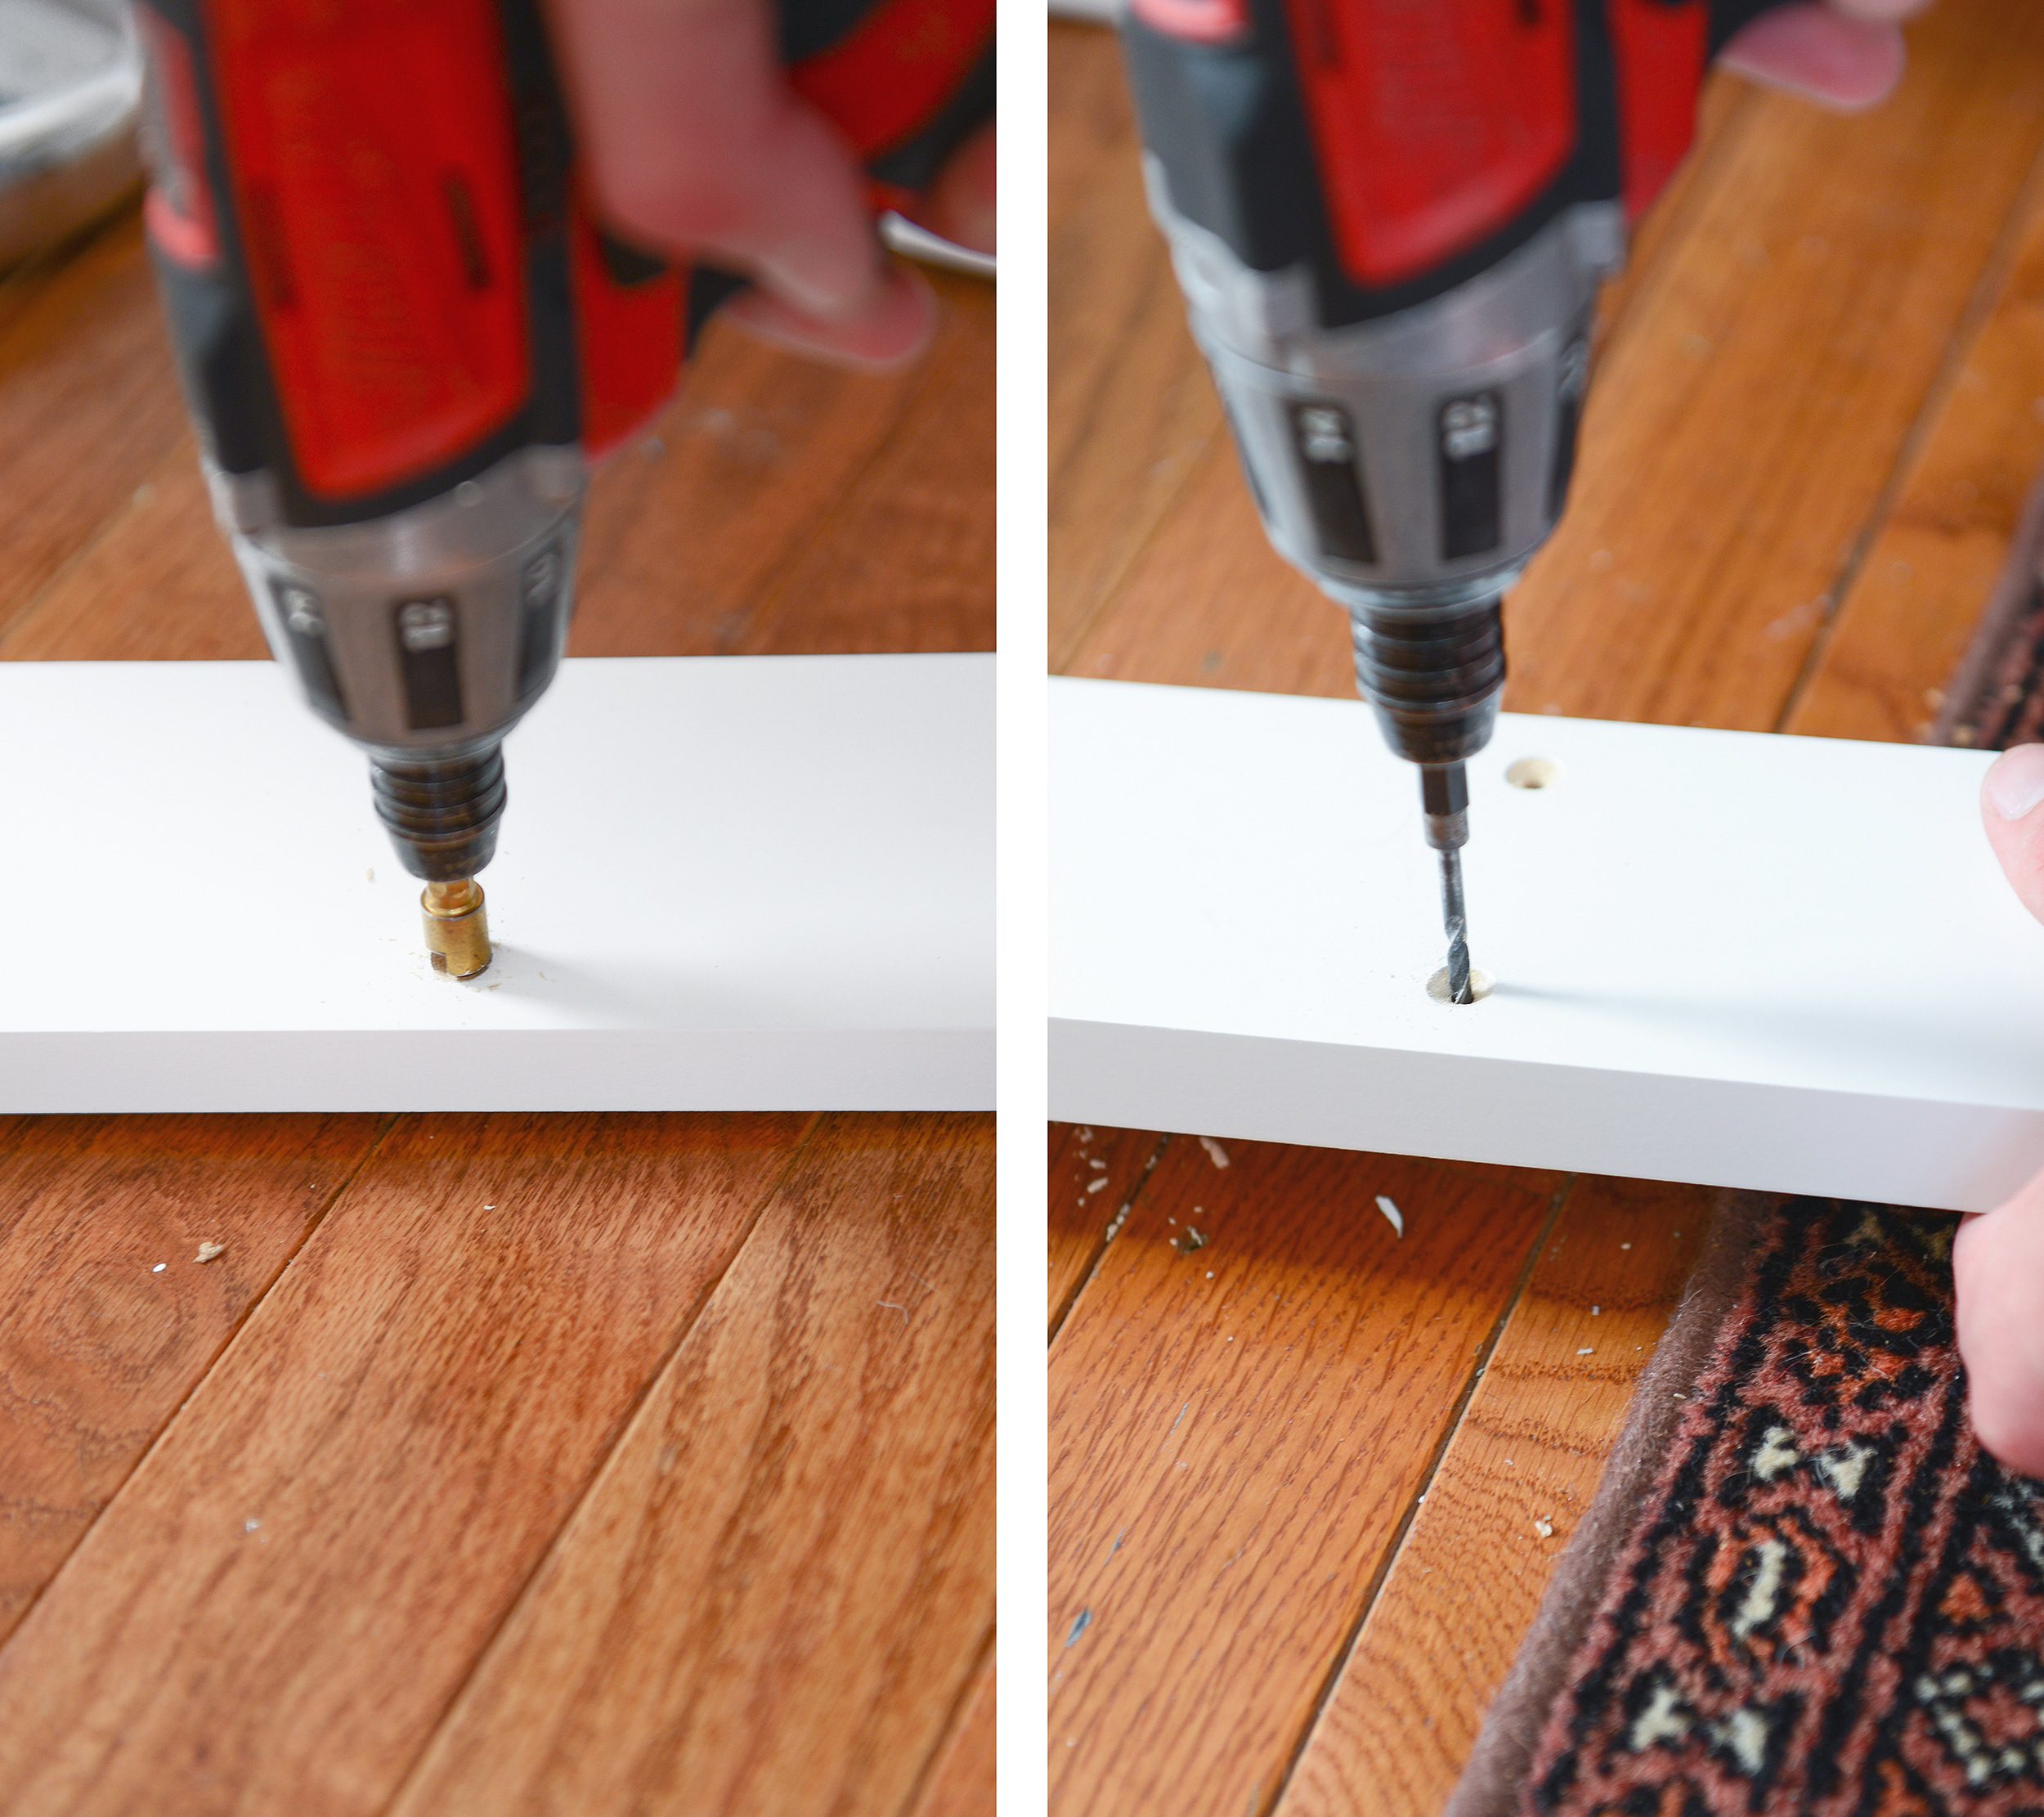
Scott used 2″ wood screws to go through his pilot holes and directly into studs. Although there are still holes in our wallpaper beneath the rail, it’s a cleaner look and much stronger overall.
3| Add the Hooks
With the rail in place, I used a putty knife to apply wood filler over the screw heads, and once it was dry, I gave it a light sanding and touched up the paint. From there, I was able to add our hooks! We used these hooks and spaced them 8″ apart on center. We left 2″ on each side of the outer hooks, which is how we landed on a 44″ width overall.
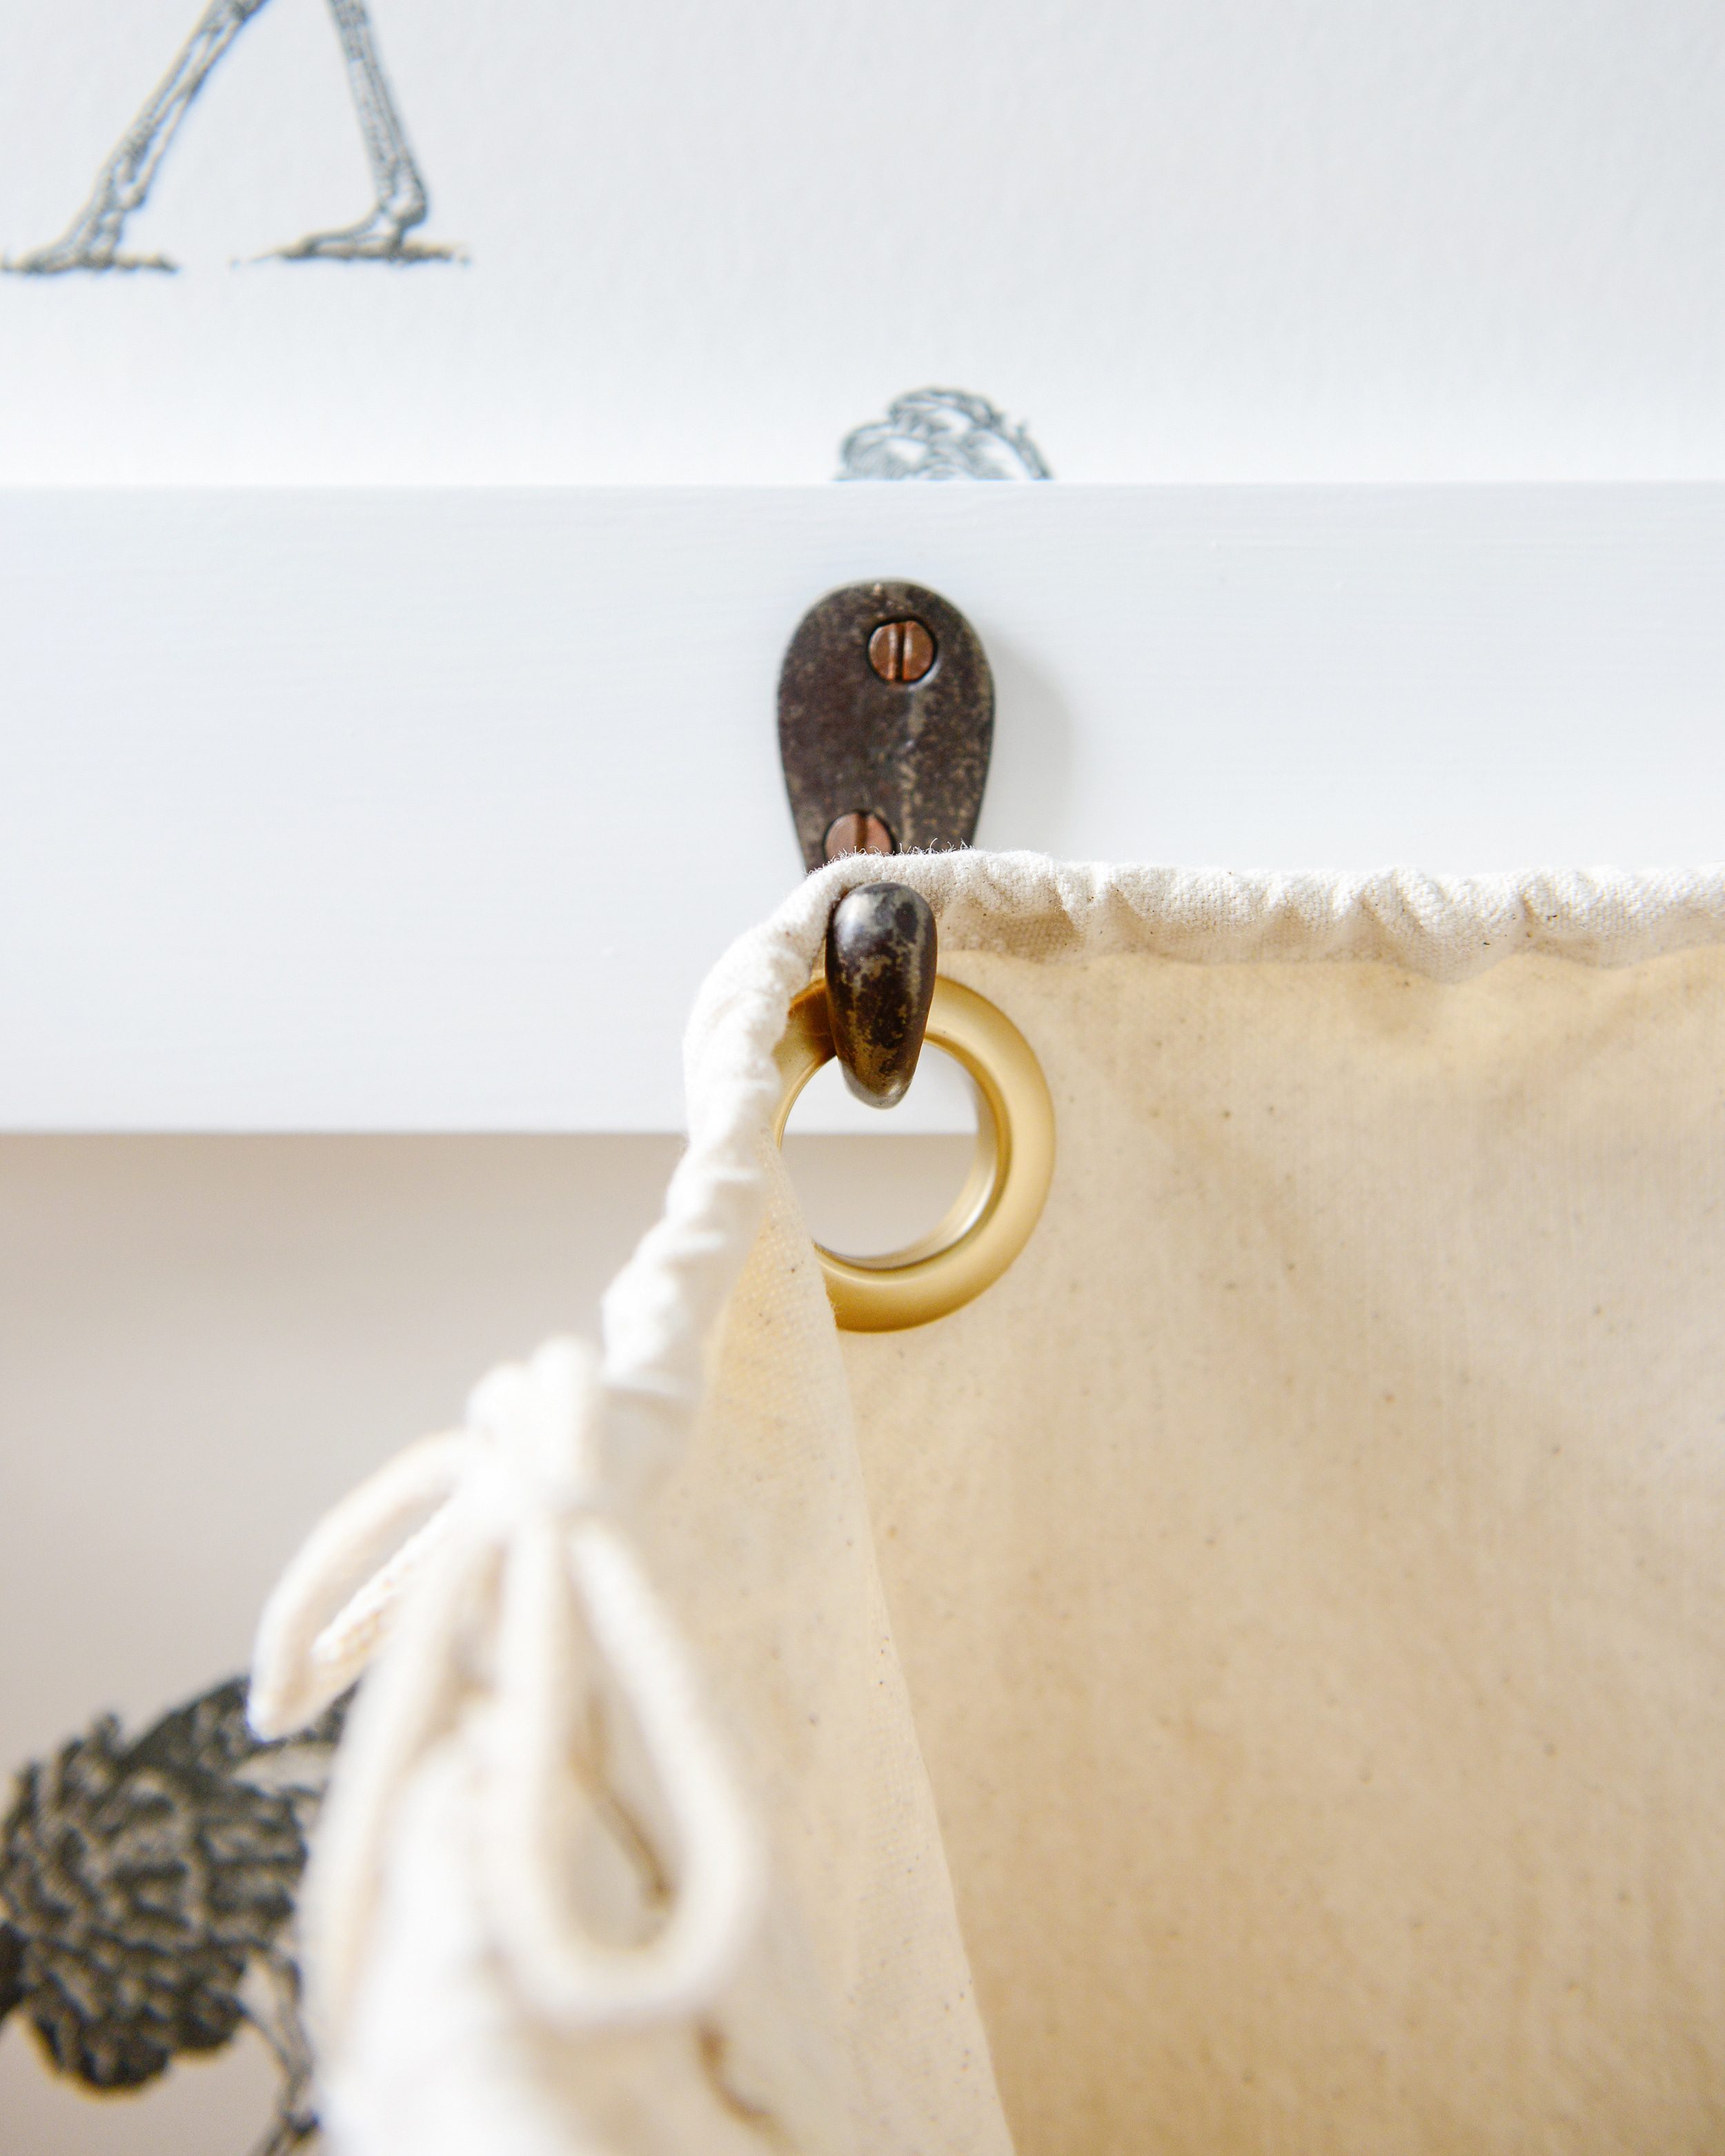
4| Hang Your Sorting Bags!
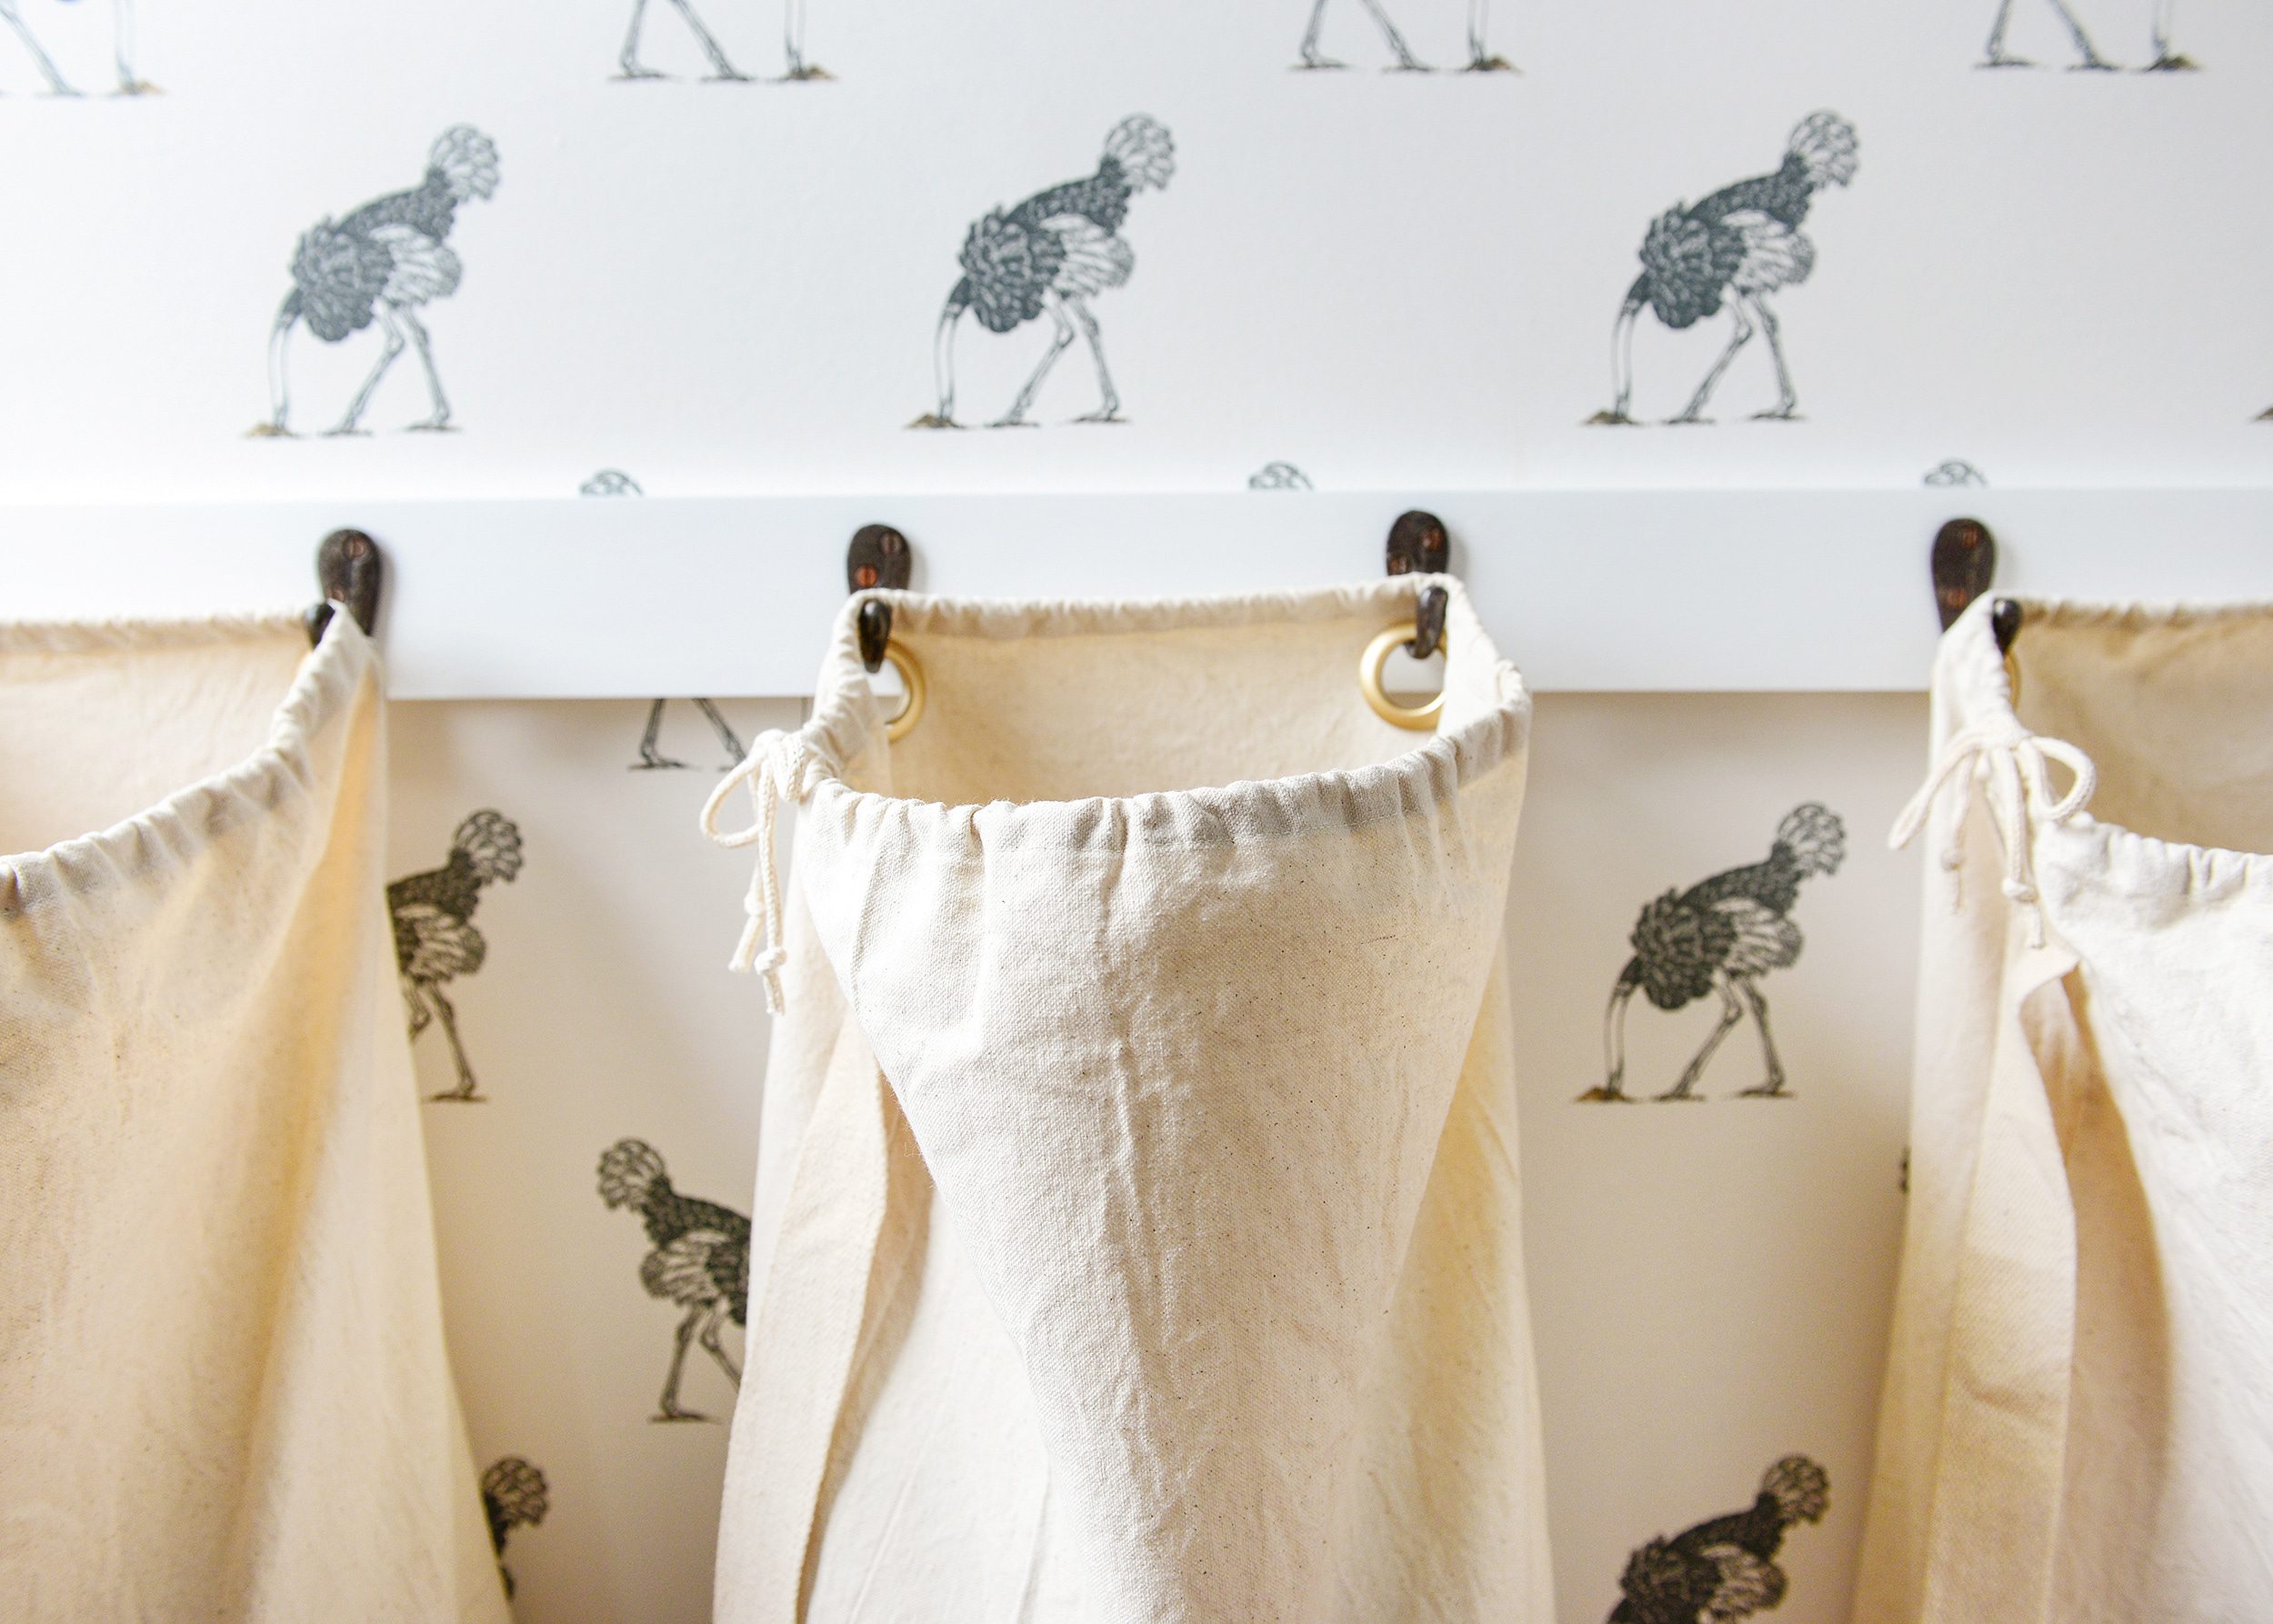
Hey, we have laundry sorters! We decided on 3 bags to be used for (1) whites, (2) colors and (3) our reusable rags/mops (we use microfiber towels for cleaning as much as possible!).
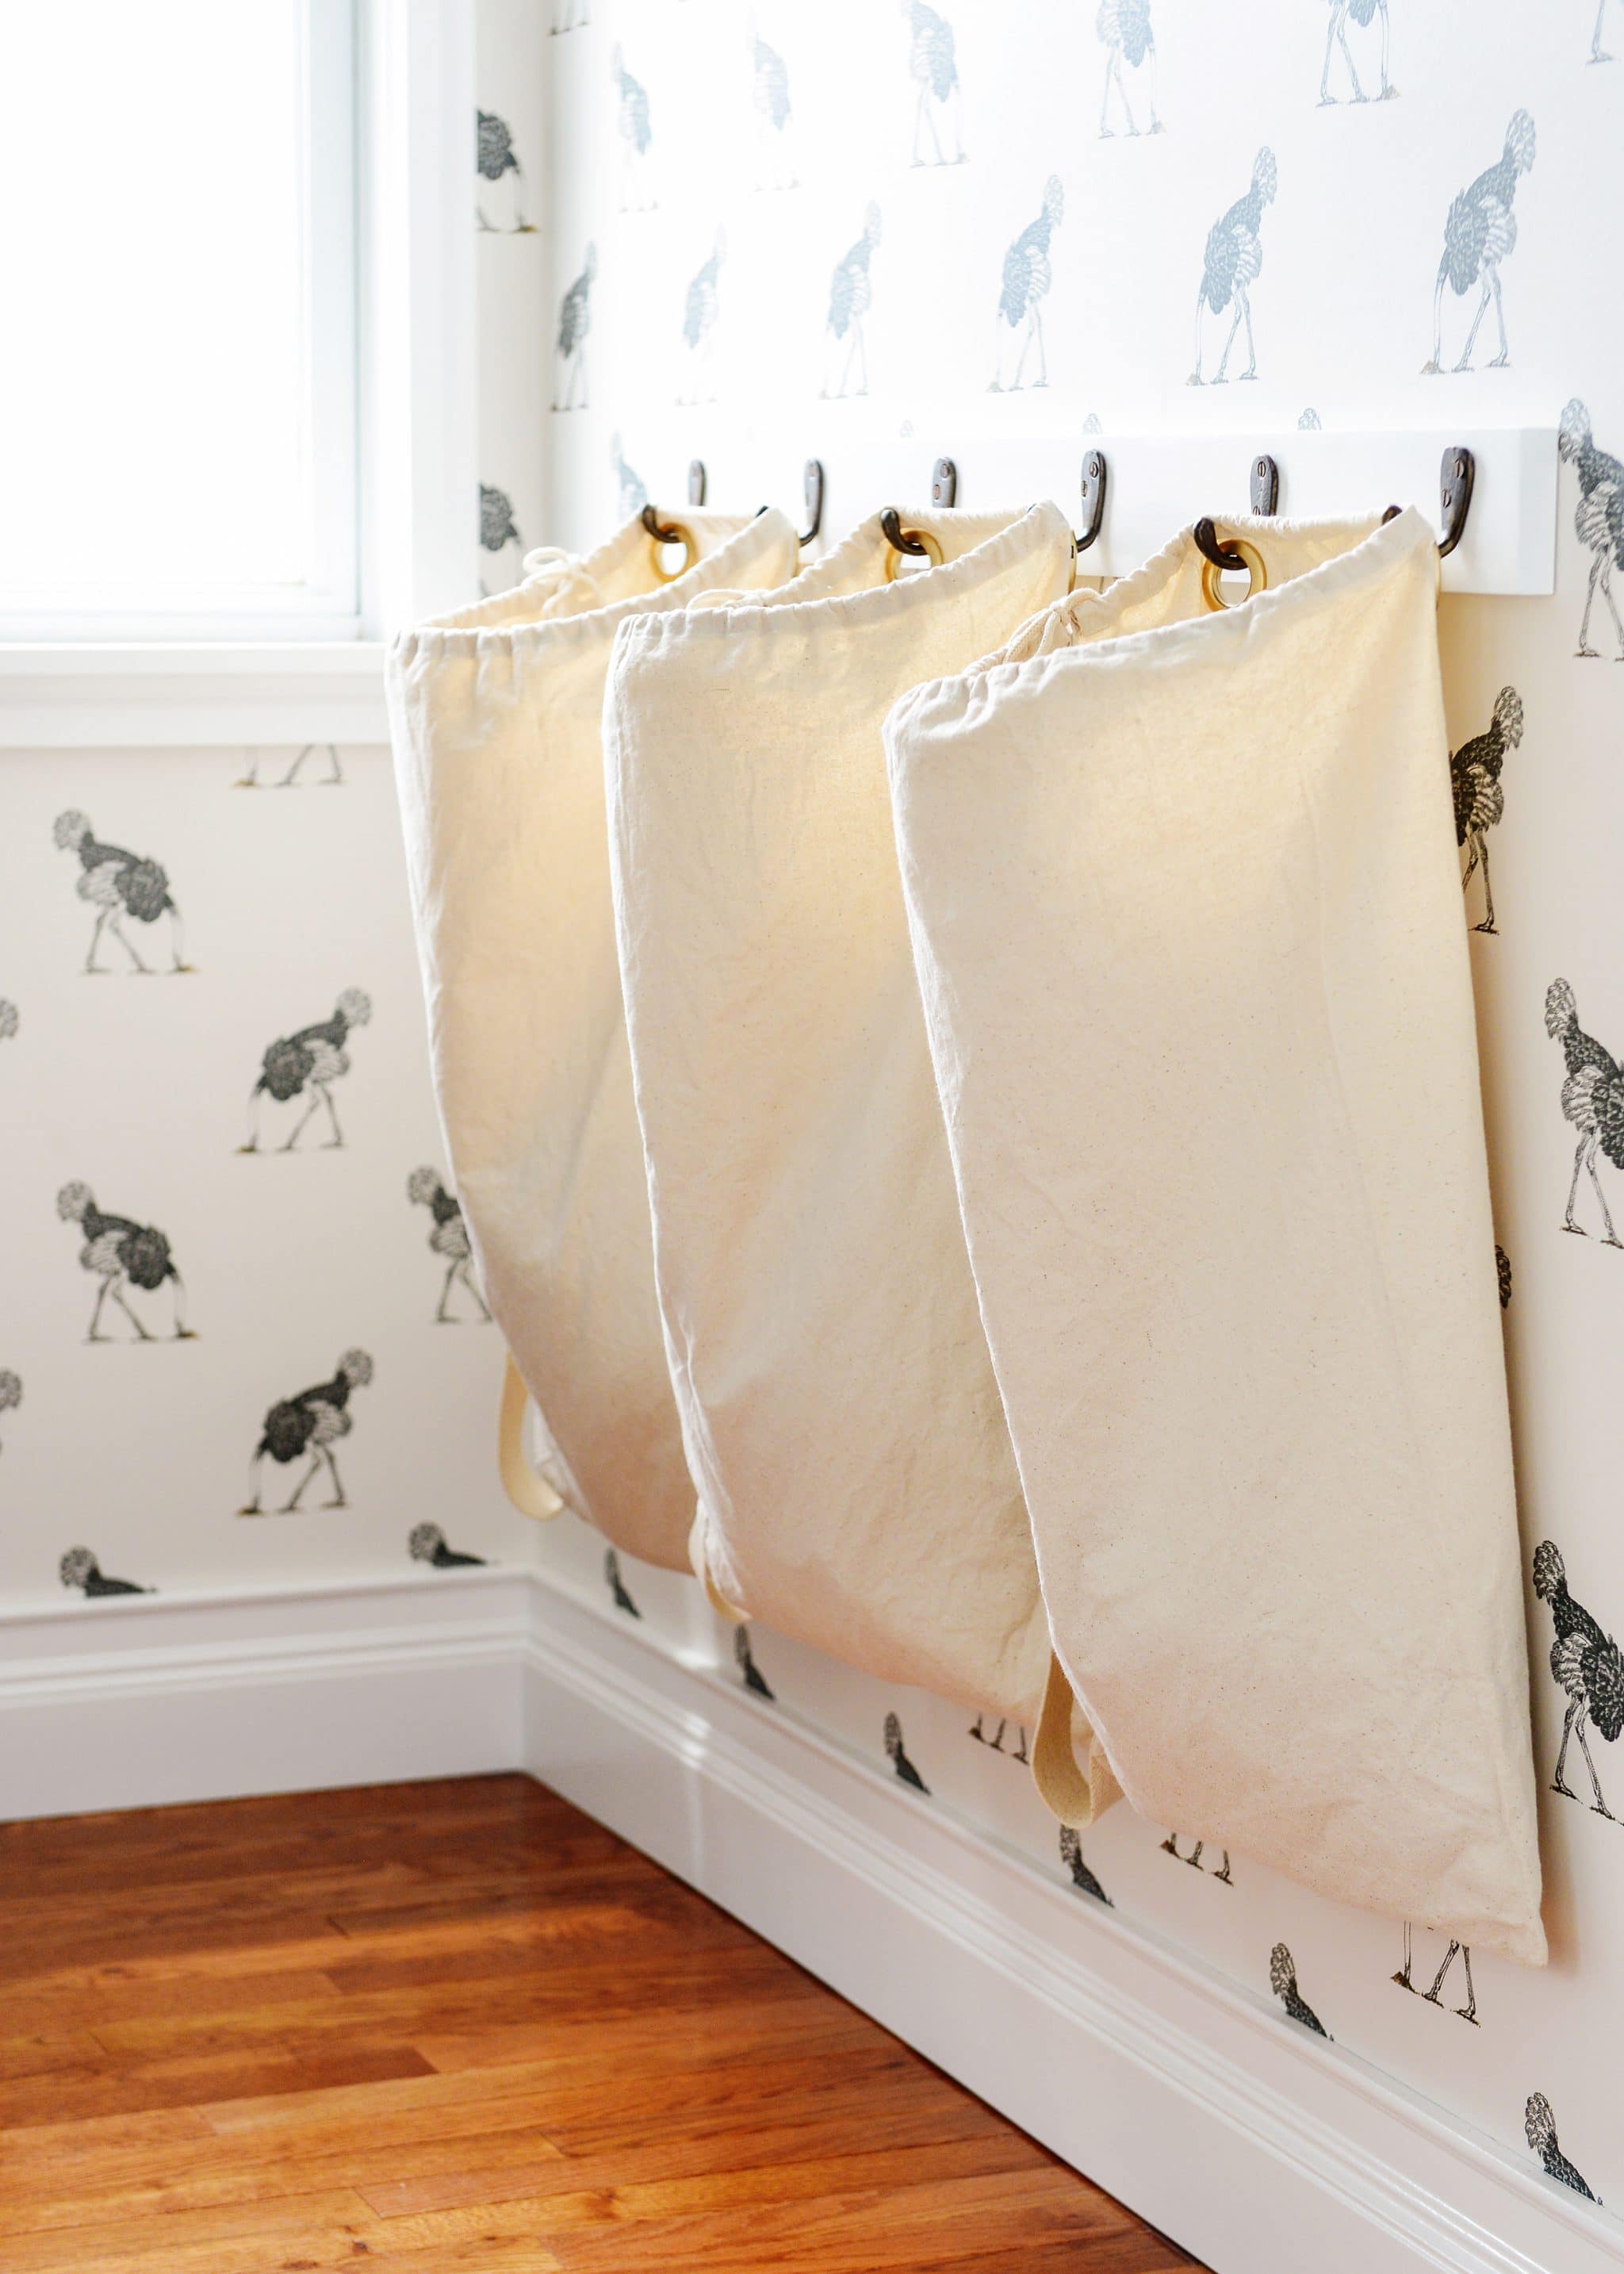
The sorting bags have been a huge game changer on laundry day. No more laundry piles on the floor! No more manual sorting! Now, we take each one off the hooks, dump our clothes into the washing machine, and hang it back up. I’ll throw the bags through a cycle every now and then, and they do get wrinkly after a wash and dry, but they eventually relax after being loaded up with more clothes.
If you recreate this project, make sure to tag @yellowbrickhome and #YBHDIY, and we may share with this DIY-loving community! Happy making!
PS: Here’s the reveal of the finished laundry room, if you’d like to see! It’s located right off of our primary bedroom, which has been a dream. Are you Team Laundry In the Bedroom or Team Laundry In the Basement?


I just love this idea! Takes up no space and laundry is always sorted. Thanks!!
I love this idea. I really want.to update my laundry room. I have looked for canvas bags similar to this.
Can I ask where you found yours?
This looks great! I am definitely stealing this idea! (I love the wallpaper too)
Steal away!
Looks great! With six people in our house, the laundry system looks a little different around here. :D However, at our last house, I made wall pockets hung the same way, for use on the wall by the top bunk of their bunk beds. They used the pockets to hold library books. This DIY could be modified for many different applications.
Love that, and you’re so right. It can be further modified by size and shape of the bags, too!
Cute! You can probably not worry so much about sorting darks from lights, advances in materials and soap means I have been washing all my clothes together for years wit out issue. The only exception is something like a red sheet.
Right! Libby’s favorite blanket is red, so we like to keep things pretty separate. And new jeans can be no bueno!
I only seperate whites to be honest but this system would be great for sorting clean laundry into who owns what and depositing the appropriate bag into children’s respective rooms to get them to put their own stuff away!
Too cute! I am confused on how you use this, though. Do you put laundry in there as you use it/dirty it up? Or do you still use one hamper and just sort into these three bags on laundry day?
We just throw our dirty laundry in the right bag! Instant sorting. When each bag gets full, we do a load.
I was wondering the same thing but still didn’t quite get it. Do you bring your clothes to the laundry room every time you change? Is your laundry room really close to your bedroom?
Hi Kelli, our laundry room is literally 5 steps from our bedroom closet. :)
I love this wallpaper!
Beautiful laundry room.
I really like this idea. It looks good and makes sense.
Cute idea!!!
http://www.bluelabelsboutique.com
http://www.fashionnotfear.wordpress.com
This is so great! We’re planning our master closet renovation and I’ve been trying to figure out a laundry sorter solution that doesn’t take up so much room. I love this. It would also be a nice solution for toys in the girls nursery.
It really would!
I love this!!! So cute and clever. Our hamper lives in a walk-in closet attached to our bathroom, so it would be a great candidate for a similar system when I finally get that closet under control… I’m going to have to remember this :)
I bet I could hang this in my sons rm and put toys in them.
[…] An amazing diy laundry idea from Yellow Brick Home […]
[…] via Yellow Brick Home […]
[…] 1. Shanty 2 Chic 2. Yellow Brick Home 3. Make It & Love It 4. Ana-White 5. […]
[…] DIY Laundry Sorter canvas bags + hooks + wood screws + wood filler + scrap wood + white paint + curtain grommets […]
Hi. Seems that 44 # is a bit too much for me. Possible to do it with smaller measurments? How tall and wide are those sacks? Best (nice solution) :)
you should make and sell these bags! imm too pregnant to do this! lol
[…] ‘Yellow Brick Home‘ keeps all the laundry off their tiny floor space by utilizing these great DIY laundry sorting bags that hang on the wall. These are made from canvas and should last longer than the clothes you put in them! […]
[…] Simple Canvas Laundry Sorting Sacks […]
[…] ‘Yellow Brick Home‘ keeps all the laundry off their tiny floor space by utilizing these great DIY laundry sorting bags that hang on the wall. These are made from canvas and should last longer than the clothes you put in them! […]
Now that you have lived with this a while, is there anything you would change?
Do you like the spacing of the hooks?
Do the bags hold up well?
Do the plastic grommets hold up in the wash or do you remove them before washing the bags?
I’m planning to do this very soon!
We absolutely LOVE our sorter bags and would do it again in a heartbeat. The only difference I would do is take my bags to a dry cleaner or alterations place, and I would ask them to install professional grommets. That way, the fabric will never pull away from the grommets. We have washed and dried our bags with the DIY grommets still on, and they look great, but sometimes if we try to stuff too much laundry in the bags, the fabric will sag away from the grommet (I just have to pop the grommets off and put them back on more snug). As for the spacing, you could have as little or as much spacing as you’re wall allows!
Probably too thin; could sew a
Strip on the back with some stiff interfacing then install grommets
Do you think I could get away with 2” in between each bag? My wall is not very wide. :(
[…] Sort your clothing into canvas bags so laundry day isn’t as much of a […]
[…] a dirty cloth basket or bin. If space allows, dedicate a bin, hamper (like this wall-hanging solution from Yellow Brick Home), or basket (I use baskets on our pantry […]
[…] will match properly in right here, although, or use a number of the hooks for a hamper resolution like Kim and Scott have. Feeling it […]
Unfortunately, it looks like the bags linked too are way too large to make this work. Could you please let me know what sized bags you used??? I’m making this for a client, and I’m stuck at this step.
[…] Check it Here […]
Where did you purchase the bags?
[…] have enough colors for a full load. We are in love with these DIY laundry sorting bags from ‘Yellow Brick Home‘. You can stitch this up from cheap, or leftover fabric, making it a truly inexpensive home […]
[…] If you are looking for a way to get laundry baskets off the floor and free up some precious space, take a look at this DIY laundry sorter from Yellow Brick Home. […]
[…] If you are looking for a way to get laundry baskets off the floor and free up some precious space, take a look at this DIY laundry sorter from Yellow Brick Home. […]
[…] was too heavy and fell down. Just as I was about to buy the expensive grommet tool and grommets, Yellow Brick Home posted a project with grommets that didn’t need the tool. So, I ordered those right away and […]
Where do you find the canvas bags?
Hi Angela, all links are listed right below the first image. Here’s the link for the bags!
I love this idea! I have a narrow space between the washer and dryer and the wall so hanging the sorter allows for it to stay as much out of the walk way as possible. My biggest problem is the wall I would like to install “the rail” on has a door on each side (one leading into my MB closet and the other into the kitchen so the space to hang the sorter is about 19” between each door stopper so I’d only have room for one laundry bag. My question is would the rail look best just slightly beyond that or still the 44”? Also how high up did you install your rail from the floor?
Hi Heather! It’s a bit tough to advise on your situation without seeing it, but I can tell you that the rail is mounted at around 36″h on center. Hope this helps!
[…] colours for a full load. We’re in love with these DIY laundry sorting baggage from ‘Yellow Brick Home‘. You possibly can sew this up from low-cost, or leftover cloth, making it a very cheap dwelling […]